はじめに
Terraformをインストールして、AWSでEC2インスタンスを作成できることを確認します。
実行環境
- Windows 10 21H2
- Terraform 1.1.9
インストール
ダウンロード
以下サイトよりダウンロードします。
Windwosだと386とAmd64の選択肢がありますが、
スタートメニュー>設定>システム>詳細情報からシステムの種類が
64 ビット オペレーティング システムだとAmd64を
32 ビット オペレーティング システムだと386を選択します。
パスを通す
ダウンロードしたファイルを解凍します。
自分の場合、解凍したファイルをCドライブ直下に作成したterraformフォルダに移動しました。

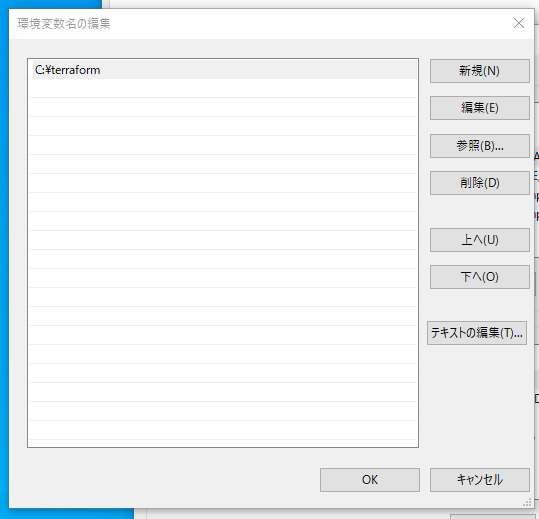
スタートメニュー>設定>システム>詳細情報>システムの詳細設定>詳細情報>環境変数>pathで編集を選択して追加します。
実行ファイル(.exe)の保存場所をパスとして保存しておくことで、実行時に実行ファイルの絶対パスを指定しなくてよくなります。
確認
コマンドプロンプトでコマンドを実行し、terraformのバージョンを表示することで正しくインストールされたことを確認します。
C:\terraform> terraform -v
Terraform v1.1.9
on windows_amd64
ちなみにパスを通さなくても実行ファイルがあれば確認はできます。
ただ実行のたびに絶対パスを記述するのは面倒なので、パスを通しました。
C:\terraform> C:\terraform\terraform.exe -v
Terraform v1.1.9
on windows_amd64
EC2作成
作成を確認できることが目的なので、簡単なコードになっています。
コード作成
terraformフォルダの中にexampleフォルダを作成しました。
terraformは実行すると実行時の状態を保存したファイルや依存関係を保存したファイルが作成されるのでフォルダを分けました。
exampleフォルダ内にmain.tfを作成しました。以下はmain.tfの中身です。
拡張子が.tfであればファイル名は何でも問題ありません。
access_keyとsecret_keyの値がxxxxxxとなっていますが、AWSのマネジメントコンソール>右上のユーザー名>セキュリティ認証情報>CLI、SDK、& API アクセスに使用する AWS アクセスキーから確認できますので、ご自身の値を入力してください。(こちらの値は他人と共有厳禁です)
terraform {
    required_providers {
        aws = {
            source = "hashicorp/aws"
            version = "~> 3.0"
        }
    }
}

provider "aws" {
    access_key = "xxxxxxxxxxxxxx"
    secret_key = "xxxxxxxxxxxxxxxxxxxxxxxxxxxx"
    region = "ap-northeast-1"
}

resource "aws_instance" "example" {
    ami = "ami-0c3fd0f5d33134a76"
    instance_type = "t2.micro"

    tags = {
        Name = "example"
    }
}
コード実行
terraform applyで実行します。
実行の途中でEnter a valueと表示されて入力待ちの状態になるのでyesと入力するとEC2の作成が開始します。
(terraform apply --auto-approveでyesの入力を省略できるオプションもあります)
C:\terraform\example> terraform apply
Terraform used the selected providers to generate the following execution plan. Resource actions are indicated with the following symbols:
  + create

Terraform will perform the following actions:

  # aws_instance.example will be created

(省略)

Plan: 1 to add, 0 to change, 0 to destroy.

Do you want to perform these actions?
  Terraform will perform the actions described above.
  Only 'yes' will be accepted to approve.

  Enter a value: yes ←yesと入力

aws_instance.example: Creating...
aws_instance.example: Still creating... [10s elapsed]

(省略)

Apply complete! Resources: 1 added, 0 changed, 0 destroyed.
確認
これで実行が完了し、EC2インスタンスが作成されました。
マネジメントコンソールで確認してみましょう。

削除
作成が確認できました。
忘れないうちにterraform destroyで削除もしておきましょう。
作成時と同じくEnter a valueではyesを入力してください。
C:\terraform\example> terraform destroy
aws_instance.example: Refreshing state... [id=i-075e0dc31836d8c17]

Terraform used the selected providers to generate the following execution plan. Resource actions are indicated with the following symbols:
  - destroy

(省略)

Plan: 0 to add, 0 to change, 1 to destroy.

Do you really want to destroy all resources?
  Terraform will destroy all your managed infrastructure, as shown above.
  There is no undo. Only 'yes' will be accepted to confirm.

  Enter a value: yes ←yesと入力

aws_instance.example: Destroying... [id=i-075e0dc31836d8c17]
aws_instance.example: Still destroying... [id=i-075e0dc31836d8c17, 10s elapsed]

(省略)

Destroy complete! Resources: 1 destroyed.
こちらで削除完了です。
さいごに
作成の確認が目的だったので簡素なものでしたが、
実行で生成される.tfstateをS3に保存したり、
main.tfに全部書くのではなくファイルを分割したり、
providerのアクセスキーやシークレットアクセスキーなどは変数として扱ったり
などやった方がいいことはたくさんあるのでやってみてください。