概要
最近Terraformを利用してAWSインフラ構築する機会をいただいているため、
CodePipelineでECSにデプロイする(Ver.rolling update)のTerraformバージョンを書いてみたいと思います。
あ、そして、
Merry christmas :)
やること
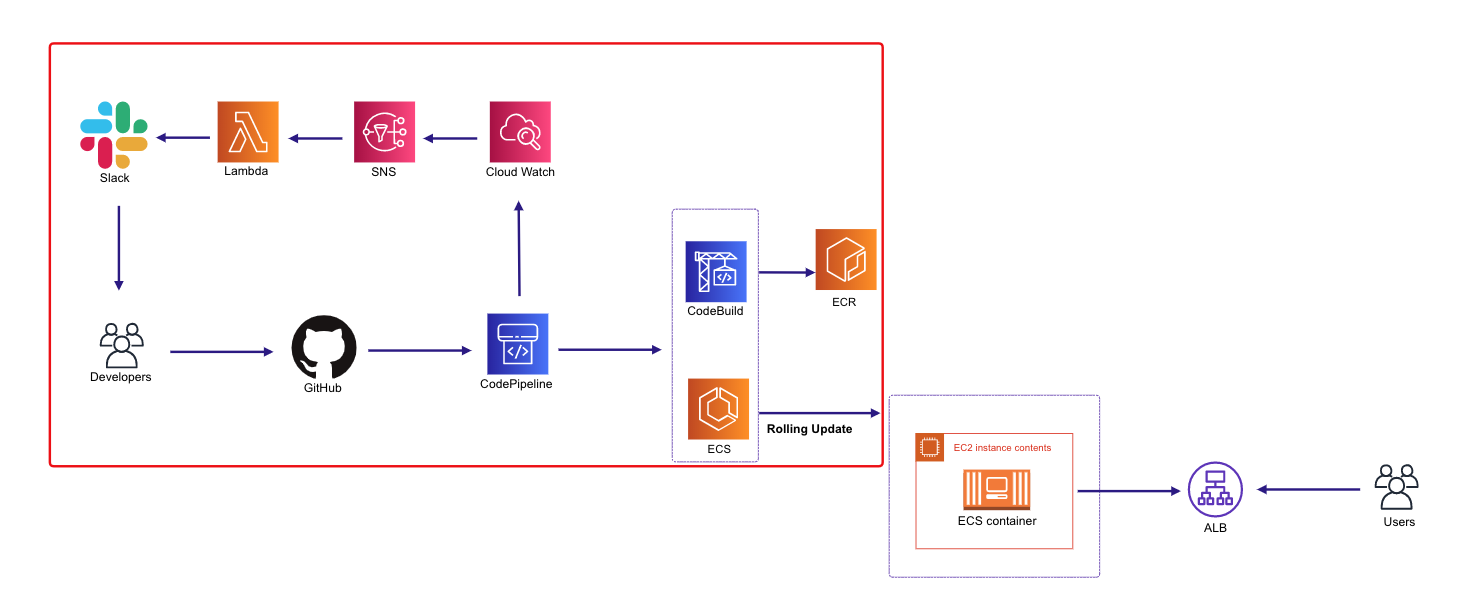
上記のイメージにある赤いところです。
AWS CodePipelineでGitHub pushしてECSにRolling updateデプロイする方法と、AWS CodePipelineのStageごとにSlack通知する方法を全部Terraformで作成することです。
手順は下記のようになります。
- Terraform + AWS CodePipeline設定
- AWS S3 bucket 設定
- AWS S3 KMSキー 設定
- AWS CodeBuild 設定
- AWS CodePipeline 設定
- Terraform + AWS CodePipelineのSlack通知設定
- AWS CloudWatch Event 設定
- AWS SNS Topic 設定
- AWS Lambda Function 設定
この記事は
Terraform v0.12.9を使っています。
Terraform variable設定を省略します。
AWS ECR&ECSがすでに作成されていることが前提です。
Policy json fileはGithubにまとめたので、下記のリンクを参考してください。
CodePipeline Policy files
Terraform + AWS CodePipeline設定
AWS S3 bucket 設定
CodePipelineの動きにArtifact Storeというものがありますが、AWS S3をデプロイプロバイダとして使用しているため、S3 bucketが必要です。
ちなみに、AWSマネジメントコンソールから作成する場合、CodePipelineのArtifact Storeを設定するだけで勝手に作られると思います。
# --------------------------------------------------------------
# S3 bucket Setting
# --------------------------------------------------------------
resource "aws_s3_bucket" "artifact" {
  bucket = "${var.artifact_bucket_name}"
  acl    = "private"
}
AWS S3 KMSキー 設定
CodePipelineはAWS S3 Artifact StoreとAWSが管理するSSE-KMS暗号化キーを作成します。Masterキーはオブジェクトデータとともに暗号化され、AWSによって管理されます。
# --------------------------------------------------------------
# s3kmskey Settings
# --------------------------------------------------------------

data "aws_kms_alias" "s3kmskey" {
  name = "alias/aws/s3"
}
AWS CodeBuild 設定
CodePipelineのStageとして、別途に作成する必要があります。
# --------------------------------------------------------------
# CodeBuild Role
# --------------------------------------------------------------
data "template_file" "codebuild_assume_role" {
  template = "${file("./policies/codepipeline/codebuild_assume_role.json.tpl")}"
}
resource "aws_iam_role" "codebuild_role" {
  name = "codebuild-role"
  assume_role_policy = "${data.template_file.codebuild_assume_role.rendered}"
}

data "template_file" "codebuild_policy" {
  template = "${file("./policies/codepipeline/codebuild_policy.json.tpl")}"

  vars = {
    account_id = "${var.account_id}"
    codebuild_name = "${var.codebuild_name}"
    bucket_name = "${var.artifact_bucket_name}"
  }
}

resource "aws_iam_role_policy" "codebuild_policy" {
  role = "${aws_iam_role.codebuild_role.name}"
  policy = "${data.template_file.codebuild_policy.rendered}"
}

# --------------------------------------------------------------
# CodeBuild Settings
# --------------------------------------------------------------
resource "aws_codebuild_project" "main_build" {
  name          = "${var.codebuild_name}"
  description   = "create for codepipeline stage"
  build_timeout = "60"
  service_role  = "${aws_iam_role.codebuild_role.arn}"

  artifacts {
    type = "NO_ARTIFACTS"
  }

  environment {
    compute_type                = "BUILD_GENERAL1_SMALL"
    image                       = "aws/codebuild/standard:2.0"
    type                        = "LINUX_CONTAINER"
    image_pull_credentials_type = "CODEBUILD"
    privileged_mode             = true
  }

  source {
    type            = "GITHUB"
    location        = "${var.github_project_url}" //GitHub project URL
    git_clone_depth = 1
    buildspec       = "${var.buildspec_path}"     //GitHubにあるbuildspec.ymlの場所
  }
}
AWS CodePipeline 設定
AWS S3とCodeBuildの準備ができたので、これからCodePipelineを作成することができます。
# --------------------------------------------------------------
# CodePipeline Role
# --------------------------------------------------------------
data "template_file" "codepipeline_assume_role" {
  template = "${file("./policies/codepipeline/codepipeline_assume_role.json.tpl")}"
}

resource "aws_iam_role" "codepipeline_role" {
  name = "codepipeline-role"
  assume_role_policy = "${data.template_file.codepipeline_assume_role.rendered}"
}

data "template_file" "codepipeline_policy" {
  template = "${file("./policies/codepipeline/codepipeline_policy.json.tpl")}"
}
resource "aws_iam_role_policy" "codepipeline_policy" {
  name = "codepipeline-policy"
  role = "${aws_iam_role.codepipeline_role.id}"
  policy = "${data.template_file.codepipeline_policy.rendered}"
}

data "template_file" "codepipeline_s3_policy" {
  template = "${file("./policies/codepipeline/codepipeline_s3_policy.json.tpl")}"
  vars = {
    bucket_name = "${var.artifact_bucket_name}"
  }
}
resource "aws_s3_bucket_policy" "codepipeline_s3_policy" {
  bucket = "${aws_s3_bucket.artifact.id}"
  policy = "${data.template_file.codepipeline_s3_policy.rendered}"
}

# --------------------------------------------------------------
# CodePipeline Settings
# --------------------------------------------------------------
resource "aws_codepipeline" "main" {
  name     = "codepipeline-main"
  role_arn = "${aws_iam_role.codepipeline_role.arn}"

  artifact_store {
    location = "${aws_s3_bucket.artifact.bucket}"
    type     = "S3"

    encryption_key {
      id   = "${data.aws_kms_alias.s3kmskey.arn}"
      type = "KMS"
    }
  }

  stage {
    name = "Source"

    action {
      name             = "Source"
      category         = "Source"
      owner            = "ThirdParty"
      provider         = "GitHub"
      version          = "1"
      output_artifacts = ["source"]

      configuration = {
        Owner  = "${var.github_account_name}" // GitHub アカウント名
        OAuthToken = "${var.github_token}"    // GitHub Token
        Repo   = "${var.github_repository}"   // GitHubリポジトリ名
        Branch = "${var.github_branch}"       // GitHub push先
      }
    }
  }

  stage {
    name = "Build"

    action {
      name             = "Build"
      category         = "Build"
      owner            = "AWS"
      provider         = "CodeBuild"
      input_artifacts  = ["source"]
      output_artifacts = ["build"]
      version          = "1"

      configuration = {
        ProjectName = "${var.codebuild_name}" //CodeBuild名
      }
    }
  }

  stage {
    name = "Deploy"

    action {
      name            = "Deploy"
      category        = "Deploy"
      owner           = "AWS"
      provider        = "ECS"
      input_artifacts = ["build"]
      version         = "1"

      configuration = {
        ClusterName = "${var.ecs_cluster_name}"      //AWS ECS Cluster名
        ServiceName = "${var.ecs_service_name}"      //AWS ECS Service名
        FileName    = "${var.imagedefinitions_path}" //GitHubにあるimagedefinitions.json場所
      }
    }
  }
}
TerraformでCodePipelineを作成する時、input_artifactsとoutput_artifactsを理解しておいた方がいいと思います。
最初AWS S3設定のところで軽く説明しましたが、CodePipelineを作成する時に選択したAWS S3に保存されているinput&outputartifactsが使われます。
CodePipelineは、Stageのアクションタイプに応じて、input_artifactsまたはoutput_artifactsのファイルを圧縮して転送します。
例えば、Source Stageからoutput_artifacts = ["source"]Outputを行い、Build StageにInputとしてinput_artifacts = ["source"]が取り込まれます。Build Stageから Deploy Stageも同じ動きになります。
Terraform + AWS CodePipelineのSlack通知設定
AWS CloudWatch Event 設定
AWS CodePipelineのStageごととそれぞれのStateに対するEvent Ruleを設定します。
# --------------------------------------------------------------
# CloudWatch Event Settings
# --------------------------------------------------------------

resource "aws_cloudwatch_event_rule" "main" {
  name = "codepipeline-notifications-rule"

  event_pattern = <<PATTERN
{
  "source": [
    "aws.codepipeline"
  ],
  "detail-type": [
    "CodePipeline Stage Execution State Change"
  ],
  "detail": {
    "state": ["STARTED", "SUCCEEDED", "FAILED"]
  }
}
PATTERN
}

resource "aws_cloudwatch_event_target" "main" {
  rule      = "${aws_cloudwatch_event_rule.main.name}"
  target_id = "SendToSNS"
  arn       = "${aws_sns_topic.main.arn}" //AWS SNS Topic 設定セッションから続く
}
ちなみに、event_patternはAWSマネジメントコンソールからService NameとEvent Typeを設定すると、
Event Pattern Previewというところで確認できるので、それをCopyしたらいいと思います。
AWS SNS Topic 設定
AWS Lambda Functionにメッセージを転送するために AWS SNSを作成します。
# --------------------------------------------------------------
# AWS SNS TOPIC
# --------------------------------------------------------------
resource "aws_sns_topic" "main" {
  name         = "codepipeline-notifications"
  display_name = "CodePipeline notifications"
}

# --------------------------------------------------------------
# AWS SNS TOPIC POLICY
# --------------------------------------------------------------
resource "aws_sns_topic_policy" "main" {
  arn = "${aws_sns_topic.main.arn}"

  policy = <<EOF
{
  "Version": "2012-10-17",
  "Id": "__default_policy_ID",
  "Statement": [
    {
      "Sid": "AWSEvents_smebiz-codepipeline-events_SendToSNS",
      "Effect": "Allow",
      "Principal": {
        "Service": "events.amazonaws.com"
      },
      "Action": "sns:Publish",
      "Resource": "${aws_sns_topic.main.arn}"
    }
  ]
}
EOF
}
AWS Lambda Function 設定
そして、Slackに通知できるようにLambda Functionを作成します。
# --------------------------------------------------------------
# AWS Lambda FUNCTION IAM ROLE
# --------------------------------------------------------------
data "aws_iam_policy_document" "lambda_assume_role" {
  statement {
    actions = ["sts:AssumeRole"]

    principals {
      type        = "Service"
      identifiers = ["lambda.amazonaws.com"]
    }
  }
}

resource "aws_iam_role" "lambda" {
  name               = "lambda-role"
  assume_role_policy = "${data.aws_iam_policy_document.lambda_assume_role.json}"
}


data "aws_iam_policy_document" "lambda_permissions" {
  statement {
    actions = [
      "logs:CreateLogGroup",
      "logs:CreateLogStream",
      "logs:PutLogEvents",
    ]

    resources = [
      "arn:aws:logs:*:*:*",
    ]
  }
}

resource "aws_iam_role_policy" "lambda" {
  name   = "lambda-policy"
  role   = "${aws_iam_role.lambda.id}"
  policy = "${data.aws_iam_policy_document.lambda_permissions.json}"
}

# --------------------------------------------------------------
# AWS Lambda FUNCTION
# --------------------------------------------------------------
resource "aws_lambda_function" "main" {
  handler          = "index.handler"
  runtime          = "nodejs10.x"
  function_name    = "codepipeline-notifications-function"
  filename         = "${path.module}/functions/notifications/dist.zip"
  role             = "${aws_iam_role.lambda.arn}"
  source_code_hash = "${filebase64sha256("${path.module}/functions/notifications/dist.zip")}"

  environment {
    variables = {
      SLACK_WEBHOOK_URL = "${var.slack_webhook}"
    }
  }
}

resource "aws_lambda_permission" "main" {
  statement_id  = "AllowExecutionFromSNS"
  action        = "lambda:InvokeFunction"
  principal     = "sns.amazonaws.com"
  function_name = "${aws_lambda_function.main.function_name}"
  source_arn    = "${aws_sns_topic.main.arn}"
}

resource "aws_sns_topic_subscription" "main" {
  topic_arn = "${aws_sns_topic.main.arn}"
  protocol  = "lambda"
  endpoint  = "${aws_lambda_function.main.arn}"
}
Node.jsコードはsmebizdev/terraform-aws-codepipeline-slack-notificationsを使っています。
動作確認
上記の通りに作成できたら、terraform plan > terraform applyを行うと、
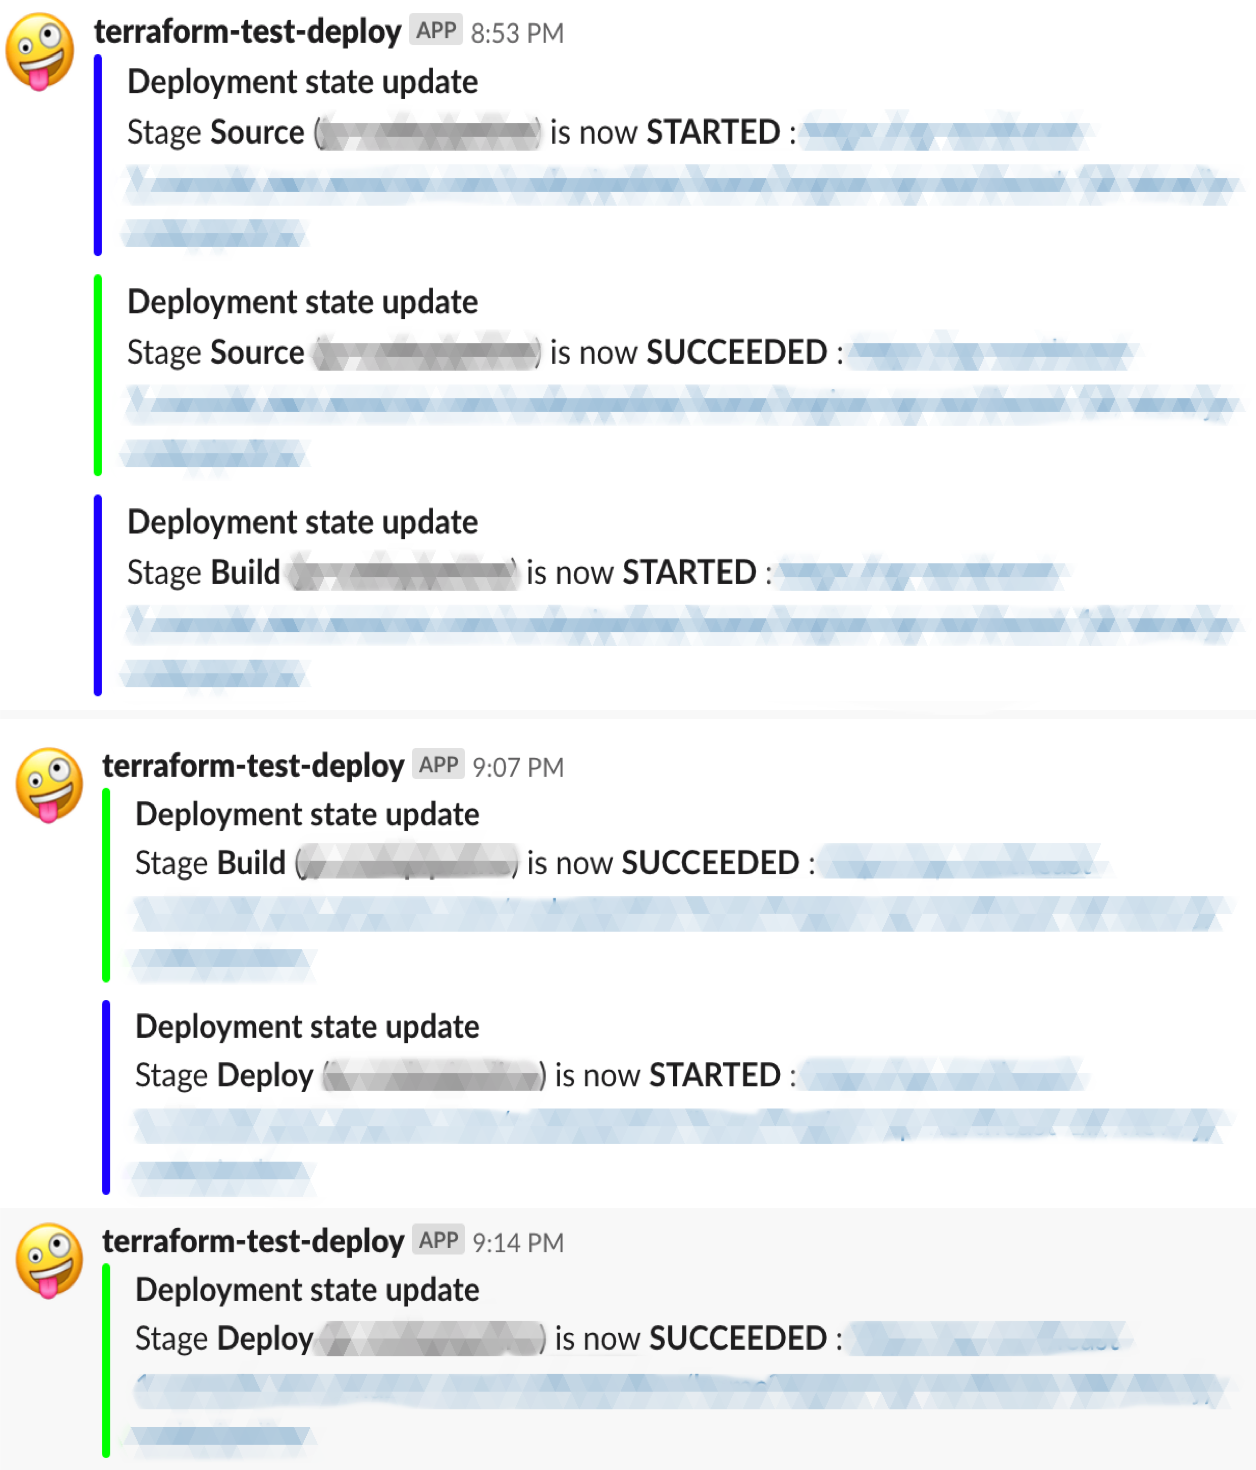
CodePipelineがGitHubのSource Stage実行をトリガーし、そのままSlackでCI/CDの確認ができると思います。もちろんCodePipelineの方でも確認ができます。
イメージにモザイク処理が多くて、わかりにくいと思いますが、情報としては
Stage ${stage} (${CodePipeline Name})is now ${state} : https://${region}.console.amazon.com/codepipeline/home?region=${region}#/view/${CodePipeline Name}
となります。
感想
AWS CodePipelineをIaC化することができ、非常に勉強になりました。
特に色んなバグを出しながら、解決へたどり着くまでに、AWSサービスの理解とTerraform文法を学ぶことができました。
最初AWSマネジメントコンソールと全く違って、細かい設定まで行うのが難しかったです。
例えば、S3 Bucket設定を抜けたり、Policyが足りなかったりするなど、AWS環境が動いていない原因探しまでがきつかったですが、
AWSを理解することができて、もっと面白くなりました。
これからは、Terraformをよりスマートに使えるように、ディレクトリ構成など、細かいところをやってみたいと思います。

