JavaFXのTableViewのセルに対してCSSのクラスを追加することはできるのか、ということを調べました。調べた結果、ひとつの方法がわかったのでそれを紹介します。途中は基本的な作りの紹介と説明です。本質的な部分は一番最後に登場します。
使ったCSSと画面
画面は以下です。TableViewは2つの列、firstNameの列、lastNameの列から構成されます。
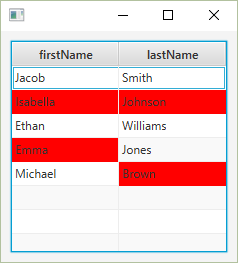
赤い背景色のセルはCSSのクラスが追加されたセルです。以下のCSSファイルを適用しています。
.tableCellClass {
    -fx-background-color: red;
}
tableCellClassというクラスの要素について、背景色を赤くするというCSSです。
画面起動時に以下の動作をして、セルにクラスを追加しています。
- firstNameの列は、内容が「a」で終わる場合、CSSのクラス「tableCellClass」を追加。
- lastNameの列は、内容が「n」で終わる場合、CSSのクラス「tableCellClass」を追加。
TableViewの行に対応するクラス
以下のクラスをTableViewの行に対応させています。
public class Person {

    private String firstName;
    private String lastName;

    public Person(String firstName, String lastName) {
        this.firstName = firstName;
        this.lastName = lastName;
    }

    public String getFirstName() {
        return firstName;
    }

    public String getLastName() {
        return lastName;
    }

    public void setFirstName(String firstName) {
        this.firstName = firstName;
    }

    public void setLastName(String lastName) {
        this.lastName = lastName;
    }

}
app.fxml
画面を構成するfxmlは以下です。stylesheets要素がCSSを指定する箇所です。
<?xml version="1.0" encoding="UTF-8"?>

<?import java.net.URL?>
<?import javafx.scene.control.TableColumn?>
<?import javafx.scene.control.TableView?>
<?import javafx.scene.layout.AnchorPane?>
<?import javafx.scene.layout.BorderPane?>

<BorderPane prefHeight="231.0" prefWidth="236.0"
  xmlns="http://javafx.com/javafx/" xmlns:fx="http://javafx.com/fxml/1"
  fx:controller="test.AppController">
  <stylesheets>
    <URL value="@app.css" />
  </stylesheets>
  <center>
    <AnchorPane prefHeight="200.0" prefWidth="200.0"
      BorderPane.alignment="CENTER">
      <children>
        <TableView fx:id="tableView" prefHeight="200.0" prefWidth="200.0"
          AnchorPane.bottomAnchor="10.0" AnchorPane.leftAnchor="10.0"
          AnchorPane.rightAnchor="10.0" AnchorPane.topAnchor="10.0">
          <columns>
            <TableColumn fx:id="colFirstName" prefWidth="75.0"
              text="firstName" />
            <TableColumn fx:id="colLastName" prefWidth="75.0"
              text="lastName" />
          </columns>
        </TableView>
      </children>
    </AnchorPane>
  </center>
</BorderPane>
起動クラス
起動するためのクラスが以下です。
import java.io.IOException;

import javafx.application.Application;
import javafx.fxml.FXMLLoader;
import javafx.scene.Scene;
import javafx.scene.layout.BorderPane;
import javafx.stage.Stage;

public class Main extends Application {

    public static void main(String[] args) {
        launch(args);
    }

    @Override
    public void start(Stage stage) {
            BorderPane root;
            try {
                root = (BorderPane)FXMLLoader.load(getClass().getResource("app.fxml"));
                Scene scene = new Scene(root);
                stage.setScene(scene);
                stage.show();
            } catch (IOException e) {
                e.printStackTrace();
            }

    }
}
セルにCSSのクラスを設定する
以下が画面をコントロールをするクラスです。
import java.net.URL;
import java.util.ResourceBundle;

import javafx.collections.FXCollections;
import javafx.collections.ObservableList;
import javafx.fxml.FXML;
import javafx.fxml.Initializable;
import javafx.scene.control.TableCell;
import javafx.scene.control.TableColumn;
import javafx.scene.control.TableView;
import javafx.scene.control.cell.PropertyValueFactory;

public class AppController implements Initializable {

    @FXML TableView<Person> tableView;
    @FXML TableColumn<Person, String> colFirstName;
    @FXML TableColumn<Person, String> colLastName;

    @Override
    public void initialize(URL location, ResourceBundle resources) {

        // 列の自動調整
        tableView.setColumnResizePolicy(TableView.CONSTRAINED_RESIZE_POLICY);

        // 列の紐づけ
        colFirstName.setCellValueFactory(new PropertyValueFactory<Person, String>("firstName"));
        colLastName.setCellValueFactory(new PropertyValueFactory<Person, String>("lastName"));

        ObservableList<Person> data =
                FXCollections.observableArrayList(
                        new Person("Jacob", "Smith"),
                        new Person("Isabella", "Johnson"),
                        new Person("Ethan", "Williams"),
                        new Person("Emma", "Jones"),
                        new Person("Michael", "Brown")
                );
        tableView.setItems(data);

        // セルのコールバックを設定
        colFirstName.setCellFactory(tableColumn -> {
            return new TableCell<Person, String>() {
                @Override protected void updateItem(final String item, final boolean empty) {
                    super.updateItem(item, empty);

                    if (empty || item == null) {
                        setText(null);
                        setGraphic(null);
                    } else {
                        setText(item.toString());

                        // 対象外にスタイル設定されていた場合、削除する。
                        getStyleClass().remove("tableCellClass");

                        // スタイルを設定する。
                        if (item.endsWith("a")) {
                            getStyleClass().add("tableCellClass");
                        }
                    }

                }
            };
        });

        colLastName.setCellFactory(tableColumn -> {
            return new TableCell<Person, String>() {
                @Override
                protected void updateItem(final String item, final boolean empty) {
                    super.updateItem(item, empty);

                    if (empty || item == null) {
                        setText(null);
                        setGraphic(null);
                    } else {
                        setText(item.toString());

                        // 対象外にスタイル設定されていた場合、削除する。
                        getStyleClass().remove("tableCellClass");

                        // スタイルを設定する。
                        if (item.endsWith("n")) {
                            getStyleClass().add("tableCellClass");
                        }
                    }

                }
            };
        });

    }

}
上記のTableColumn#setCellFactory()メソッドを呼び出している部分が、今回のポイントです。セルに変更があった場合、Cell#updateItem()メソッドが呼び出されるようです。それを利用して、クラスの設定を記述しています。「getStyleClass().add("tableCellClass");」の箇所です。
updateItem()メソッドの書き方ですが、API仕様書のCellのページに標準的な実装が記載されてました。以下が標準的のようです。
 protected void updateItem(T item, boolean empty) {
     super.updateItem(item, empty);

     if (empty || item == null) {
         setText(null);
         setGraphic(null);
     } else {
         setText(item.toString());
     }
 }
上記のelseの方にクラスの設定を記述しているのですが、その前に「getStyleClass().remove("tableCellClass");」を記述しています。これはセルにクラスが残ってしまうのを回避するためです。列のヘッダー部分をクリックするとソート処理が行われ、表示順序が変わります。そのときにセルに残ったクラスを削除する処理です。