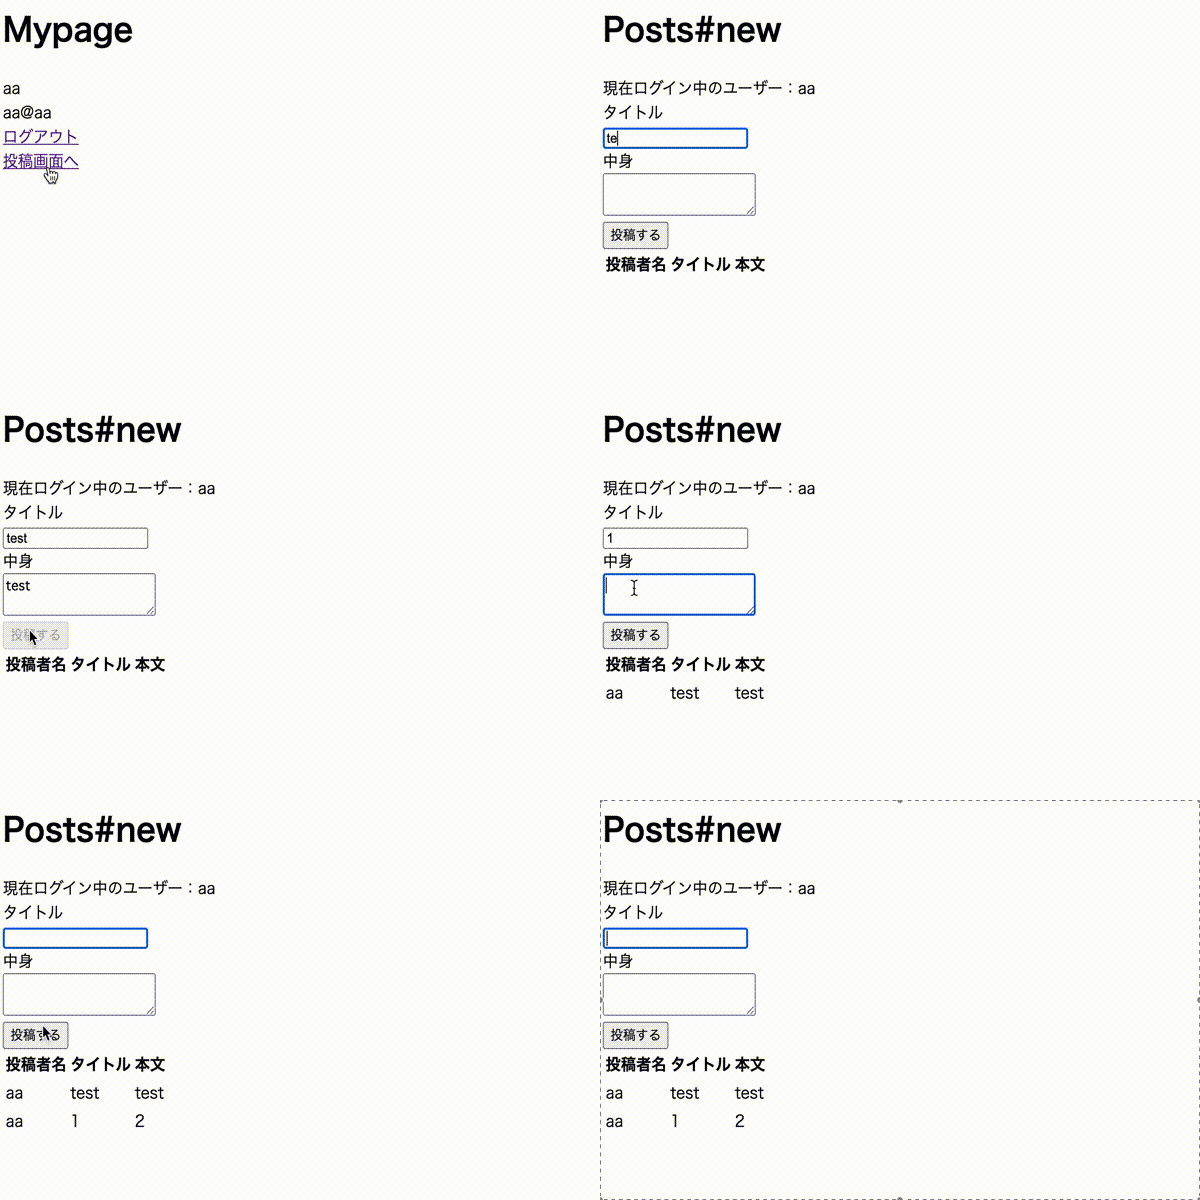
目標
開発環境
ruby 2.5.7
Rails 5.2.4.3
OS: macOS Catalina
前提
※ ▶◯◯ を選択すると、説明等が出てきますので、
よくわからない場合の参考にしていただければと思います。
deviseで名前ログイン環境構築
controller名はpost(今回は投稿機能のみ)
1、テーブルの作成
Postモデルを追加
ターミナル
$ rails g model Post user:references title:string body:string
実行すると下記のようになり、カラムが追加され保存可能。
db/migrate/xxxxxxxxxxxxx_create_posts.rb
class CreatePosts < ActiveRecord::Migration[5.2]
  def change
    create_table :posts do |t|
      t.references :user, foreign_key: true
      t.string :title
      t.string :body

      t.timestamps
    end
  end
end
補足
t.references :user, foreign_key: trueはuserの外部キーになります。 外部キーに関しては、[こちら](https://qiita.com/kamillle/items/5ca2db470f199c1bc3ef)。ターミナル
$ rails db:migrate
モデルを編集
app/models/post.rb
class Post < ApplicationRecord
  belongs_to :user
end
app/models/user.rb
class User < ApplicationRecord
  # Include default devise modules. Others available are:
  # :confirmable, :lockable, :timeoutable, :trackable and :omniauthable
  devise :database_authenticatable, :registerable,
         :recoverable, :rememberable, :validatable

  has_many :posts, dependent: :destroy ←ここを追加
end
解説
コントローラー作成時のuser:referencesにより、 post側にはbelongs_to :userと記述され、1投稿1投稿が誰の投稿か保存できる。 user側にはhas_many :posts, dependent: :destroyと追加することで 1対多の関係を作ることができ、1人のユーザーが多くの投稿ができる。2、controllerの作成
ターミナル
$ rails g controller posts create new
app/controllers/posts_controller.rb
class PostsController < ApplicationController
  before_action :authenticate_user!
  def create
  	@post = Post.new(post_params)  # 何を新しく保存するか指定
  	@post.user_id = current_user.id  # 誰が投稿したかを指定
  	if @post.save  # もし保存ができたら
   	 redirect_to new_post_path  # 投稿画面に遷移
  	else  # できなければ
   	 render :new  # newに遷移
  	end
  end

  def new
   @post = Post.new
   @posts = Post.all
  end

  private  # ストロングパラメーター(予期しない値を変更されてしまう脆弱性を防ぐ機能)
  def post_params
   params.require(:post).permit(:title, :body)  # titleとbodyの変更を許可
  end
end
補足
before_action :authenticate_user!と記述することで、 URLをベタ打ちしてもログインしていない限り、new・createアクションを実行できず、 ログイン画面に遷移するようにする。下記のように変更。
config/routes.rb
  get 'posts/create' ←削除
  get 'posts/new' ←削除
  resources :posts, only: [:create, :new] ←追加
↓変更後
config/routes.rb
Rails.application.routes.draw do
  devise_for :users, controllers: {
    sessions: 'users/sessions',
    registrations: 'users/registrations',
  }
  root 'homes#top'
  get 'mypage', to: 'homes#mypage'
  resources :posts, only: [:create, :new] ←追加
end
補足
resourcesはRESTfulなURLであり、getやpatchなどの記述を省略できる。3、Viewsの変更
app/views/posts/create.html.erb を右クリックで削除。
app/views/posts/new.html.erb
<h1>Posts#new</h1>
<span>現在ログイン中のユーザー:<%= current_user.name %></span>

<%= form_for(@post, url: posts_path) do |f| %>
	<div>
		<%= f.label :タイトル %><br>
		<%= f.text_field :title, autofocus: true %>
	</div>
	<div>
		<%= f.label :中身 %><br>
		<%= f.text_area :body %>
	</div>
	<div><%= f.submit "投稿する" %></div>
<% end %>


<table>
	<thead>
		<tr>
			<th>投稿者名</th>
			<th>タイトル</th>
			<th>本文</th>
		</tr>
	</thead>
	<tbody>
		<% @posts.each do |post| %>
			<tr>
				<td><%= post.user.name %></td>
				<td><%= post.title %></td>
				<td><%= post.body %></td>
			</tr>
		<% end %>
	</tbody>
</table>
補足
form_forヘルパーで投稿機能、eachメソッドで投稿内容取得。P.S.
twitterではQiitaにはアップしていない技術や考え方もアップしていますので、
よければフォローして頂けると嬉しいです。
詳しくはこちら https://twitter.com/japwork
