株式会社Neverの近藤です。
株式会社Neverはモバイルアプリケーションの受託開発、技術支援、コンサルティングを行っております。アプリ開発のご依頼や開発面でのお困りの際はお気楽にこちらへお問合せください。
今日はFlutterでインスタのストーリーのようなUIの作成について解説します。
目次
1.成果物
2.概要
3.実装手順
4.まとめ
5.おわりに
成果物
概要
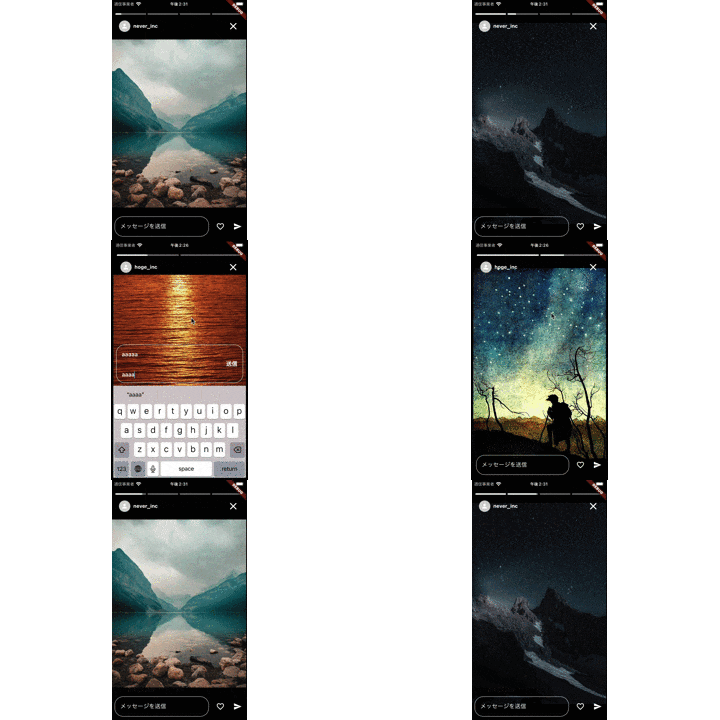
インスタのストーリーのようなUIを今回は実装してみました。
簡単に実装できる素敵なライブラリーはありますが、今回は基本的に使用せずにUIの実装を行いました。
実装手順
ストーリーを表示するデータモデル
今回は画像か動画を判定するためのMediaTypeとurlを持ったContentDataというデータモデルのクラスを作成しています。
// 画像か動画かを判別するためのenum
enum MediaType {
  image,
  video,
}

// ストーリーのコンテンツに関するデータクラス
class ContentData extends Equatable {
  const ContentData({
    required this.url,
    required this.media,
  });

  final String url;
  final MediaType media;

  @override
  List<Object?> get props => [url, media];
}
また、各ユーザがストーリーの内容を保持するためにContentDataを使用する必要があるため、StoryDataというデータモデルのクラスも作成しました。
// ストーリーに関するデータクラス
class StoryData extends Equatable {
  const StoryData({
    required this.contentData,
    required this.userName,
  });

  final List<ContentData> contentData;
  final String userName;

  @override
  List<Object?> get props => [contentData, userName];
}
※ ContentDataについてはの実装はこちら
※ StoryDataについてはの実装はこちら
画像または動画の表示とメッセージ入力欄のWidget
ストーリーの表示は、画像または動画の表示とメッセージ入力欄のWidgetを用意する必要があります。
画像または動画を表示するWidgetとメッセージ入力欄のWidgetは後に解説します。
また、ストーリーの表示中に画面を長押しをした時にメッセージ入力欄を非表示にする実装もAnimatedOpacityを使用して行なっています。
ストーリーを表示するWidgetの全体の実装はこちら
// 画像や動画を表示するWidget
class Content extends StatefulWidget {
  const Content({
    super.key,
    required this.contentData,
    required this.focusNode,
    required this.textController,
    required this.videoController,
    required this.isLongPress,
  });

  final ContentData contentData;
  final FocusNode focusNode;
  final TextEditingController textController;
  final VideoPlayerController? videoController;
  final bool isLongPress;

  @override
  State<Content> createState() => _ContentState();
}

class _ContentState extends State<Content> {
  @override
  Widget build(BuildContext context) {
    return Stack(
      children: [
        Container(
          constraints: const BoxConstraints.expand(),
          child: ClipRRect(
            borderRadius: BorderRadius.circular(8),
            child: () {
              switch (widget.contentData.media) {
                case MediaType.image:
                  return Container(
                    constraints: const BoxConstraints.expand(),
                    child: Image(
                      image: NetworkImage(widget.contentData.url),
                      fit: BoxFit.fitWidth,
                    ),
                  );
                case MediaType.video:
                  final videoController = widget.videoController;
                  if (videoController == null ||
                      !videoController.value.isInitialized) {
                    return const SizedBox.shrink();
                  }
                  return FittedBox(
                    fit: BoxFit.fitWidth,
                    child: SizedBox(
                      width: videoController.value.size.width,
                      height: videoController.value.size.height,
                      child: VideoPlayer(videoController),
                    ),
                  );
              }
            }(),
          ),
        ),
        AnimatedOpacity(
          opacity: widget.isLongPress ? 0 : 1,
          duration: const Duration(milliseconds: 500),
          child: MessageArea(
            focusNode: widget.focusNode,
            textController: widget.textController,
          ),
        ),
      ],
    );
  }
}
画像または動画を表示するWidget
画像または動画を表示するストーリーの画面のUIを作成していきます。
動画の再生や停止にはvideo_playerを使用しました。
MediaTypeがimageの場合はNetworkImageで表示を行い、videoの場合はVideoPlayerを使用して表示しています。
また、ClipRRectで画像や動画の角を丸くしています。
Container(
  constraints: const BoxConstraints.expand(),
  child: ClipRRect(
    borderRadius: BorderRadius.circular(8),
    child: () {
      switch (widget.contentData.media) {
        case MediaType.image:
          return Container(
            constraints: const BoxConstraints.expand(),
            child: Image(
              image: NetworkImage(widget.contentData.url),
              fit: BoxFit.fitWidth,
            ),
          );
        case MediaType.video:
          final videoController = widget.videoController;
          if (videoController == null ||
              !videoController.value.isInitialized) {
            return const SizedBox.shrink();
          }
          return FittedBox(
            fit: BoxFit.fitWidth,
            child: SizedBox(
            width: videoController.value.size.width,
            height: videoController.value.size.height,
            child: VideoPlayer(videoController),
            ),
          );
      }
    }(),
  ),
),
ストーリーに対してメッセージ入力欄のWidget
インスタのストーリーではTextFieldがフォーカスされているか否か、メッセージが入力されているか否かで、少しUIが変わるのでその部分も実装しました。
メッセージ入力欄の全体の実装はこちら
Stack(
  fit: StackFit.expand,
  children: [
    Positioned(
      bottom: 0,
      right: 0,
      left: 0,
      child: Row(
        children: <Widget>[
          Flexible(
            child: Padding(
              padding: const EdgeInsets.all(
                8,
              ),
              child: TextField(
                focusNode: widget.focusNode,
                controller: widget.textController,
                maxLines: 4,
                minLines: 1,
                decoration: InputDecoration(
                  contentPadding: const EdgeInsets.symmetric(
                    horizontal: 16,
                    vertical: 16,
                  ),
                  hintText: 'メッセージを送信',
                  hintStyle:
                      Theme.of(context).textTheme.bodyLarge?.copyWith(
                            color: Colors.white,
                            fontSize: 16,
                          ),
                  enabledBorder: OutlineInputBorder(
                    borderRadius: BorderRadius.circular(24),
                    borderSide: const BorderSide(color: Colors.white),
                  ),
                  focusedBorder: OutlineInputBorder(
                    borderRadius: BorderRadius.circular(24),
                    borderSide: const BorderSide(color: Colors.white),
                  ),
                  // フォーカスがされているか否か、テキストが入力されているか否か
                  suffixIcon: widget.focusNode.hasFocus
                      ? hasText
                          ? TextButton(
                              onPressed: () {
                                // バックエンド等にメッセージ送信する
                                debugPrint(widget.textController.text);
                              },
                              child: Text(
                                '送信',
                                style: Theme.of(
                                  context,
                                ).textTheme.bodyLarge?.copyWith(
                                      color: Colors.white,
                                      fontWeight: FontWeight.bold,
                                      fontSize: 16,
                                    ),
                              ),
                            )
                          : IconButton(
                              onPressed: () {},
                              icon: const Icon(
                                Icons.gif_box_outlined,
                                color: Colors.white,
                                size: 32,
                              ),
                            )
                      : const SizedBox.shrink(),
                ),
                style: Theme.of(context)
                    .textTheme
                    .bodyLarge
                    ?.copyWith(color: Colors.white, fontSize: 16),
                onChanged: (value) {
                  setState(() {
                    hasText = value.isNotEmpty;
                  });
                },
              ),
            ),
          ),
          // フォーカスがされているか否か
          widget.focusNode.hasFocus
              ? const SizedBox.shrink()
              : Row(
                  children: [
                    IconButton(
                      icon: const Icon(
                        Icons.favorite_border,
                        color: Colors.white,
                      ),
                      onPressed: () => {},
                    ),
                    IconButton(
                      icon: const Icon(
                        Icons.send,
                        color: Colors.white,
                      ),
                      onPressed: () => {
                        // バックエンド等にメッセージ送信する
                        debugPrint(widget.textController.text),
                      },
                    ),
                  ],
                ),
        ],
      ),
    ),
  ],
),
表示の残り時間のバーのWidget
表示が完了または未完了のバーと表示中のバーをStackを使用して重ね合わせています。
それをLayoutBuilder使用してストーリーのコンテンツのデータの数だけレイアウトが収まるように実装しました。
ストーリーの表示の残り時間のバーはAnimatedBuilderを使用して実装しています。
表示の残り時間のバーの全体の実装はこちら
class _AnimatedBar extends StatelessWidget {
  const _AnimatedBar({
    required this.animationController,
    required this.position,
    required this.currentIndex,
  });

  final AnimationController animationController;
  final int position;
  final int currentIndex;

  @override
  Widget build(BuildContext context) {
    return Flexible(
      child: Padding(
        padding: const EdgeInsets.symmetric(horizontal: 2),
        child: LayoutBuilder(
          builder: (context, constraints) {
            return Stack(
              children: <Widget>[
                // 表示完了または未完了のバー
                _Bar(
                  width: double.infinity,
                  color: position < currentIndex
                      ? Colors.white
                      : Colors.white.withOpacity(0.5),
                ),
                // 表示中のバー
                position == currentIndex
                    ? AnimatedBuilder(
                        animation: animationController,
                        builder: (context, child) {
                          return _Bar(
                            width: constraints.maxWidth * animationController.value,
                          );
                        },
                      )
                    : const SizedBox.shrink(),
              ],
            );
          },
        ),
      ),
    );
  }
}
バーの残り時間の読み込み処理
animationControllerにてストーリーのヘッダーに表示されているバーの残り時間を管理しています。
MediaTypeはimageの場合は固定で3秒、videoの場合は動画の長さ分を設定しています。
void _loadStory({
  required ContentData contentData,
  bool animateToPage = true,
}) {
  _animationController
    ..stop()
    ..reset();
  switch (contentData.media) {
    case MediaType.image:
      // 1つ画像の表示する時間を設定
      _animationController.duration = const Duration(seconds: 3);
      _animationController.forward();
      break;
    case MediaType.video:
      _videoController?.dispose();
      _videoController = VideoPlayerController.network(contentData.url)
        ..initialize().then((_) {
          setState(() {});
          if (_videoController != null &&
              _videoController!.value.isInitialized) {
            // ビデオの長さ分の時間を設定
            _animationController.duration = _videoController!.value.duration;
            _videoController!.play();
            _animationController.forward();
          }
        });
      break;
  }
  if (animateToPage) {
    _pageController.animateToPage(
      _currentIndex,
      duration: const Duration(milliseconds: 1),
      curve: Curves.easeInOut,
    );
  }
}
ストーリーのページング表示
ページングを実装するために、PageView.builderを使用しています。
ストーリー表示中の画面をタップした時の挙動は別で実装を行うために、physics: const NeverScrollableScrollPhysics()にしています。
また、ヘッダー部分はメッセージ入力欄と同様にストーリーの表示中に画面を長押しをした時にを非表示にするためにAnimatedOpacityを使用しています。
Stack(
  children: <Widget>[
    PageView.builder(
      controller: _pageController,
      physics: const NeverScrollableScrollPhysics(),
      itemCount: widget.storyData.contentData.length,
      itemBuilder: (context, i) {
        final contentData = widget.storyData.contentData[i];
        return Content(
          contentData: contentData,
          focusNode: _focusNode,
          textController: _textController,
          videoController: _videoController,
          isLongPress: isLongPress,
        );
      },
    ),

    // ヘッダー部分(時間のバーとサムネ、ユーザ名)
    AnimatedOpacity(
      opacity: isLongPress ? 0.0 : 1.0,
      duration: const Duration(milliseconds: 500),
      child: Header(
        animationController: _animationController,
        currentIndex: _currentIndex,
        storyData: widget.storyData,
      ),
    ),
  ],
)
※ Headerの実装はこちら
ストーリー表示中の画面をタップした挙動の実装
ストーリーを表示している時に画面の右側をタップしたら次の画像が表示されたり、長押し時の場合には動画が停止をしたりします。
[ストーリーのページング表示で実装したPageViewにGestureDetectorをWrapしてタップしたイベント毎に処理を追加していきます。
今回はonTapUpとonLongPressStartとonLongPressEndを使用していきます。
それぞれのタップイベントの役割は下記の通りです。
-
onTapUp
- 画面の左側の1/3をタップした場合に1つ前の画像を表示
- 画面の左側の2/3をタップした場合は1つ次の画像を表示
- キーボードが表示されている場合はキーボードのフォーカスを外す
-
onLongPressStart
- 長押し時の場合にはアニメーションや動画の再生を停止する(キーボードが表示されいない場合のみ)
-
onLongPressEnd
- 長押し終了の場合にはアニメーションや動画の再生を再開する(キーボードが表示されいない場合のみ)
GestureDetector(
  // 画面タップ時の処理
  onTapUp: (details) {
    // キーボードが表示されている場合はキーボードのフォーカスを外すのみ
    if (_focusNode.hasFocus) {
      FocusScope.of(context).unfocus();
    } else {
      _onTapUp(
        details: details,
        contentData: contentData,
        textController: _textController,
        isLastStory: widget.isLastStory,
      );
    }
  },

  // 長押し時の場合にはアニメーションや動画の再生を停止する
  onLongPressStart: (details) {
    // キーボードが表示されている場合は処理を行わない
    if (_focusNode.hasFocus) {
      return;
    }

    _animationController.stop();
    if (_videoController != null &&
        _videoController!.value.isPlaying) {
      _videoController!.pause();
    }

    setState(() {
      isLongPress = true;
    });
  },

  // 長押し終了の場合にはアニメーションや動画の再生を再開する
  onLongPressEnd: (details) {
    // キーボードが表示されている場合は処理を行わない
    if (_focusNode.hasFocus) {
      return;
    }
    _animationController.forward();
    if (_videoController != null &&
        !_videoController!.value.isPlaying) {
      _videoController!.play();
    }

    setState(() {
      isLongPress = false;
    });
  },
  child: PageView.builder(
    controller: _pageController,
    physics: const NeverScrollableScrollPhysics(),
    itemCount: widget.storyData.contentData.length,
    itemBuilder: (context, i) {
      final contentData = widget.storyData.contentData[i];
      return Content(
        contentData: contentData,
        focusNode: _focusNode,
        textController: _textController,
        videoController: _videoController,
        isLongPress: isLongPress,
      );
    },
  ),
)
※ _onTapUpの実装はこちら
ユーザ毎のストーリーのページング表示
ストーリーをい表示中に次のユーザのストーリーへはPageViewを使用して右スワイプすることで実装可能です。
isScrollableがtrueの場合はスワイプ可能、falseの場合はスワイプできないようにしています。
falseになる場合はストーリーのメッセージ入力欄へのフォーカスしている時です。
physics: isScrollable ? null : const NeverScrollableScrollPhysics()
PageView.builder(
  controller: _pageController,
  physics: isScrollable ? null : const NeverScrollableScrollPhysics(),
  itemCount: stories.length,
  itemBuilder: (context, i) {
    final story = stories[i];
    return Story(
      pagesControl: _pageController,
      storyData: story,
      isLastStory: i + 1 == stories.length,
      updateScrollable: (value) {
        setState(() {
          isScrollable = value;
        });
      },
    );
  },
)
まとめ
インスタのストーリーのようなUIを実装する方法を説明しました。
ライブラリーを使用せずに実装することで、インスタのストーリーの挙動を把握できたのでとても勉強になりした。
今回のソースコードはこちらのGitHubにて公開してます。
おわりに
最後までお読みいただきありがとうございます。
間違っている点などあればコメントにて指摘いただけますと幸いです。
アプリ設計や実装でお困りの際はお気楽にお問合せください。


