株式会社Neverの近藤です。
株式会社Neverはモバイルアプリケーションの受託開発、技術支援、コンサルティングを行っております。アプリ開発のご依頼や開発面でのお困りの際はお気楽にこちらへお問合せください。
今回はflutter_sharing_intentで僕が実装の時にハマった点について記載します。
目次
1.概要
2.画面イメージ
3.ハマったところ
4.実装
5.まとめ
概要
Flutterアプリで他のアプリから共有されたデータ(テキストやファイルなど)を取得することができます。
iOSでいうところのShare Extensionのことです。
今回実装した時にハマったので備忘録も込めて投稿します。
画面イメージ
ハマったところ
Androidはドキュメント通りに実装して期待通りの挙動になったのですが、
iOSでFlutterアプリに共有したデータがnullになりハマりました。
原因は、SharingFile.swiftのCodingKeysのvalue = "path" になっているのですが、Flutter側のパッケージのSharedFile.fromJsonがvalueになっているためでした。
SharingFile.swift
    enum CodingKeys: String, CodingKey {
        case value = "path"
        case thumbnail
        case duration
        case type
    }
sharing_file.dart
  SharedFile.fromJson(Map<String, dynamic> json)
      : value =  json['value'],
        thumbnail = json['thumbnail'],
        duration = json['duration'],
        type = SharedMediaType.values[json['type']];
修正のPRも出ていたのマージされるのを待ちつつ、現状はForkして該当箇所修正して実装しました。
実装
ここからはドキュメントに記載してある実装手順を少し解説しながら記載します。
Android
Androidはパッケージのドキュメントに記載してある通り、AndroidManifestに追記のみです。
    <activity
            android:name=".MainActivity"
            android:configChanges="orientation|keyboardHidden|screenSize"
            android:exported="true"
            android:theme="@style/LaunchTheme"
            android:hardwareAccelerated="true"
            android:windowSoftInputMode="adjustResize"
            android:screenOrientation="portrait"
            android:launchMode="singleTask">

            <!--TODO:  Add this filter, if you want support opening urls into your app-->
            <intent-filter>
               <action android:name="android.intent.action.VIEW" />
               <category android:name="android.intent.category.DEFAULT" />
               <category android:name="android.intent.category.BROWSABLE" />
               <data
                   android:scheme="https"
                   android:host="example.com"
                   android:pathPrefix="/invite"/>
            </intent-filter>

            <!--TODO: Add this filter, if you want to support sharing text into your app-->
            <intent-filter>
                <action android:name="android.intent.action.SEND" />
                <category android:name="android.intent.category.DEFAULT" />
                <data android:mimeType="text/*" />
            </intent-filter>

            <!--TODO: Add this filter, if you want to support sharing images into your app-->
            <intent-filter>
                <action android:name="android.intent.action.SEND" />
                <category android:name="android.intent.category.DEFAULT" />
                <data android:mimeType="image/*" />
            </intent-filter>

            <!--TODO: Add this filter, if you want to support sharing multi images into your app-->
            <intent-filter>
                <action android:name="android.intent.action.SEND_MULTIPLE" />
                <category android:name="android.intent.category.DEFAULT" />
                <data android:mimeType="image/*" />
            </intent-filter>

            <!--TODO: Add this filter, if you want to support sharing videos into your app-->
            <intent-filter>
                <action android:name="android.intent.action.SEND" />
                <category android:name="android.intent.category.DEFAULT" />
                <data android:mimeType="video/*" />
            </intent-filter>

            <!--TODO: Add this filter, if you want to support sharing multi videos into your app-->
            <intent-filter>
                <action android:name="android.intent.action.SEND_MULTIPLE" />
                <category android:name="android.intent.category.DEFAULT" />
                <data android:mimeType="video/*" />
            </intent-filter>


            <!--TODO: Add this filter, if you want to support sharing any type of files-->
            <intent-filter>
                <action android:name="android.intent.action.SEND" />
                <category android:name="android.intent.category.DEFAULT" />
                <data android:mimeType="*/*" />
            </intent-filter>

            <!--TODO: Add this filter, if you want to support sharing multiple files of any type-->
            <intent-filter>
                <action android:name="android.intent.action.SEND_MULTIPLE" />
                <category android:name="android.intent.category.DEFAULT" />
                <data android:mimeType="*/*" />
            </intent-filter>
      </activity>

  </application>
</manifest>
iOS
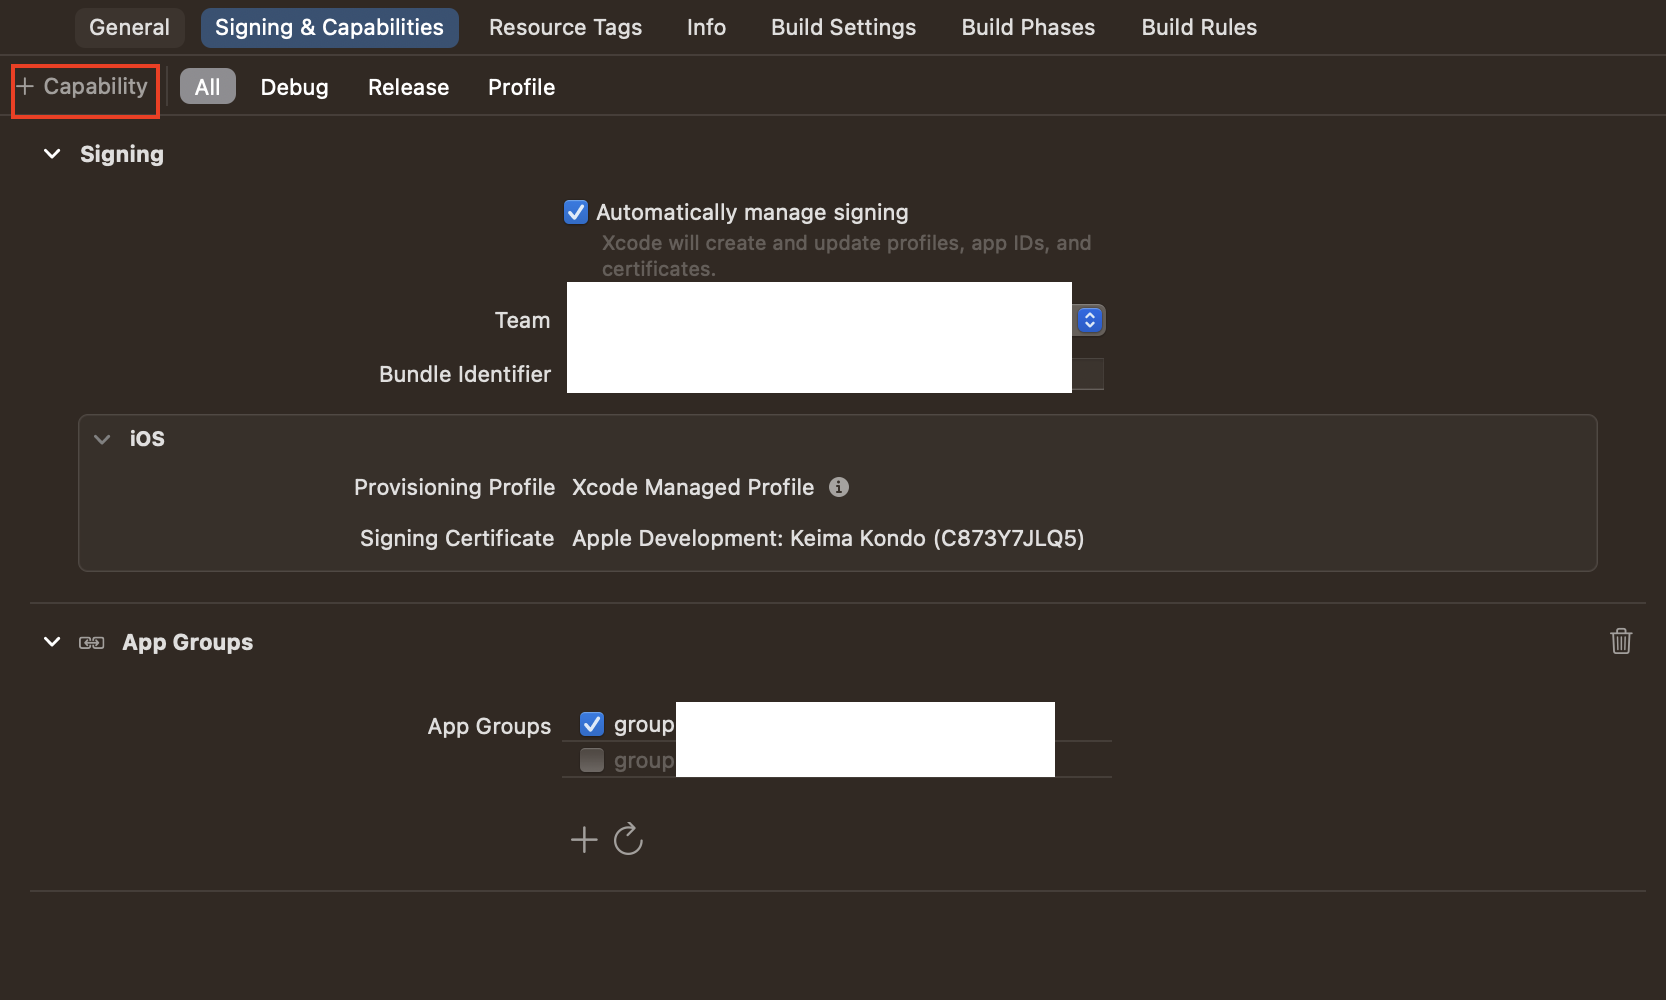
App Groupsの追加
FlutterアプリとShare Extensionでデータを共有するためにApp Groupsの設定をします。
XcodeでSigning & CapabilitiesのCapabilityからApp Groupsを追加します。
ios/Runner/info.plistに追加
AppGroupIdはアプリのBundleIdにgruop.${アプリのBundleId}なら追記しなくても良いです。
e.g.)
アプリのBundleId : com.hoge.app
GruopId : gruop.com.hoge.app
<!-- アプリのBundleIdに`gruop.${アプリのBundleId}`なら記載は不要 -->
<key>AppGroupId</key>
<string>$(CUSTOM_GROUP_ID)</string>
<key>CFBundleURLTypes</key>
	<array>
		<dict>
			<key>CFBundleTypeRole</key>
			<string>Editor</string>
			<key>CFBundleURLSchemes</key>
			<array>
				<string>SharingMedia-$(PRODUCT_BUNDLE_IDENTIFIER)</string>
			</array>
		</dict>
	</array>
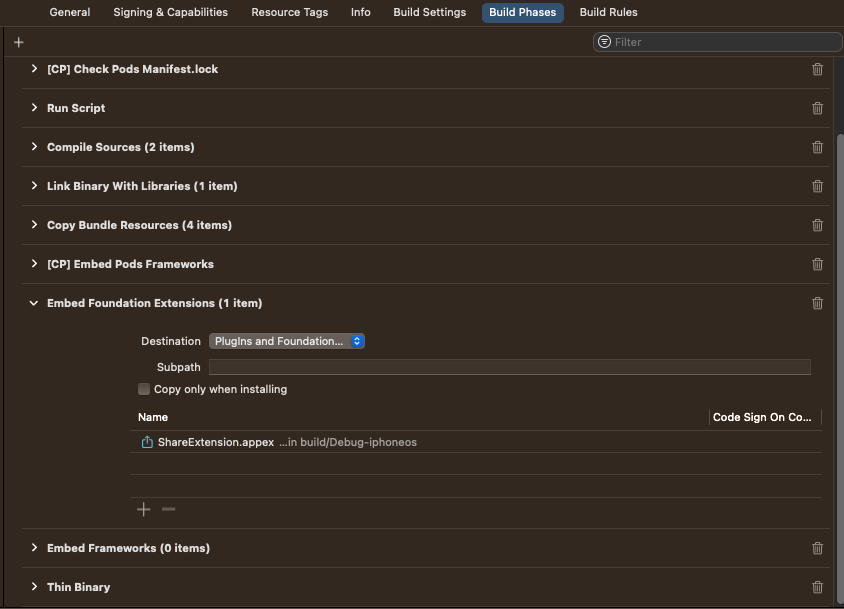
XcodeからShare Extensionを追加する
XcodeでFile/New/Target で Share Extension選択をします。


Share Extensionを追加した後にそのまま実行すると、Cycle inside Runner; building could produce unreliable resultsになってしまいます。
これはEmbed Pods FrameworksとThin BinaryのBuild Phasesは、Extensionのコピー作業を前提としているためです。
なので、Embed Foundation ExtensionsをEmbed Pods FrameworksとThin Binaryよりも上に持っていく必要があります。
Share ExtensionにもApp Groupsを追加する
アプリのSigning & CapabilitiesにApp Groupsを追加したように、Share Extensionの方にも追加します。
ios/Share Extension/info.plistに追加
パッケージのドキュメントに記載してある通りに追記します。
NSExtensionActivationRuleの内容はアプリに必要な部分のみで良いです。
	<key>NSExtension</key>
    <dict>
    <key>NSExtensionAttributes</key>
    <dict>
        <key>PHSupportedMediaTypes</key>
        <array>
            <!-- To share video into your app-->
            <string>Video</string>
            <!-- To share images into your app-->
            <string>Image</string>
        </array>

        <key>NSExtensionActivationRule</key>
        <dict>
            <!-- To share text into your app -->
            <key>NSExtensionActivationSupportsText</key>
            <true/>
            <!-- TO share urls into your app -->
            <key>NSExtensionActivationSupportsWebURLWithMaxCount</key>
            <integer>1</integer>
            <!-- To share images into your app -->
            <key>NSExtensionActivationSupportsImageWithMaxCount</key>
            <integer>20</integer>
            <!-- To share video into your app -->
            <key>NSExtensionActivationSupportsMovieWithMaxCount</key>
            <integer>10</integer>
            <!-- To share other files into your app -->
            <key>NSExtensionActivationSupportsFileWithMaxCount</key>
            <integer>10</integer>
        </dict>
    </dict>
    <key>NSExtensionMainStoryboard</key>
    <string>MainInterface</string>
    <key>NSExtensionPointIdentifier</key>
    <string>com.apple.share-services</string>
    </dict>
ShareViewController
Share Extensionを追加した時に生成されたShareViewController.swiftをドキュメントの通りに実装します。
AppDelegate
AppDelegateもドキュメントの通りに実装します。
import UIKit
import Flutter
import flutter_sharing_intent


@UIApplicationMain
@objc class AppDelegate: FlutterAppDelegate {
    override func application(
        _ application: UIApplication,
        didFinishLaunchingWithOptions launchOptions: [UIApplication.LaunchOptionsKey: Any]?
    ) -> Bool {
        GeneratedPluginRegistrant.register(with: self)
        return super.application(application, didFinishLaunchingWithOptions: launchOptions)
    }

    // 追加部分
    override func application(_ app: UIApplication, open url: URL, options: [UIApplication.OpenURLOptionsKey : Any] = [:]) -> Bool {

     let sharingIntent = SwiftFlutterSharingIntentPlugin.instance
     /// if the url is made from SwiftFlutterSharingIntentPlugin then handle it with plugin [SwiftFlutterSharingIntentPlugin]
     print(url)
     if sharingIntent.hasSameSchemePrefix(url: url) {
         return sharingIntent.application(app, open: url, options: options)
     }

     // Proceed url handling for other Flutter libraries like uni_links
     return super.application(app, open: url, options:options)
    }
}
Flutter
Flutterはドキュメント通りに実装しました。
import 'dart:async';
import 'dart:io';

import 'package:flutter/material.dart';
import 'package:flutter_sharing_intent/flutter_sharing_intent.dart';
import 'package:flutter_sharing_intent/model/sharing_file.dart';

void main() {
  runApp(const MyApp());
}

class MyApp extends StatefulWidget {
  const MyApp({super.key});

  @override
  State<MyApp> createState() => _MyAppState();
}

class _MyAppState extends State<MyApp> {
  late StreamSubscription _intentDataStreamSubscription;
  List<SharedFile>? list;

  @override
  void initState() {
    super.initState();
    // アプリがメモリ内にあるときにアプリ外から来た画像を共有する場合
    _intentDataStreamSubscription = FlutterSharingIntent.instance
        .getMediaStream()
        .listen((List<SharedFile> value) {
      setState(() {
        list = value;
      });
    }, onError: (err) {
      print('getIntentDataStream error: $err');
    });

    // アプリ終了中にアプリの外から来た画像を共有する場合
    FlutterSharingIntent.instance
        .getInitialSharing()
        .then((List<SharedFile> value) {
      setState(() {
        list = value;
      });
    });
  }

  @override
  void dispose() {
    _intentDataStreamSubscription.cancel();
    super.dispose();
  }

  @override
  Widget build(BuildContext context) {
    final sharingData = list?.firstOrNull?.value;

    return MaterialApp(
      home: Scaffold(
        appBar: AppBar(
          title: const Text('Plugin example app'),
        ),
        body: Padding(
          padding: const EdgeInsets.all(8.0),
          child: sharingData != null
              ? Image.file(File(sharingData))
              : const SizedBox.shrink(),
        ),
      ),
    );
  }
}
まとめ
今回、ハマった部分のPRが早くマージされることを祈ります。
おわりに
最後までお読みいただきありがとうございます。
間違っている点などあればコメントにて指摘いただけますと幸いです。
アプリ設計や実装でお困りの際はお気楽にお問合せください。