書籍を購入したので、勉強をします。このサイト、メモは書くなというお達しが出ていますが、うーん、メモです。
C++実践プログラミング 単行本 – 2003/9/1
スティーブ オウアルライン (著), Steve Oualline (原名), 望月 康司 (翻訳), クイープ (翻訳)
環境
- Raspberry Pi 5 8GB
- 追加ボード;NVMe Base for Raspberry Pi 5 (NVMe Base by Pimoroni)
- Crucial クルーシャル P2シリーズ 500GB 3D NAND NVMe PCIe M.2 SSD CT500P2SSD8
- Ubuntu Desktop 24.04LTS(64-bit)
準備
Windows10のコマンドプロンプトからsshで入ります。
ssh yoshi.local
$ mkdir book
$ cd book
$ nano ex001.cpp
coutを使ってみたが
8ビットの二つのデータを16ビットに合成しています。センサの読み出してはよく使われます。
16進とバイナリ表示を併用しています。
#include <iostream>
#include <bitset>

int main(){
    int high_byte = 0xab;
    int low_byte = 0xef;
    int data = (high_byte << 8) | low_byte;

    std::cout << "high_bye : " << high_byte << " 0x" << std::hex << high_byte << " 0b" << std::bitset<8>(high_byte) << "\n";
    std::cout << "low_bye  : " << low_byte << " 0x" << std::hex << low_byte << " 0b" << std::bitset<8>(low_byte) << "\n";
    std::cout << "data     : " << data << " 0x" << std::hex << data << " 0b" << std::bitset<16>(data) << "\n";

    return 0;
}
実行します。
$ g++ ex001.cpp
$ ./a.out
high_bye : 171 0xab 0b10101011
low_bye  : ef 0xef 0b11101111
data     : abef 0xabef 0b1010101111101111
与えるデータを変えてみました。
    int high_byte = 0x02;
    int low_byte = 0x02;
実行します。
$ g++ ex001.cpp
$ ./a.out
high_bye : 2 0x2 0b00000010
low_bye  : 2 0x2 0b00000010
data     : 202 0x202 0b0000001000000010
単に、std::cout << "high_bye : " << high_byteの挙動が変です。これが仕様なのかもしれませんけど。16進で与えたデータが、表示で10進表示に見えたり、明らかに文字の場合は 16進表示になっています。
なので、
- 16進表示
<< " 0x" << std::hex - バイナリ表示
<< " 0b" << std::bitset<8>(high_byte)
を使わないと、かんちがいすることがありそうです😊
std::hexやstd::decはありますが、std::binはありません。
intの長さを指定してみました。
  int8_t high_byte = 0x02;
  int8_t low_byte = 0x02;
  int16_t data = (high_byte << 8) | low_byte;
実行します。
$ g++ ex001.cpp
$ ./a.out
high_bye :  0x 0b00000010
low_bye  :  0x 0b00000010
data     : 202 0x202 0b0000001000000010
std::hexの表示がおかしくなりました。coutはint8を表示できなくて、すごく使いずらいです。
最後に、次の3行を追加しました。
   std::cout << sizeof(high_byte) << "\n";
   std::cout << sizeof(low_byte) << "\n";
   std::cout << sizeof(data) << "\n";
実行しました。
$ g++ ex001.cpp
$ ./a.out
high_bye :  0x 0b00000010
low_bye  :  0x 0b00000010
data     : 202 0x202 0b0000001000000010
1
1
2
サイズは想定通りですね。
<<はもともとシフトの演算子
#include <iostream>

int main(){

     std::cout << "test1 " << 0xff+1 << " ok?\n";
     std::cout << "test2 " << 0xff<<1 << " ok?\n";
     std::cout << "test3 " << (0xff<<1) << " ok?\n";
     std::cout << "test4 " << 0xff & 1 << " ok?\n";
     std::cout << "test5 " << (0xff & 1) << " ok?\n";
    return 0;
}
実行すると、エラーが出ます。
$ g++ ex002.cpp
ex002.cpp: In function ‘int main()’:
ex002.cpp:8:40: error: invalid operands of types ‘int’ and ‘const char [6]’ to binary ‘operator<<’
    8 |      std::cout << "test4 " << 0xff & 1 << " ok?\n";
      |                                      ~ ^~ ~~~~~~~~
      |                                      |    |
      |                                      int  c
test4 の行をコメントアウトしました。
$ g++ ex001.cpp
yoshi@yoshi:~/book/src$ ./a.out
test1 257 ok?
test2 2552 ok?
test3 1020 ok?
test5 2 ok?
実行します。
$ nano ex002.cpp
yoshi@yoshi:~/book$ g++ ex002.cpp
`yoshi@yoshi:~/book$ ./a.out
test1 256 ok?
test2 2551 ok?
test3 510 ok?
test5 1 ok?
ビット演算は、動作を確認しながら使うのがよさそうです。
実際に使ってみる
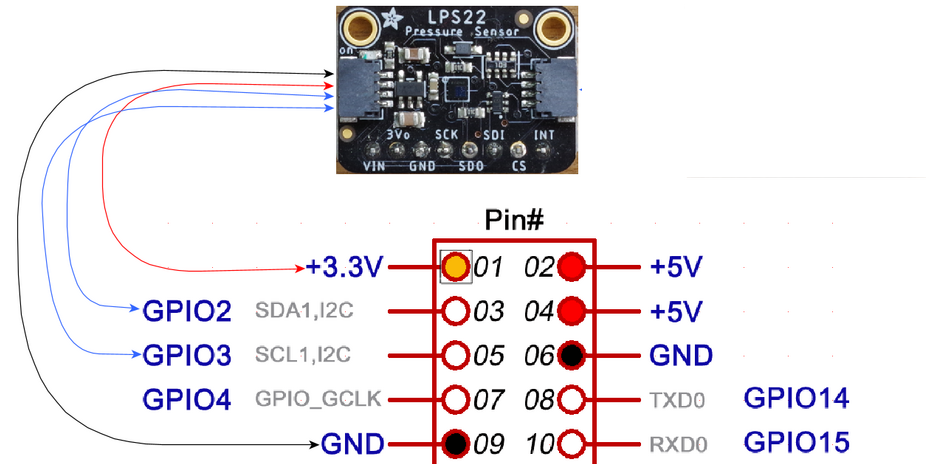
i2cバス接続の気圧センサLPS22HBをラズパイにつなぎました。
$ ls /dev/i2c*
/dev/i2c-1  /dev/i2c-11  /dev/i2c-12
$ i2cdetect -y 1
     0  1  2  3  4  5  6  7  8  9  a  b  c  d  e  f
00:                         -- -- -- -- -- -- -- --
10: -- -- -- -- -- -- -- -- -- -- -- -- -- -- -- --
20: -- -- -- -- -- -- -- -- -- -- -- -- -- -- -- --
30: -- -- -- -- -- -- -- -- -- -- -- -- -- -- -- --
40: -- -- -- -- -- -- -- -- -- -- -- -- -- -- -- --
50: -- -- -- -- -- -- -- -- -- -- -- -- -- 5d -- --
60: -- -- -- -- -- -- -- -- -- -- -- -- -- -- -- --
70: -- -- -- -- -- -- -- UU
BME280はつないでいませんが、デバイス・ドライバを入れたままになっているのでUUと表示が出ています。LPS22HBは0x5dに見つかりました。
WHO AM Iレジスタ(0x0f)を読み出します。
$ i2cget 1 0x5d 0x0f
WARNING! This program can confuse your I2C bus, cause data loss and worse!
I will read from device file /dev/i2c-1, chip address 0x5d, data address
0x0f, using read byte data.
Continue? [Y/n] y
0xb1
0xb1はこのデバイでは正しい値です。
LPS22HBの気圧データは、アドレス0xa8から、24ビット長で入っています。
パワーオン後Power downモードになっています。CTRL_REG1 (10h)に0x10を書き込んで、1Hzでデータを変換するようにします。
そのあと、3バイトを1バイトずつ読み出します。
$ i2cset 1 0x5d 0x10 0x10 b
WARNING! This program can confuse your I2C bus, cause data loss and worse!
I will write to device file /dev/i2c-1, chip address 0x5d,
data address 0x10, data 0x10, mode byte.
Continue? [Y/n] y
yoshi@yoshi:~/book$ i2cget 1 0x5d 0xa8 b
WARNING! This program can confuse your I2C bus, cause data loss and worse!
I will read from device file /dev/i2c-1, chip address 0x5d, data address
0xa8, using read byte data.
Continue? [Y/n] y
0x8a
yoshi@yoshi:~/book$ i2cget 1 0x5d 0xa9 b
WARNING! This program can confuse your I2C bus, cause data loss and worse!
I will read from device file /dev/i2c-1, chip address 0x5d, data address
0xa9, using read byte data.
Continue? [Y/n] y
0xf9
yoshi@yoshi:~/book$ i2cget 1 0x5d 0xaa b
WARNING! This program can confuse your I2C bus, cause data loss and worse!
I will read from device file /dev/i2c-1, chip address 0x5d, data address
0xaa, using read byte data.
Continue? [Y/n] y
0x3e
MSBのバイトから入っているので、0x3ef98aが読み出した24ビット・データです。10進に直すと、4127114なので、これを、マニュアルに従って4096で割ります。
1007.5hPaです。正しく読めたようです。
ioctlのプログラムを作る
ここに書かれた手順を実装します。
for文を使っているのは、オシロスコープで波形を見るためです。
#include <iostream>
#include <fcntl.h>
#include <sys/ioctl.h>
#include <linux/i2c-dev.h>
#include <linux/i2c.h>
#include <unistd.h>
#include <string>

int main(){
    std::cout << "\nstart LPS22HB data read \n";
    int fd = open("/dev/i2c-1", O_RDWR);

    struct i2c_msg msg[1]; /* /usr/include/linux/i2c.h */
    struct i2c_rdwr_ioctl_data packets; /* /usr/include/linux/i2c-dev.h */
    unsigned char data[2];
    int ret;

    msg[0].addr = 0x5d; /* addrは16bit幅 */
    msg[0].flags = 0; /* read、writeやアドレス長の指定に利用 */
    msg[0].len = 2; /* bufに指定するdataのサイズ */
    msg[0].buf = data;

    data[0] = 0x10;  // レジスタアドレス上位8bit;
    data[1] = 0x10;  // 書き込み値;
    packets.msgs = msg;
    packets.nmsgs = 1;  /* msgのサイズ指定 */

    ret = ioctl(fd, I2C_RDWR, &packets);
    std::cout << "\nsend: 0x" << std::hex << msg[0].addr << " - 0x"
              << std::hex << (int)data[0] << " - 0x"  << std::hex << (int)data[1] << "\n";

    for (int i=0 ; i<100; i++){
        struct i2c_msg msgR[4];
        struct i2c_rdwr_ioctl_data packetsR;
        unsigned char data1[4], data2, data3, data4;

        msgR[0].addr = 0x5d;
        msgR[0].flags = 0; // 最初はアドレスを書き込み
        msgR[0].len = 1;
        msgR[0].buf = data1;

        data1[0] = 0x8a;  // 0x28 | 0x80
        msgR[1].addr = 0x5d;
        msgR[1].flags = I2C_M_RD; // リード時に設定
        msgR[1].len = 1; // データを1byte読み出し
        msgR[1].buf = &data2; // data2に読み出しデータが入る
        data1[0] = 0xa9;
        msgR[2].addr = 0x5d;
        msgR[2].flags = 1;
        msgR[2].len = 1; // データを1byte読み出し
        msgR[2].buf = &data3;
        data1[0] = 0xaa;
        msgR[3].addr = 0x5d;
        msgR[3].flags = 1;
        msgR[3].len = 1; // データを1byte読み出し
        msgR[3].buf = &data4;

        packetsR.msgs = msgR;
        packetsR.nmsgs = 4; // アドレス書き込みとデータ読み出しでmsgは4
        int retR = ioctl(fd, I2C_RDWR, &packetsR);

        std::cout << "read data: " << (int)data2 << " - " << (int)data3 << " - " << (int)data4 << "\n";
        float press = std::stof( std::to_string((data2 << 16) | (data3 <<8) | (data4) )) /4096;
        std::cout << "\npress is " << press << "\n";

        sleep(1);
    }
    //close(fd);
        return 0;
}
実行します。
$ ./a.out

start LPS22HB data read

send: 0x5d - 0x10 - 0x10
read data: 3f - a - 17

press is 1008.63
read data: 3f - a - 17

press is 1008.63
read data: 3f - a - 17

press is 1008.63
波形です。アドレスを毎回送出するので、3バイトを連続して読み出せていません。
構造体msg[]の内容がバラエティに富んでいて、メンバの役割をまだ理解できていません。うまく指定ができると、マルチバイト・リードがスマートにできるかもしれません(本来、最初のアドレス送出以降に何度もアドレスが出る必要はない)。

.formatは?
printfではformatが利用できました。書籍には書かれていませんが、<ios>を使うようです。リファレンスにはC98となっていたので、新しいのかもしれません。調べると、一番古かった。一番新しいのC20らしい。素人の推測は外れるものらしい。
右寄せとかが指定できるようです。別途勉強します。
(※)書いている途中で投稿してしまっていたようです。最終は9/2です。