EPOS4のコントローラには、
- ディジタル入力4ポート、出力2ポート
- アナログ入力2ポート、出力2ポート
が用意されています。オブジェクト・ディレクトリに登録されているので、SDOで読み書きできます。
ディジタル入出力
コネクタX7 Digital I/Oのピン番号と機能です。
1 white : Digital input 1 ; Logic 0 <0.8 V Logic 1 >2.0 V 、22k pulldown
2 brown : Digital input 2
3 green : Digital input 3
4 yellow : Digital input 4
5 grey : Digital output 1 ; 2.2k pullup to 5.45V MOS FET Drain-GND 、sink 0.5A max 36V
6 pink : Digital output 2 ; Souce <2mA
7 blue : GND
8 red : VAux Auxiliary output voltage (+5 VDC; IL ≤150 mA)
デフォルトでは入力は、Lowが0.8V以下、Highは2.0V以上です。コントローラ上のDIPスイッチの設定でPLCモードにすると、Lowが5.5V以下、Highは9V以上です。デフォルトのまま使います。22kΩでプルダウンされ、ヒステリシスのあるバッファの入力されます。購入した純正のケーブル長は約1mありました。
機能を定義する
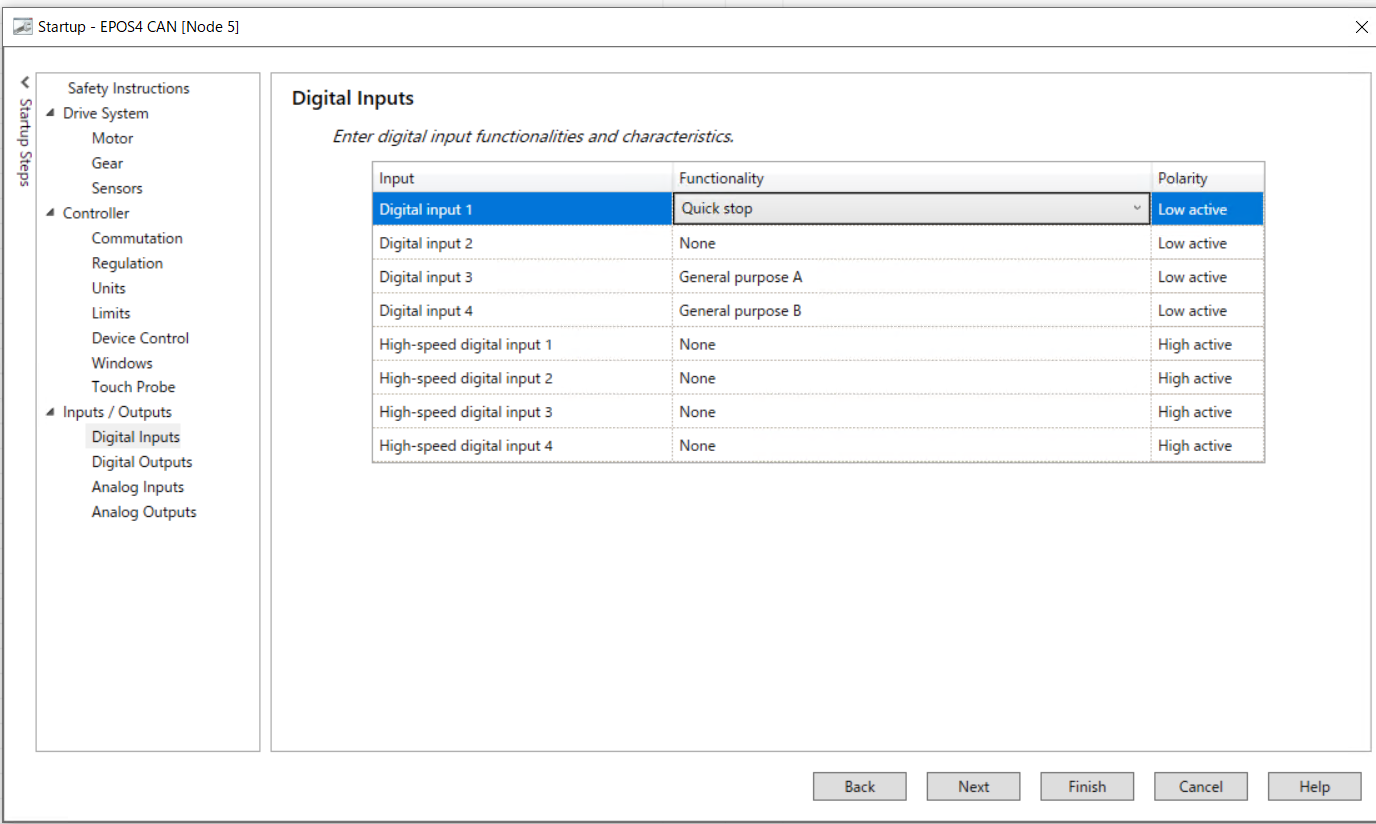
WizardsのStartupからDigital Inputを選択します。Digital input1~4にFunctionalityとPolarityを画面のように選択します。
Digital input3はGeneral purouse Aで、CW回転のスイッチに使います。Digital input4はGeneral purouse Bで、CCW回転のスイッチに使います。四つとも負論理にしました。
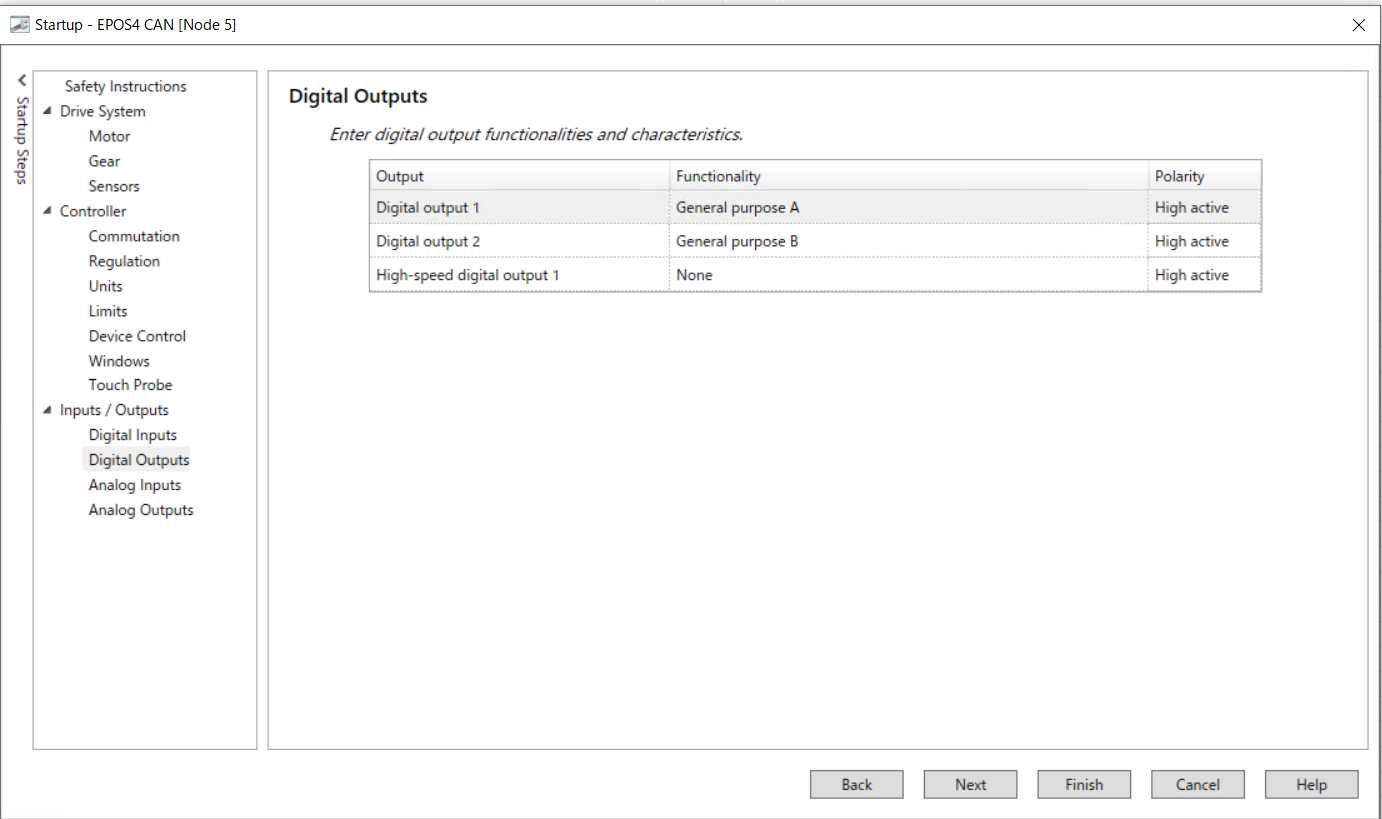
WizardsのStartupからDigital outputを選択します。
Digital output1、2にFunctionalityとPolarityを画面のように選択します。
Digital output1はGeneral purouse Aで、CW回転のスイッチの確認のLED点灯に使います。Digital output2はGeneral purouse Bで、CCW回転のスイッチの確認のLED点灯に使います。二つとも正論理にしました。
Finishで終了します。
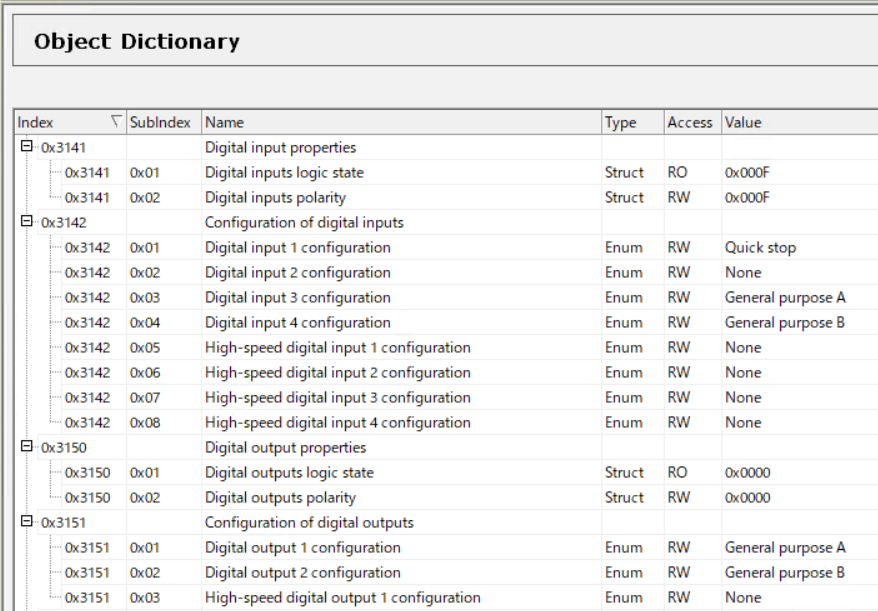
オブジェクト・ディレクトリでも確認できます。
入力は0x3141で、出力は0x3150が状態を読んだり指定するプロパティになっています。
ハードウェア
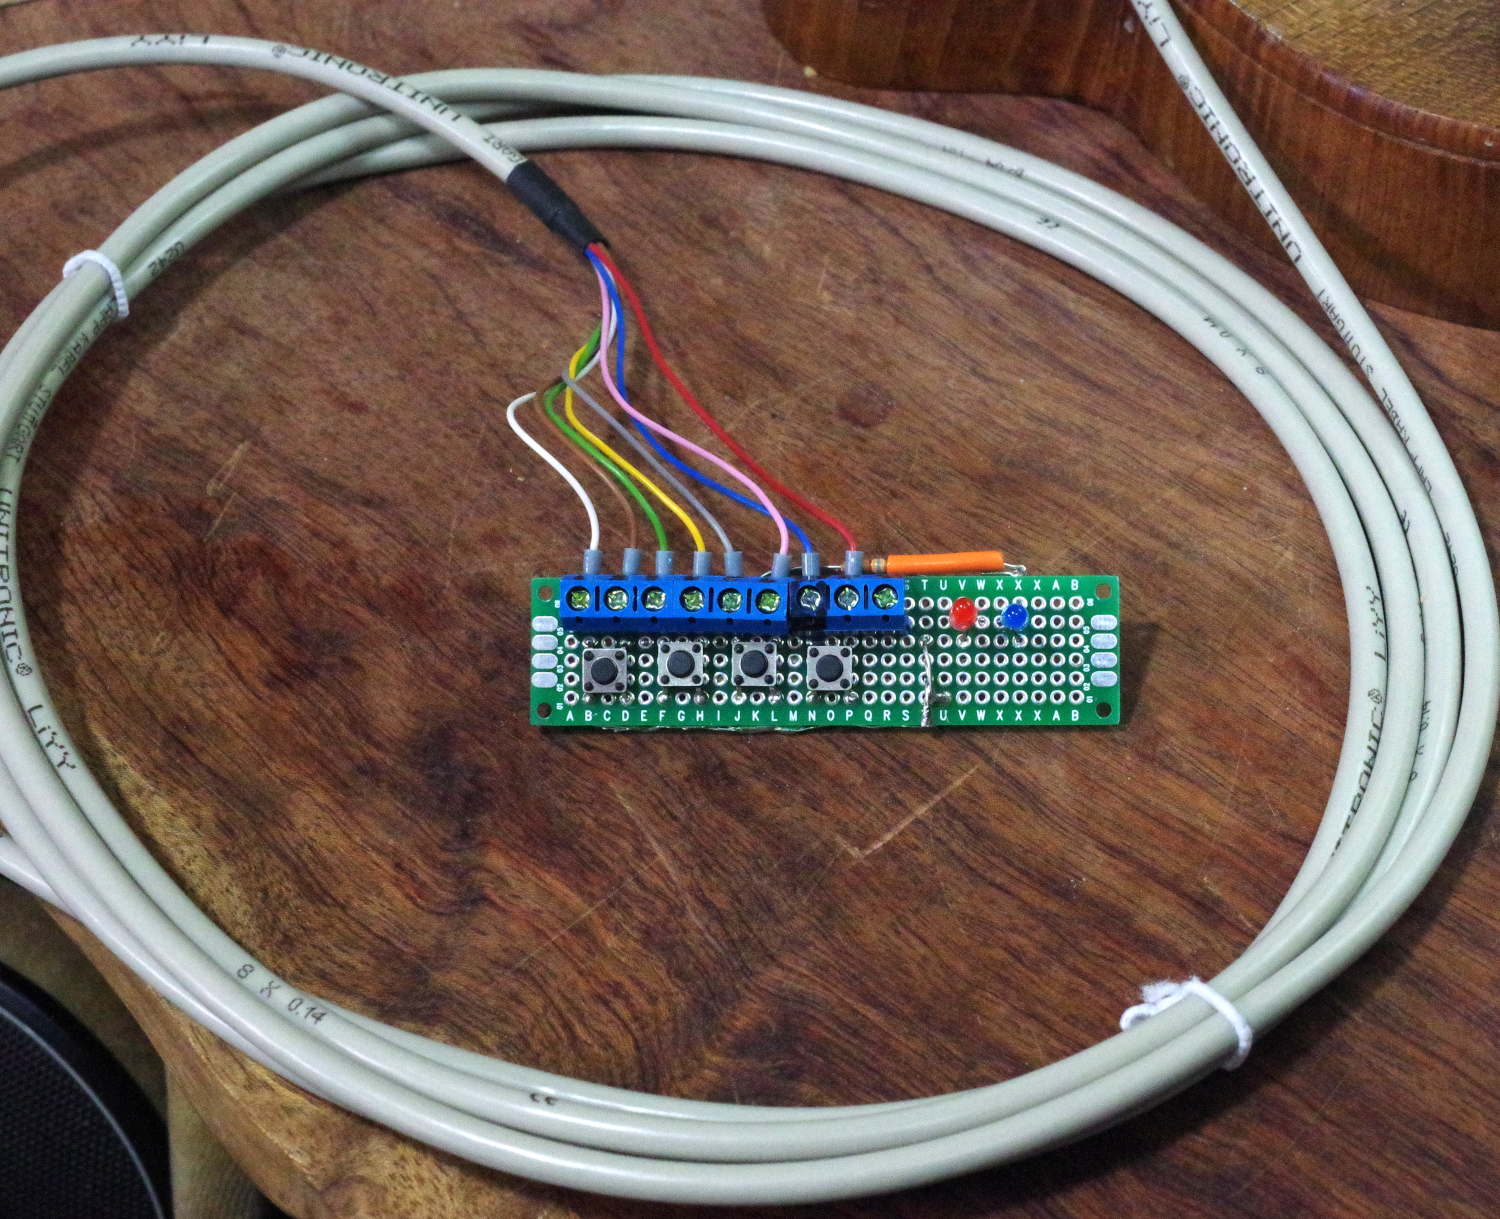
スイッチとLEDを並べた基板を用意しました。
スイッチと直列に1kを入れる予定でしたが、配線を間違え、プルアップしてしまいました。プルダウンに22kが入っていますが、1kが小さいので、4.7VのHighになっています。
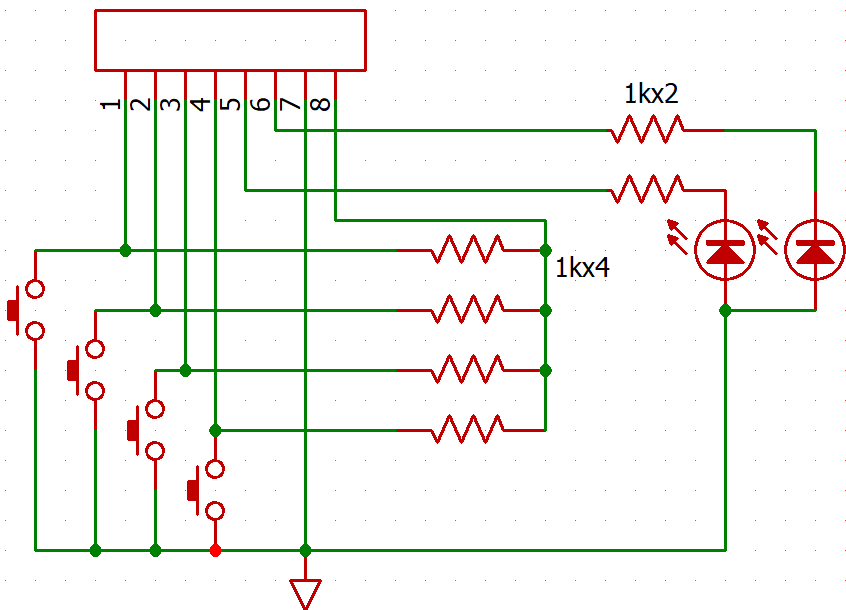
コネクタの信号です。
- 1 Digital input1
- 2 Digital input2
- 3 Digital input3
- 4 Digital input4
- 5 Digital output1
- 6 Digital output2
- 7 Vdd(5V)
- 8 GND
プログラム
入力はDigital input3、4だけの対応です。
Digital inputs logic stateでは、bit2がDigital input3、bit3がDigital input4です。負論理なので、7と11になります。
whileループ内で、Digital input3が押されてLowになると、positionを500、速度500でCW方向に回転し、Digital outputs polarityを'1'にします。Digital outputs1(5番)のLEDが点灯します。Digital input4が押されてLowになると、positionを500、速度500でCCW方向に回転し、Digital outputs polarityを'2'にします。Digital outputs2(6番)のLEDが点灯します。
ループの最後で0.1秒待ち、LEDを消します。
import canopen
import time

# Start with creating a network representing one CAN bus
network = canopen.Network()

# Add some nodes with corresponding Object Dictionaries
node = canopen.BaseNode402(5,'maxon_motor_EPOS4_0170h_6050h_0000h_0000h.eds')
network.add_node(node)

# Connect to the CAN bus
network.connect(bustype='ixxat', channel=0, bitrate=1000000)

print("\n===start  ID=5 EPOS4\n")

node.nmt.send_command(0x81)  # NMT reset
time.sleep(0.5)
node.nmt.send_command(0x82)  # NMT Reset Communication
#node.nmt.wait_for_bootup(15)
time.sleep(0.5)
node.nmt.send_command(0x80)  # NMT Pre-ope
time.sleep(0.5)
node.nmt.send_command(0x1)   # NMT start
network.check()
print('NMT:node state  = {0}\n'.format(node.nmt.state))
#--------------------

network.sync.start(0.1)

print("---Switch CiA402")
node.setup_402_state_machine()

#node.sdo[0x6040].raw = 0x0010  # Fault Reset
node.sdo[0x1003].raw = 0x0000
time.sleep(0.1)
node.sdo[0x1003].raw = 0x0000
time.sleep(0.1)
node.sdo[0x1003].raw = 0x0000
time.sleep(0.1)
#node.state = 'NOT READY TO SWITCH ON'

#node.state = 'SWITCH ON DISABLED'

Statusword = node.sdo[0x6041].raw
print('Statusword  {:0>16b}'.format(Statusword))


#node.state = 'READY TO SWITCH ON'
node.sdo[0x6040].raw = 0x0006
time.sleep(0.1)
node.sdo[0x6040].raw = 0x0006
time.sleep(0.1)
node.sdo[0x6040].raw = 0x0006
time.sleep(0.1)

#node.state = 'SWITCHED ON'
node.sdo[0x6040].raw = 0x0007
time.sleep(0.1)
node.sdo[0x6040].raw = 0x0007
time.sleep(0.1)
node.sdo[0x6040].raw = 0x0007
time.sleep(0.1)

#node.state = 'OPERATION ENABLED'
node.sdo[0x6040].raw = 0x000f
time.sleep(0.1)
node.sdo[0x6040].raw = 0x000f
time.sleep(0.1)
node.sdo[0x6040].raw = 0x000f
time.sleep(0.1)

print("\nSWITCH ready\n")
print('Statusword  {:0>16b}\n'.format(node.sdo[0x6041].raw))

#----main----------------

def move(position, velocity):
    node.sdo[0x6040].raw = 0x0006
    node.sdo[0x6040].raw = 0x000f
    node.rpdo[3]['Controlword'].phys  = 0x007f
    node.rpdo[3]['Target position'].phys  = position
    node.rpdo[3].transmit()
    node.rpdo[4]['Controlword'].phys  = 0x007f
    node.rpdo[4]['Profile velocity'].phys  = velocity
    node.rpdo[4].transmit()

def readPosition():
    print('Target position {:5d}'.format(node.tpdo[3]['Position actual value'].raw))

readPosition()

node.sdo[0x6060].raw = 0x0001  #  Modes of operation <- Profile Position Mode
node.sdo[0x6083].raw = 5000    # Prfile acceleration

node.nmt.state = 'OPERATIONAL'
print('\n>>> move\n')
while 1:
    #print(node.sdo[0x3141]['Digital inputs logic state'].phys)
    #print(node.sdo[0x3141]['Digital inputs polarity'].phys)
    #print("")
    if node.sdo[0x3141]['Digital inputs logic state'].phys == 11:
        move(500,500)
        node.sdo[0x3150]['Digital outputs polarity'].phys =1
        print(node.sdo[0x3141]['Digital inputs logic state'].phys)
        print('\n>>> move +\n')
        readPosition()
    if node.sdo[0x3141]['Digital inputs logic state'].phys == 7:
        move(-500,500)
        node.sdo[0x3150]['Digital outputs polarity'].phys =2
        print(node.sdo[0x3141]['Digital inputs logic state'].phys)
        print('\n>>> move -\n')
        readPosition()

    time.sleep(0.1)
    node.sdo[0x3150]['Digital outputs polarity'].phys =0


#-------------------
print("\n-----")
node.sdo[0x6040].raw = 0x0010  # Fault Reset
print("")
node.nmt.send_command(0x02)  # NMT remote stop
network.check()
print('node state end) = {0}'.format(node.nmt.state))
node.nmt.send_command(0x81)  # NMT reset
time.sleep(0.5)
node.nmt.send_command(0x82)  # NMT Reset Communication
network.sync.stop()
network.disconnect()
中断はCTRL-Cです。正常終了していません。
