I2Cはマルチマスタで使われることがあります。最初にアドレスを出していったんストップ・コンディションにすると、ほかのマスタがI2Cバスを乗っ取ることができてしまいます。たいてい、それはまずいので、スレーブ・デバイスによっては、ストップ・コンディションに移行する途中の状態からスタート・コンディションに遷移する「リピーテッド・スタート・コンディション」を実行します。
たとえば、温度センサのLM75B、同じく温度センサのADT7410、A-DコンバータのADS1015などがあります。LM75Bはマスタがリピーテッド・スタート・コンディションをサポートしていなくても、シングルマスタでは正常に読み書きができます。
ADT7410は、IDの読み出しでさえ、リピーテッド・スタート・コンディションをサポートしていないと、正しく読み出せません。
Arduino IDEは、1.0.1からWire.endTransmission(false);でリピーテッド・スタート・コンディションをサポートしています。
ラズパイのsmbusライブラリは、2016年ごろまで、combined=1という指定を書きましたが、2017年中ごろから、その記述をしなくても、リピーテッド・スタート・コンディションが有効になっているようです。
ADT7410をつなぐ

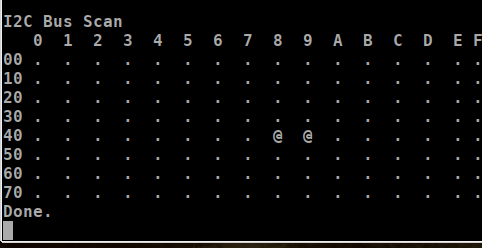
GP21/20のI2C0バスにはTMP117をすでにつないでいます。ここにADT7410をつないでi2c_bus_scanを動かします。出力はターミナルです。
TMP117が0x48、ADT7410が0x49に見つかりました。
あとでプログラムを掲載しますが、IDを読み取る部分の関数です。IDは11001xxxです。11001が製造者IDで不変です。xxxはリビジョンIDで、ロットにより異なるようです。この記事でID=0xcbであることがわかっています。
static void I2C_read_registers(uint8_t reg, uint8_t *buf, uint16_t len) {
// For this particular device, we send the device the register we want to read
// first, then subsequently read from the device. The register is auto incrementing
// so we don't need to keep sending the register we want, just the first.
reg = reg | READ_BIT;
i2c_write_blocking(I2C_PORT, addr, ®, 1, false);
i2c_read_blocking(I2C_PORT, addr, buf, len, true);
}
最後の2行が読み出すアドレスを書き込んで読み出すところです。最後のパラメータを四つの組み合わせで実行しました。
i2c_write_blocking(I2C_PORT, addr, ®, 1, true);
i2c_read_blocking(I2C_PORT, addr, buf, len, true);
答え;0xcb
i2c_write_blocking(I2C_PORT, addr, ®, 1, true);
i2c_read_blocking(I2C_PORT, addr, buf, len, false);
答え;0xcb
i2c_write_blocking(I2C_PORT, addr, ®, 1, false);
i2c_read_blocking(I2C_PORT, addr, buf, len, false);
答え;a
i2c_write_blocking(I2C_PORT, addr, ®, 1, false);
i2c_read_blocking(I2C_PORT, addr, buf, len, true);
答え;a
正しいIDは0xcbです。つまり、書き込みのときにtrueにすると、正しいIDを読み出しています。リピーテッド・スタート・コンディションが有効になっているようです。これは、Arduino IDEと逆の記述になっています。
/home/pi/pico/pico-examples/i2c/mpu6050_i2cのサンプルでは、
i2c_write_blocking(I2C_PORT, addr, &val, 1, true); // true to keep master control of bus
最後は、
i2c_read_blocking(I2C_PORT, addr, buffer, 6, false); // False - finished with bus
というコメントがついています。
したがって、リピーテッド・スタート・コンディションが有効という意味合いではなく、I2Cバスを使い始めはtrueにし、使い終わったらfalseにするのがPicoというデバイスのセオリなのかもしれません。
プログラム
/**
* Copyright (c) 2020 Raspberry Pi (Trading) Ltd.
*
* SPDX-License-Identifier: BSD-3-Clause
*/
# include <stdio.h>
# include "pico/stdlib.h"
# include "hardware/i2c.h"
static int addr = 0x49;
# define I2C_PORT i2c0
# define IDregister 0x0b
# define READ_BIT 0x80
void setup_I2C(){
// This example will use I2C0 on GPIO20 (SDA) and GPIO21 (SCL) running at 100kHz.
i2c_init(I2C_PORT, 100 * 1000);
gpio_set_function(20, GPIO_FUNC_I2C);
gpio_set_function(21, GPIO_FUNC_I2C);
gpio_pull_up(20);
gpio_pull_up(21);
}
static void I2C_read_registers(uint8_t reg, uint8_t *buf, uint16_t len) {
// For this particular device, we send the device the register we want to read
// first, then subsequently read from the device. The register is auto incrementing
// so we don't need to keep sending the register we want, just the first.
reg = reg | READ_BIT;
i2c_write_blocking(I2C_PORT, addr, ®, 1, true);
i2c_read_blocking(I2C_PORT, addr, buf, len, false);
}
int main() {
// Enable UART so we can print status output
stdio_init_all();
setup_I2C();
uint8_t buffer[1];
I2C_read_registers(IDregister, buffer, 1);
printf("Done. %x\n", buffer[0]);
return 0;
}
make
第8回で解説したpico/worksで作業をしています。adt7410というフォルダを作りました。
worksの中にあるCMakeLists.txtの内容です。第6回と比べ、不要なinclude(example_auto_set_url.cmake)の行を削除しました。
cmake_minimum_required(VERSION 3.12)

# Pull in SDK (must be before project)
include(pico_sdk_import.cmake)

project(pico_examples C CXX ASM)
set(CMAKE_C_STANDARD 11)
set(CMAKE_CXX_STANDARD 17)

set(PICO_EXAMPLES_PATH ${PROJECT_SOURCE_DIR})

# Initialize the SDK
pico_sdk_init()

# Add blink example
add_subdirectory(blink)
add_subdirectory(cmake)
add_subdirectory(LED7seg_74HC595)
add_subdirectory(bus_scan)
add_subdirectory(lcd_1602_i2c)
add_subdirectory(CRC8)
add_subdirectory(adt7410)
フォルダadt7410には二つのファイルがあります。ソースadt7410.cは最初に掲載しました。 CMakeLists.txtの内容です。
add_executable(adt7410
        adt7410.c
        )

# Pull in our (to be renamed) simple get you started dependencies
target_link_libraries(adt7410 pico_stdlib hardware_i2c)

# create map/bin/hex file etc.
pico_add_extra_outputs(adt7410)
adt7410のフォルダを作ってその直下のCMakeLists.txtを修正した後、pico/works/buildに降りて、cmake ..を実行します。
その直下にできたpico/works/build/adt7410へ降りて、make -j4を実行すると、このフォルダ内にadt7410.uf2ができています。
第6回で作ったResetボタンを使います。Resetボタンを押したまま、BOOTSELボタンを押し、Resetボタンを放してから、BOOTSELボタンを放します。これでRPI-RP2ディスクがマウントができます。これにadt7410.uf2をドロップします。
cmakeは1回だけ実行、makeはソースを修正するたびに実行します。ビルドされるとき、リンクされるライブラリ類は最初の1回だけコンパイルされるので、時間がかかるのは最初の1回だけです。
その前に、第3回で解説した「標準出力を用意」でターミナルを動かしておきます。このターミナルにIDが出力されます。
温度を読み出すプログラム
ID以外に温度のデータを読み出します。レジスタの定義などにいろいろな記述がありますが、過去のプログラムからコピペしてきたもので統一が取れていません。Picoに合った方法で将来統一する予定です。
/**
* Copyright (c) 2020 Raspberry Pi (Trading) Ltd.
*
* SPDX-License-Identifier: BSD-3-Clause
*/
# include <stdio.h>
# include "pico/stdlib.h"
# include "hardware/i2c.h"
static int addr = 0x49;
const unsigned char Configuration_register = 0x03 ;
const unsigned char Temp_register = 0x00 ;
# define I2C_PORT i2c0
# define IDregister 0x0b
# define READ_BIT 0x80
void setup_I2C(){
// This example will use I2C0 on GPIO20 (SDA) and GPIO21 (SCL) running at 100kHz.
i2c_init(I2C_PORT, 100 * 1000);
gpio_set_function(20, GPIO_FUNC_I2C);
gpio_set_function(21, GPIO_FUNC_I2C);
gpio_pull_up(20);
gpio_pull_up(21);
}
static void I2C_read_registers(uint8_t reg, uint8_t *buf, uint16_t len) {
// For this particular device, we send the device the register we want to read
// first, then subsequently read from the device. The register is auto incrementing
// so we don't need to keep sending the register we want, just the first.
reg = reg | READ_BIT;
i2c_write_blocking(I2C_PORT, addr, ®, 1, true);
i2c_read_blocking(I2C_PORT, addr, buf, len, false);
}
static void I2C_write_register(uint8_t reg, uint8_t data) {
uint8_t buf[2];
//buf[0] = reg & 0x7f; // remove read bit as this is a write
buf[0] = reg;
buf[1] = data;
i2c_write_blocking(I2C_PORT, addr, buf, 2, true);
}
int main() {
// Enable UART so we can print status output
stdio_init_all();
setup_I2C();
I2C_write_register(Configuration_register, 0x80); // 13 to 16bit
uint8_t buffer[2];
I2C_read_registers(IDregister, buffer, 1);
printf("ID: %x\n", buffer[0]);
I2C_read_registers(Temp_register, buffer, 2);
int16_t tempSign = (buffer[0]<<8) | buffer[1];
int16_t temp = tempSign & 0x7fff;
if (tempSign & 0x8000 ) temp = -( (~temp & 0x7fff) +1);
float temperature = temp * 0.0078125;
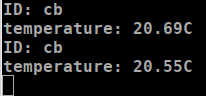
printf("temperature: %.2fC\n",temperature);
return 0;
}
実行例です。Resetスイッチを押すと再度実行します。