第2回では、BMP280をつないで、気圧や温度をMuに表示しました。ここでは気圧センサLPS25HBを使いまします。どちらのブレークアウト・ボードもAdafruit製です。動作環境はラズパイ4です。
LPS25HBボードのおもなスペック
- 動作電圧 3.3V(デバイスは1.7~3.6 V)
- 測定範囲 260~1260hPa
- 確度 ±0.1hPa(25℃)、±1hPa(0~80℃)
- インターフェース SPI、I2C。I2C用プルアップ抵抗は実装、5V用レベル変換回路実装
準備
ダウンロード・フォルダにあったadafruit-circuitpython-raspberry_pi_pico-en_US-6.2.0-beta.1.uf2をデスクトップにドロップしておきます。
BOOTSELボタンを押したまま、ラズパイとPicoをUSBケーブルをつなげます。つながったら、BOOTSELから手を放します。RPI-RP2ドライブがマウントされます。そのRPI-RP2ドライブへ、adafruit-circuitpython-raspberry_pi_pico-en_US-6.2.0-beta.1.uf2をドラッグします。コピーが数秒で終わると、デスクトップには、CIRCUITPYドライブがマウントされています。

エディタMuを起動します。Circuitpythonモードで立ち上がります。
接続
Adafruitの気圧センサLPS25HB(Adafruit LPS25 and LPS22 Barometric Pressure and Temperature Sensors)をBMP280の4ピン・コネクタにつなげます。ケーブルは純正ではないので、色はSTEMMA QTと異なっています。
| STEMMA QTコネクタ | 物理的ピン番号 | GPIOピン番号 |
|---|---|---|
| SCL 緑 | 12 | GP9 |
| SDA 黄 | 11 | GP8 |
| Vcc 赤 | 36 | 3.3V |
| GND 黒 | 13 | GND |
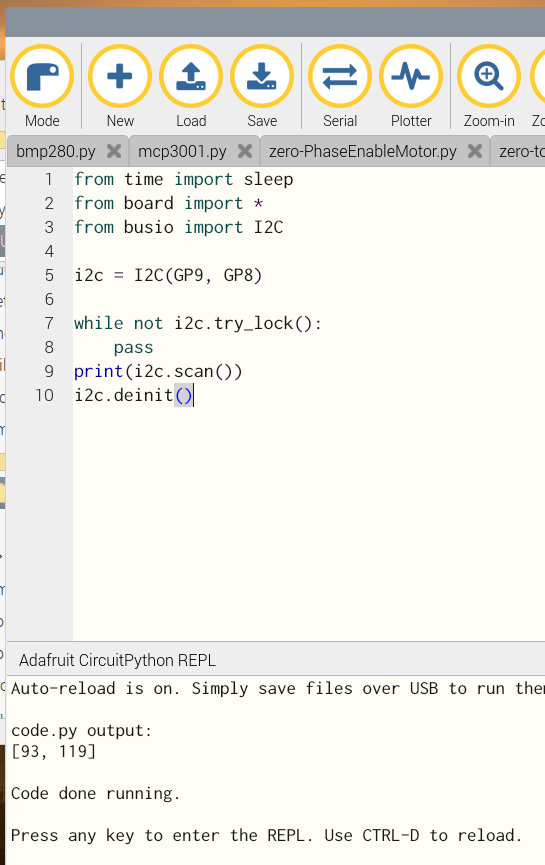
Muで次のプログラムを動かします。i2cのScannerです。

探してきたのは二つのアドレスです。119は16進で0x77なので、BMP280です。93は16進で0x5dで、LPS25HBのスレーブ・アドレスです。
WHO_AM_I
データシートにWHO_AM_I(0x0f)を読み出し、0xbdが読めれば正常に通信できていると書かれているので実行します。

10進の189は16進では0xbdなので、うまく読めていますね。
LPS25HBのドライバとプログラム
ラズパイのlibフォルダにあるadafruit_lps2x.mpyをPicoのlibフォルダへコピーします。また、adafruit_resisterフォルダもコピーします。
ラズパイのexamplesにあるlps2x_simpletest.pyをエディタで読み込みます。
(※)ラズパイのlib、examplesというのは、第2回でAdafruitからダウンロードしたzipファイルを解凍して出てきたフォルダをラズパイの\piへコピーしものです。どちらもPicoのEEPROMの容量が小さすぎてコピーできないので、必要なものだけをコピっています。
第2回のBMP280のプログラムに、必要なものを追加します。
# SPDX-FileCopyrightText: 2021 ladyada for Adafruit Industries
# SPDX-License-Identifier: MIT

import time
import board
import busio
import adafruit_bmp280
import adafruit_lps2x

# Create library object using our Bus I2C port
i2c = busio.I2C(board.GP9, board.GP8)
bmp280 = adafruit_bmp280.Adafruit_BMP280_I2C(i2c)
lps = adafruit_lps2x.LPS25(i2c)

while True:
    print("\nTemperature: {:0.1f} C  {:0.1f} C".format(bmp280.temperature, lps.temperature))
    print("Pressure: {:0.1f} hPa {:0.1f} hPa".format(bmp280.pressure, lps.pressure))
    time.sleep(2)


