この記事について
最近オンライン学習でpython AIによる画像認識について学んできたので、その知識を用いて商品の分類を行ってみようという取り組みです。
まだ私はpython・AIともに初学者なので、ここではまずは2種類の商品の分類を行えるものを作成することが目標です。
その後に、分類の種類を増やしていったり機能的な拡張をしていければと思います。
目次
0.実行環境
1.やったこと
2.画像データの収集
3.データの前処理
4.モデルの定義と学習
5.任意画像の分類
6.今後の展望
0. 実行環境
PC:Windows 10 Home
JupyterLab 3.3.2
Google colab
1. やったこと
商品の例として、ゲームセンターの景品のフィギュア(の箱)を用いました。
手元にあるフィギュアでたくさん画像を撮り、訓練データ・テストデータに分類。
訓練データで学習し、テストデータで精度検証。
作成したモデルを用いて、任意の写真でどの程度の精度で分類できるのか、を確認しました。
2. 画像データの収集
ディープラーニングには大量の学習データが必要です。
今回は手元にあるフィギュアを、PCのwebカメラで撮影することにしました。
こちらのコードをjupyter labで実行して、コマ撮り・PCに保存。商品はターンテーブルに乗っけてくるくる回して360度撮ります。
コード
import cv2
import os
import datetime

def save_frame_camera_key(device_num, dir_path, basename, ext='jpg', delay=1, window_name='frame'):
    cap = cv2.VideoCapture(device_num)

    if not cap.isOpened():
        return

    os.makedirs(dir_path, exist_ok=True)
    base_path = os.path.join(dir_path, basename)

    n = 0
    while True:
        ret, frame = cap.read()
        cv2.imshow(window_name, frame)
        key = cv2.waitKey(delay) & 0xFF
        if key == ord('c'):
            cv2.imwrite('{}_{}.{}'.format(base_path, n, ext), frame)
            n += 1
        elif key == ord('q'):
            break

    cv2.destroyWindow(window_name)

def save_frame_camera_cycle(device_num, dir_path, basename, cycle, ext='jpg', delay=1, window_name='frame'):
    cap = cv2.VideoCapture(device_num)

    if not cap.isOpened():
        return

    os.makedirs(dir_path, exist_ok=True)
    base_path = os.path.join(dir_path, basename)

    n = 0
    while True:
        ret, frame = cap.read()
        cv2.imshow(window_name, frame)
        if cv2.waitKey(delay) & 0xFF == ord('q'):
            break
        if n == cycle:
            n = 0
            cv2.imwrite('{}_{}.{}'.format(base_path, datetime.datetime.now().strftime('%Y%m%d%H%M%S%f'), ext), frame)
        n += 1

    cv2.destroyWindow(window_name)

#save_frame_camera_key(0, 'data/temp', 'camera_capture')
save_frame_camera_cycle(0, 'data/temp', '***', 15) #***は保存するファイルに着ける名前

セーラームーン 月野うさぎ

ヒロアカ トガヒミコ
撮った画像はこんな感じでいろいろな角度から。1種類200枚以上を目安に撮りました。
最初はセーラームーンのキャラ違いでやろうと思ったのですが、髪やパッケージの色が明らかに違うために分類は簡単になってしまうだろうと思い、パッケージの色やデザインの似ているものを選びました。(私はセーラームーンのキャラ違いで未だに名前を間違えますが・・・)
3. データの前処理
Googleドライブのマウント
データの処理からはGoogle Colaboratoryで行っていきます。理由は簡単にGPUを使った学習ができてサクッと進められるから。
Googleドライブに画像をアップしてgoogleドライブをマウント
from google.colab import drive

drive.mount('/content/drive/')
画像データの縮小
今回はMyDriveの下にAI_Appというフォルダを作って、そこを作業ディレクトリとしました。
./temp/に元画像を保存しておいたので、まずはそれらを./sample_images/へコピー。
import cv2
import os, glob
import shutil

caractors = ["usagi", "togahimiko"]
work_DIR = "/content/drive/MyDrive/AI_App/"
os.chdir(work_DIR)

# temp/caractor/下の写真データを
# test_images/caractor/へコピー
for caractor in caractors:

    # テストデータ保存ディレクトリの作成
    os.makedirs("./sample_images/" + caractor, exist_ok=True)

    files = glob.glob('./temp/' + caractor + '/*.jpg')
    print(files)

    for file in files:
        shutil.copy(file, './sample_images/' + caractor)
画像サイズを縮小して学習に時間がかかりすぎないようにします。今回は150x150のサイズ。目視で違いは分かるよね、という感じのサイズ。
訓練データとテストデータに分割
テストデータとして50枚の画像をランダムに抽出して./test_images/へ保存
import os, glob
import random


# 50枚をtest_imagesに移行
os.makedirs("./test_images", exist_ok=True)

for caractor in caractors:
    files = glob.glob(os.path.join(work_DIR, "sample_images/" + caractor + "/resize_*.jpg"))
    random.shuffle(files)
    os.makedirs('./test_images/' + caractor, exist_ok=True)

    for i in range(50):
        shutil.move(str(files[i]), "./test_images/" + caractor)
訓練データの水増し
200枚弱の残った画像で学習を進めていく。ディープラーニングには1種類に何千枚もの画像があった方が精度を担保するには良いのですが、準備にコストがかかるので画像を水増しします。画像の反転・回転・ぼかし、など。
import os
import cv2
import numpy as np

def scratch_image(img, flip=True, blur=True, rotate=True):
    methods = [flip, blur, rotate]
        # filp は画像上下反転
        # blur はぼかし
        # rotate は画像回転

    # 画像のサイズ(x, y)
    size = np.array([img.shape[1], img.shape[0]])
    # 画像の中心位置(x, y)
    center = tuple([int(size[0]/2), int(size[1]/2)])
    # 回転させる角度
    angle = 30
    # 拡大倍率
    scale = 1.0

    mat = cv2.getRotationMatrix2D(center, angle, scale)

    # 画像処理をする手法をNumpy配列に格納
    scratch = np.array([
        lambda x: cv2.flip(x, 0),                               # flip
        lambda x: cv2.GaussianBlur(x, (15, 15), 0),             # blur
        lambda x: cv2.warpAffine(x, mat, img.shape[::-1][1:3])  # rotate
    ])

    # imagesにオリジナルの画像を配列として格納
    images = [img]

    # 関数と画像を引数に、加工した画像を元と合わせて水増しする関数
    def doubling_images(func, images):
        return images + [func(i) for i in images]

    for func in scratch[methods]:
        images = doubling_images(func, images)

    return images

for caractor in caractors:
    files = glob.glob(os.path.join(work_DIR, "sample_images/" + caractor + "/resize_*.jpg"))
    print(files[0])

    for index, file in enumerate(files):

        caractor_image = cv2.imread(file)
        data_aug_list = scratch_image(caractor_image)

        # 拡張した画像を出力するディレクトリを作成
        os.makedirs("train_images/{}".format(caractor), exist_ok=True)
        output_dir = "train_images/{}".format(caractor)

        # 保存
        for j, img in enumerate(data_aug_list):
            cv2.imwrite("{}/{}_{}.jpg".format(output_dir, str(index).zfill(3), str(j).zfill(2)), img)
4. モデルの定義と学習
ここではVGG16を使った転移学習を行っていきます。
事前準備
まずは事前に準備した訓練データとテストデータを格納・変換。
正解ラベルはOne-hotベクトルで表現。
import os, glob
import random
import cv2
import numpy as np
import matplotlib.pyplot as plt
from tensorflow.keras.utils import to_categorical
from tensorflow.keras import Input, Sequential, Model
from tensorflow.keras.models import load_model, save_model
from tensorflow.keras.layers import Dense, Conv2D, Flatten, Dropout, MaxPooling2D
from tensorflow.keras.preprocessing.image import ImageDataGenerator, img_to_array, load_img
from tensorflow.keras.applications.vgg16 import VGG16
from tensorflow.keras.optimizers import SGD, Adam
from keras.callbacks import ModelCheckpoint, EarlyStopping

caractors = ["usagi", "togahimiko"]
work_DIR = "/content/drive/MyDrive/AI_App/"
os.chdir(work_DIR)

num_classes = len(caractors)
image_size = 150

IMAGE_DIR_TRAIN = "train_images"
IMAGE_DIR_TEST = "test_images"

# 訓練データとテストデータをわける
X_train = []
X_test  = []
y_train = []
y_test  = []

# 訓練データをリストに代入
for index, caractor in enumerate(caractors):
    files = glob.glob(os.path.join(IMAGE_DIR_TRAIN, caractor + "/*.jpg"))
    for file in files:
        image = load_img(file)
        image = image.resize((image_size, image_size))
        image = img_to_array(image)
        X_train.append(image)
        y_train.append(index)

# テストデータをリストに代入
for index, caractor in enumerate(caractors):
    files = glob.glob(os.path.join(IMAGE_DIR_TEST, caractor + "/*.jpg"))
    for file in files:
        image = load_img(file)
        image = image.resize((image_size, image_size))
        image = img_to_array(image)
        X_test.append(image)
        y_test.append(index)

# テストデータと訓練データをシャッフル
p = list(zip(X_train, y_train))
random.shuffle(p)
X_train, y_train = zip(*p)

q = list(zip(X_test, y_test))
random.shuffle(q)
X_test, y_test = zip(*q)

# Numpy配列に変換
X_train = np.array(X_train)
X_test = np.array(X_test)
y_train = np.array(y_train)
y_test = np.array(y_test)

# データの正規化
X_train = X_train / 255.0
X_test = X_test / 255.0

# One-hot表現
y_train = to_categorical(y_train, num_classes)
y_test = to_categorical(y_test, num_classes)
モデルの定義
転移学習なので、VGG16に全結合層とドロップアウト、出力層の結合。
# VGG16のインスタンスの生成
input_tensor = Input(shape=(150, 150, 3))
vgg16 = VGG16(include_top=False, weights="imagenet", input_tensor=input_tensor)

# モデルの生成
top_model = Sequential()
top_model.add(Flatten(input_shape=vgg16.output_shape[1:]))
top_model.add(Dense(256, activation="relu"))
top_model.add(Dropout(0.5))
top_model.add(Dense(128, activation="relu"))
top_model.add(Dropout(0.5))
top_model.add(Dense(num_classes, activation="softmax"))

# モデルの結合
model = Model(inputs=vgg16.input, outputs=top_model(vgg16.output))

# model.summary()

# 15層目までのパラメータを固定
for layer in model.layers[:15]:
    layer.trainable = False


# モデルのコンパイル
optimizer = SGD(learning_rate=1e-4, momentum=0.9)
model.compile(optimizer=optimizer, loss="categorical_crossentropy", metrics=["accuracy"])


# モデルの学習
batch_size = 32
epochs = 30

# EaelyStoppingの設定
early_stopping =  EarlyStopping(
                            monitor='val_loss',
                            min_delta=0.0,
                            patience=3,
)
history = model.fit(X_train,
                    y_train,
                    batch_size=batch_size,
                    epochs=epochs,
                    verbose=1,
                    validation_data=(X_test, y_test),
                    callbacks=[early_stopping]
)

scores = model.evaluate(X_test, y_test, verbose=1)
学習
history = model.fit(X_train,
                    y_train,
                    batch_size=batch_size,
                    epochs=epochs,
                    verbose=1,
                    validation_data=(X_test, y_test),
                    callbacks=[early_stopping]
)

scores = model.evaluate(X_test, y_test, verbose=1)

# モデルの保存
model.save("./model.h5")
学習結果の確認
さて結果は・・・
# 可視化
fig = plt.figure(figsize=(15,5))
plt.subplots_adjust(wspace=0.4, hspace=0.6)

ax1 = fig.add_subplot(1, 2, 1)
ax1.plot(history.history["accuracy"], c="b", label="acc")
ax1.plot(history.history["val_accuracy"], c="r", label="val_acc")
ax1.set_xlabel("epochs")
ax1.set_ylabel("accuracy")
plt.legend(loc="best")

ax2 = fig.add_subplot(1, 2, 2)
ax2.plot(history.history["loss"], c="b", label="loss")
ax2.plot(history.history["val_loss"], c="r", label="val_loss")
ax2.set_xlabel("epochs")
ax2.set_ylabel("loss")
plt.legend(loc="best")

fig.show()
結果はこちら。
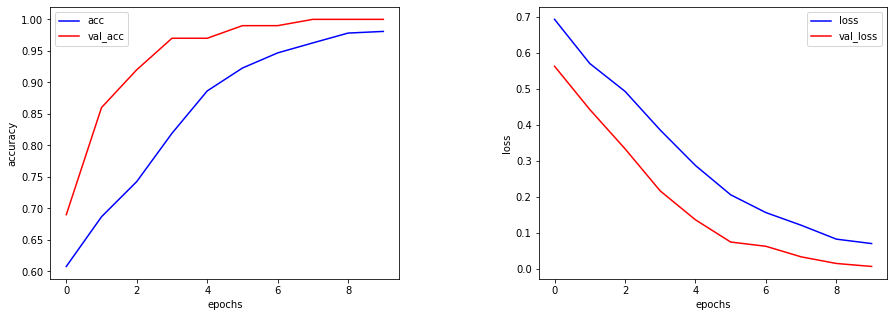
ターンテーブルで回した似たような画像ばかりなので、精度は高いですね。
5. 任意画像の分類
ではスマホで適当に撮った画像の分類はどの程度できるのか、試してみました。
精度が高くなりそうな、プレーンな背景とガチャガチャした背景の2通りで試してみます。
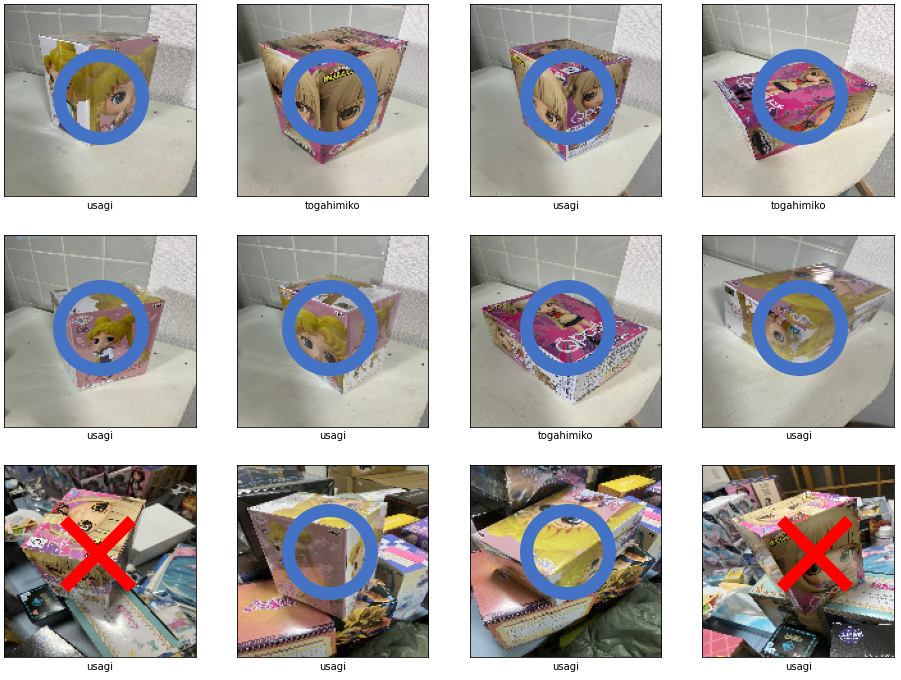
プレーンな背景では8/8正解ですが、ガチャガチャした背景では2/4正解。間違った答えが微妙な判定をしているかというとそうでもなかったので、背景の特徴量に強く影響を受けているのかと思われます。
6. 今後の展望
今回は、最も基本的な2種類の分類を行ってきました。
今後は種類を増やして行ったときに、精度がどの程度担保できるのか。輪郭から図形抽出ということもできるようなので、それができれば背景の影響を受けない精度の高い分類ができそうです。
その後は、動画からリアルタイムで分類を行えるようにするのが次のステップ。そして商品が何個も写った画像からどの商品がどこに何個あるのか、を行えるようになるまで出来るといいなあと思っています。
こんなのとっくにそこらで使われていてもおかしくないと思うのですが、2022/08/08の記事ですし、導入事例を実際に目にしたことはないので、アイデア次第でAI活用はまだまだいろいろなことができそうですね。