概要
SUMO(Simulation of Urban MObility)はドイツ航空宇宙センター(DLR)が開発しているオープンソースの交通流シミュレータで,高度交通システム(ITS)の研究でもよく使われています.道路上に信号等を設置し,一定の法規に従った交通流を再現できます.
本稿では,交通流シミュレータSUMOを初めて触る人に向けて,Windowsにインストールする方法を説明します.
環境
- Windows10 Home/Pro 64bit
- SUMO version 1.1.0
インストール
- 公式ページのDownloads部分の "SUMO x.x.x for Windows" を選択し,インストーラをダウンロードする
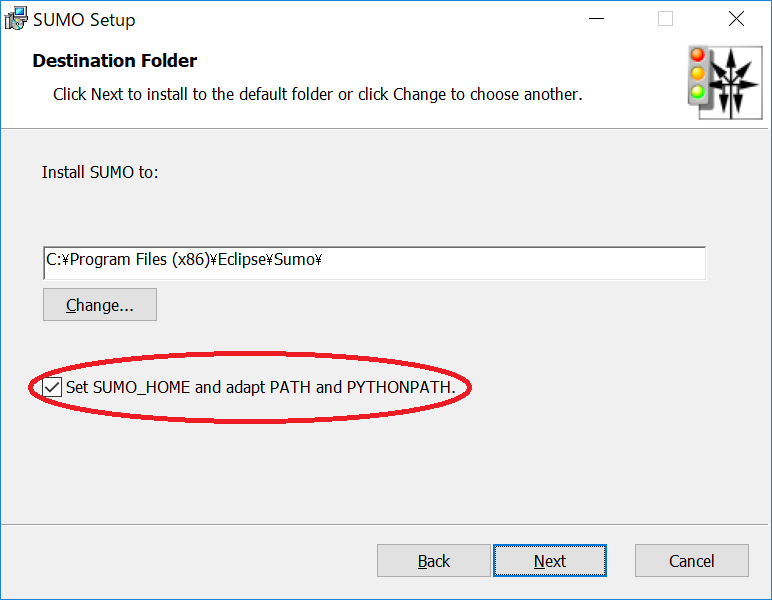
- インストーラを実行する
※このとき,Set SUMO_HOME and adapt PATH... にチェックを入れ,PATHを通すのに注意する.

インストールが終了したら,コマンドプロンプトを立ち上げ,インストールが成功しPATHが通っていることを確認する.
$sumo
バージョンが表示されればOK

$netconvert
バージョンが表示されればOK
また,GUI版のSUMOは,下記コマンドもしくは "インストールフォルダ\eclipse\Sumo\bin" の中にある sumo-gui.exeを実行すれば起動します.
$sumo-gui
デモシミュレーションを実行してみる
"インストールフォルダ\eclipse\Sumo\doc\tutorial\quickstart\data" の中にある quickstart.sumocfgをクリックし,GUI版SUMOを起動します.
ツールバーでよく使用するボタンは以下の2つ
- Delay (ms): シミュレーションの再生速度.1000にすると1倍速.今回は50msくらいにしときます.
- 再生ボタン: 右からシミュレーション開始・停止・ステップ実行のボタンになります.
実行ボタンを押すと,黄色い矢印で表された車両が仮想の道路上を走行するのが観察できると思います.
関連記事
-
交通流シミュレータ SUMO でグリッド地図を生成し,GUIで読み込む
: 交通流シミュレータでグリッドなどモデルにもとづいた地図の生成方法を解説 -
交通流シミュレータ SUMO で日本国内のOpenStreetMap地図を読み込む際の設定と注意点
: 交通流シミュレータでOpenStreetMapの実際の地図を読み込んで利用する方法と注意点を解説 -
東名高速 大和トンネルの渋滞を再現する【交通流シミュレータSUMO】
: 【SUMO応用編】交通流シミュレータで非ランダムなデマンド(トリップ)を発生させ,渋滞のシミュレーションを行う方法を紹介

