WithによるEAGERローディング
BoardControllerクラスのindexを修正する。
public function index(Request $request)
{
    $items = Board::with('person')->get();
    return view('board.index', ['items' => $items]);
}
index.blade.phpの@section('content')を修正する。
@section('content')
    <table>
        <tr><th>Message</th><th>Name</th></tr>
        @foreach ($items as $item)
            <tr>
                <td>{{$item->message}}</td>
                <td>{{$item->person['name']}}</td>
            </tr>
        @endforeach
    </table>
@endsection
画像のように表示されればOK
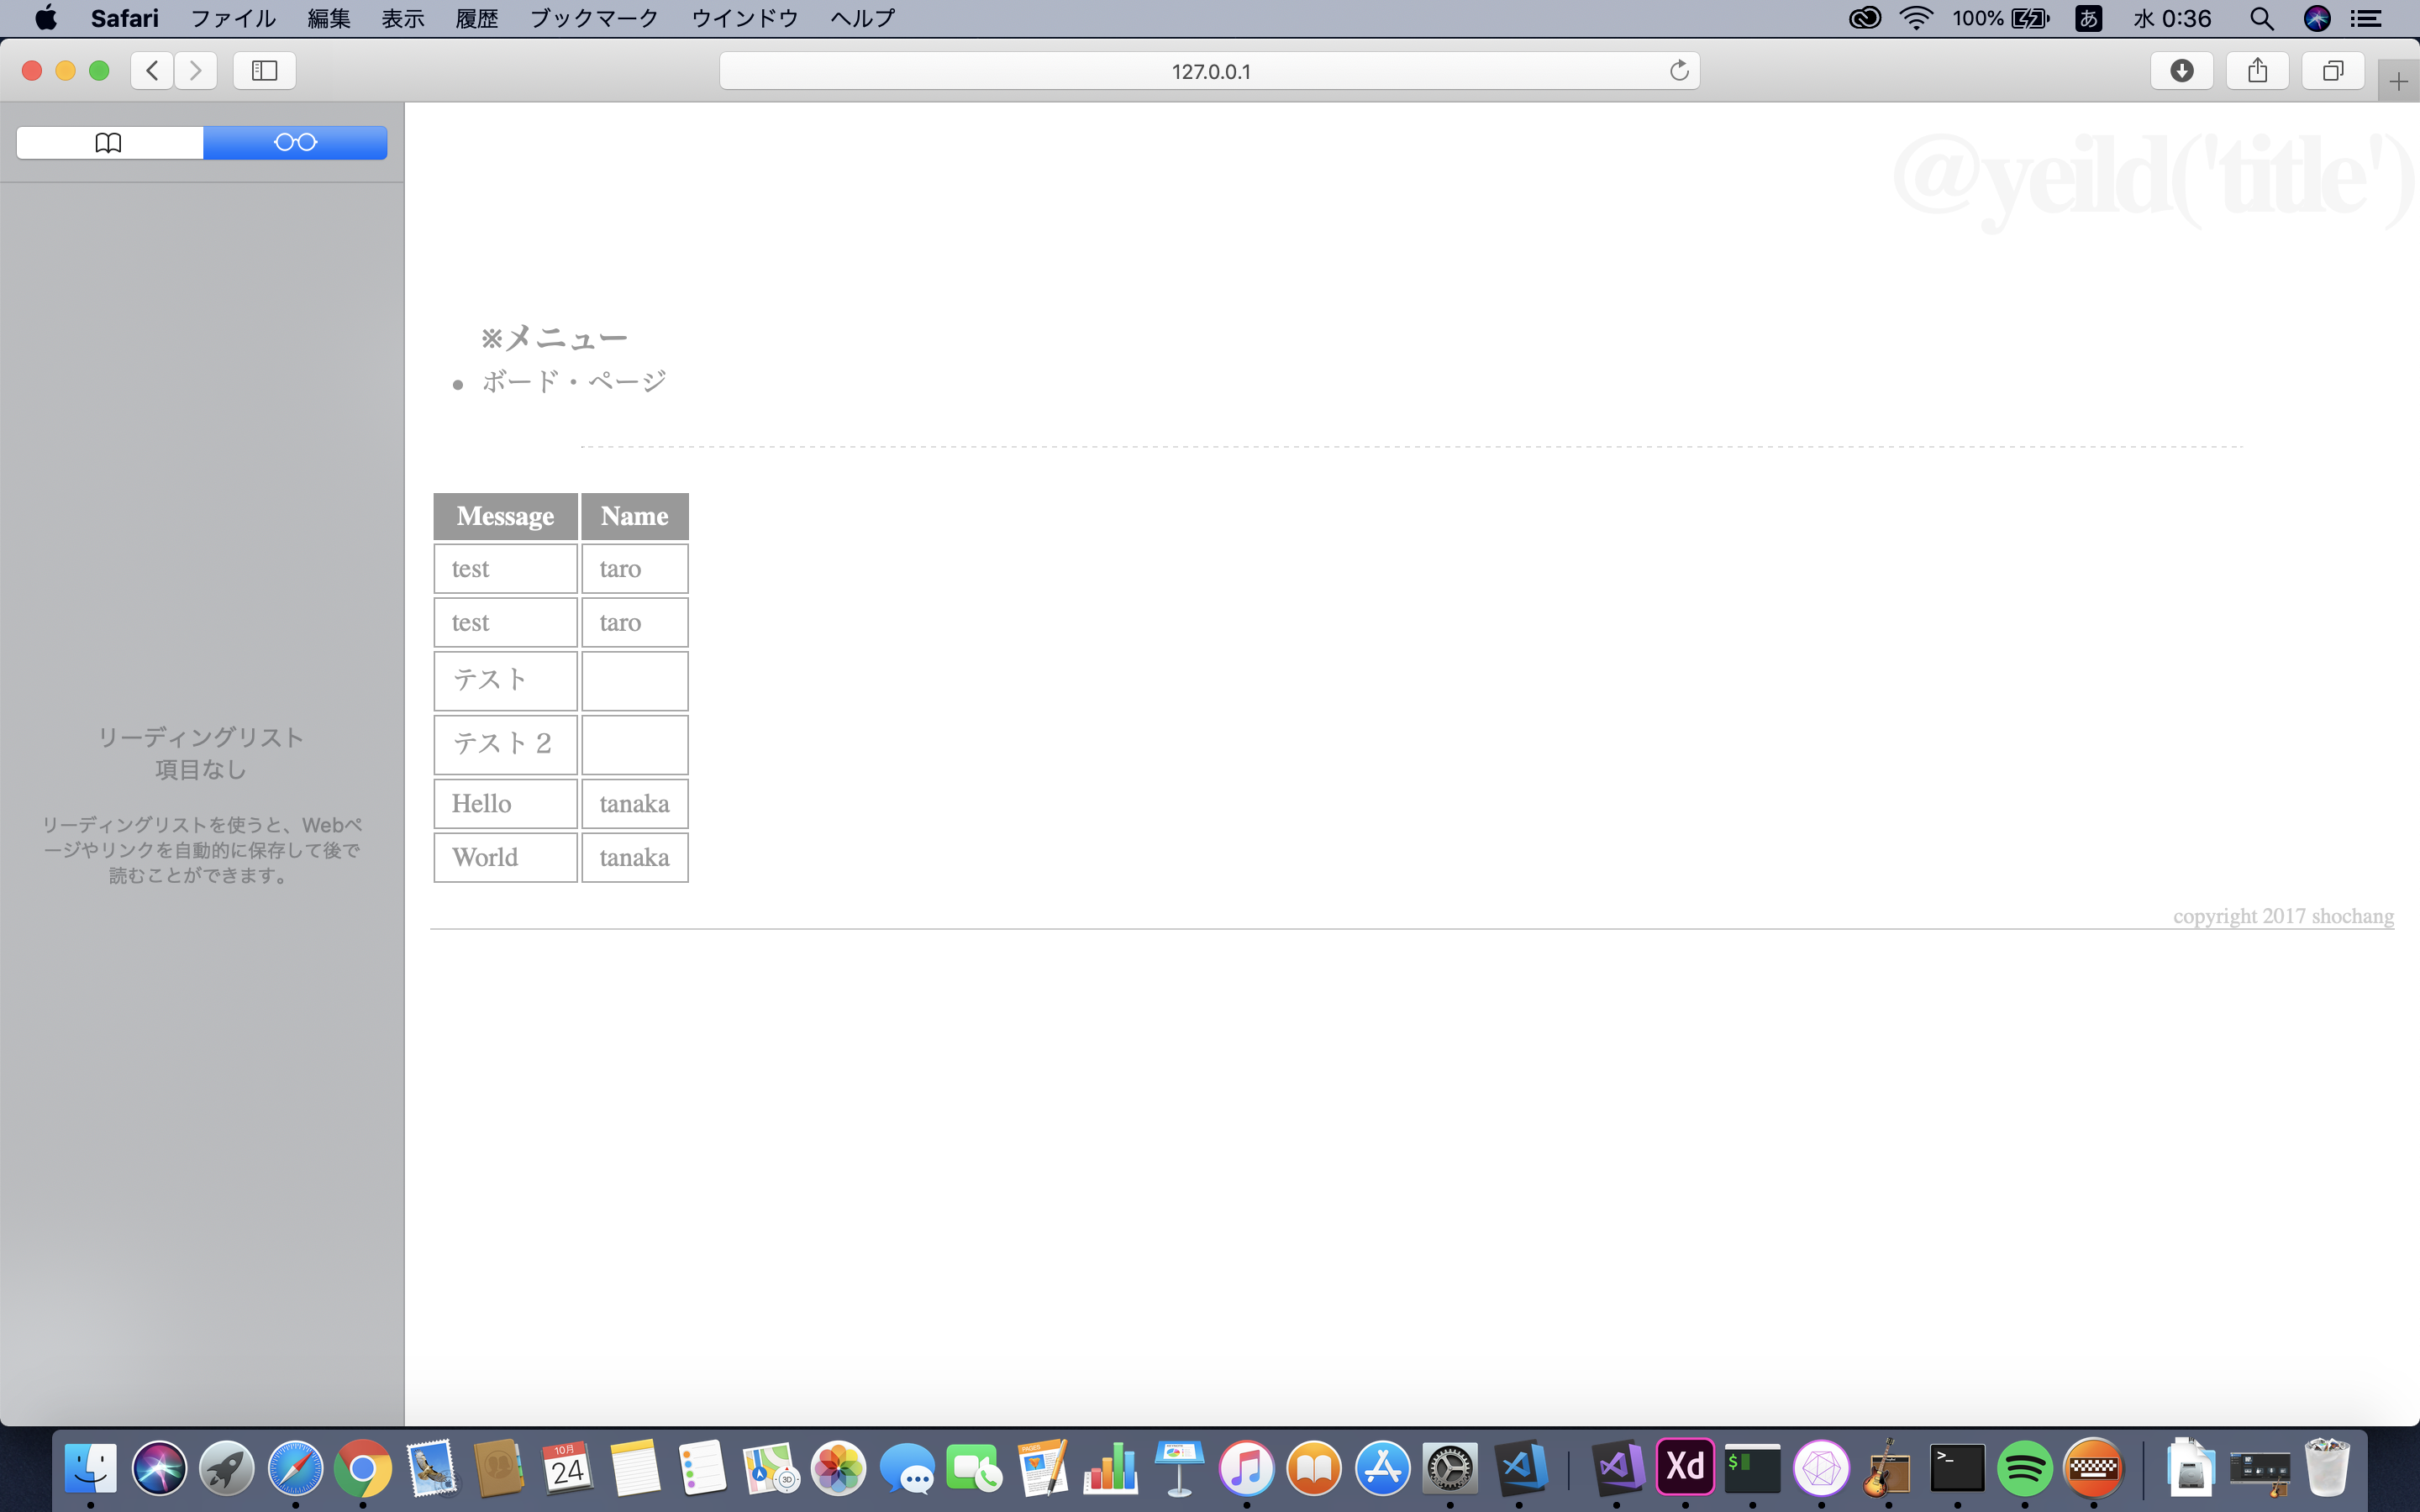
BoardController.phpで記載したwithを使ったやり方を「Eagerローディング」と呼ぶ。
データベースへのアクセス回数を減らすことができる。
RESTfulサービスを開発してみる
マイグレーションファイルを作成する。
php artisan make:migration create_restdata_table
出力されたマイグレーションファイルに追記する。
<?php

use Illuminate\Support\Facades\Schema;
use Illuminate\Database\Schema\Blueprint;
use Illuminate\Database\Migrations\Migration;

class CreateRestdataTable extends Migration
{
    /**
     * Run the migrations.
     *
     * @return void
     */
    public function up()
    {
        Schema::create('restdata', function (Blueprint $table) {
            $table->increments('id');
            $table->string('message');
            $table->string('url');
            $table->timestamps();
        });
    }

    /**
     * Reverse the migrations.
     *
     * @return void
     */
    public function down()
    {
        Schema::dropIfExists('restdata');
    }
}
マイグレーションを実行する。
php artisan migrate
モデルを作成する。
php artisan make:model Restdata
作成されたRestdata.phpに追記していく。
<?php

namespace App;

use Illuminate\Database\Eloquent\Model;

class Restdata extends Model
{
    protected $table = 'restdata';
    protected $guarded = array('id');

    public static $rules = array(
        'message' => 'required',
        'url' => 'required'
    );

    public function getData()
    {
        return $this->id . ':' > $this->message . '(' . $this->url . ')';
    }
}
シードを作成する。
php artisan make:seeder RestdataTableSeeder
作成されたシーダーファイルに追記する。
<?php

use Illuminate\Database\Seeder;
use App\Restdata;

class RestdataTableSeeder extends Seeder
{
    /**
     * Run the database seeds.
     *
     * @return void
     */
    public function run()
    {
        $param = [
            'message' => 'Google Japan',
            'url' => 'http://www.google.co.jp',
        ];
        $restdata = new RestData;
        $restdata->fill($param)->save();
        $param = [
            'message' => 'Yahoo Japan',
            'url' => 'http://www.yahoo.co.jp',
        ];
        $restdata = new RestData;
        $restdata->fill($param)->save();
        $param = [
            'message' => 'MSN Japan',
            'url' => 'http://www.msn.com/ja-jp',
        ];
        $restdata = new RestData;
        $restdata->fill($param)->save();
    }
}
DatabaseSeederに追記する。
<?php

use Illuminate\Database\Seeder;


class DatabaseSeeder extends Seeder
{
    /**
     * Seed the application's database.
     *
     * @return void
     */
    public function run()
    {
        $this->call(RestdataTableSeeder::class);
    }
}
シードを実行する。
php artisan db:seed
続いてコントローラを作成する。
php artisan make:controller RestappController --resource
--resourceというオプションを追記することで、リソース(CRUD関係の機能一式をセットして登録する)として
コントローラにメソッド類を追記する。
<?php

namespace App\Http\Controllers;

use Illuminate\Http\Request;

class RestappController extends Controller
{
    /**
     * Display a listing of the resource.
     *
     * @return \Illuminate\Http\Response
     */
    public function index()
    {
        //
    }

    /**
     * Show the form for creating a new resource.
     *
     * @return \Illuminate\Http\Response
     */
    public function create()
    {
        //
    }

    /**
     * Store a newly created resource in storage.
     *
     * @param  \Illuminate\Http\Request  $request
     * @return \Illuminate\Http\Response
     */
    public function store(Request $request)
    {
        //
    }

    /**
     * Display the specified resource.
     *
     * @param  int  $id
     * @return \Illuminate\Http\Response
     */
    public function show($id)
    {
        //
    }

    /**
     * Show the form for editing the specified resource.
     *
     * @param  int  $id
     * @return \Illuminate\Http\Response
     */
    public function edit($id)
    {
        //
    }

    /**
     * Update the specified resource in storage.
     *
     * @param  \Illuminate\Http\Request  $request
     * @param  int  $id
     * @return \Illuminate\Http\Response
     */
    public function update(Request $request, $id)
    {
        //
    }

    /**
     * Remove the specified resource from storage.
     *
     * @param  int  $id
     * @return \Illuminate\Http\Response
     */
    public function destroy($id)
    {
        //
    }
}
ルート情報を追記する。
Route::resource('rest', 'RestappController');
/rest下にCRUD関係のアクセスがまとめて登録される。
コントローラにindexとshowメソッドを用意する。
use App\Restdata;

public function index()
{
    $items = Restdata::all();
    return $items->toArray();
}

public function show($id)
{
    $item = Restdata::find($id);
    return $item->toArray();
}
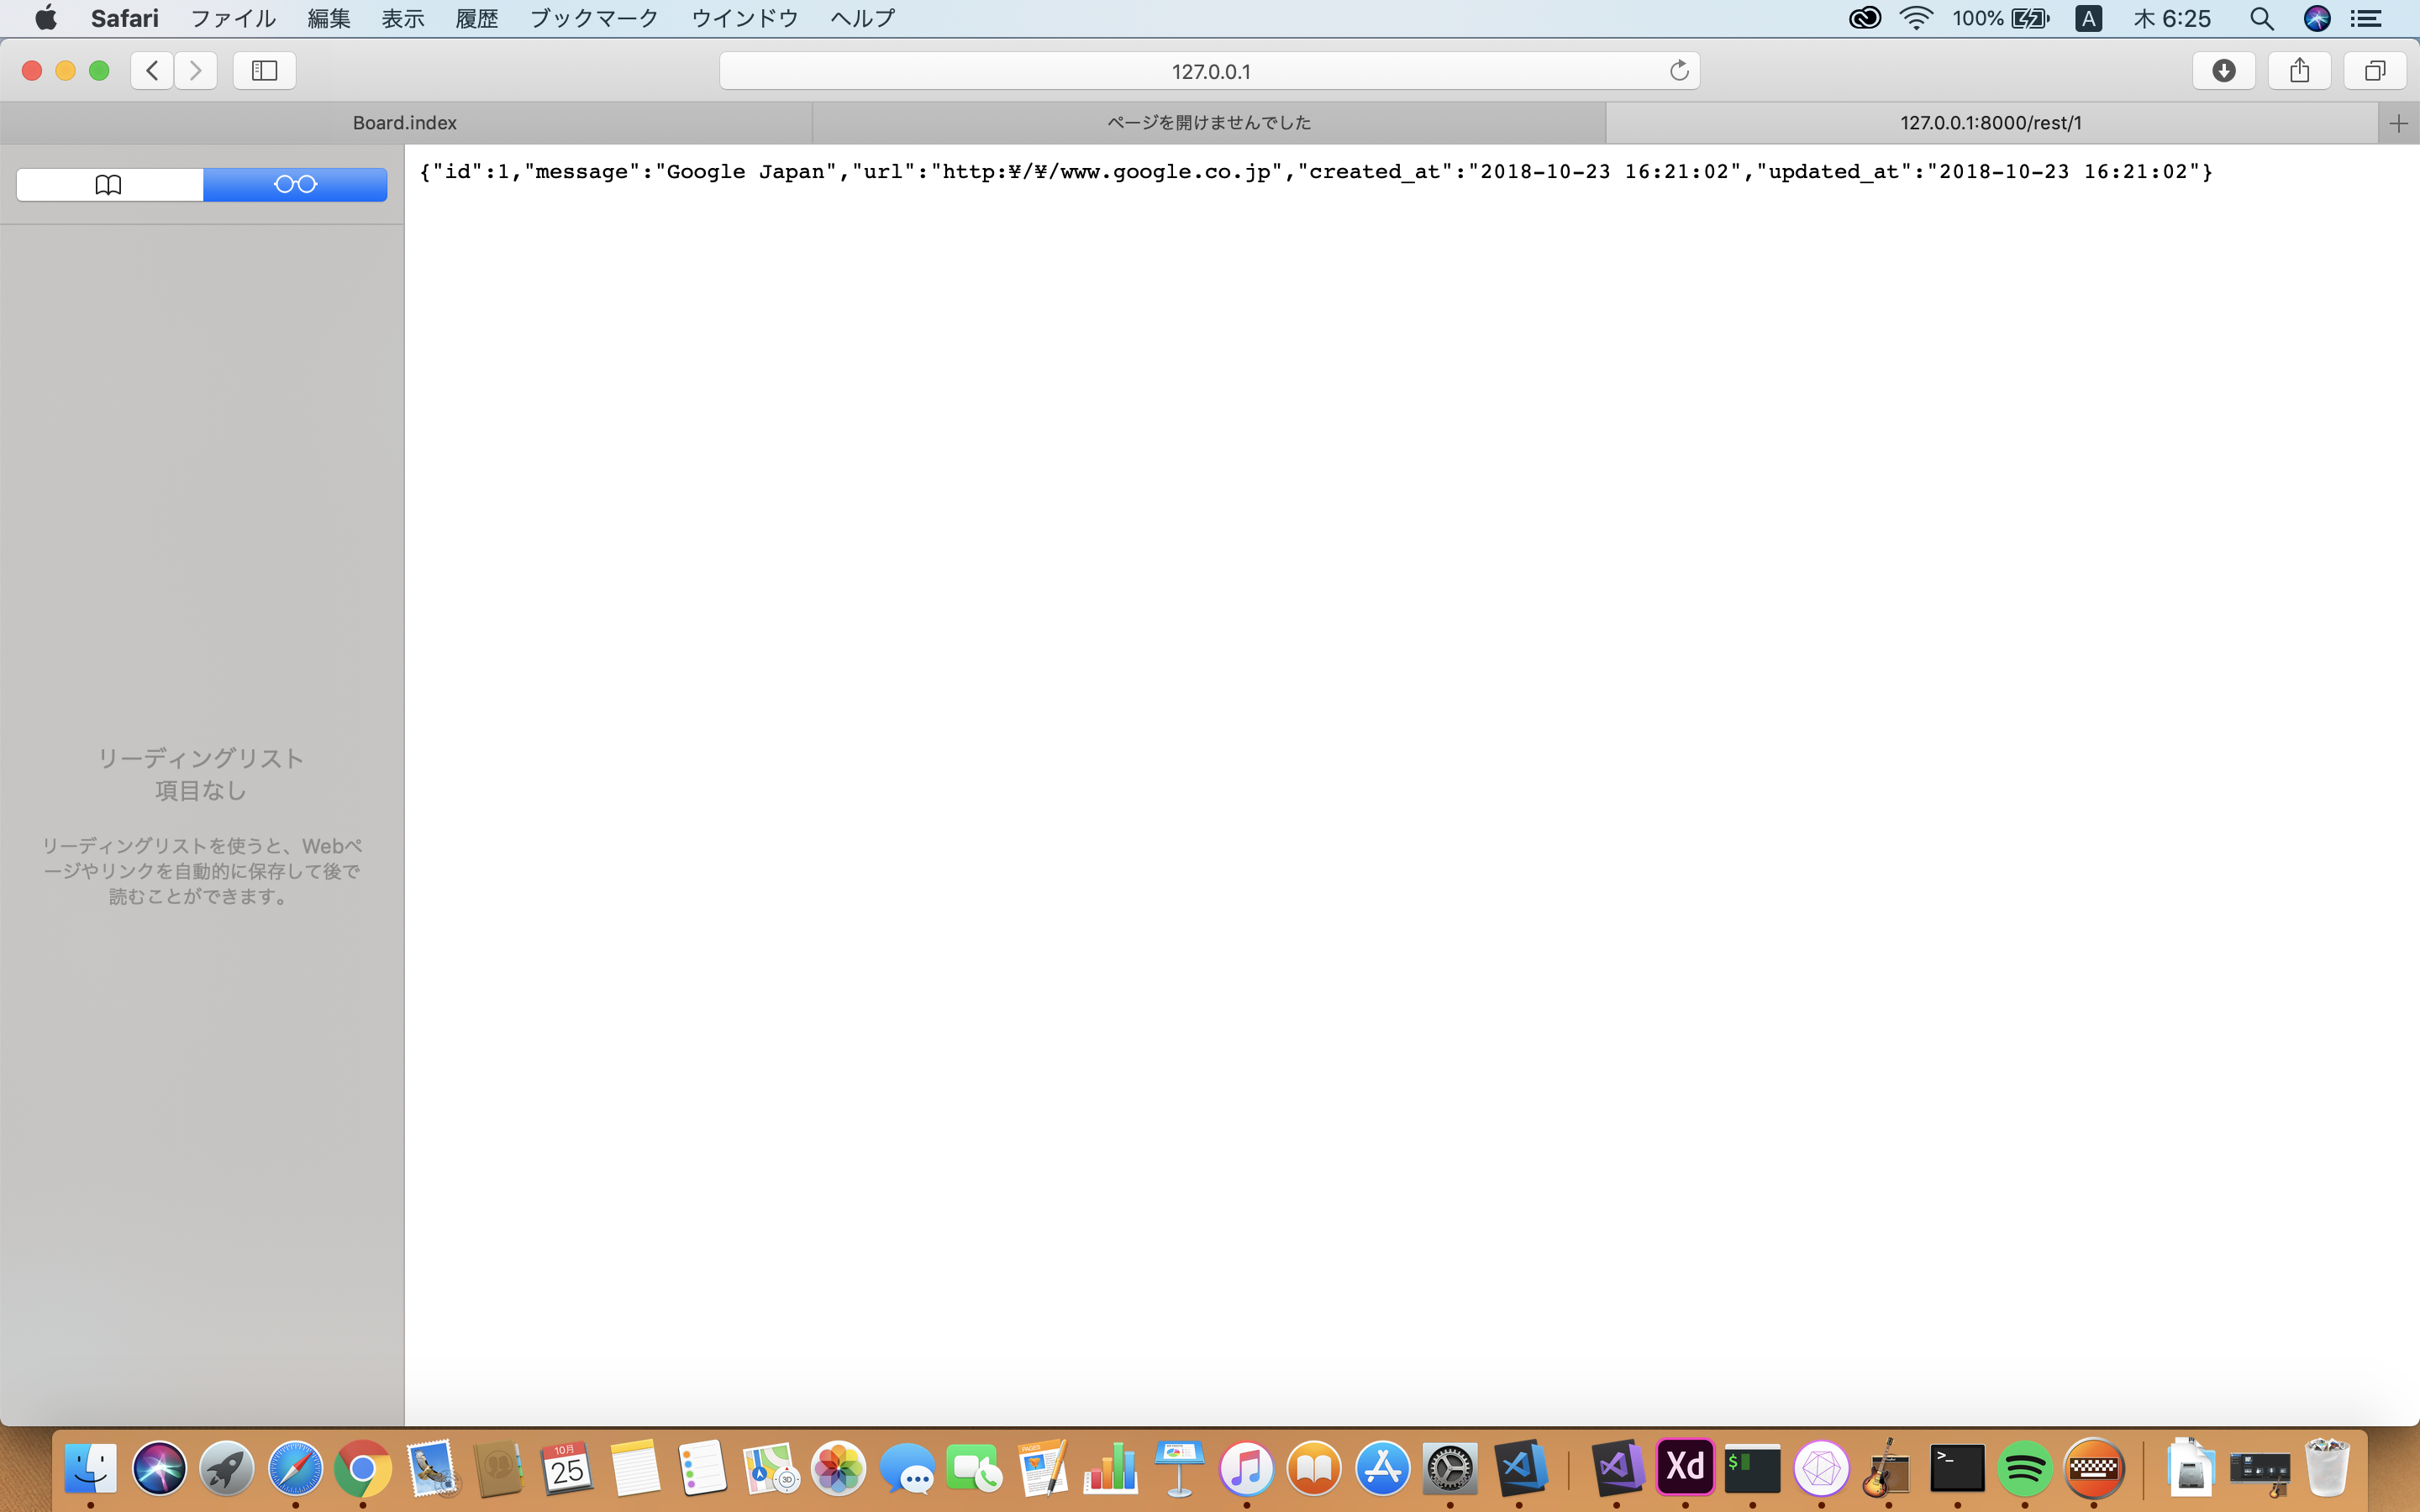
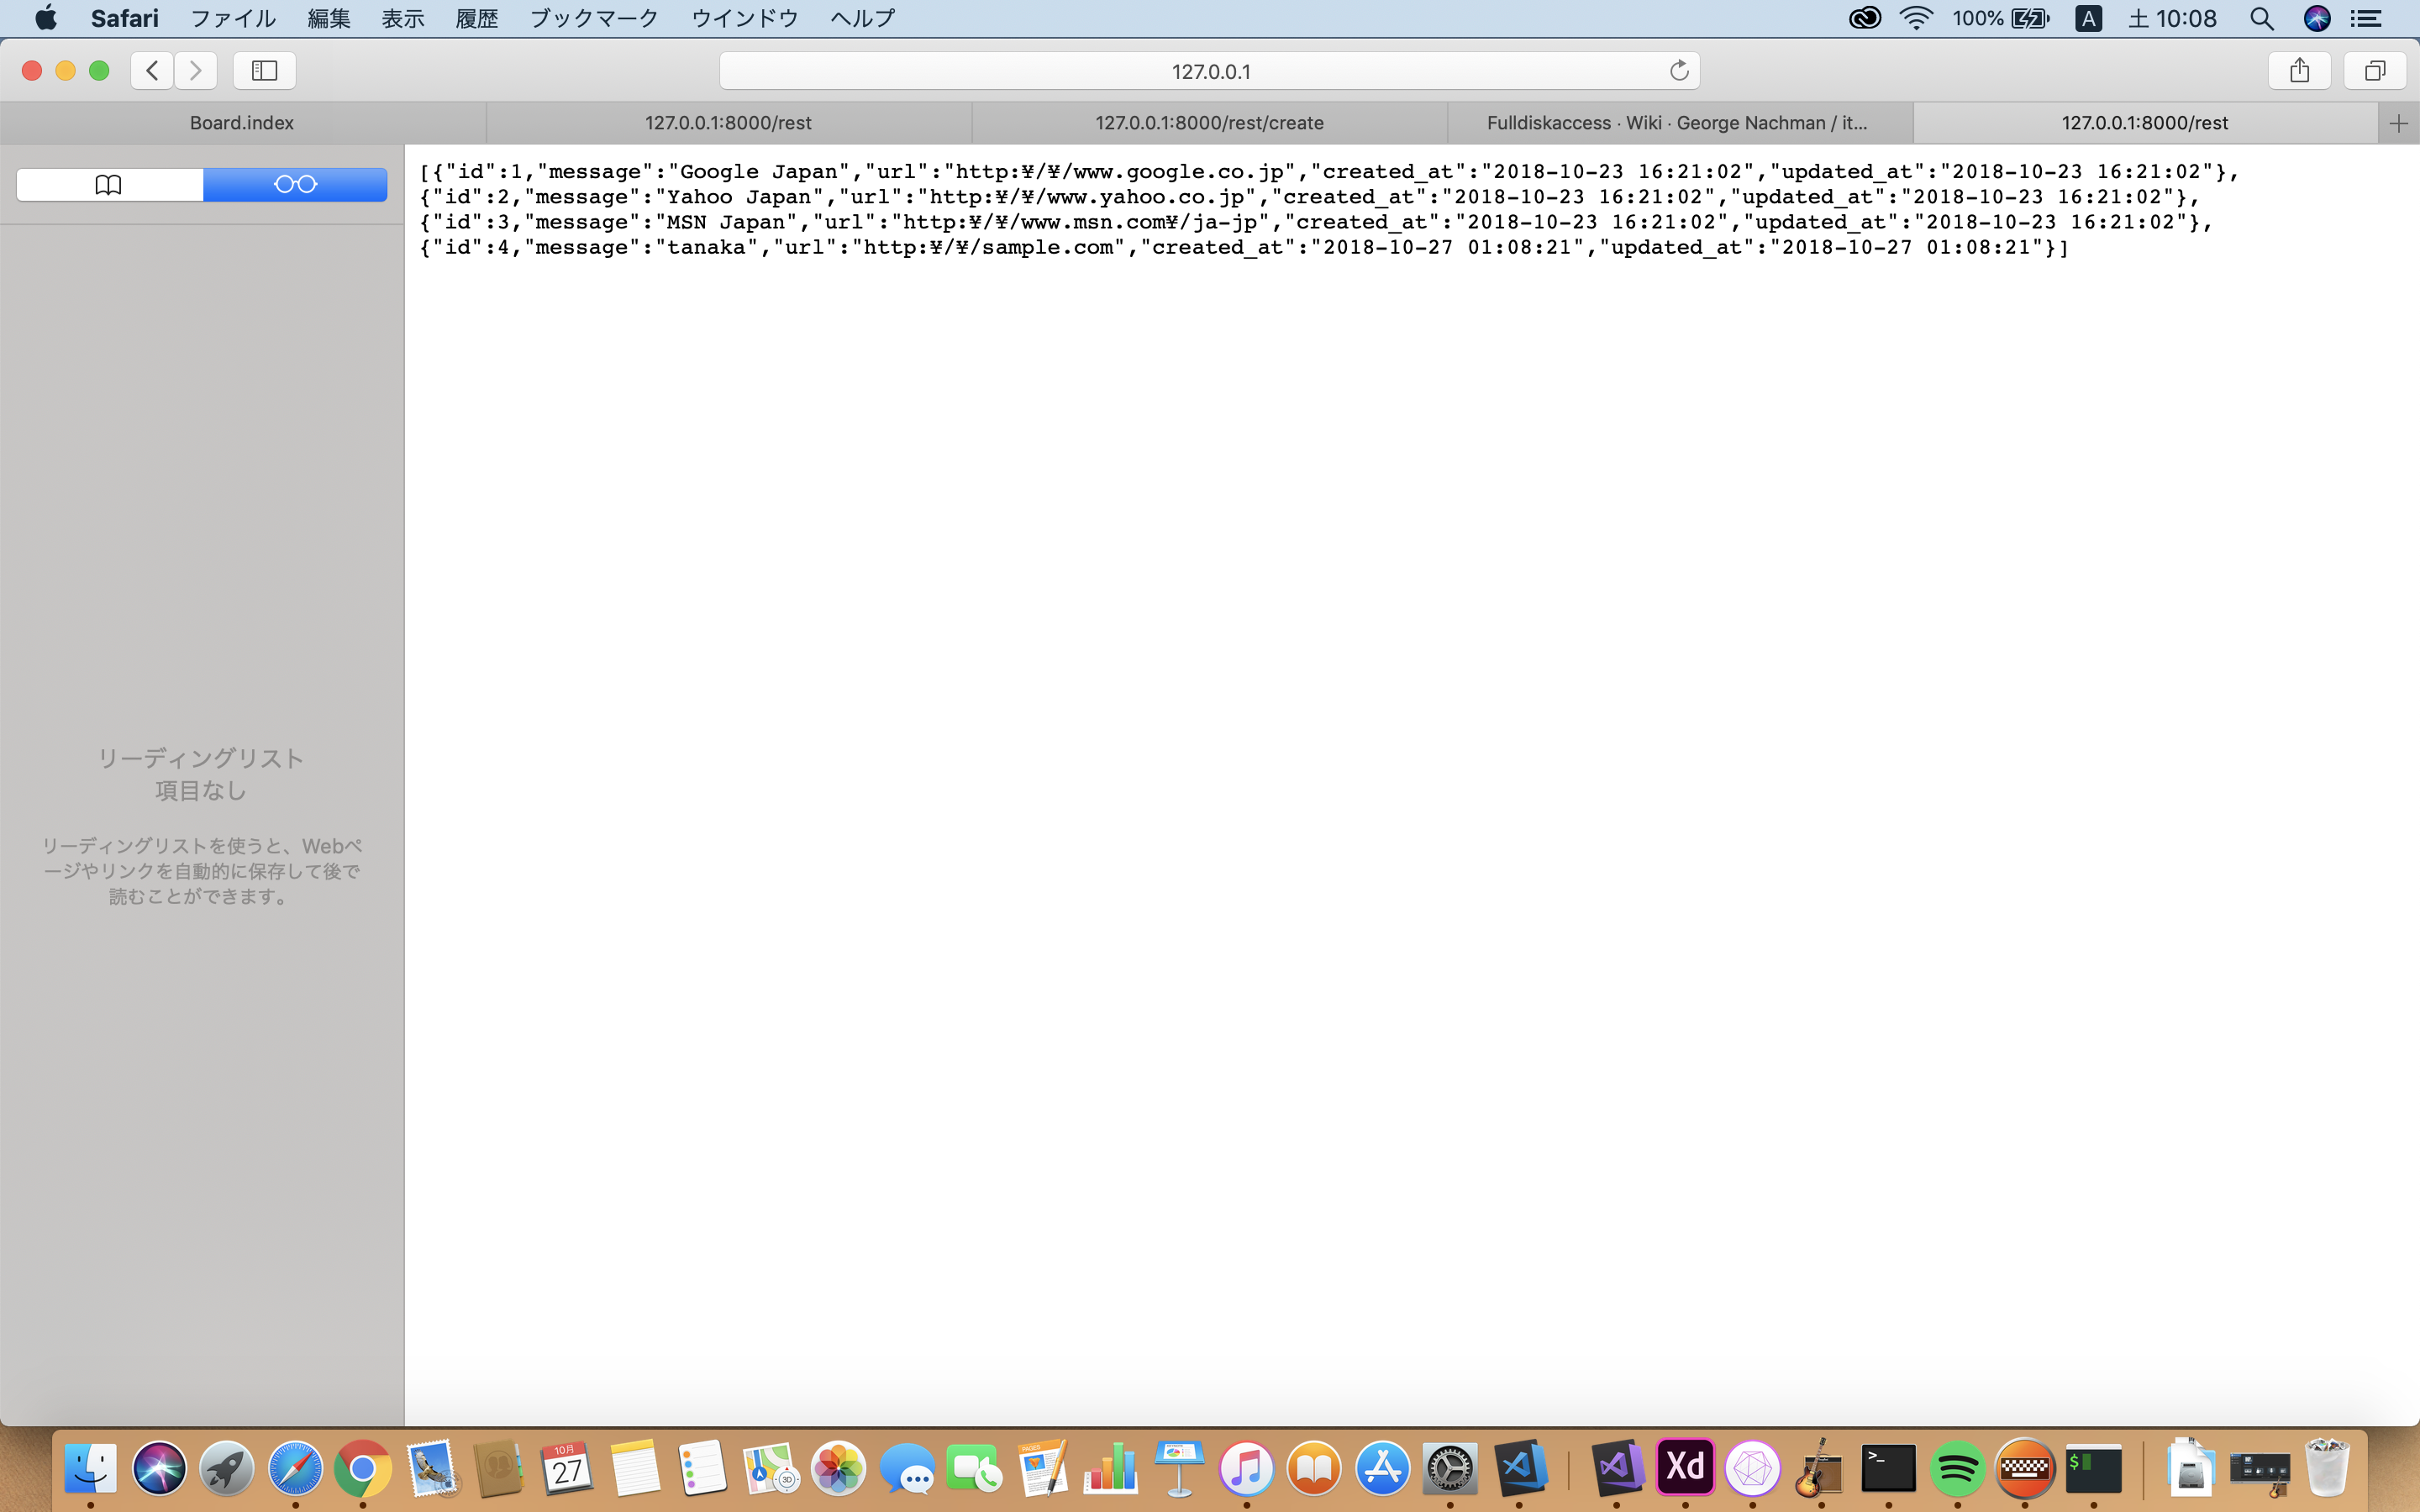
/restにアクセスするとJSON形式で出力される。
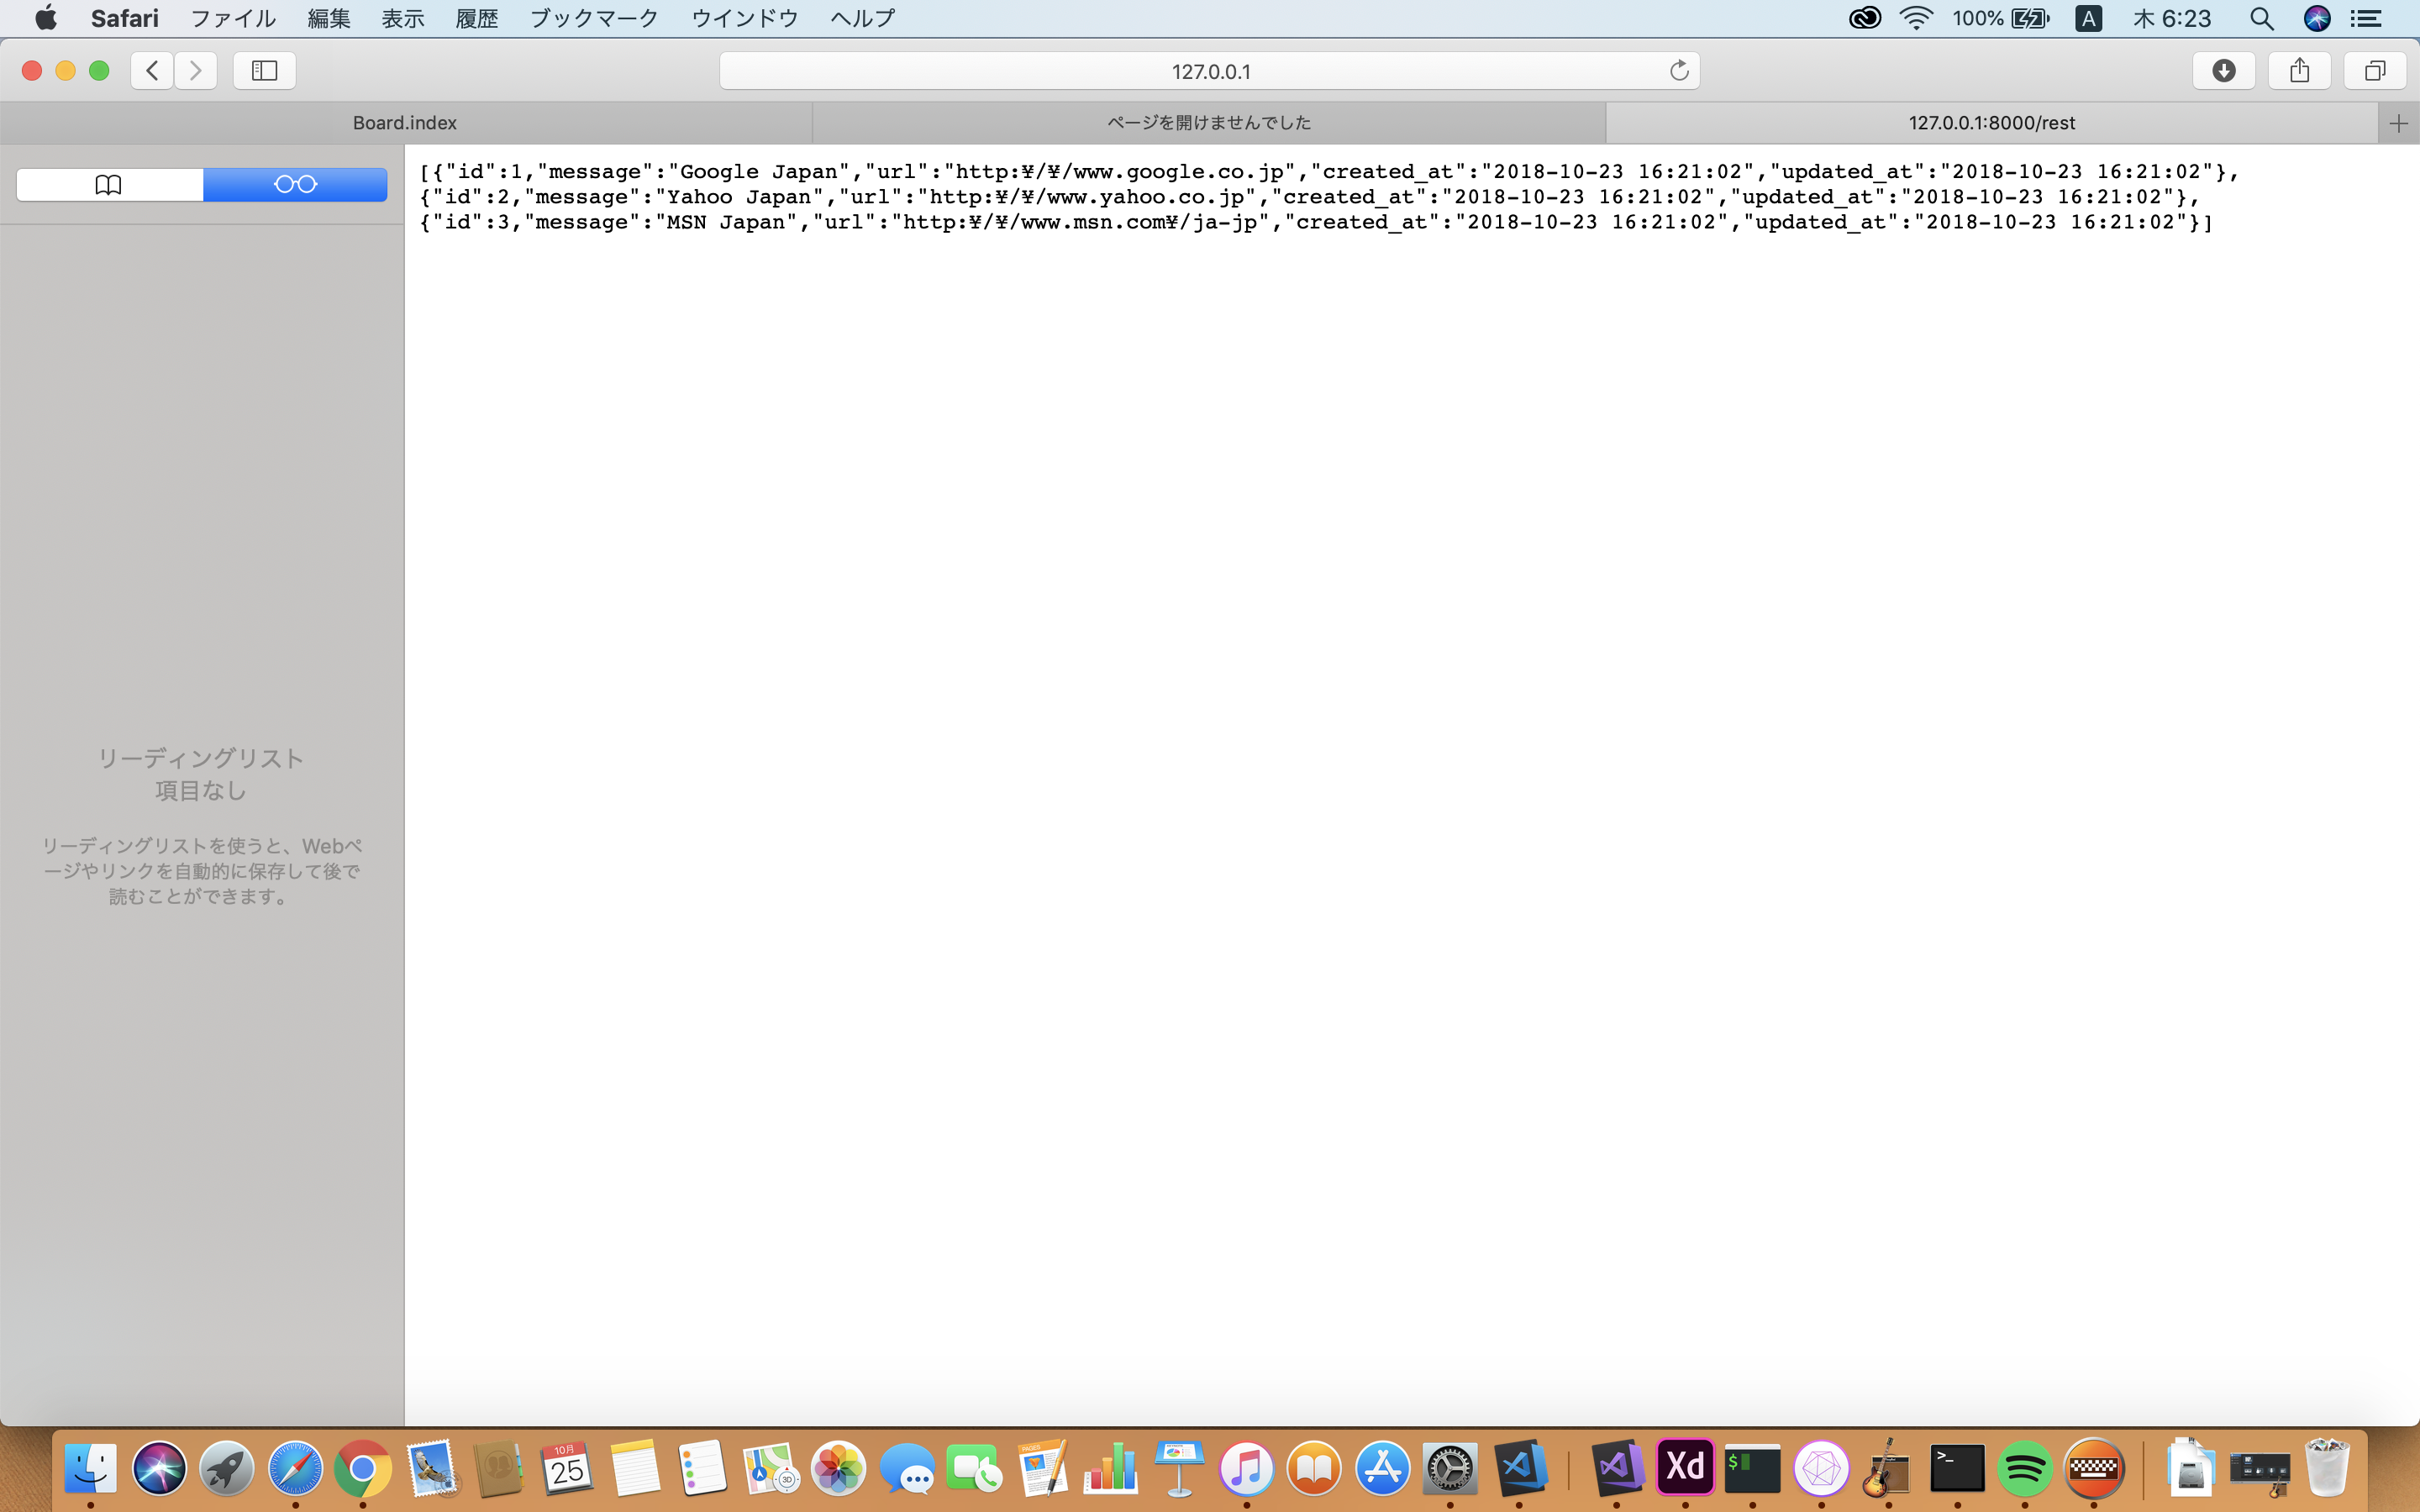
また、/rest/1のようにアクセスするとid=1のレコードが表示される。
レコードを追加できるようにする
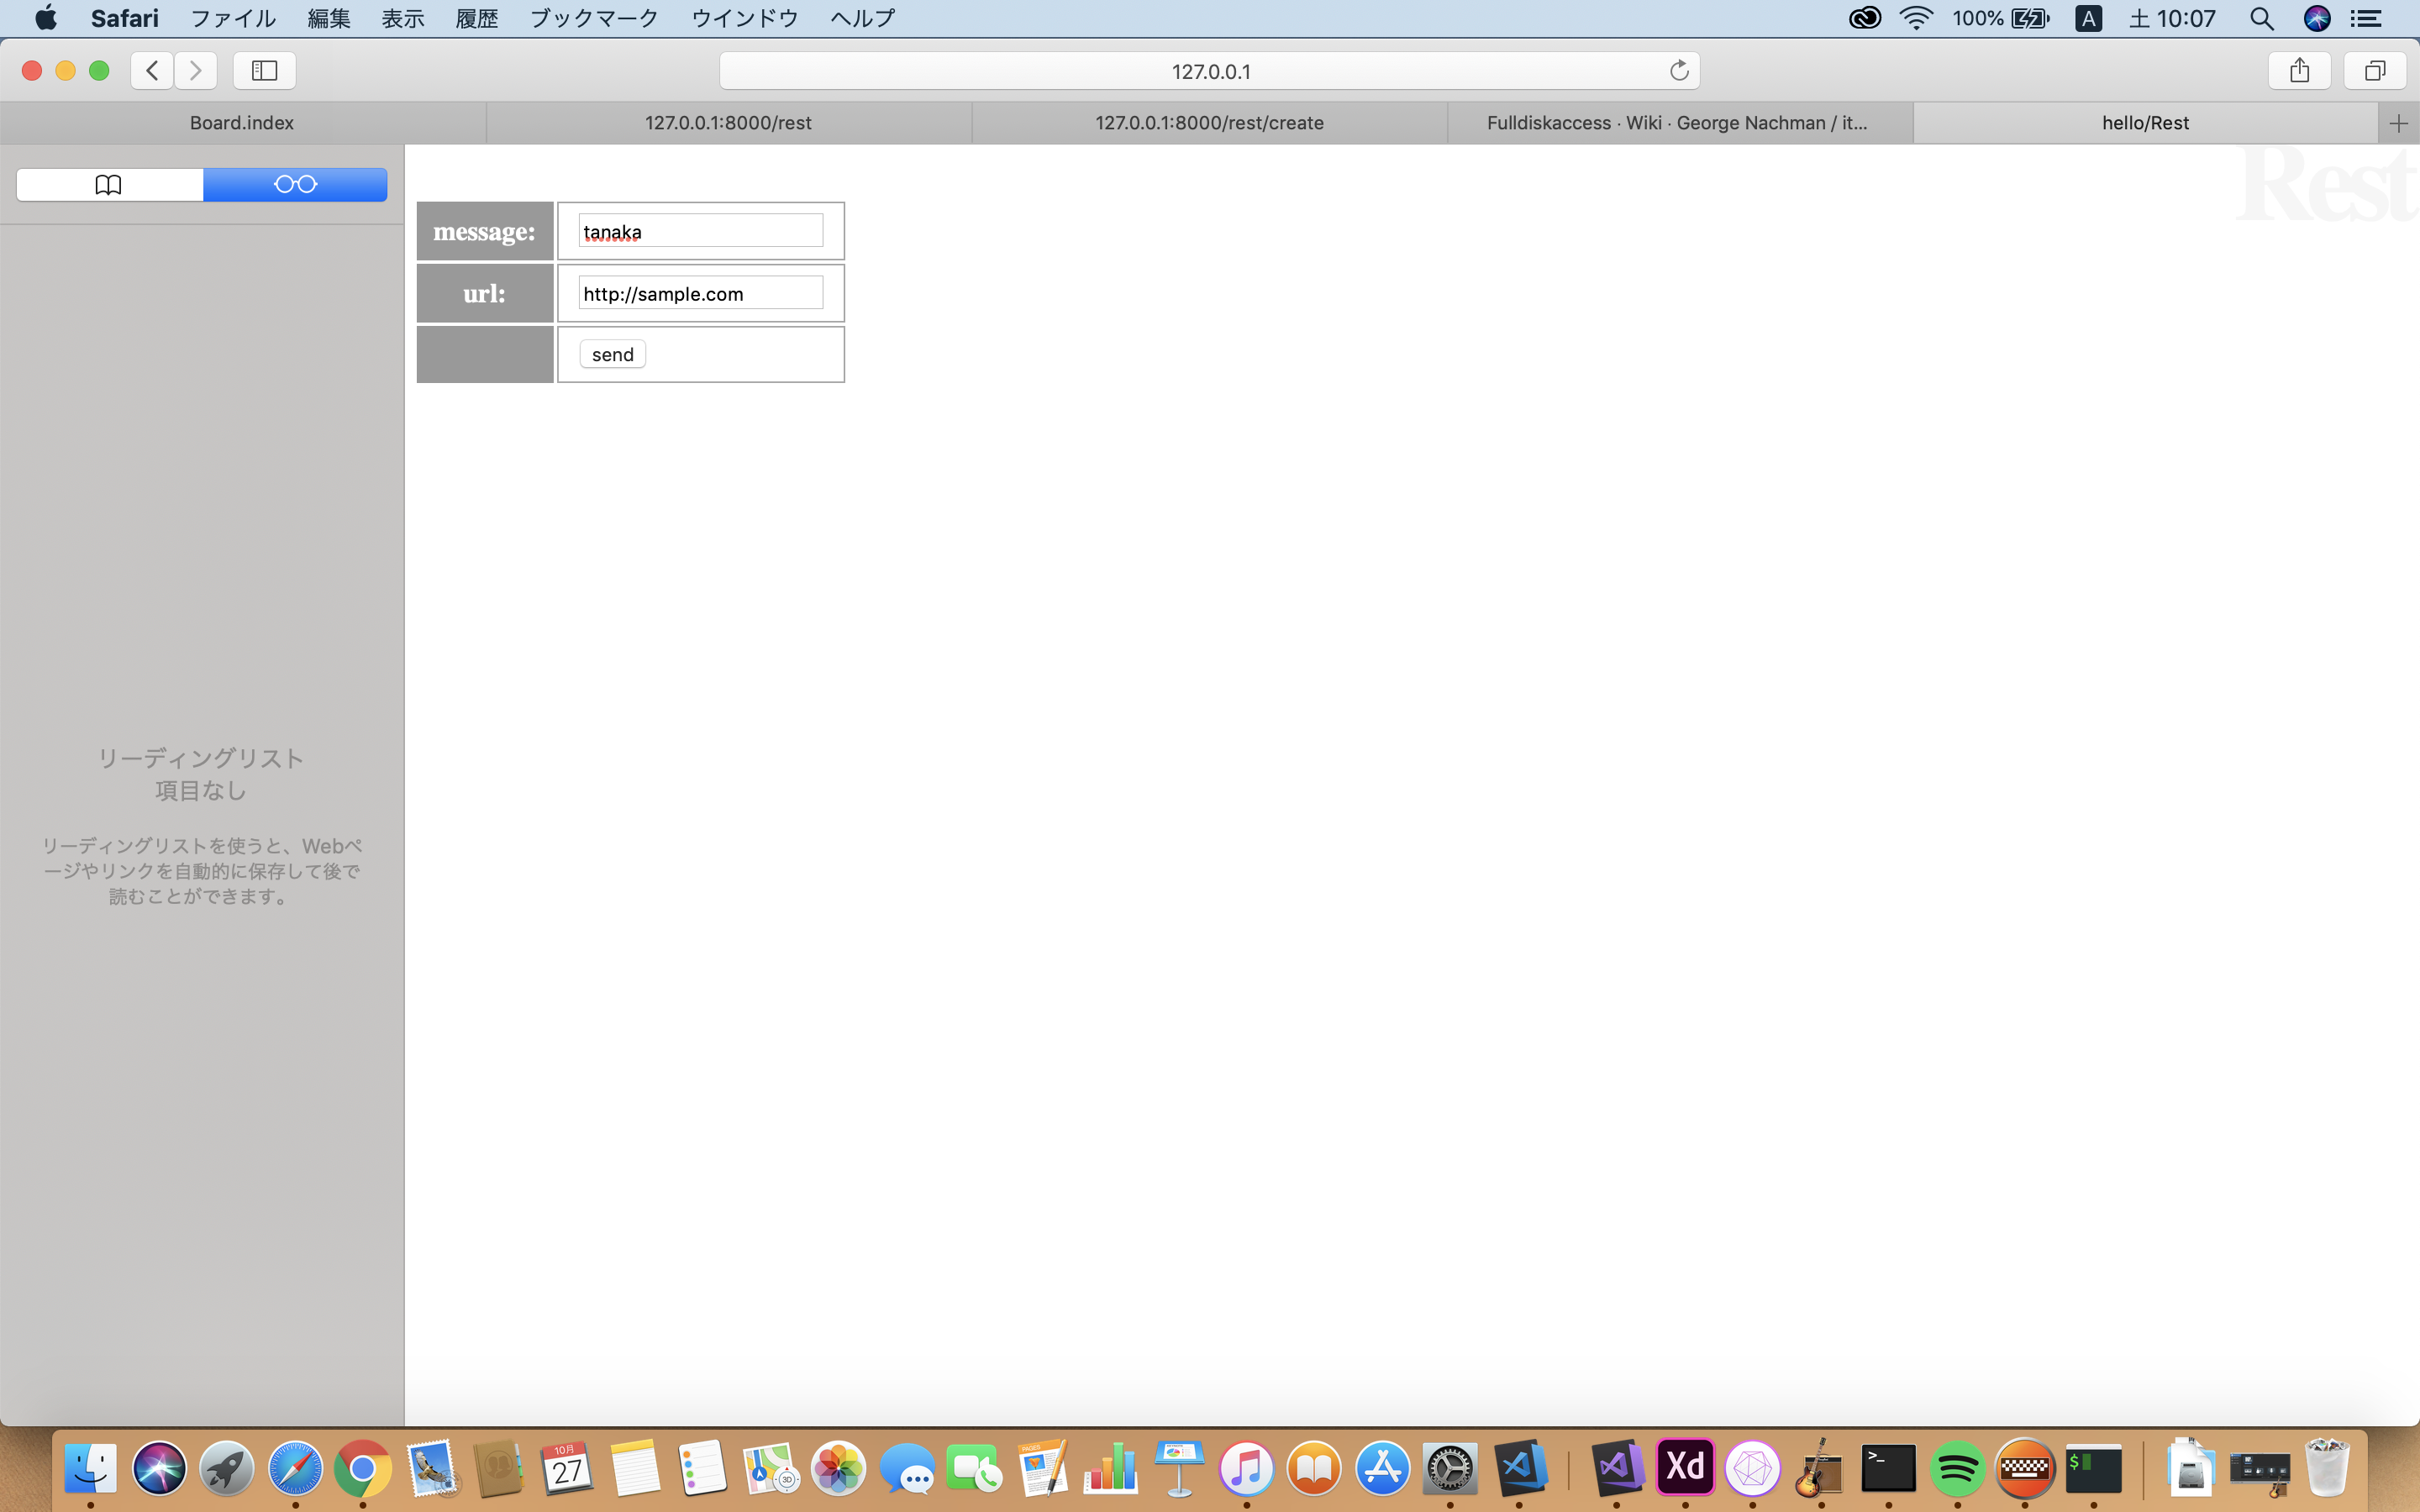
まず/views/rest/にcreate.blade.php作成する。
<table>
    <form action="/rest" method="post">
        {{ csrf_field() }}
        <tr><th>message: </th><input type="text" name="message" value="{{old('message')}}"></tr>
        <tr><th>url: </th><input type="text" name="url" value="{{old('url')}}"></tr>
        <tr><th></th><td><input type="submit" value="send"></td></tr>
    </form>
</table>
RestappController.phpのcreateとstoreメソッドにも記述する。
public function create()
{
    return view('rest.create');
}

public function store(Request $request)
{
    $restdata = new Restdata;
    $form = $request->all();
    unset($form['_token']);
    $restdata->fill($form)->save();
    return redirect('/rest');
}
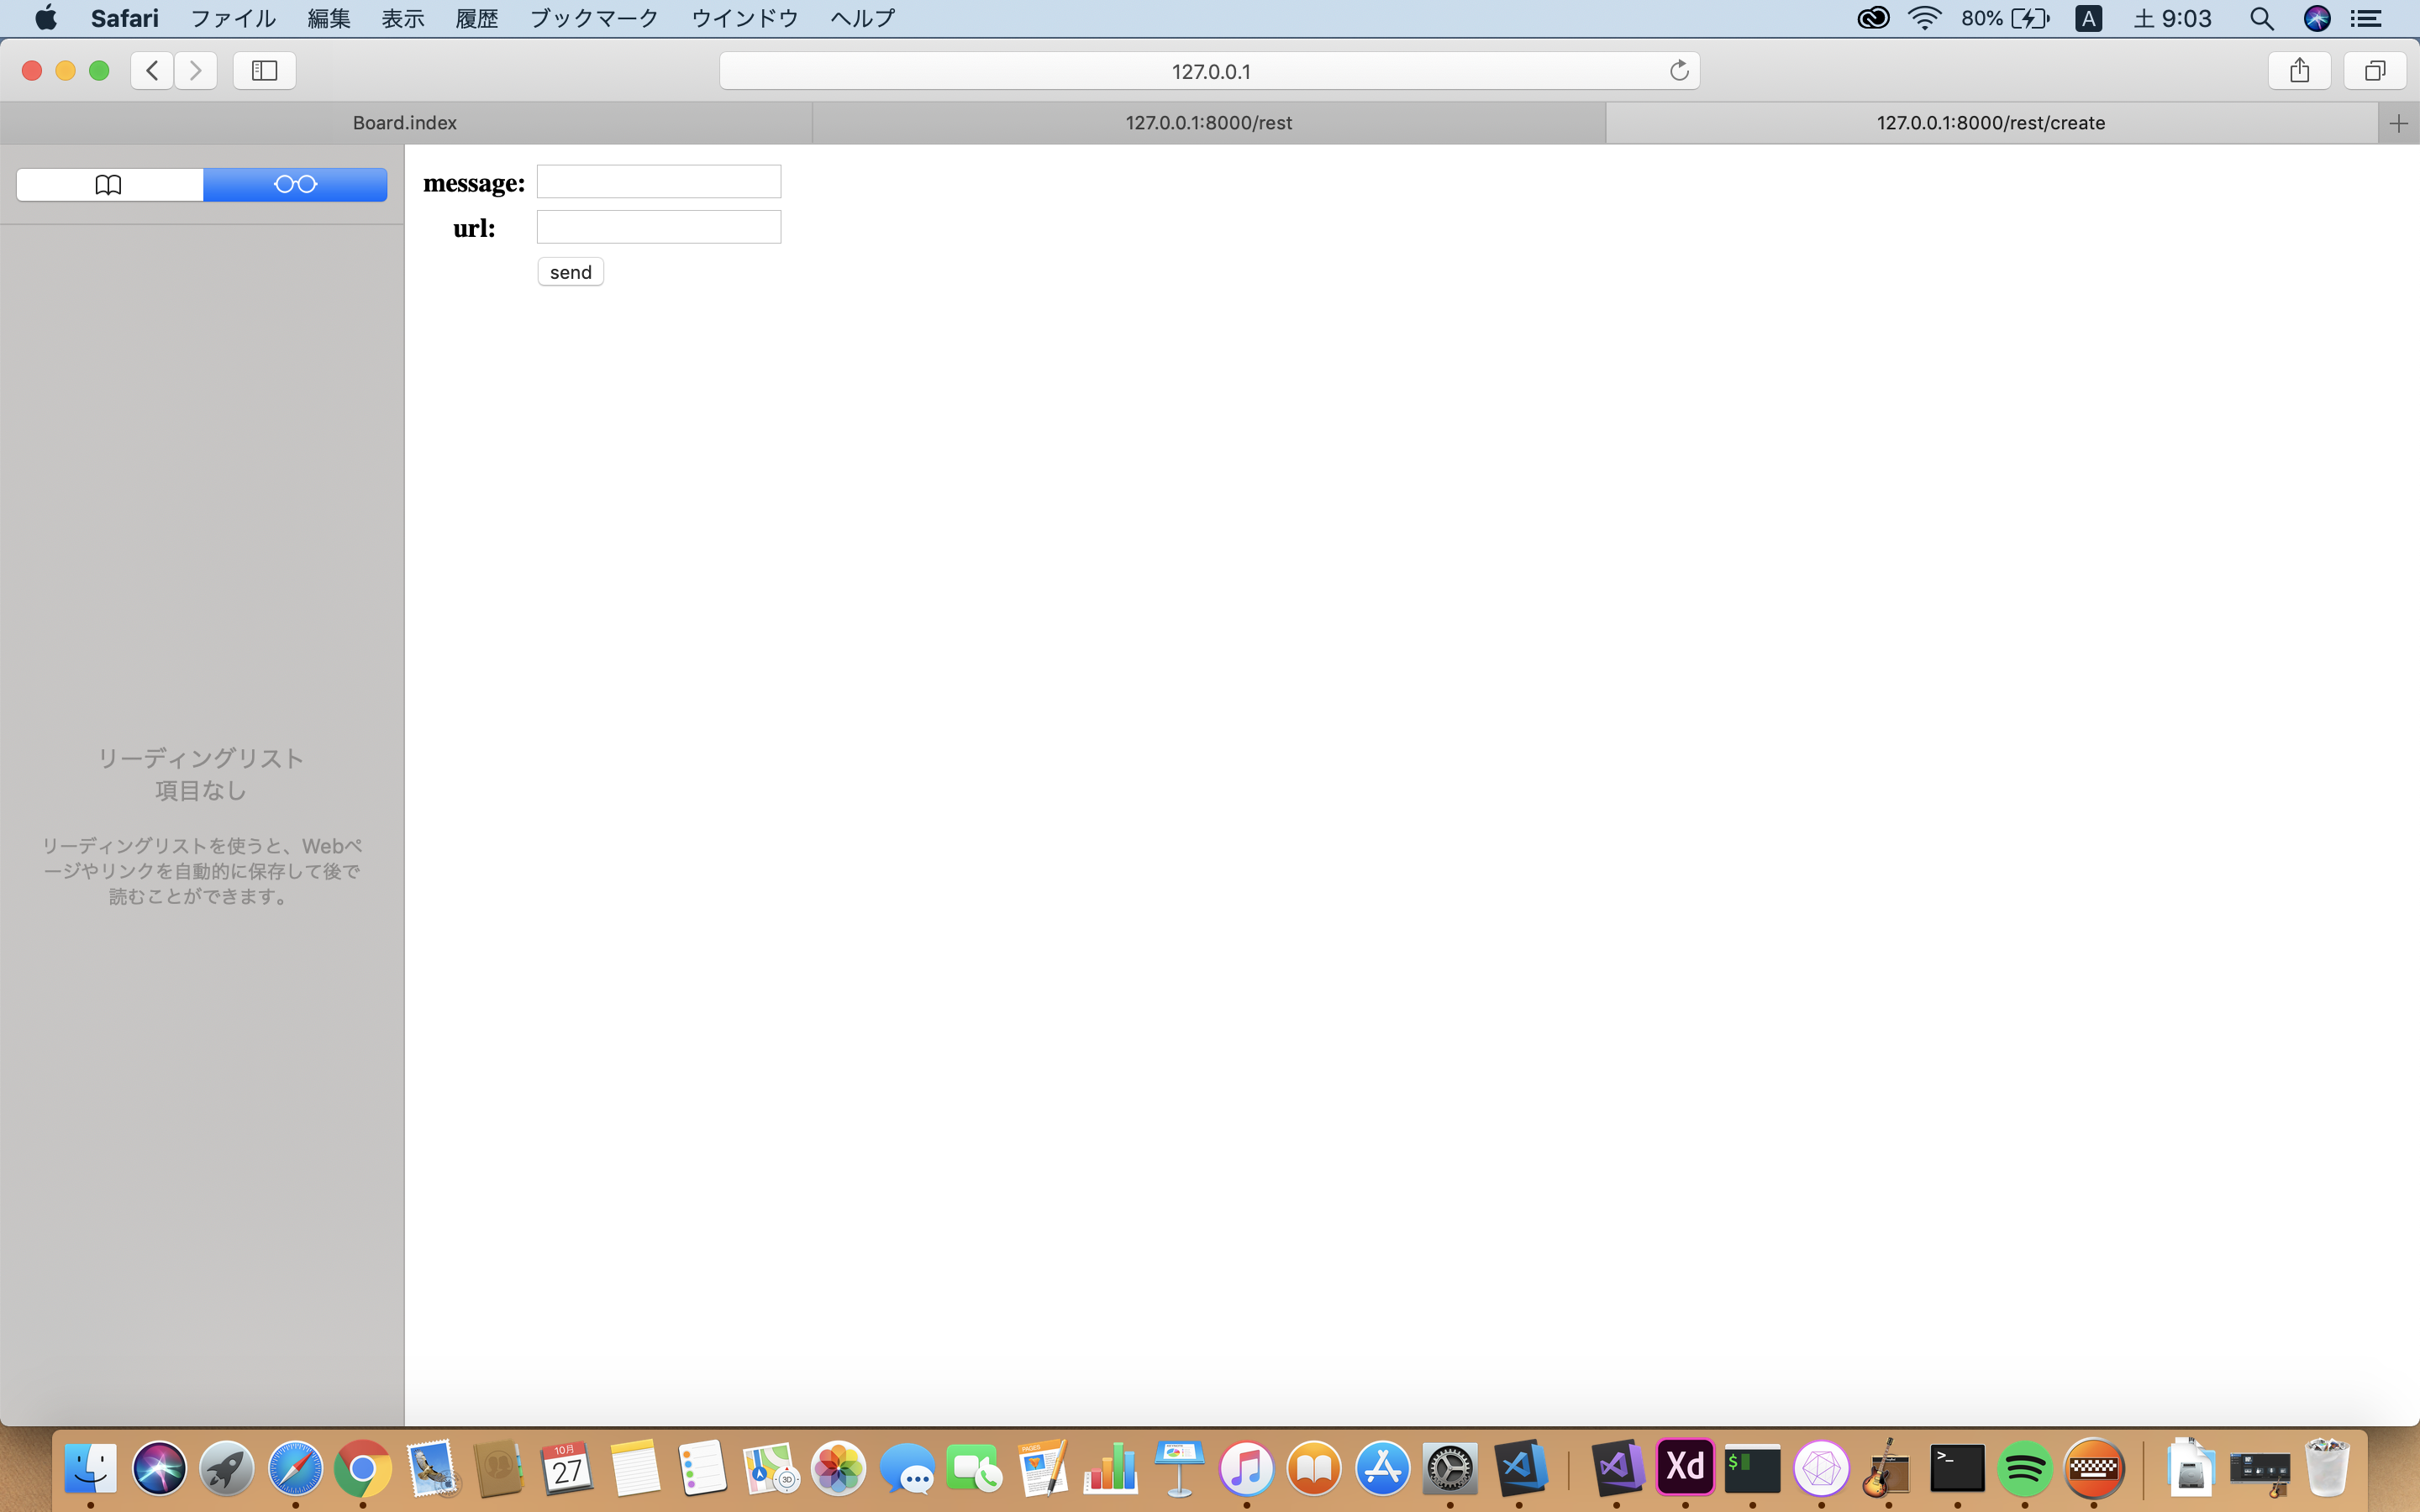
/rest/createにアクセスするとフォームだけ表示される。
フォームを/hello/restに埋め込む
/views/hello/フォルダの中にrest.blade.phpを作成する。
<html>
    <head>
        <title>hello/Rest</title>
        <style>
            body {
                font-size: 16pt;
                color:#999;
                margin: 5px;
            }
            h1 {
                font-size: 50pt;
                text-align: right;
                color: #f6f6f6;
                margin: -20px 0px -30px 0px;
                letter-spacing: -4pt;
            }
            th {
                background-color: #999;
                color: fff;
                padding: 5px 10px;
            }
            td {
                border: solid 1px #aaa;
                color: #999;
                padding: 5px 10px;
            }
            .content {
                margin: 10px;
            }
        </style>
    </head>
    <body>
        <h1>Rest</h1>

        @include('rest.create')

    </body>
</html>
HelloControllerを作成する
php artisan make:controller HelloController
HelloControllerクラスにrestアクションメソッドを追記する。
<?php

namespace App\Http\Controllers;

use Illuminate\Http\Request;

class HelloController extends Controller
{
    public finction rest(Request $request)
    {
        return view('hello.rest');
    }
}
web.phpにルートを追記する。
Route::get('hello/rest', 'HelloController@rest');
/hello/restにアクセスしてレコードが追加されればOK!
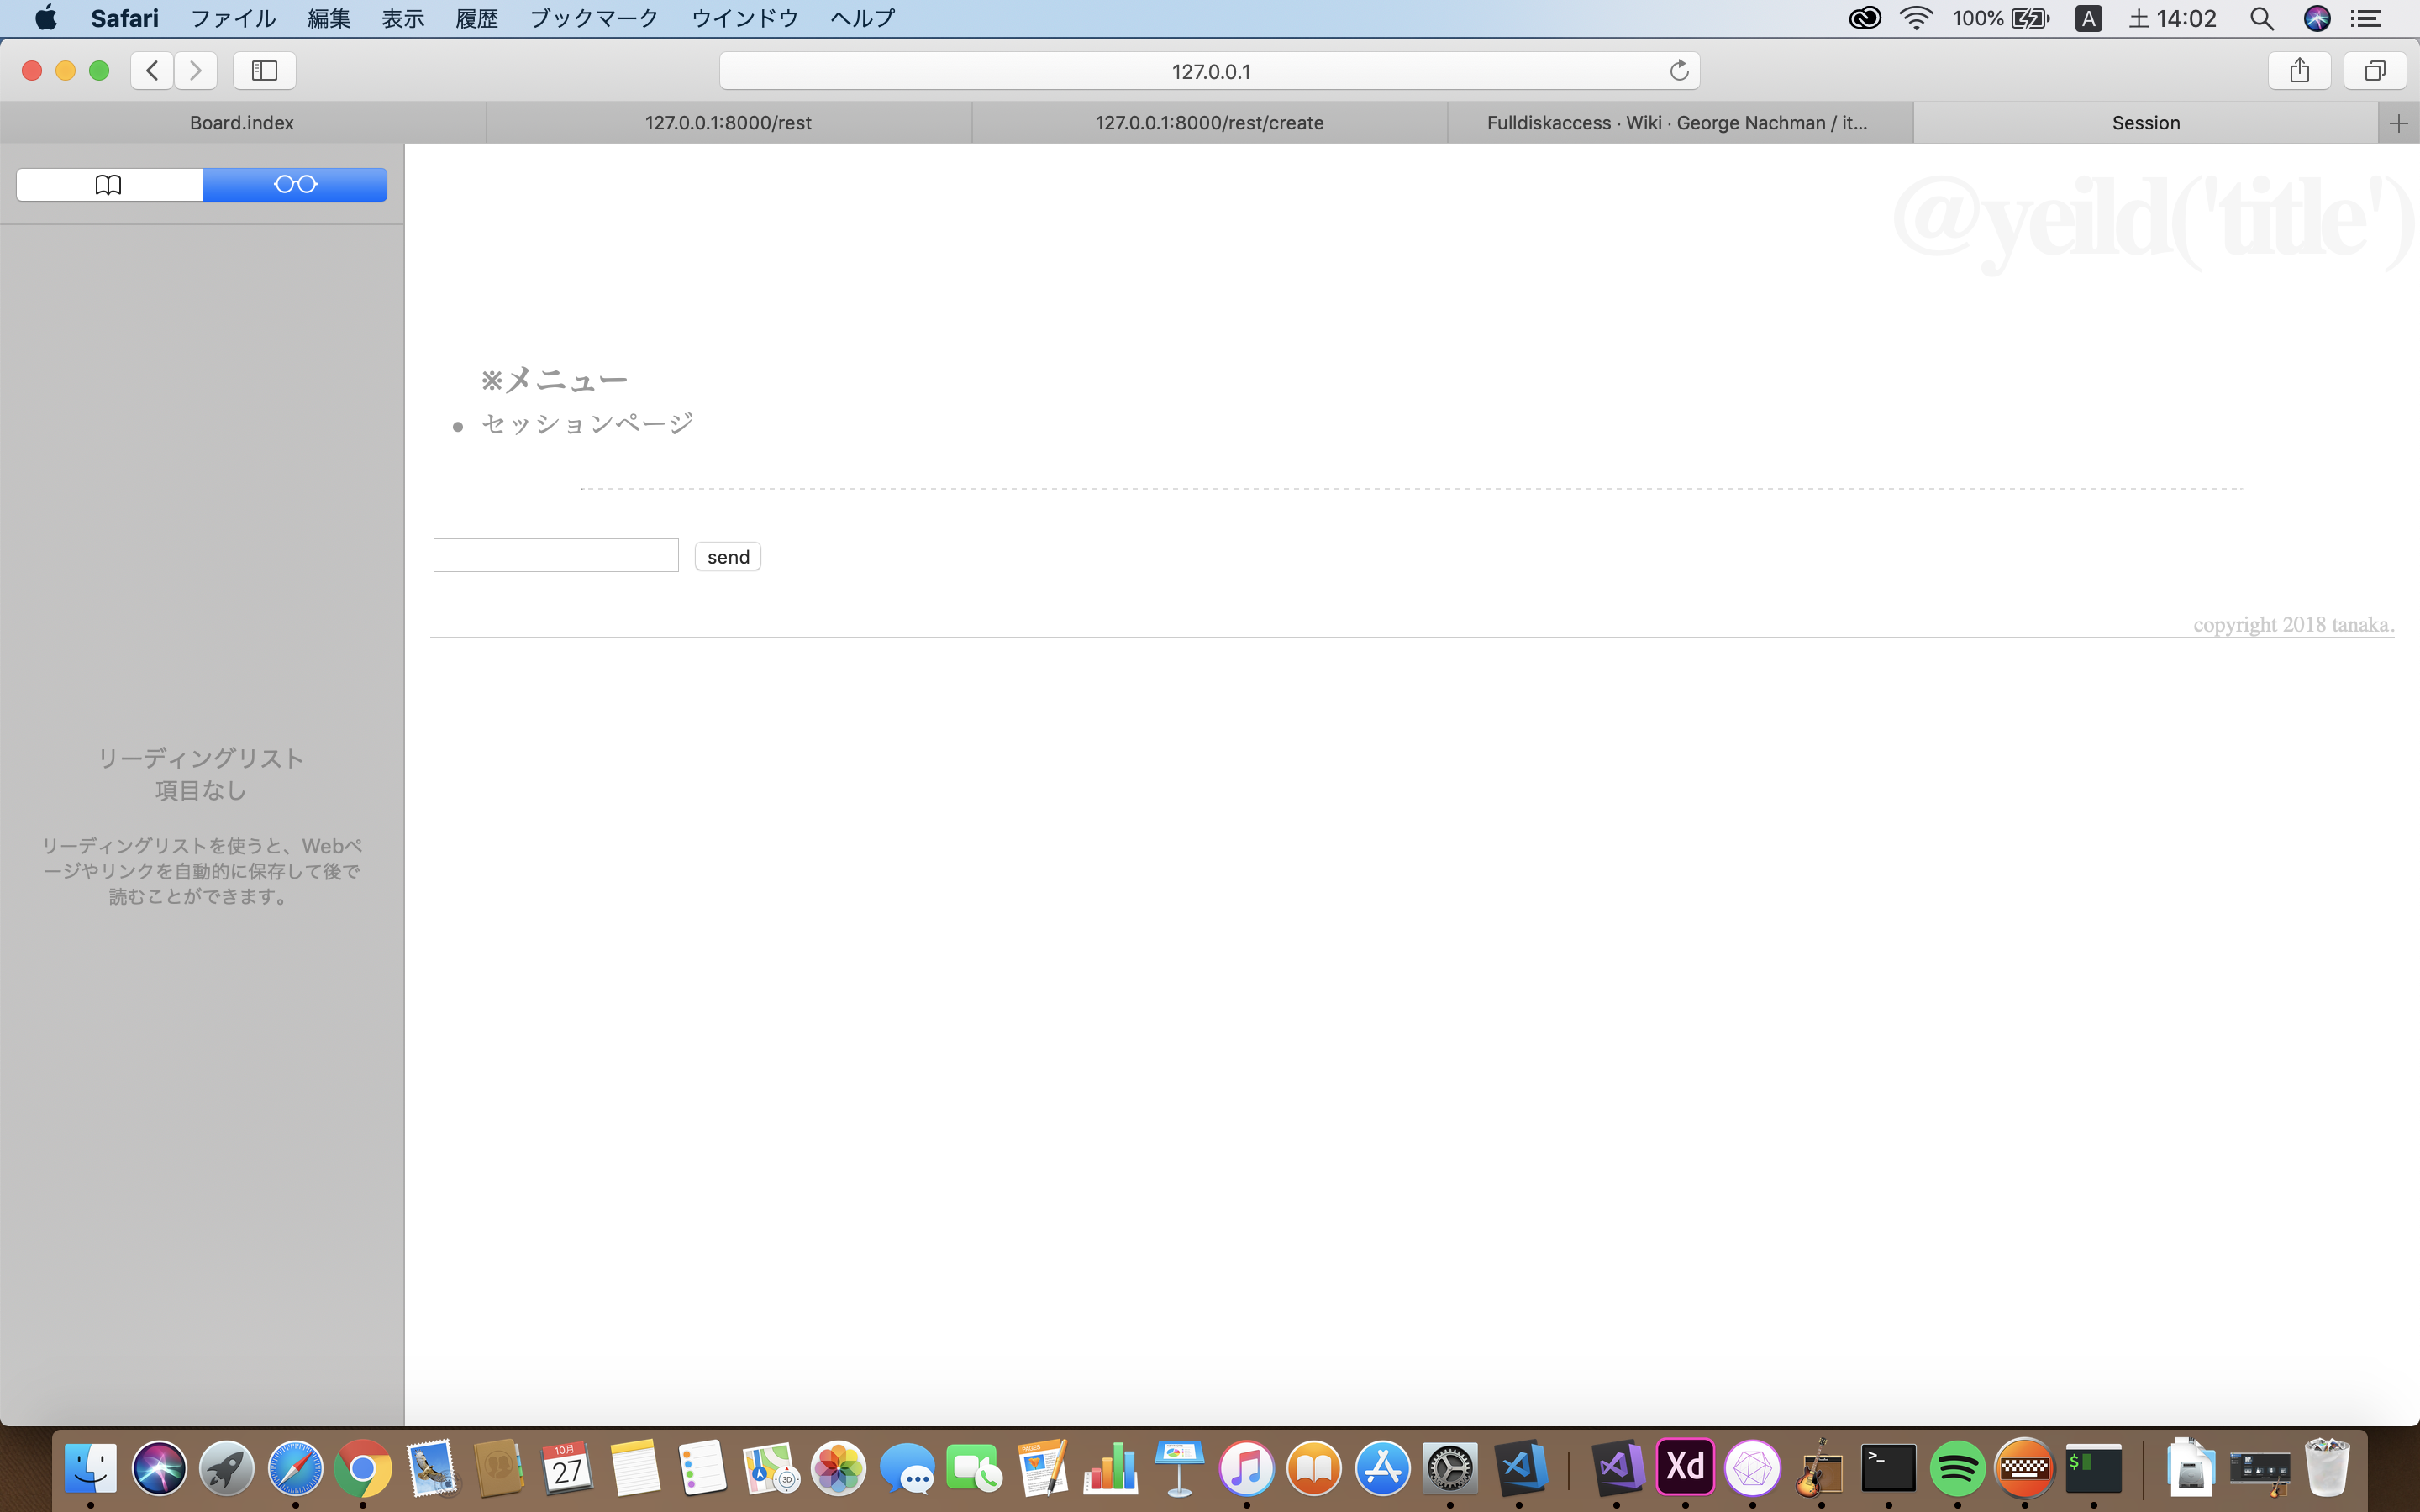
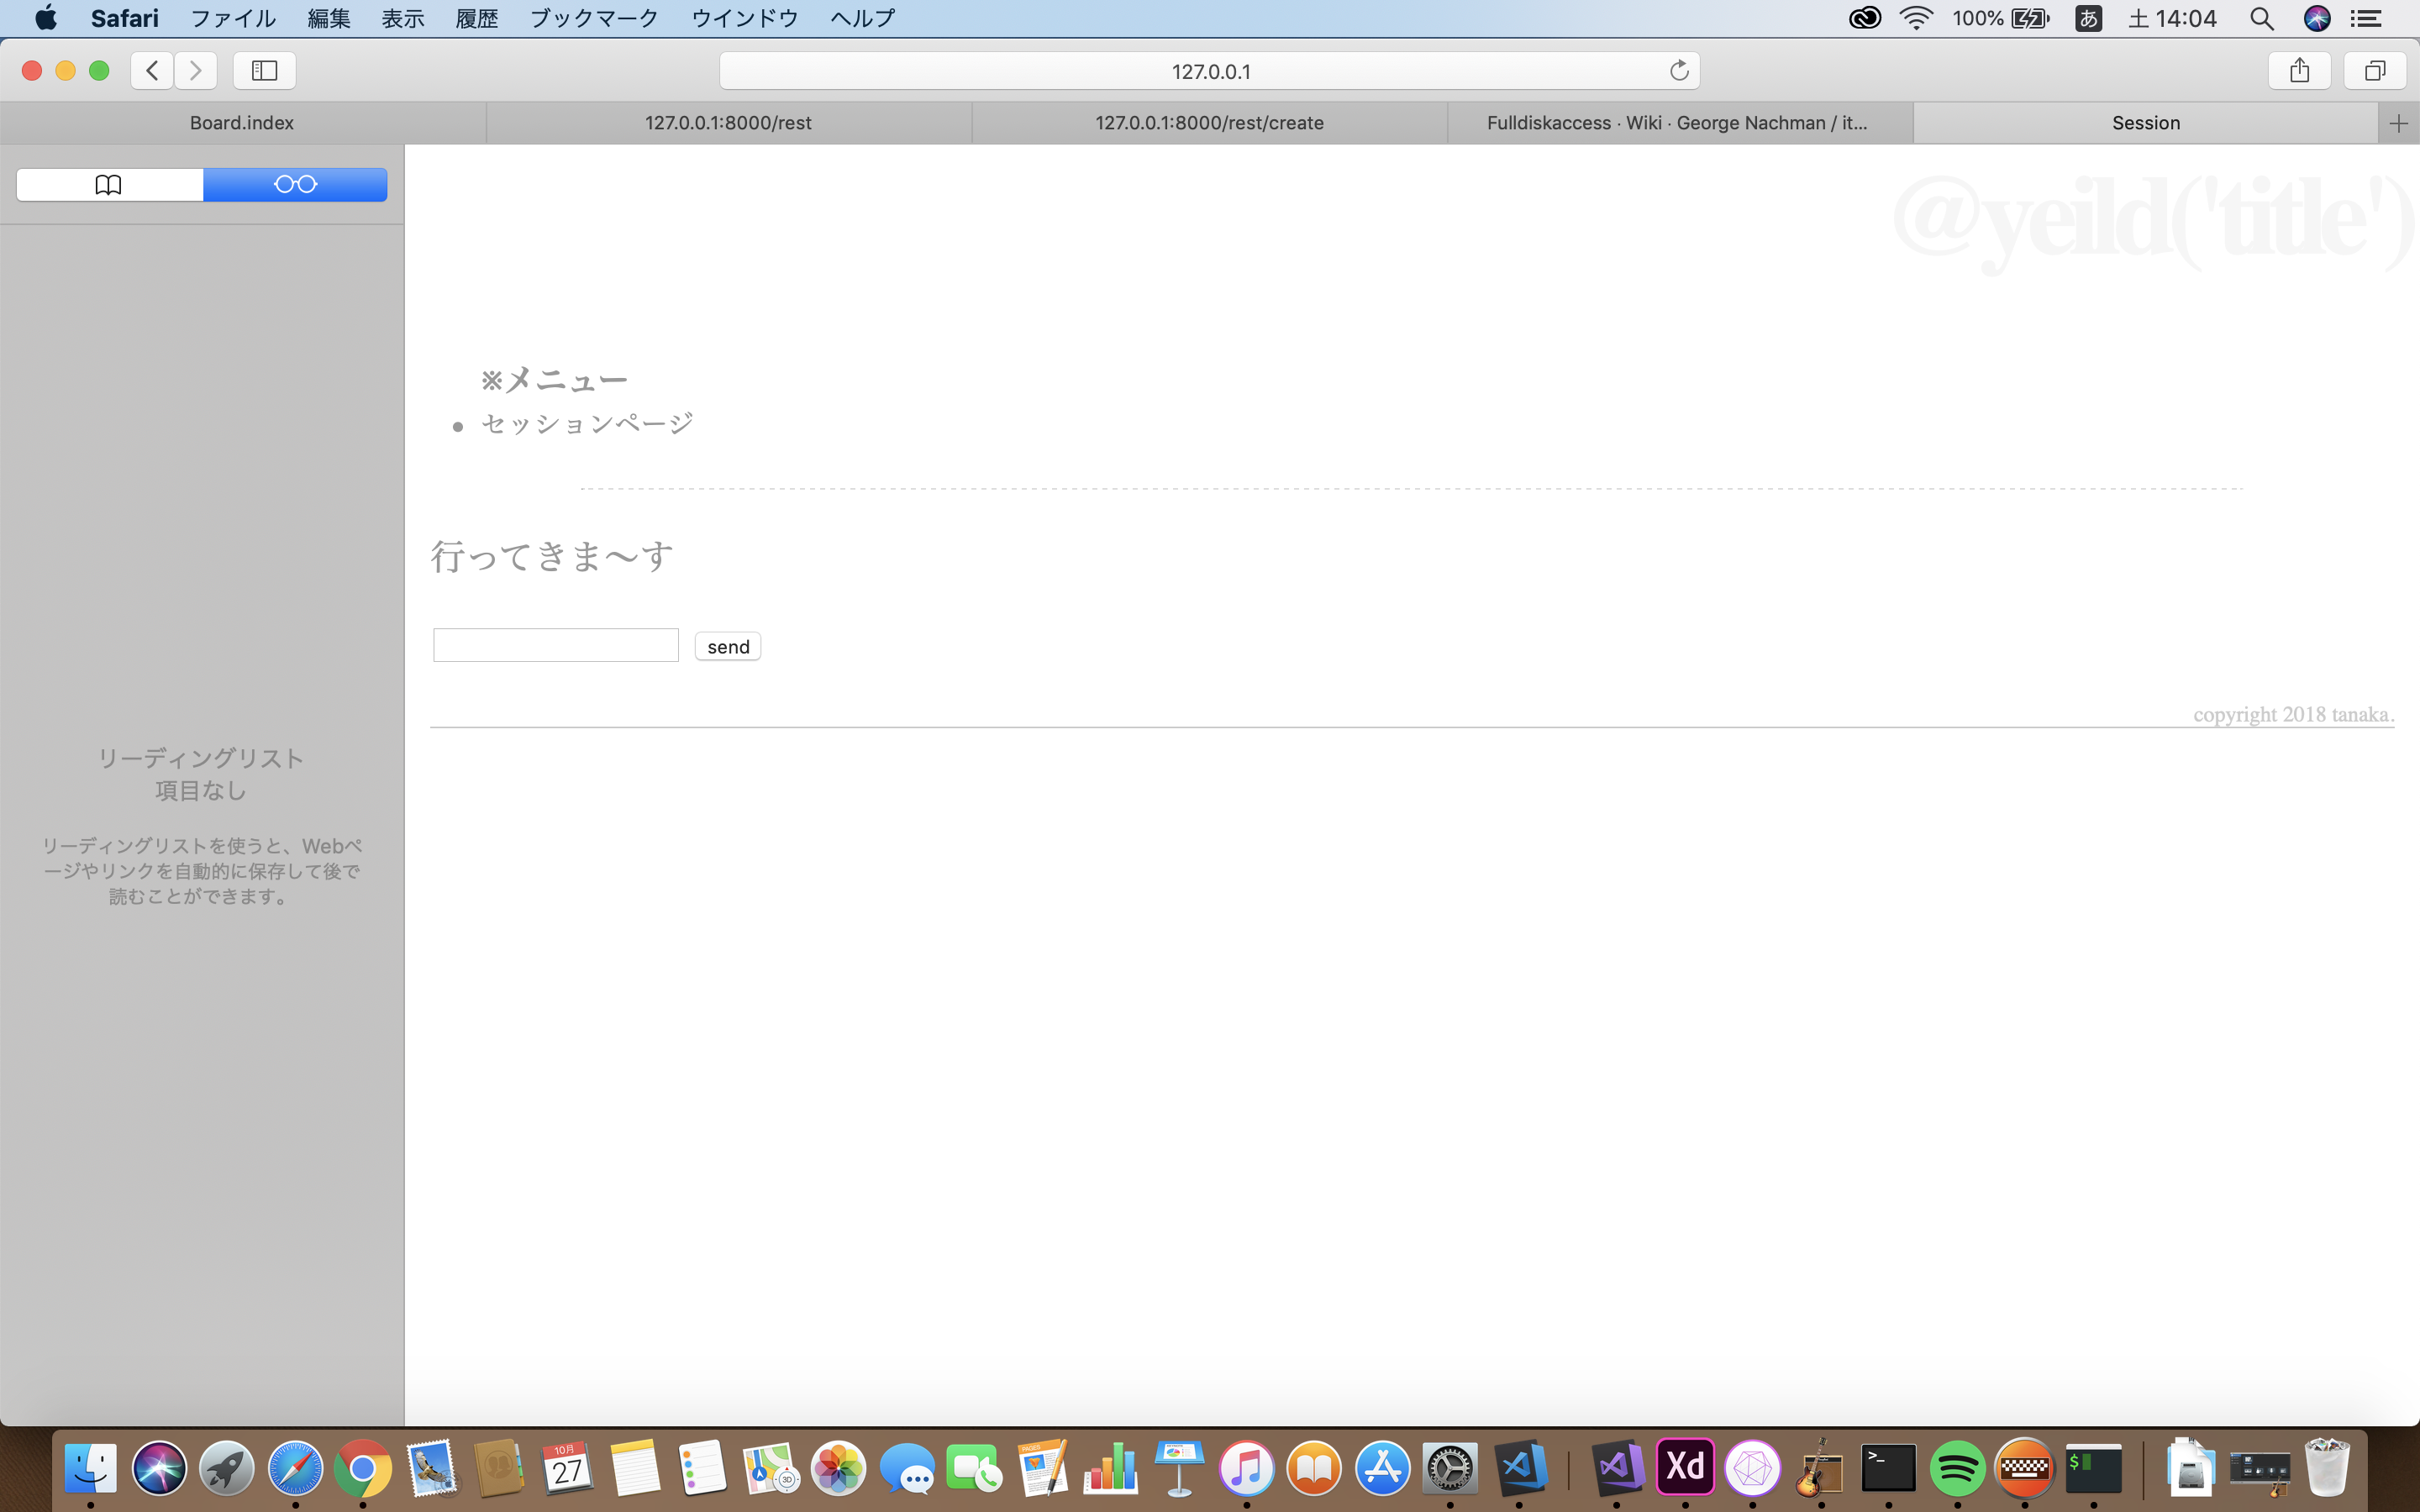
セッション利用アクションを作る
/view/helloないにsession.blade.phpを作成する。
@extends('layouts.helloapp')

@section('title', 'Session')

@section('menubar')
    @parent
    セッションページ
@endsection

@section('content')
    <p>{{$session_data}}</p>
    <form action="/hello/session" method="post">
    {{ csrf_field() }}
    <input type="text" name="input">
    <input type="submit" value="send">
    </form>
@endsection

@section('footer')
copyright 2018 tanaka.
@endsection
HelloController.phpにアクションを追加する。
public function ses_get(Request $request)
{
    $sesdata = $request->session()->get('msg');
    return view('hello.session', ['session_data' => $sesdata]);
}

public function ses_put(Request $request)
{
    $msg = $request->input;
    $request->session()->put('msg', $msg);
    return redirect('hello/session');
}
web.phpにルート情報を記載する。
Route::get('hello/session', 'HelloController@ses_get');
Route::post('hello/session', 'HelloController@ses_put');
下記のように表示されていればOK!
データベースをセッションで使う
/configフォルダ内のsession.phpの項目を変更する。
'driver' => env('SESSION_DRIVER', 'database'),
これでデータベースのドライバーが使われる。
.envファイルを修正する。
SESSION_DRIVER=database
セッション用マイグレーションを作成する。
php artisan session:table
マイグレーションを実行する。
php artisan migrate
ペジネーションを利用するためにHelloController.phpに追記をする。
use App\Person;
use Illuminate\Support\Facades\DB;

public function index(Request $request)
{
    $items = DB::table('people')->simplePaginate(5);
    return view('hello.index', ['items' => $items]);
}
$items = DB::table('people')->simplePaginate(5);で1ページあたりの表示レコード数を指定している。
前後のページのページに移動する情報もsimplePaginateの戻り値に含まれている。
/views/helloフォルダ内にindex.blade.phpを作成する。
@extends('layouts.helloapp')
<style>
    .paginate {
        font-size: 10pt;
    }
    .paginate li {
        display: inline-block
    }
</style>
@section('title', 'Index')

@section('menubar')
    @parent
    インデックスページ
@endsection

@section('content')
    <table>
        <tr><th>Name</th><th>Mail</th><th>Age</th></tr>
        @foreach ($items as $item)
            <tr>
                <td>{{$item->name}}</td>
                <td>{{$item->mail}}</td>
                <td>{{$item->age}}</td>
            </tr>
        @endforeach
    </table>
    {{ $items->links() }}
@endsection

@section('footer')
copyright 2018 tanaka.
@endsection
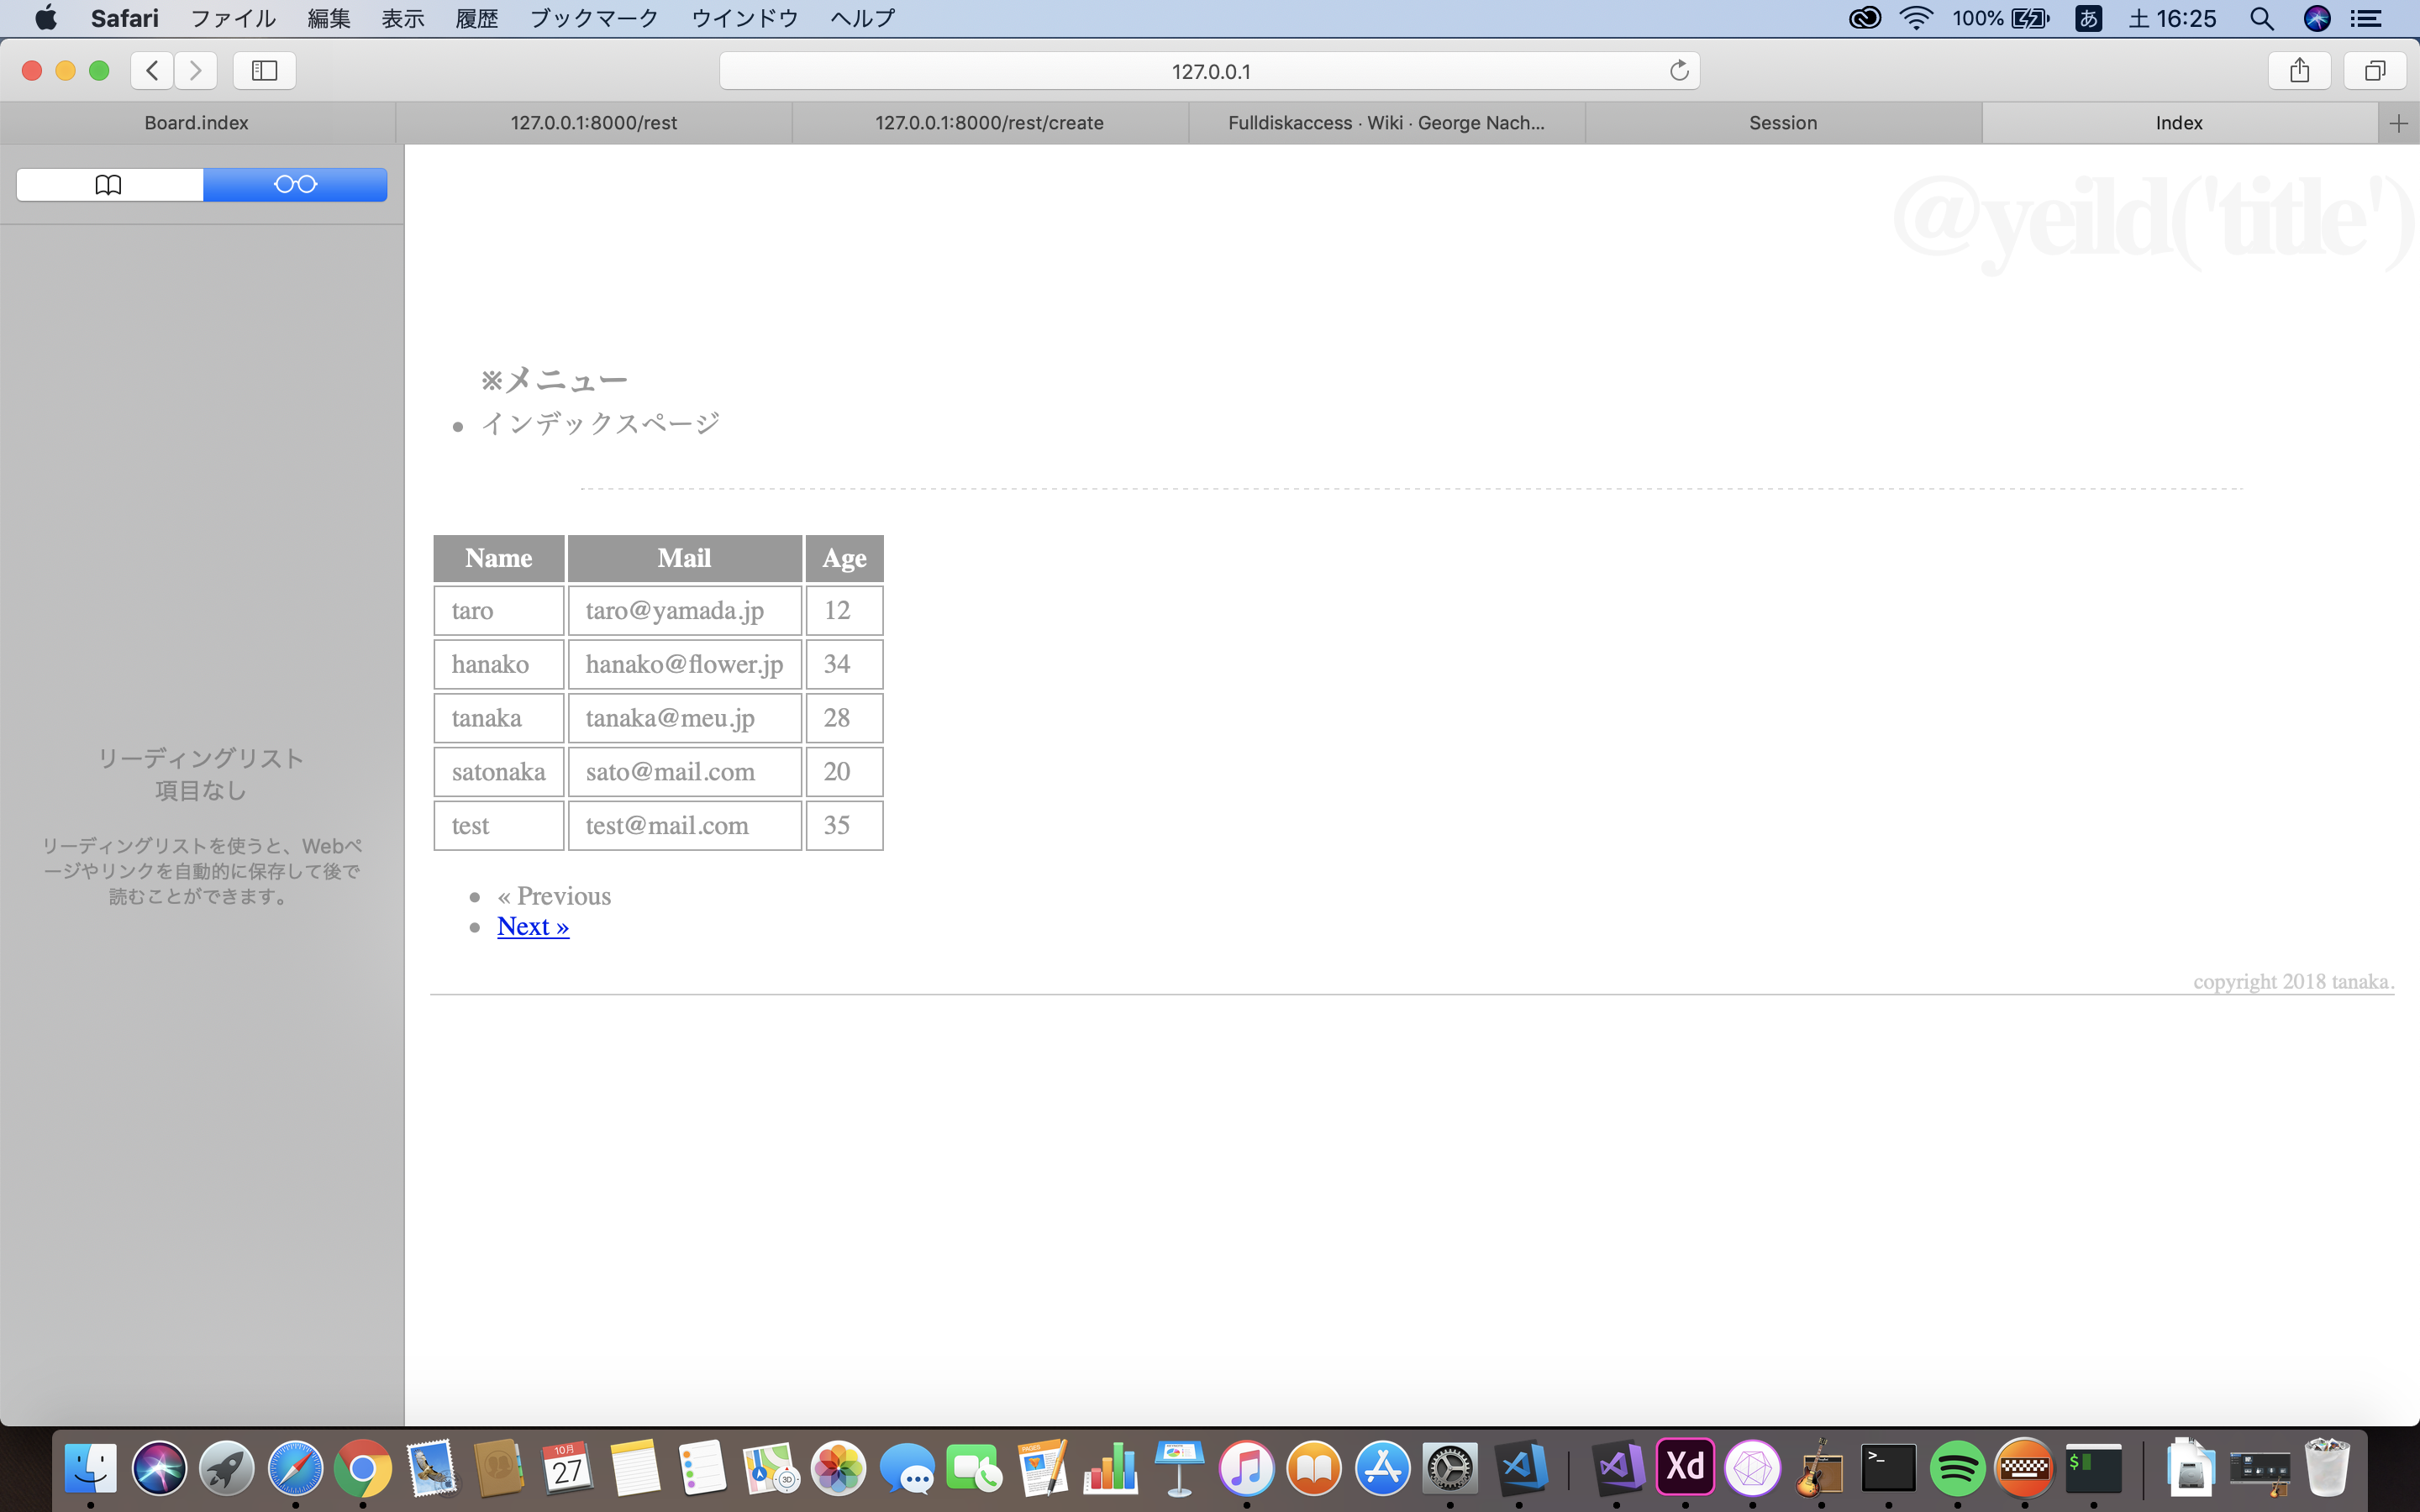
画像のように出力されればOK
ちゃんとページングされてる。
ちなみに並び順を変更するには、HelloController.phpを下記のように書き換える。
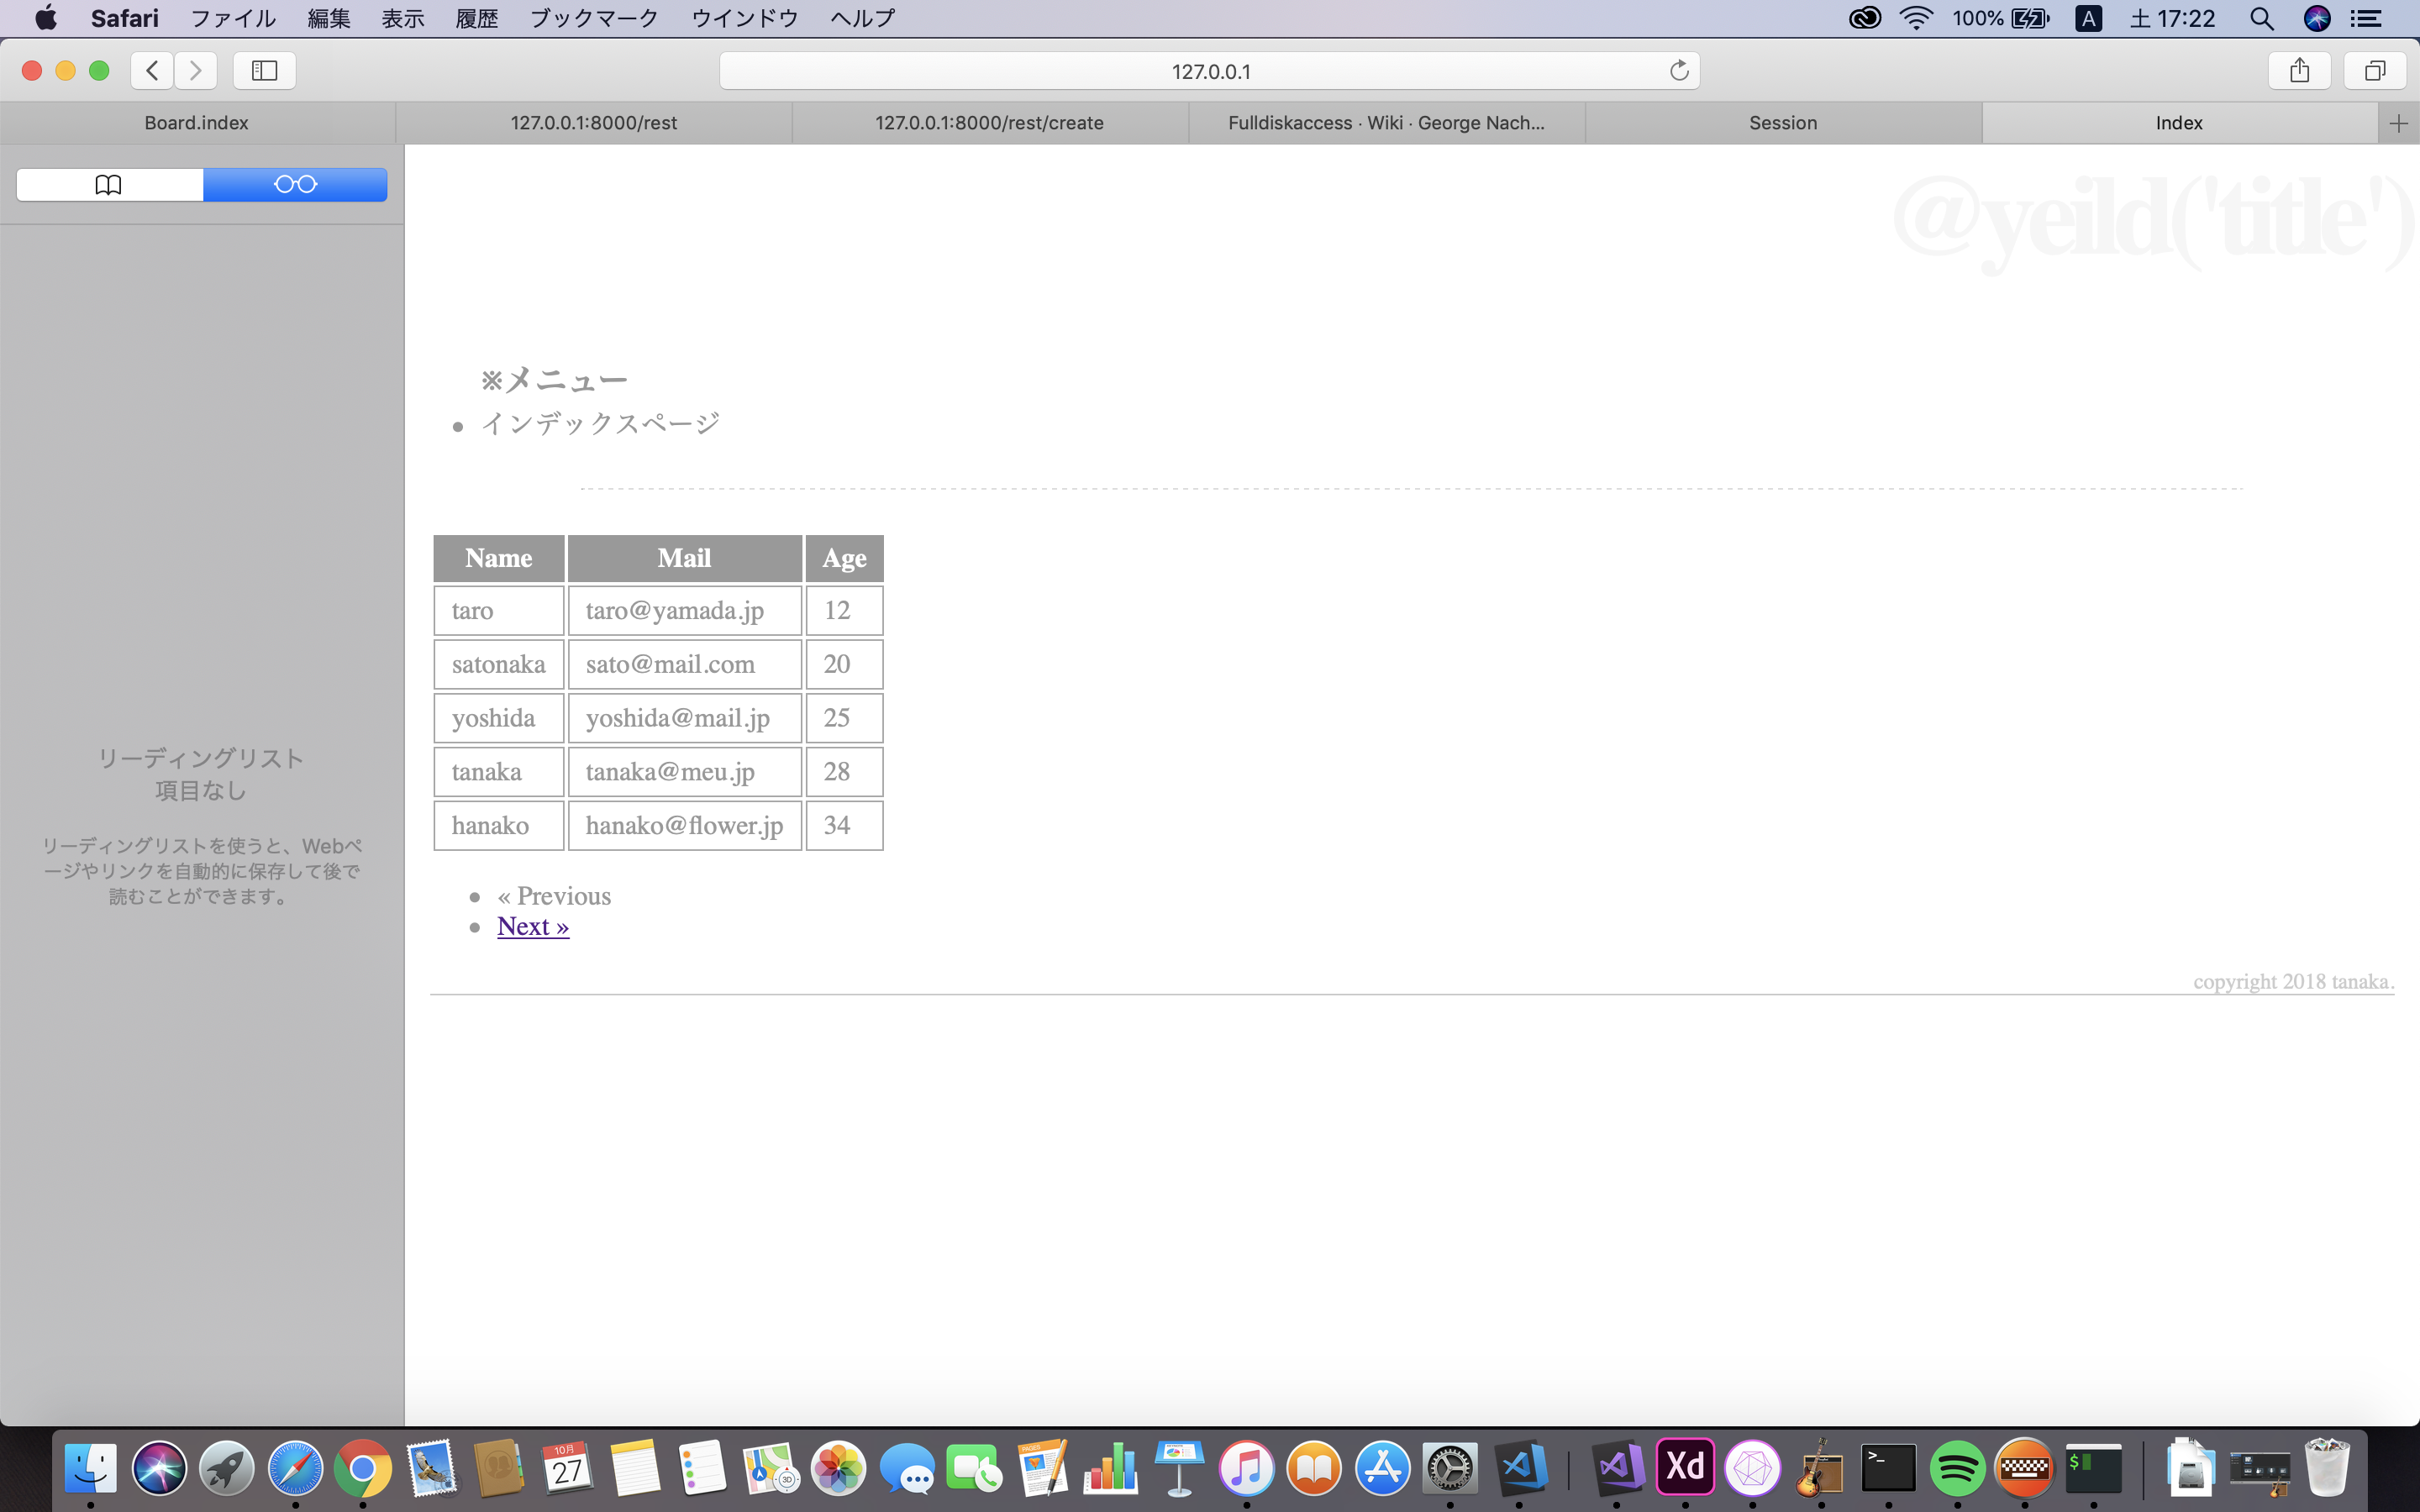
$items = DB::table('people')->orderBy('age', 'asc')->simplePaginate(5);
画像のように並び順が変わる
ソート順を変更する。
Nameのところをクリックしたらname順に、AgeのところをクリックしたらAge順に並び替える。
HelloController.phpのindexメソッドを修正。
public function index(Request $request)
{
    $sort = $request->sort;
    $items = Person::orderBy($sort, 'asc')->simplePaginate(5);
    $param = ['items' => $items, 'sort' => $sort];
    return view('hello.index', $param);
}
hello内のindex.blade.phpを修正する。
@extends('layouts.helloapp')
<style>
    .pagination {
        font-size: 10pt;
    }
    .pagination li {
        display: inline-block
    }
    tr th a:link {
        color: white;
    }
    tr th a:visited {
        color: white;
    }
    tr th a:hover {
        color: white;
    }
    tr th a:active {
        color: white;
    }
</style>
@section('title', 'Index')

@section('menubar')
    @parent
    インデックスページ
@endsection

@section('content')
    <table>
        <tr>
            <th><a href="/hello?sort=name">name</a></th>
            <th><a href="/hello?sort=mail">mail</a></th>
            <th><a href="/hello?sort=age">age</a></th>
        </tr>
    @foreach ($items as $item)
        <tr>
            <td>{{$item->name}}</td>
            <td>{{$item->mail}}</td>
            <td>{{$item->age}}</td>
        </tr>
    @endforeach
    </table>
    {{ $items->appends(['sort' => $sort])->links()}}
@endsection

@section('footer')
copyright 2018 tanaka.
@endsection
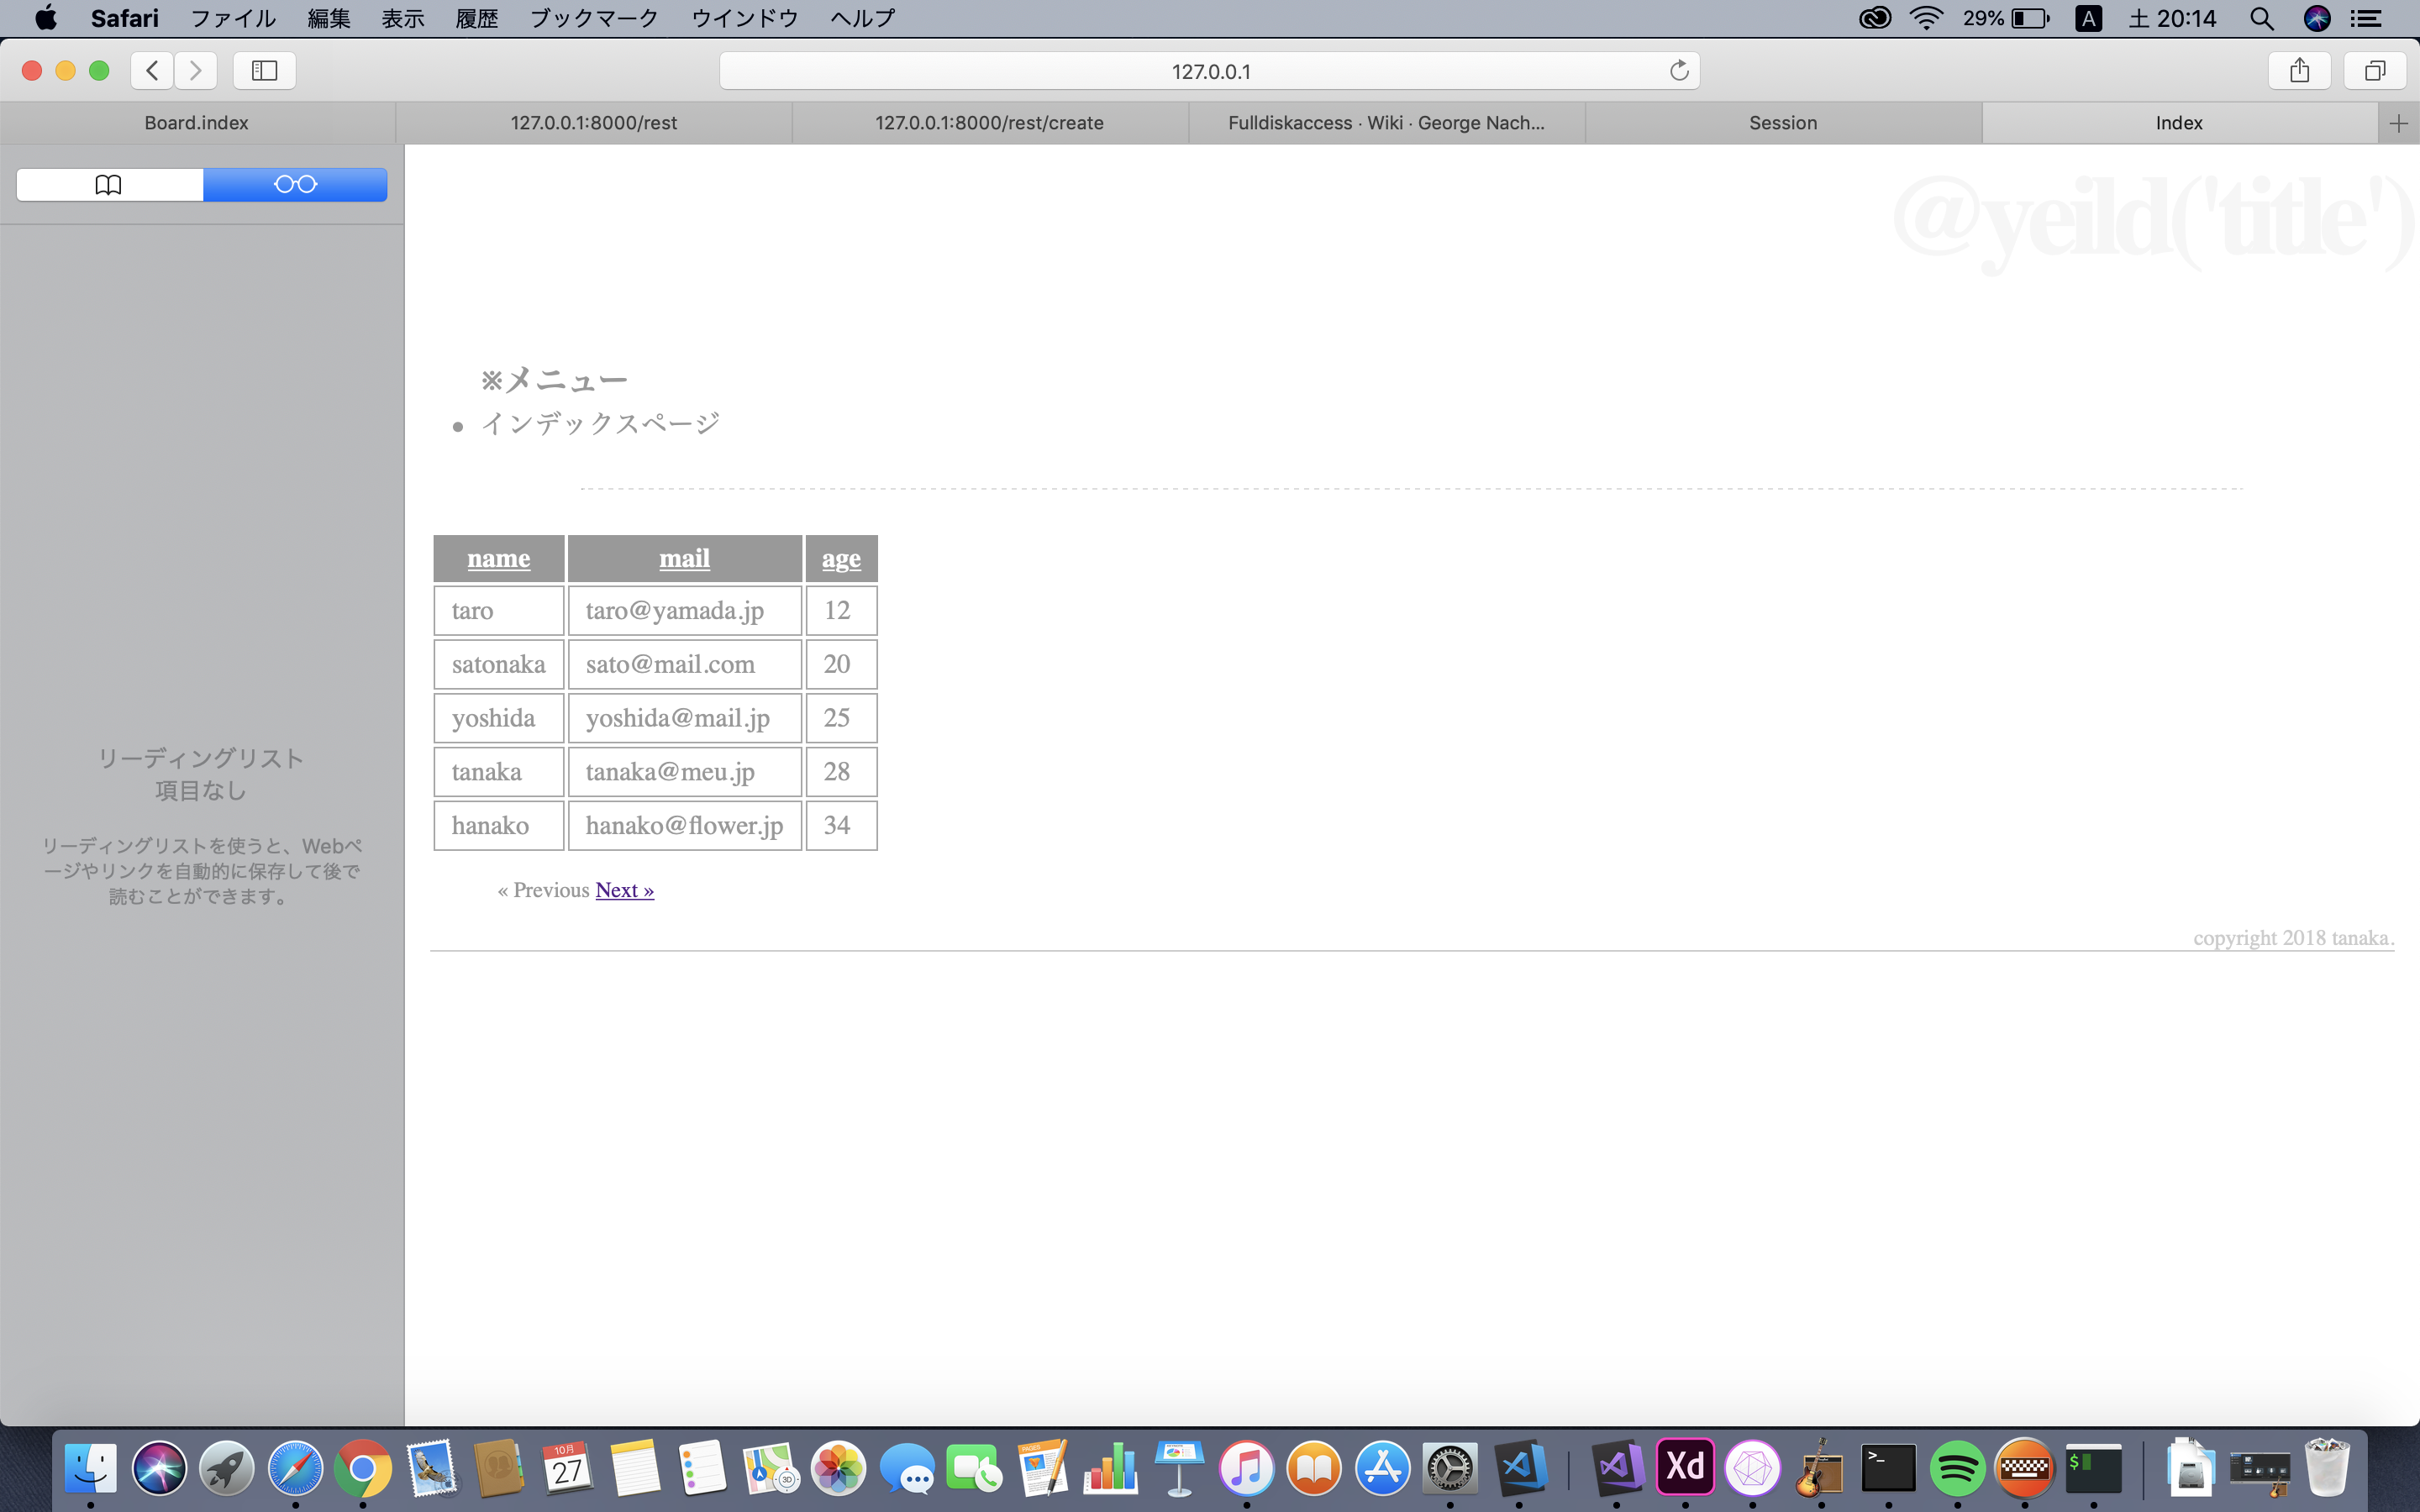
画像のように画面が出力されればOK。
name、age、mailの各順でソートができるようになった。
本日はこの辺で。ではでは。