Pref.
Unity ShaderLabの個人的備忘録です。
Unity shaderの基本はCg/HLSL
基本的にはこれらを使えば基礎的なものは作れるはず...
間違いがあれば指摘して頂けると幸いです。
とても分かりやすい記事をありがとうございます。
<参考サイト>
http://nn-hokuson.hatenablog.com/
<公式ドキュメント>
https://docs.unity3d.com/ja/current/Manual/SL-SurfaceShaders.html
描画系Shader
レンダリングパイプライン
| Input Assembly | → | Vertex | → | Surface | → | Lightning | → | Render Target Output |
|---|
| 種類 | できること | |
|---|---|---|
| Vertex Shader | 頂点シェーダー | ポリゴン頂点を移動 |
| Fragment Shader | フラグメント | |
| Surface Shader | サーフェスシェーダー | ライティングやシャドウを簡単に実装し,低レベルの簡単な絵作りができる |
変数の型
| 型 | 説明 |
|---|---|
| float | 高精度 浮動小数点値 32bit 複雑な関数などに利用 |
| half | 中精度 16bit -60000 ~ 60000小数点以下約3桁 方向 オブジェクト空間位置に利用 |
| fixed | 低精度 11bit -2.0 ~ 2.0 1/256精度 色情報 単純な制御に利用 |
| 例 | 説明 |
|---|---|
| float3 | x, y, z を含む3Dベクトル |
| half4 | x, y, z, w または r, g, b, a を含む |
| float4x4 | 4x4変換行列 正方行列しかサポートしないものがあるので注意が必要 |
shaderプロパティ
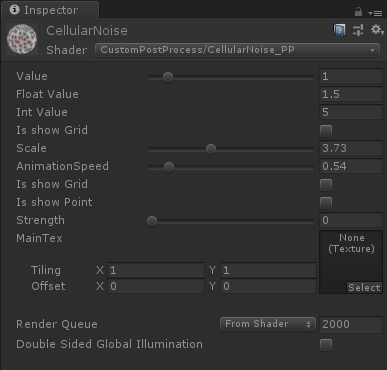
以下のようにプロパティを記述することでUnity Editor上のインスペクタから変数を変更できます.
ココのこと↓

Range
Properties {
	_Value("Value", Range(0, 10)) = 1
}
Float
Properties {
	_Fvalue("Float Value", float) = 1.5
}
Int
Properties {
	_Ivalue("Int Value", int) = 5
}
Bool toggle
Properties {
	[MaterialToggle] _IsShowGrid ("Is show Grid", int) = 0
}
Color

Properties {
	_Color ("Color", Color) = (1,1,1,1)
}
PowerSlider属性
以下のようにプロパティに属性をつけると以下の場合0.01刻みになる.
Properties {
	[PowerSlider(0.01)] _Strebgth("Strength", Range(0.0, 1.0)) = 0.999
}
基礎的な関数
| 関数名 | 例 | 説明 | GLSL関数 |
|---|---|---|---|
| dot | dot(x, y) | 2ベクトルの内積を求める | |
| floor | floor(x) | 小数値の整数部分を返す | |
| frac | frac(x) | 小数値の小数部分を返す | fract |
| abs | abs(x) | 絶対値を返す | |
| saturate | saturate(x) | xを0 ~ 1にクランプ | |
| clamp | clamp(x, a, b) | xをa ~ bにクランプ | clamp |
| lerp | lerp(x, y, s) | 線形補間 x + s(y - x) | mix |
| sqrt | sqrt(x) | 平方根 √x | |
| mul | mul(x, y) | 行列乗算 | |
| step | step(y, x) | y<=xなら1,y>xなら0 | |
| min | min(x, y) | xかyを比べ小さい方を返す | |
| max | max(x, y) | xかyを比べ大きい方を返す |
途中で描画処理を終了する
ディゾルブとかに使えるやつ
| 関数名 |
|---|
| discard |
Surface Shader input構造体
| 型? | 入力変数 | 説明 |
|---|---|---|
| float2 | uv_MainTex | テクスチャuv座標 |
| float3 | worldPos | ワールド座標 |
| float2 | screenPos | スクリーン座標 |
| float3 | viewDir | 視線方向 |
Unity ShaderLab における定義済み値
基本的に変数名の前に_(アンダーバー)が付いている
|変数名|型|説明| |---|---|---| |_Time|float4|(x→y→z→wの順に早くなっていく)| |_Time.x||時間 t/20| |_Time.y||時間 t| |_Time.z||時間 t*2| |_Time.w||時間 t*3|| 変数名 | 型 | 説明 |
|---|---|---|
| _SinTime | float4 | 時間の正弦 (t/8, t/4, t/2, t) |
| _CosTime | float4 | 時間の余弦 (t/8, t/4, t/2, t) |
| unity_DeltaTime | float4 | デルタ時間: (dt,1/dt,smoothDt,1/smoothDt) |
公式ドキュメント
https://docs.unity3d.com/jp/460/Manual/SL-BuiltinValues.html
Surface Shader output構造体
| 型 | 出力変数 | 説明 |
|---|---|---|
| fixed3 | Albedo | 表面の色 |
| fixed3 | Normal | 法線情報 |
| fixed3 | Emission | 発光色 |
| half | Specular | 鏡面情報 |
| fixed | Gloss | 艶情報 |
| fixed | Alpha | 透明度 |
Vertex Shader input構造体
| 型 | 含まれる情報 |
|---|---|
| appdata_base | 位置, 法線, 1つのテクスチャ座標 |
| appdata_tan | 位置, 接戦, 法線, 1つのテクスチャ座標 |
| appdata_full | 位置, 接戦, 法線, 4つのテクスチャ座標 |
Vertex shaderのセマンティックス
| Semantics | 型 | 説明 |
|---|---|---|
| POSITION | float3, float4 | 頂点の位置 |
| NORMAL | float3 | 頂点の法線 |
| TEXCOORDn nは0~4 | float2, float,3, float4 | n番目のUV座標 |
| TANGENT | float4 | 接線 |
| COLOR | float4 | 頂点の色 |
Vertex shaderの記述例
# pragma surface surf Lambert vertex:vert

:

void vert(inout appdata_full v, out input o){
    UNITY_INITIALIZE_OUTPUT(Input, o);

    //こんな感じに書くとアニメーションができたりもする
    float a = sin(_Time * 100 + v.vertex.x);
    v.vertex.xyz = float3(v.vertex.x + a, v.vertex.y + a, v.vertex.z + a);
    :
}
三項演算子
これを使うことでif文よりも処理が軽く,よりcoolになるらしい(笑
以下の三項演算子では変数colorにxが0.5未満ならfixed3(1, 1, 1)つまり白色が代入され,0.5以上ならばfixed3(0, 0, 0)つまり黒色が代入される.
fixed3 color = (x < 0.5) ? fixed3(1, 1, 1) : fixed3(0, 0, 0);
UnityComputeShader
ComputeShaderとは
CPU側(C#スクリプト)で処理するのに対し,GPU側(ComputeShader)で処理をするときに使うGPU側のプログラム
Shaderと名前はなっているが,描画部分を担っているサーフェスシェーダーとかフラグメントシェーダとは別物.
C#スクリプト側でComputeShaderを定義
ComputeShader型でグローバル変数に定義してあげることで,インスペクタ上でComputeShaderをアタッチ.
[SerializeField] private ComputeShader _computeShader;
グローバル変数上にComputeBuffer型の変数を定義しておく.
これを定義することでComputeShaderのスレッドをComputeBuffer型変数に紐づけて,処理をComputeBuffer型変数で命令させ,最終的にComputeBuffer型変数から結果を取り出す感じ(?)
//グローバル変数として定義
ComputeBuffer testComputeBuffer;
ComputeShaderを書く
例として今回使ったのは以下のComputeShaderファイル「test.compute」
# pragma kernel CSFunction_test

RWStructuredBuffer<int> intBuffer; //ComputeShader上のBuffer領域
int intValue; //C#から値をもらうための変数

[numthreads(6, 1, 1)]
void CSFunction_test (uint3 groupThreadID : SV_GroupThreadID)
{
	intBuffer[groupThreadID.x] = groupThreadID.x * intValue;
}
以下解釈
| 文章 | 意味 |
|---|---|
| #pragma kernel CSFunction_test | CSFunction_testというカーネルの定義 |
| RWStructuredBuffer intBuffer | intBufferという名のC#側に値を戻すときに使うBuffer |
| int intValue | C#側から値をComputeShader側に渡すときに使うint型変数 |
| [numthreads(6, 1, 1)] | 属性,カーネルを実行するスレッドの数を定義.意味:611=6個のthreadを実行する |
| void CSFunction_test | CSFunction_testカーネル.カーネルとはGPUの処理のこと |
| SV_GroupThreadID | セマンティクス:実行しているThreadID |
| intBuffer[***] = group*** | カーネルの処理内容,今回はintBuffer[groupThreadID.x]に自らのThreadID*intValueを代入している |
C#からComputeShaderを使う
以下今回使ったC#スクリプトの例
using System.Collections;
using System.Collections.Generic;
using UnityEngine;

public class CSTest : MonoBehaviour {

    [SerializeField] private ComputeShader _computeShader;
    int CSFunction_testIndex;
    ComputeBuffer intComputeBuffer;

	// Use this for initialization
	void Start () {
        //カーネルインデックスの保存
        CSFunction_testIndex = _computeShader.FindKernel("CSFunction_test");

        intComputeBuffer = new ComputeBuffer(6, sizeof(int));   //スレッドサイズの保存

        //ComputeShaderにどのカーネルバッファを設定するのか,カーネルバッファの名前の設定
        //C#側で使うComputeBufferの指定
        _computeShader.SetBuffer(CSFunction_testIndex, "intBuffer", intComputeBuffer);

        _computeShader.SetInt("intValue", 1);   //ComputeShaderに値を渡す
        _computeShader.Dispatch(CSFunction_testIndex, 1, 1, 1);  //ComputeShaderの実行

        int[] result = new int[6];  //ComputeShaderの結果受け取り用
        intComputeBuffer.GetData(result);   //結果の取り出し

        for (int i = 0; i < 6; i++) {
            Debug.Log(result[i]);   //結果を出力
        }

        intComputeBuffer.Release(); //バッファの開放
	}
}
実効すると今回はnumThread(6, 1, 1)で
intBuffer[groupThreadID.x] = groupThreadID.x * intValue;
を実行しているので,UnityのConsole上に0 ~ 5の6個の結果が出力される.


