No more fragment transaction!!
ということで,Android開発で画面遷移にJetPackのNavigationを使いたいものの,safeargsやらDeepLinkやら機能が豊富で腰が重いみなさん.基本的な動きは正味10分で出来るので作って覚えましょう.
多分途中でハマっても20分あれば大丈夫だと思います.若干射幸心を煽るタイトルですが,10分を超えても訴えたりしないでくれると助かります.
作るもの
Navigationの基本を使えるようになるのが目的なので,ボタンを押すと次の画面に遷移しループするだけのシンプルな仕様です.実装はGitHubのこちら.
10分で出来るのは単純な遷移ですが,
3分のアディショナルタイムでアニメーションを加えることができます.
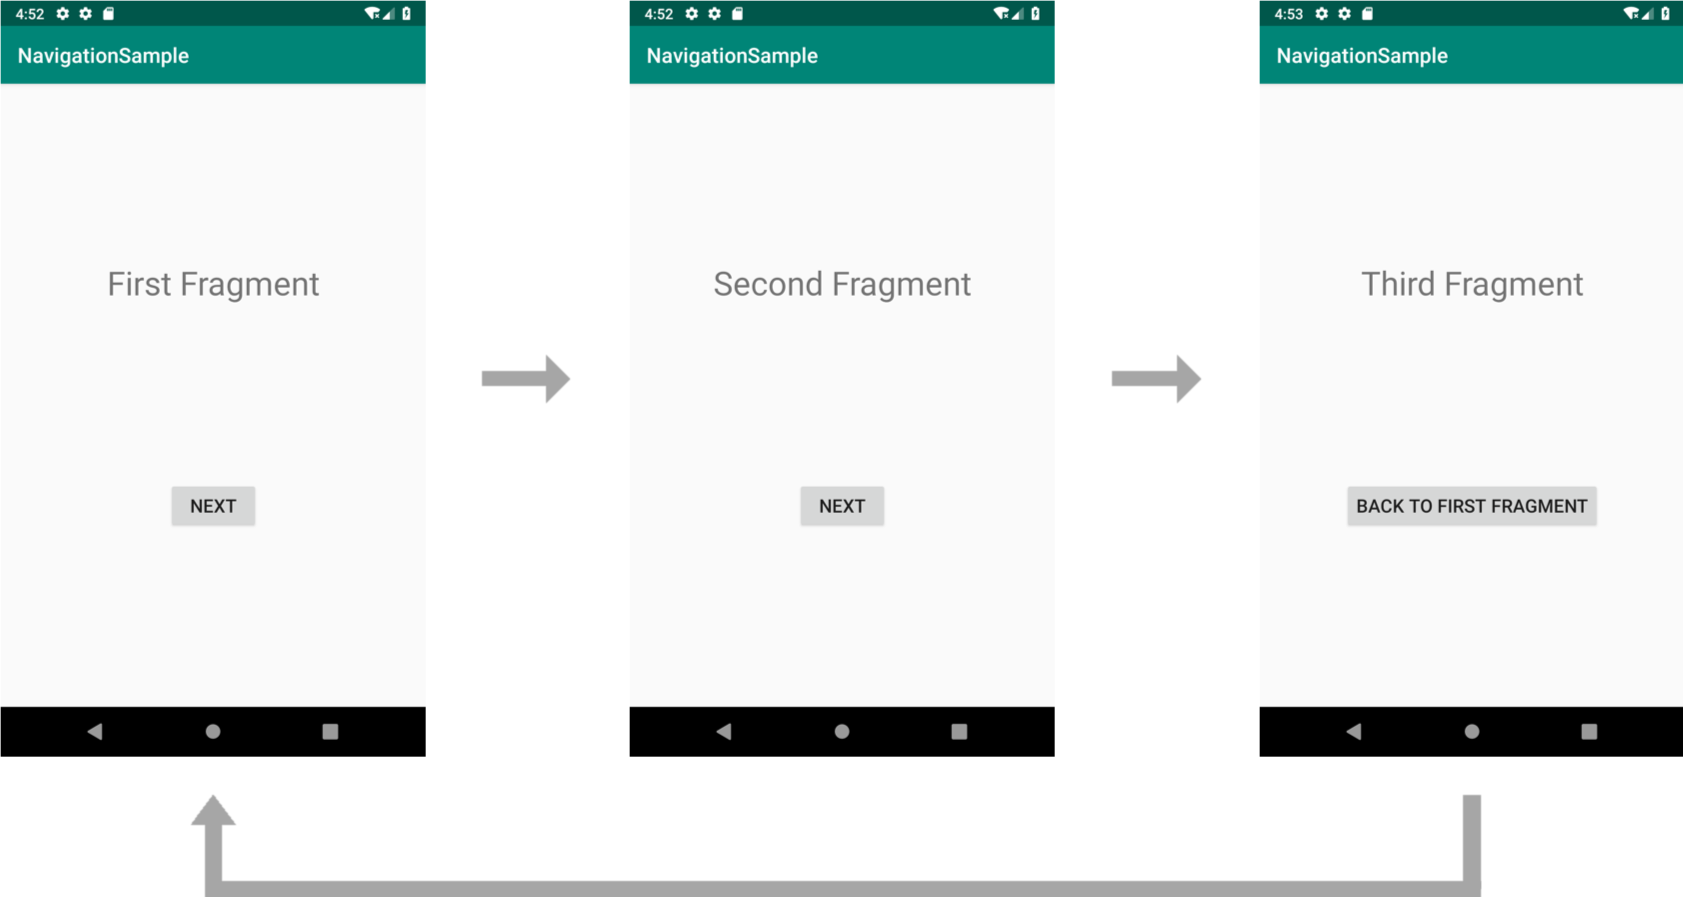
完成画面

遷移図
あらかじめ上記のレポジトリからCloneするか,適当に空のプロジェクトを作っておいてください.
では始めましょう!
依存関係を追加(1分)
dependencies {
    ....
    implementation "android.arch.navigation:navigation-fragment:1.0.0"
    implementation "android.arch.navigation:navigation-ui:1.0.0"
    implementation "android.arch.navigation:navigation-fragment-ktx:1.0.0"
    implementation "android.arch.navigation:navigation-ui-ktx:1.0.0"
}
画面を作成(4分)
必要なActivityとFragmentは以下の4つです.
- MainActivity (この上にFragmentが乗る)
- FirstFragment
- SecondFragment
- ThirdFragment
ということで必要最低限に作ります.
GUIからも追加できますが,要らんコードまでくっついて来るので最初は手動が良さげです.
一応全て載せますが,ほぼ同じなのでクラス名等に気をつけてコピペするだけ.
こんな感じになると思います.
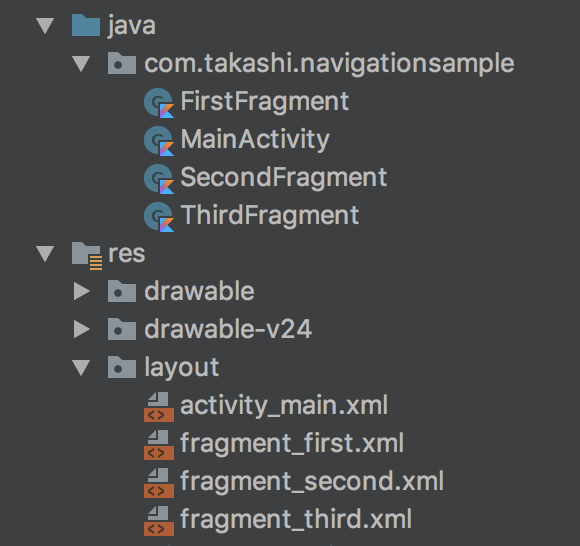
以下ソース.
なお,package名およびimport文は省略しているので補ってください
MainActivity
class MainActivity : AppCompatActivity() {
    override fun onCreate(savedInstanceState: Bundle?) {
        super.onCreate(savedInstanceState)
        setContentView(R.layout.activity_main)
    }
}
<?xml version="1.0" encoding="utf-8"?>
<android.support.constraint.ConstraintLayout xmlns:android="http://schemas.android.com/apk/res/android"
    xmlns:app="http://schemas.android.com/apk/res-auto"
    xmlns:tools="http://schemas.android.com/tools"
    android:layout_width="match_parent"
    android:layout_height="match_parent"
    tools:context=".MainActivity">

</android.support.constraint.ConstraintLayout>
FristFragment
class FirstFragment : Fragment() {
    override fun onCreateView(inflater: LayoutInflater, container: ViewGroup?, savedInstanceState: Bundle?): View? {
        val view = inflater.inflate(R.layout.fragment_first, container, false)

        return view
    }
}
<?xml version="1.0" encoding="utf-8"?>
<android.support.constraint.ConstraintLayout xmlns:android="http://schemas.android.com/apk/res/android"
    android:layout_width="match_parent"
    android:layout_height="match_parent"
    xmlns:tools="http://schemas.android.com/tools"
    xmlns:app="http://schemas.android.com/apk/res-auto"
    tools:context=".FirstFragment">

    <TextView
        android:id="@+id/textView"
        android:layout_width="wrap_content"
        android:layout_height="wrap_content"
        android:text="First Fragment"
        android:textSize="32sp"
        app:layout_constraintTop_toTopOf="parent"
        app:layout_constraintBottom_toTopOf="@+id/button"
        app:layout_constraintStart_toStartOf="parent"
        app:layout_constraintEnd_toEndOf="parent" />

    <Button
        android:id="@+id/button"
        android:layout_width="wrap_content"
        android:layout_height="wrap_content"
        android:text="Next"
        android:textSize="18sp"
        app:layout_constraintTop_toBottomOf="@+id/textView"
        app:layout_constraintBottom_toBottomOf="parent"
        app:layout_constraintStart_toStartOf="parent"
        app:layout_constraintEnd_toEndOf="parent" />

</android.support.constraint.ConstraintLayout>
SecondFragment
class SecondFragment : Fragment() {
    override fun onCreateView(inflater: LayoutInflater, container: ViewGroup?, savedInstanceState: Bundle?): View? {
        val view = inflater.inflate(R.layout.fragment_second, container, false)

        return view
    }
}
<?xml version="1.0" encoding="utf-8"?>
<android.support.constraint.ConstraintLayout xmlns:android="http://schemas.android.com/apk/res/android"
    android:layout_width="match_parent"
    android:layout_height="match_parent"
    xmlns:tools="http://schemas.android.com/tools"
    xmlns:app="http://schemas.android.com/apk/res-auto"
    tools:context=".SecondFragment">

    <TextView
        android:id="@+id/textView"
        android:layout_width="wrap_content"
        android:layout_height="wrap_content"
        android:text="Second Fragment"
        android:textSize="32sp"
        app:layout_constraintTop_toTopOf="parent"
        app:layout_constraintBottom_toTopOf="@+id/button"
        app:layout_constraintStart_toStartOf="parent"
        app:layout_constraintEnd_toEndOf="parent" />

    <Button
        android:id="@+id/button"
        android:layout_width="wrap_content"
        android:layout_height="wrap_content"
        android:text="Next"
        android:textSize="18sp"
        app:layout_constraintTop_toBottomOf="@+id/textView"
        app:layout_constraintBottom_toBottomOf="parent"
        app:layout_constraintStart_toStartOf="parent"
        app:layout_constraintEnd_toEndOf="parent" />

</android.support.constraint.ConstraintLayout>
ThirdFragment
class ThirdFragment : Fragment() {
    override fun onCreateView(inflater: LayoutInflater, container: ViewGroup?, savedInstanceState: Bundle?): View? {
        val view = inflater.inflate(R.layout.fragment_third, container, false)

        return view
    }
}
<?xml version="1.0" encoding="utf-8"?>
<android.support.constraint.ConstraintLayout xmlns:android="http://schemas.android.com/apk/res/android"
    android:layout_width="match_parent"
    android:layout_height="match_parent"
    xmlns:tools="http://schemas.android.com/tools"
    xmlns:app="http://schemas.android.com/apk/res-auto"
    tools:context=".ThirdFragment">

    <TextView
        android:id="@+id/textView"
        android:layout_width="wrap_content"
        android:layout_height="wrap_content"
        android:text="Third Fragment"
        android:textSize="32sp"
        app:layout_constraintTop_toTopOf="parent"
        app:layout_constraintBottom_toTopOf="@+id/button"
        app:layout_constraintStart_toStartOf="parent"
        app:layout_constraintEnd_toEndOf="parent" />

    <Button
        android:id="@+id/button"
        android:layout_width="wrap_content"
        android:layout_height="wrap_content"
        android:text="Back to First Fragment"
        android:textSize="18sp"
        app:layout_constraintTop_toBottomOf="@+id/textView"
        app:layout_constraintBottom_toBottomOf="parent"
        app:layout_constraintStart_toStartOf="parent"
        app:layout_constraintEnd_toEndOf="parent" />

</android.support.constraint.ConstraintLayout>
遷移グラフを定義する(3分)
次に,遷移関係を記述するnavigationのXMLファイルを作りましょう.
まずres下に,navigationディレクトリを作成します.
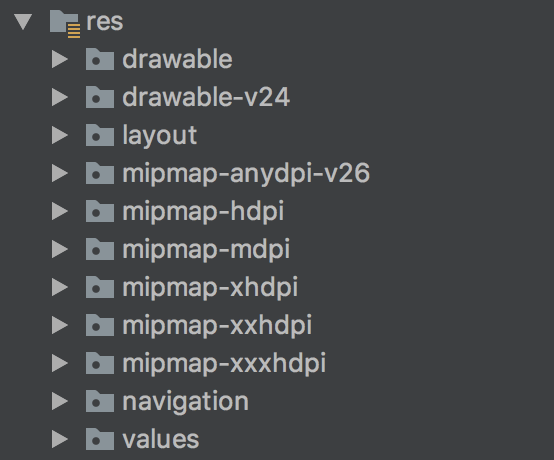
下から2番目にできてますね.
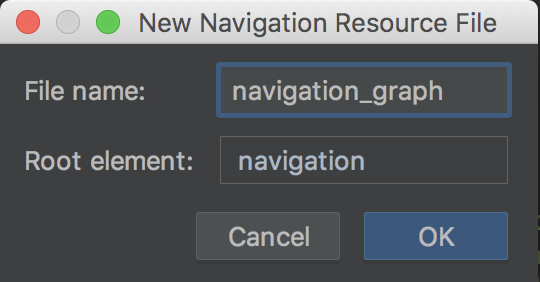
次にnavigationディレクトリのメニューから,New -> Navigation resource fileでxmlを作成します.
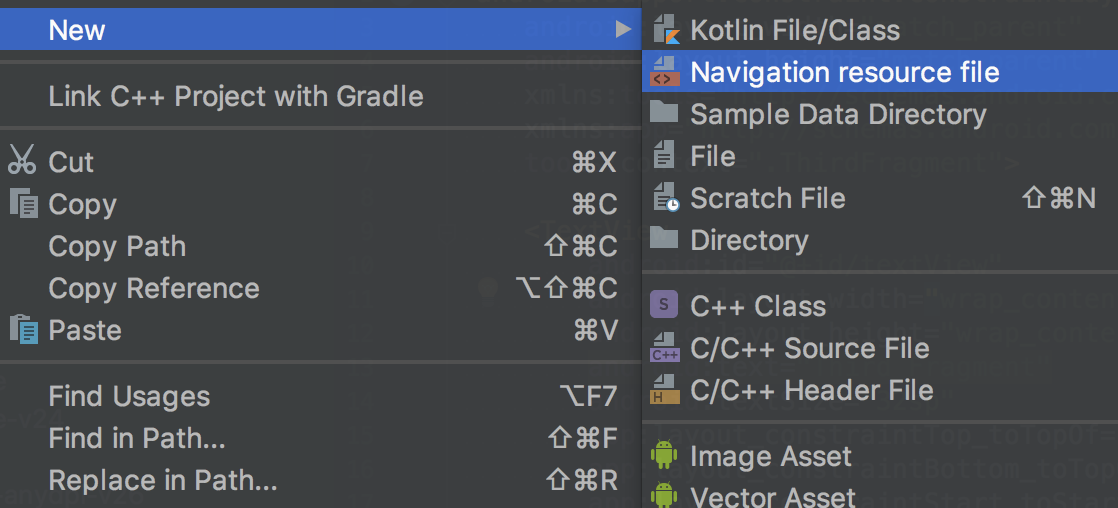
なんでも良いですが,navigation_graphとでもしておきましょう.
すると無事navigation_graph.xmlができていると思うので,以下のソースを記述します.
<?xml version="1.0" encoding="utf-8"?>
<navigation xmlns:android="http://schemas.android.com/apk/res/android"
    xmlns:app="http://schemas.android.com/apk/res-auto"
    xmlns:tools="http://schemas.android.com/tools"
    android:id="@+id/navigation_graph"
    app:startDestination="@id/firstFragment">

    <fragment
        android:id="@+id/firstFragment"
        android:name="com.takashi.navigationsample.FirstFragment"
        android:label="fragment_first"
        tools:layout="@layout/fragment_first" >
        <action
            android:id="@+id/action_first_to_second"
            app:destination="@id/secondFragment" />
    </fragment>

    <fragment
        android:id="@+id/secondFragment"
        android:name="com.takashi.navigationsample.SecondFragment"
        android:label="fragment_second"
        tools:layout="@layout/fragment_second" >
        <action
            android:id="@+id/action_second_to_third"
            app:destination="@id/thirdFragment" />
    </fragment>

    <fragment
        android:id="@+id/thirdFragment"
        android:name="com.takashi.navigationsample.ThirdFragment"
        android:label="fragment_third"
        tools:layout="@layout/fragment_third">
        <action
            android:id="@+id/action_third_to_first"
            app:destination="@id/firstFragment" />
    </fragment>

</navigation>
簡単に解説.
まずはじめに,navigationで遷移させたいfragmentは<navigation>要素内で<fragment>要素として定義する必要があります.そしていつも通りandroid:idで固有idを,android:nameでは先ほど作ったFragmentと紐付けてあげましょう.
次に<action>要素で,遷移先を定義します.android:idで設定したidは,次のステップで遷移を行う際に使用します.app:destinationには,一つ前で定義した遷移したいFragmentのidを設定します.
あと忘れてはいけないのが,<navigation>のandroid:idとapp:startDestinationタグ.idは好きなものを,startDestinationには最初に表示させたいFragmentを設定しておいてください.
ここまで来れば,あとは遷移を呼び出すだけ!
Navigationを呼び出す(2分)
その前に,今しがた作ったnavigationファイルをFragmentの受け皿となるMainActivityに紐づけておきます.
さりげなく設定しているNavHostFragmentがnavigationの肝だったりするんですが,とりあえずは理解しなくても大丈夫です.
<?xml version="1.0" encoding="utf-8"?>
<android.support.constraint.ConstraintLayout xmlns:android="http://schemas.android.com/apk/res/android"
    xmlns:app="http://schemas.android.com/apk/res-auto"
    xmlns:tools="http://schemas.android.com/tools"
    android:layout_width="match_parent"
    android:layout_height="match_parent"
    tools:context=".MainActivity">

    <fragment
        android:id="@+id/nav_host_fragment"
        android:layout_height="match_parent"
        android:layout_width="match_parent"
        android:name="androidx.navigation.fragment.NavHostFragment"
        app:navGraph="@navigation/navigation_graph"
        app:defaultNavHost="true" />

</android.support.constraint.ConstraintLayout>
最後の仕上げ.Fragmentのボタンのクリックリスナに遷移処理を書きましょう.
各FragmentのonCreateView内に,以下を記述するだけ.
呼び出したいactionを先ほど設定したidを使って呼び出します.
view.button.setOnClickListener {
    findNavController().navigate(R.id.action_first_to_second)
}
もはや自明ですが,各フラグメントは以下のようになりますね.
class FirstFragment : Fragment() {
    override fun onCreateView(inflater: LayoutInflater, container: ViewGroup?, savedInstanceState: Bundle?): View? {
        val view = inflater.inflate(R.layout.fragment_first, container, false)

        view.button.setOnClickListener {
            findNavController().navigate(R.id.action_first_to_second)
        }
        return view
    }
}
class SecondFragment : Fragment() {
    override fun onCreateView(inflater: LayoutInflater, container: ViewGroup?, savedInstanceState: Bundle?): View? {
        val view = inflater.inflate(R.layout.fragment_second, container, false)

        view.button.setOnClickListener {
            findNavController().navigate(R.id.action_second_to_third)
        }
        return view
    }
}
class ThirdFragment : Fragment() {
    override fun onCreateView(inflater: LayoutInflater, container: ViewGroup?, savedInstanceState: Bundle?): View? {
        val view = inflater.inflate(R.layout.fragment_third, container, false)

        view.button.setOnClickListener {
            findNavController().navigate(R.id.action_third_to_first)
        }
        return view
    }
}
動く!
アニメーションは無いですが,遷移できるようになりました.

アニメーションを適用する(+3分)
このままではなんだか味気なくてテンションが上がらないですね.
しかしNavigationを使えば,xmlレベルでアニメーションの適用が可能です.醍醐味.
アニメーションを適用するにあたり,まずアニメーションを作らねばなりません.
ということで,res下にanimディレクトリを作成し,以下のようにアニメーションリソースを作成しましょう.
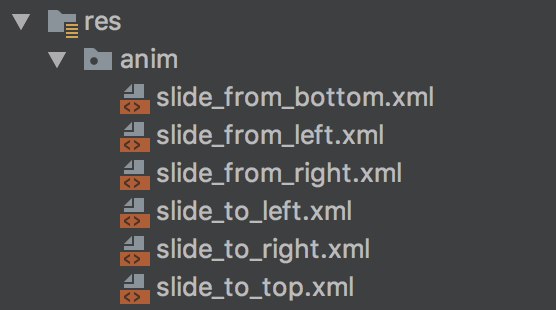
ソース.
<?xml version="1.0" encoding="utf-8"?>
<set xmlns:android="http://schemas.android.com/apk/res/android">
    <translate android:fromYDelta="100%p" android:toYDelta="0"
        android:duration="@android:integer/config_mediumAnimTime" />
    <alpha android:fromAlpha="0.0" android:toAlpha="1.0"
        android:duration="@android:integer/config_mediumAnimTime" />
</set>
<?xml version="1.0" encoding="utf-8"?>
<set xmlns:android="http://schemas.android.com/apk/res/android">
    <translate android:fromXDelta="-100%p" android:toXDelta="0"
        android:duration="@android:integer/config_mediumAnimTime" />
    <alpha android:fromAlpha="0.0" android:toAlpha="1.0"
        android:duration="@android:integer/config_mediumAnimTime" />
</set>
<?xml version="1.0" encoding="utf-8"?>
<set xmlns:android="http://schemas.android.com/apk/res/android">
    <translate android:fromXDelta="100%p" android:toXDelta="0"
        android:duration="@android:integer/config_mediumAnimTime" />
    <alpha android:fromAlpha="0.0" android:toAlpha="1.0"
        android:duration="@android:integer/config_mediumAnimTime" />
</set>
<?xml version="1.0" encoding="utf-8"?>
<set xmlns:android="http://schemas.android.com/apk/res/android">
    <translate android:fromXDelta="0" android:toXDelta="-100%p"
        android:duration="@android:integer/config_mediumAnimTime" />
    <alpha android:fromAlpha="1.0" android:toAlpha="0.0"
        android:duration="@android:integer/config_mediumAnimTime" />
</set>
<?xml version="1.0" encoding="utf-8"?>
<set xmlns:android="http://schemas.android.com/apk/res/android">
    <translate android:fromXDelta="0" android:toXDelta="100%p"
        android:duration="@android:integer/config_mediumAnimTime" />
    <alpha android:fromAlpha="1.0" android:toAlpha="0.0"
        android:duration="@android:integer/config_mediumAnimTime" />
</set>
<?xml version="1.0" encoding="utf-8"?>
<set xmlns:android="http://schemas.android.com/apk/res/android">
    <translate android:fromYDelta="0" android:toYDelta="-100%p"
        android:duration="@android:integer/config_mediumAnimTime" />
    <alpha android:fromAlpha="1.0" android:toAlpha="0.0"
        android:duration="@android:integer/config_mediumAnimTime" />
</set>
これらを先ほどいじっていたnavigation_graph.xml内の<action>要素に追加するだけでアニメーションが適用されます.
例えば遷移の際に左にスライドするアニメーションは,
元のViewが左に出て行くアニメーションと,新しいViewが右から入ってくるアニメーション
を組み合わせるので,
app:enterAnim="@anim/slide_from_right"
app:exitAnim="@anim/slide_to_left"
のように指定しましょう.
例えば冒頭にあげた動画のように動かしたければ,以下の様になります.
<?xml version="1.0" encoding="utf-8"?>
<navigation xmlns:android="http://schemas.android.com/apk/res/android"
    xmlns:app="http://schemas.android.com/apk/res-auto"
    xmlns:tools="http://schemas.android.com/tools"
    android:id="@+id/navigation_graph"
    app:startDestination="@id/firstFragment">

    <fragment
        android:id="@+id/firstFragment"
        android:name="com.takashi.navigationsample.FirstFragment"
        android:label="fragment_first"
        tools:layout="@layout/fragment_first" >
        <action
            android:id="@+id/action_first_to_second"
            app:enterAnim="@anim/slide_from_right"
            app:exitAnim="@anim/slide_to_left"
            app:destination="@id/secondFragment" />
    </fragment>

    <fragment
        android:id="@+id/secondFragment"
        android:name="com.takashi.navigationsample.SecondFragment"
        android:label="fragment_second"
        tools:layout="@layout/fragment_second" >
        <action
            android:id="@+id/action_second_to_third"
            app:enterAnim="@anim/slide_from_bottom"
            app:exitAnim="@anim/slide_to_top"
            app:destination="@id/thirdFragment" />
    </fragment>

    <fragment
        android:id="@+id/thirdFragment"
        android:name="com.takashi.navigationsample.ThirdFragment"
        android:label="fragment_third"
        tools:layout="@layout/fragment_third">
        <action
            android:id="@+id/action_third_to_first"
            app:enterAnim="@anim/slide_from_left"
            app:exitAnim="@anim/slide_to_right"
            app:destination="@id/firstFragment" />
    </fragment>

</navigation>
また, app:popEnterAnim と app:popExitAnim を指定してあげることでpop時のアニメーションを設定することもできます.
完成
おつかれさまです.
補足(popBackStackについて)
今回のサンプルではThirdFragmentからFirstFragmentに戻る際にactionを使用しているので,一周した後にBackキーを押すとThirdに戻ります.
多くのアプリの場合FirstからThirdに向かってスタックを積んで行く設計になることが多いでしょうから,ThirdFragmentから戻る際には,以下のようにfragmentのidを指定して一気にFirstFragmentまでpopすることができます.
class ThirdFragment : Fragment() {
    override fun onCreateView(inflater: LayoutInflater, container: ViewGroup?, savedInstanceState: Bundle?): View? {
        val view = inflater.inflate(R.layout.fragment_third, container, false)

        view.button.setOnClickListener {
            findNavController().popBackStack(R.id.firstFragment, false)
        }
        return view
    }
}
おわりに
Navigationを使うことで,アニメーションを追加して,Transactionを呼び出して...みたいなことをしなくてよくなりましたね.部分的に導入することもできるので,積極的に使うことで結構実装がスッキリするのではないでしょうか.
本記事では基本中の基本しか触れていませんが,Toolbarとの連携や引数の受け渡し,DeepLinkも使えたりします.気になった方は以下の公式サイトやブログ記事で紹介されているので,ぜひ調べて見てください.