MacにPythonを複数インストールしてゴチャゴチャしてきたので、初心に返って綺麗に入れ直そうという思い至った際の作業のメモです。
これからMacでpython開発環境を構築する際のガイドになれば幸いです。
環境
MacBook Pro 13" (mid-2020) / Mac Mini M1
macOS BigSure Version 11.4.x
Xcode Version 12.5
XCodeをインストールする
Appleの提供する統合開発環境(IDE)のXcodeは色々とライブラリを提供してくれるので、便利な子です。入れておきましょう。
入手はAppStoreのXcodeのページを踏むとMacのアプリであるAppStoreを開いてくれますので、インストールボタンを押してからのんびりお茶でもいれててください。
終わったら、XCodeのCommand Line Toolsが次のステップに必要なのでいれておきましょう。
Terminal.appを開いて次のコマンドを実行します。
user@host $ xcode-select --install
xcode-select: error: command line tools are already installed, use "Software Update" to install updates
すでにツールがインストールされている旨を通知されます。これは大助かり。ただ、インスールされているだけでEULAには同意していないので、実際にツールを使う際には
shell-session:terminal.app
user@host $ make
Agreeing to the Xcode/iOS license requires admin privileges, please run “sudo xcodebuild -license” and then retry this command.
と怒られたりします。なので、指示に従ってEULAに同意します。
shell-session:terminal.app
user@host $ xcode-select -license
EULAへの同意を求められるので、EULAをすっ飛ばした後 隅々まで読んでからagreeと入力して終わりです。
インストールされているのをしっかり確認しましょう。
user@host $ xcode-select --print-path
/Library/Developer/CommandLineTools
これでXcodeの準備は万全です。
場合によって、ツールにインストールを求められる場合もありますので、その場合にはインストールしましょう。
user@host $ xcode-select --install
xcode-select: note: install requested for command line developer tools
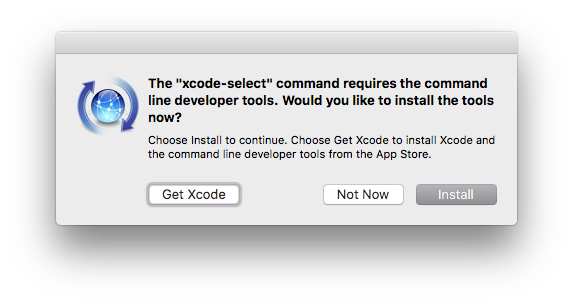
そうするとこんな感じの窓がポップアップしてくるので、installボタンをポチりとやってしまいましょう。

インストールがはじまる前にEULAを読まされそうになりますが、Agreeして先へ。これもしばらくかかります。
成功した暁にはxcode-selectがツールのパスを教えてくれます。めでたし、めでたし。
user@host $ xcode-select --print-path
/Library/Developer/CommandLineTools
Homebrewをインストールする
続いてははhomebrew。HomeBrewの公式ページにあるコマンドをTerminalで実行します。
色々とチェックが入った後、実際に変更を行う前にパスワードを聞いてきます、/usr/local 以下にしか変更をしようとしていないかどうか軽く確認してから、パスワードを与えてあげましょう。
user@host ~ % /bin/bash -c "$(curl -fsSL https://raw.githubusercontent.com/Homebrew/install/master/install.sh)"

....

==> Next steps:
- Add Homebrew to your PATH in /Users/username/.zprofile:
    echo 'eval "$(/opt/homebrew/bin/brew shellenv)"' >> /Users/username/.zprofile
    eval "$(/opt/homebrew/bin/brew shellenv)"
- Run `brew help` to get started
- Further documentation:
    https://docs.brew.sh
Apple製CPU(arm64)に対応した際にhomebrewのインストール先が選択式になったので、shellで指定してね、というお話ですね。
私はこんな感じでコマンドが存在するか確認してから初期化してます。ご参考までに。
  if [ -e /opt/homebrew ]; then
    HOMEBREW_ROOT=/opt/homebrew
  else
    HOMEBREW_ROOT=/usr/local
  fi
  export HOMEBREW_ROOT
  eval $(${HOMEBREW_ROOT}/bin/brew shellenv)
Homebrewの挙動をたしかめる。
user@host $ brew doctor
Your system is ready to brew.
とでれば準備万端。
HomeBrewを更新
HomeBrewは時折更新しておいた方がいいので、とりあえず更新しておきます。
user@host $ brew update
Already up-to-date.
憧れのPython、でもその前に....。pyenvをインストール
HomeBrewが入った所で今度はPythonの番なのですが....。
pythonを直接入れるのではなく、複数のpython環境を使えるようにpyenvを使います。
HomeBrewが必要な物をインストールしてくれます。(追記:2022-02 現在、pyenvの最新版は2.2.4です)
user@host $ brew install pyenv
==> Downloading https://ghcr.io/v2/homebrew/core/pyenv/manifests/2.0.0
Already downloaded: /Users/alex.sayle/Library/Caches/Homebrew/downloads/823107b6ae39c10de6f60dd15aa12afb8725c8e5f07a3a300268d038379999bb--pyenv-2.0.0.bottle_manifest.json
==> Downloading https://ghcr.io/v2/homebrew/core/pyenv/blobs/sha256:9f7cd1cebda2b4b73bef022f7291e52fa9440791f08daf78609cd3b721fee2a9
==> Downloading from https://pkg-containers.githubusercontent.com/ghcr1/blobs/sha256:9f7cd1cebda2b4b73bef022f7291e52fa9440791f08daf78609cd3b
######################################################################## 100.0%
==> Pouring pyenv--2.0.0.arm64_big_sur.bottle.tar.gz
🍺  /opt/homebrew/Cellar/pyenv/2.0.0: 756 files, 2.6MB
brew install pyenv  1.79s user 1.14s system 76% cpu 3.832 total
pyenv用にprofileを調整
pyenvには自動補完機能があるので、それを提供してもらう。
MacOS 10.5 (Catalina) からはzshがデフォルトです。pyenv2.0ではpyenvの初期化と、PATHの変更を別々にする仕様になったので、~/.zprofile と ~/.zshrcの両方を変更してあげます。ざっくりと以下の様な変更を入れてあげます。
# set PIPENV behaviour to always place .venv inside the project
export PIPENV_VENV_IN_PROJECT=true

if [ `uname` = "Darwin" ]; then
  # set op homebrew
  if [ -e /opt/homebrew ]; then
    HOMEBREW_ROOT=/opt/homebrew
  else
    HOMEBREW_ROOT=/usr/local
  fi
  export HOMEBREW_ROOT

  eval $(${HOMEBREW_ROOT}/bin/brew shellenv)

  # set up pyenv
  export PYENV_ROOT=${HOMEBREW_ROOT}/var/pyenv
  if command -v pyenv 1>/dev/null 2>&1; then
    export PATH="$PYENV_ROOT/bin:$PATH"
    eval "$(pyenv init --path)"
  fi

fi
if [ `uname` = "Darwin" ]; then
    if command -v pyenv 1>/dev/null 2>&1; then
      eval "$(pyenv init -)"
    fi
fi
まだまだ時代はbashだ!という方は.bash_profileへ。
pyenvを確認
これでpyenvがインストールされ、使う準備が整ったはず!試してみよう。
user@host $ pyenv --help
Usage: pyenv <command> [<args>]

Some useful pyenv commands are:
   --version   Display the version of pyenv
   commands    List all available pyenv commands
   exec        Run an executable with the selected Python version
   global      Set or show the global Python version(s)
   help        Display help for a command
   hooks       List hook scripts for a given pyenv command
   init        Configure the shell environment for pyenv
   install     Install a Python version using python-build
   local       Set or show the local application-specific Python version(s)
   prefix      Display prefix for a Python version
   rehash      Rehash pyenv shims (run this after installing executables)
   root        Display the root directory where versions and shims are kept
   shell       Set or show the shell-specific Python version
   shims       List existing pyenv shims
   uninstall   Uninstall a specific Python version
   version     Show the current Python version(s) and its origin
   version-file   Detect the file that sets the current pyenv version
   version-name   Show the current Python version
   version-origin   Explain how the current Python version is set
   versions    List all Python versions available to pyenv
   whence      List all Python versions that contain the given executable
   which       Display the full path to an executable

See `pyenv help <command>' for information on a specific command.
For full documentation, see: https://github.com/pyenv/pyenv#readme
Pythonをインストール
まずはインストールできるバージョンを確認してみましょう。
user@host $ pyenv install --list
Available versions:
沢山のバージョンが羅列されましたね...。
今回はpython3.10系列とpython3.9系列を一つづついれましょう。
user@host $ pyenv install --list | egrep '^[ ]+[3]\.(9|10|11)\..+$' | sort -Vr
とやって、オフィシャルなpythonたちを探して上げます。3.xの最新はそれぞれ、2022-02、こんな感じですね。
user@host $ pyenv install --list  | egrep '^[ ]+[3]\.(10)\..+$'  | sort -Vr | head -n 1
  3.10.2
user@host $ pyenv install --list  | egrep '^[ ]+[3]\.(9)\..+$'  | sort -Vr | head -n 1
  3.9.10
インストールは自前でコンパイルを始めるので時間もCPUも電気も食べます。電源を確保した上でやりましょう。
user@host $ pyenv install 3.9.10
python-build: use openssl@1.1 from homebrew
python-build: use readline from homebrew
Downloading Python-3.9.10.tar.xz...
-> https://www.python.org/ftp/python/3.9.10/Python-3.9.10.tar.xz
Installing Python-3.9.10...
python-build: use readline from homebrew
python-build: use zlib from xcode sdk

Installed Python-3.9.10 to /opt/homebrew/var/pyenv/versions/3.9.10/
普段使用するPythonを選ぶ
デフォルトではMacOSのPythonを使おうとするので、折角いれたpython達が使われません。pyenvを使って設定してあげましょう。
user@host $ pyenv global 3.10.2
user@host $ pyenv versions
  system
* 3.10.2 (set by /opt/homebrew/var/pyenv/version)
user@host $ python --version
python 3.10.2
これでようやくHomebrew+pyenv+pythonまでたどり着きました。
Pythonの設定 (Pipenv)
pythonの使い方は人それぞれですが、昨今はpipenvやpoetryが流行ってますね。
私はpipenv派です。そのための初期設定まではやってしまいましょう。
まずは既存のパッケージの古いやつがないかチェックです。
user@host $ python -m pip list -o
Package    Version Latest Type
---------- ------- ------ -----
pip        21.1.1  21.1.2 wheel
setuptools 56.0.0  57.0.0 wheel
WARNING: You are using pip version 21.1.1; however, version 21.1.2 is available.
You should consider upgrading via the '/opt/homebrew/var/pyenv/versions/3.9.10/bin/python3.9 -m pip install --upgrade pip' command.
いますね....。上げましょう。
user@host $ python -m pip install pip --upgrade
user@host $ python -m pip install setuptools --upgrade
続いて、pipenvをインストールして、ベースのpythonにはこれ以上入れないようにします。
後はpipenvで制作するプロジェクトの中で吸収してもらいます。
user@host $ python -m pip install pipenv
皆様も良いpythonライフを。