はじめに
- 例としてAPI Client Library for PythonでCompute Engine APIを操作する方法を説明します。その他の言語やGoogle Cloud APIでも流れは同様のはずです。
想定する環境
- Redhat系Linux / MacOSX ※debian系についても、ツールの導入方法が多少違う程度のはず
- Python 2.6, 2.7, 3.3, or 3.4(2015/9現在)および pip が導入済み
- この記事を書くために使用した検証環境は以下の通り
$ cat /etc/redhat-release
CentOS Linux release 7.1.1503 (Core)
$ python -V
Python 2.7.5
$ pip -V
pip 7.1.0 from /usr/lib/python2.7/site-packages (python 2.7)
準備
- API Client Library for Python をインストールする。
$ sudo pip install --upgrade google-api-python-client
- (オプション)Google Cloud SDKをインストールする。
$ sudo curl https://sdk.cloud.google.com | bash
 → 途中の質問は全て Y またはデフォルト値のままでOK。
$ exec -l $SHELL
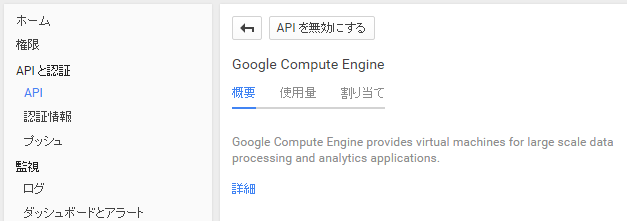
- 自分のプロジェクトのGoogle Developer Consoleで "APIと認証 - API - APIライブラリ" から "Compute Engine API" を選択して、APIが有効であることを確認する(無効であれば”APIを有効にする”というボタンが表示されるため、クリックして有効にする)。

認証
2つの方法を説明します。
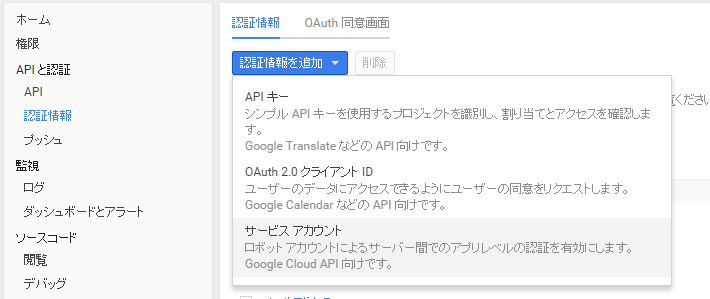
1. サービスアカウントを利用する方法
自分のgoogleアカウントの代わりのアプリケーション用アカウントを作成する方法。当然自分(達)が使うアプリケーション用の仕組みなので、人に配布したりしないように注意。
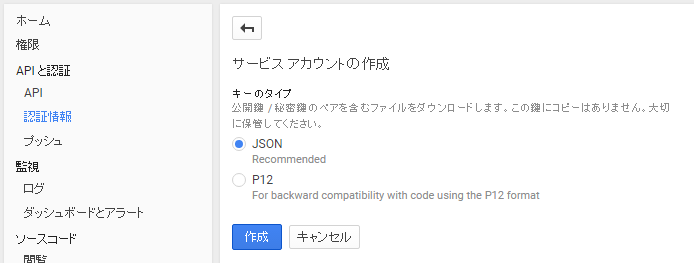
- "プロジェクト名-xxx.json" という名前でクレデンシャルファイルがダウンロードされるので、これをAPI Client Libraryを使うホストの任意のパスに保存する(※取り扱い注意※) 。
- 環境変数 GOOGLE_APPLICATION_CREDENTIALS に、先ほどのクレデンシャルファイルのパスを設定する。必要に応じて、.bash_profileその他に記載しておくとよい。
$ export GOOGLE_APPLICATION_CREDENTIALS='/xxx/xxx/プロジェクト名-xxx.json'
2. gcloudコマンドで認証する方法
自分のgoogleアカウントで認証して、ホスト上にクレデンシャルを保存しておく方法。
- 以下のコマンドを実行し、ホストに認証情報をセットする。
$ gcloud auth login
Go to the following link in your browser:

    https://accounts.google.com/o/oauth2/auth?redirect_uri=xxx...
    → 表示されたURLに、自分のプロジェクトに対してアクセス権限があるgoogleアカウントでログインしたWebブラウザで接続する。

Enter verification code: ※上記URLにて表示された認証コードを入力する
Saved Application Default Credentials.
動作確認
- 以下のサンプルコードを保存する。
- シェバン行は環境に合わせて変更
- 3~6行目はコピペでOK
- 8行目以降はCompute Engine APIを用いてインスタンス情報を取得するだけのサンプル
sample.py
 1  #!/usr/bin/python
 2
 3  from oauth2client.client import GoogleCredentials
 4  from googleapiclient.discovery import build
 5
 6  credentials = GoogleCredentials.get_application_default()
 7
 8  compute = build('compute', 'v1', credentials=credentials)
 9  project = 'プロジェクトID'
10  zone = 'ゾーン名'
11
12  print compute.instances().list(project=project, zone=zone).execute()
- 実行し、GCEのインスタンス情報がずらずら表示されたら動作確認OK。
- ここまできたら何も怖くない。適宜リファレンスを参照しながら気のきいたコードを書くのみ。
余談と補足
- ちょっとした操作であればgcloudコマンドで事足りるが、ちょっと気のきいたことをしたくなることもある。
- しかしそのために必要なOAuth認証の手続きが、それならいいやと諦める人が一定数いる程度には面倒であった(個人の感想)が、この話(http://googlecloudplatform-japan.blogspot.jp/2015/07/application-default-credentials-google.html) 以降ずいぶん楽になっていてありがたい。
- この内容は2015年9月時点のものです。google関連は変化が速いため、何か変わっていても焦らず最新の1次情報にあたってください。
※参考文献
https://cloud.google.com/compute/docs/tutorials/python-guide
https://developers.google.com/api-client-library/python/?hl=ja

