課題
訳があって(seleniumを使いたい)LinuxのGUIコンソール(DISPLAY=:0)をアクセスしたいが、サーバーがawsのec2にあり、どうすればよいか?
TL;DR(Too Long, Didn’t Read)
- GUI関連パッケージをインストール
yum groupinstall "Server with GUI" - x0vncserverをインストール
yum install tigervnc-server - ユーザー追加
adduser user1、パスワード変更passwd user1、VNC用パスワードも設定vncpasswd - pam設定
vi /etc/pam.d/xerver、この行を auth required pam_console.so ⇐ pem_permit.soへ変更 - SELinux停止
vi /etc/selinux/config、SELINUX=disabled に変更、reboot - firewall停止
systemctl stop firewalld - user1で
startx - user1で
x0vncserver -display :0 -passwordfile ~/.vnc/passwd - vncviewerでサーバーに接続
手順
ゆっくり話そう
aws ec2インスタンスの作成
awsの利用はお金かかる場合があるので、ご理解の上で利用ください。
- aws ec2 console の接続。注意、右上
東京になっているが、必要に応じて修正
-
インスタンス起動をクリック。翻訳のせいか、「インスタンス新規作成」の意味 - 検索ボックスに
redhatを入れてエンターを押す - 「AWS Marketplace で
105 件の結果件」をクリック - 今回試験で選ぶのは「RHEL-7.8-20200506-10GiB | 担当 ProComputers.com」、右の
選択をクリック -
Continueをクリック - STEP2:既に
t2.largeが選ばれた状態である、必要に応じて修正。今回試験はこのまま利用。次のステップ:インスタンスの詳細の設定をクリック - STEP3:今回は修正なし、
次のステップ:ストレージの追加をクリック - STEP4:サイズが
10GBになっているが、今回は余裕をもって20GBにする。次のステップ:タグの追加をクリック - STEP5:今回は修正なし、
次のステップ:セキュリティグループの設定をクリック - STEP6:ソース欄 '0.0.0.0/0'ななっているが、自分のアドレスを調べて、(例えばここで)、
自分のIPアドレス/32を入れる - ----- タイプが'SSH'になっているが、
すべてのトラフィックに変える。警告:↑の行と合わせてやらないとセキュリティーが著しく低下するのでご注意ください - -----
確認と作成をクリック - STEP7:内容確認して、問題なければ
起動をクリック - 'キーペア'の小窓が出る。新規キーペア作成を選ぶ。新規の場合キーペア名を入れる。
キーペアのダウンロードをクリックし、pemファイルを保存する。注意:青い注意書きをよく読んでください。このpemファイルがないと今後このインスタンスがアクセスできなくなること、と、このpemファイルは再度ダウンロードする方法はないこと - 問題なければ、
インスタンスの作成をクリック。作成自体はしばらく(数分程度)かかる
環境
試験環境接続
割愛。
tera termと先保存したpemファイルを使って接続する。
試験環境確認
NAME="Red Hat Enterprise Linux Server"
VERSION="7.8 (Maipo)"
ID="rhel"
ID_LIKE="fedora"
VARIANT="Server"
VARIANT_ID="server"
VERSION_ID="7.8"
PRETTY_NAME="Red Hat Enterprise Linux Server 7.8 (Maipo)"
ANSI_COLOR="0;31"
CPE_NAME="cpe:/o:redhat:enterprise_linux:7.8:GA:server"
HOME_URL="https://www.redhat.com/"
BUG_REPORT_URL="https://bugzilla.redhat.com/"

REDHAT_BUGZILLA_PRODUCT="Red Hat Enterprise Linux 7"
REDHAT_BUGZILLA_PRODUCT_VERSION=7.8
REDHAT_SUPPORT_PRODUCT="Red Hat Enterprise Linux"
REDHAT_SUPPORT_PRODUCT_VERSION="7.8"
ディスク容量確認
デフォルト10GBだが、余裕をもって20GBのディスクを選んでました。
Filesystem      Size  Used Avail Use% Mounted on
devtmpfs        3.8G     0  3.8G   0% /dev
tmpfs           3.9G     0  3.9G   0% /dev/shm
tmpfs           3.9G   17M  3.9G   1% /run
tmpfs           3.9G     0  3.9G   0% /sys/fs/cgroup
/dev/xvda2       20G  1.6G   19G   8% /
tmpfs           782M     0  782M   0% /run/user/0
tmpfs           782M     0  782M   0% /run/user/1000
GUIのインストール
以降特別説明なければrootで作業する
sudo su -
まず利用できる選択肢を確認
yum grouplist
Available Environment Groups:
   Minimal Install
   Infrastructure Server
   File and Print Server
   Basic Web Server
   Virtualization Host
   Server with GUI   ⇐ 今回これを使う
Available Groups:
   Compatibility Libraries
   Console Internet Tools
   Development Tools
   Graphical Administration Tools
   Legacy UNIX Compatibility
   Scientific Support
   Security Tools
   Smart Card Support
   System Administration Tools
   System Management
Done
今回はServer with GUIを使う。ちなみにyum grouplist hiddenで詳細な選択肢が出る。
yum groupinstall "Server with GUI"
途中の質問にyで答え
しばらく自動実行が続く(約8分)
物理モニタがあれば、/etc/inittabを修正して、起動時自動的にGUIを立ち上げる設定を入れるが、今回は必要ない、というより、上げない方が次の設定がうまくいく。
x0vncserverをインストール
x0vncserverは新規Xサーバーを起動するのではなく、既存のXサーバーを繋げられることができる
yum install tigervnc-server
Xを起動
rootユーザーで以下のコマンドを実行
startx
VNC準備と起動
別ターミナルで以下のコマンドを実行。これもrootユーザーで、vnc接続用パスワードを設定
vncpasswd
Password:
Verify:
Would you like to enter a view-only password (y/n)? n
A view-only password is not used
vncサーバーを起動
x0vncserver -display :0 -passwordfile ~/.vnc/passwd
ポート番号を覚える
Sun Sep 20 07:48:15 2020
 Geometry:    Desktop geometry is set to 1024x768+0+0
 Main:        XTest extension present - version 2.2
 Main:        Listening on port 5900  ⇐ ポート番号
接続
接続には vnc viewer、或いはUltraVNCを利用できる。
サーバーのIPとポートでつなげ、先設定したパスワードが聞かれる。成功したらこんな感じ
サーバー側
Sun Sep 20 07:48:36 2020
 Connections: accepted: 111.98.64.161::58004
 SConnection: Client needs protocol version 3.8
 SConnection: Client requests security type VncAuth(2)

Sun Sep 20 07:48:43 2020
 Main:        Enabling 8 buttons of X pointer device
 Main:        Allocated basic Xlib image
 VNCSConnST:  Server default pixel format depth 16 (16bpp) little-endian rgb565
 VNCSConnST:  Client pixel format depth 6 (8bpp) rgb222
クライアント側こんな感じ。
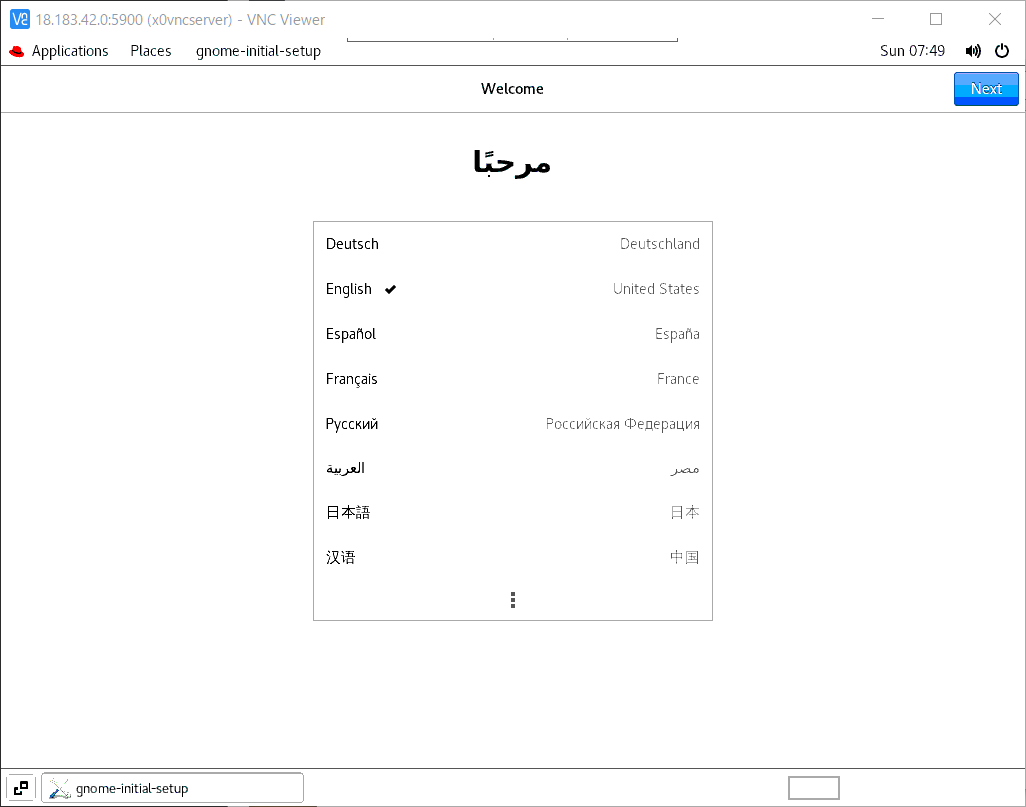
初回入るので、初期設定が必要
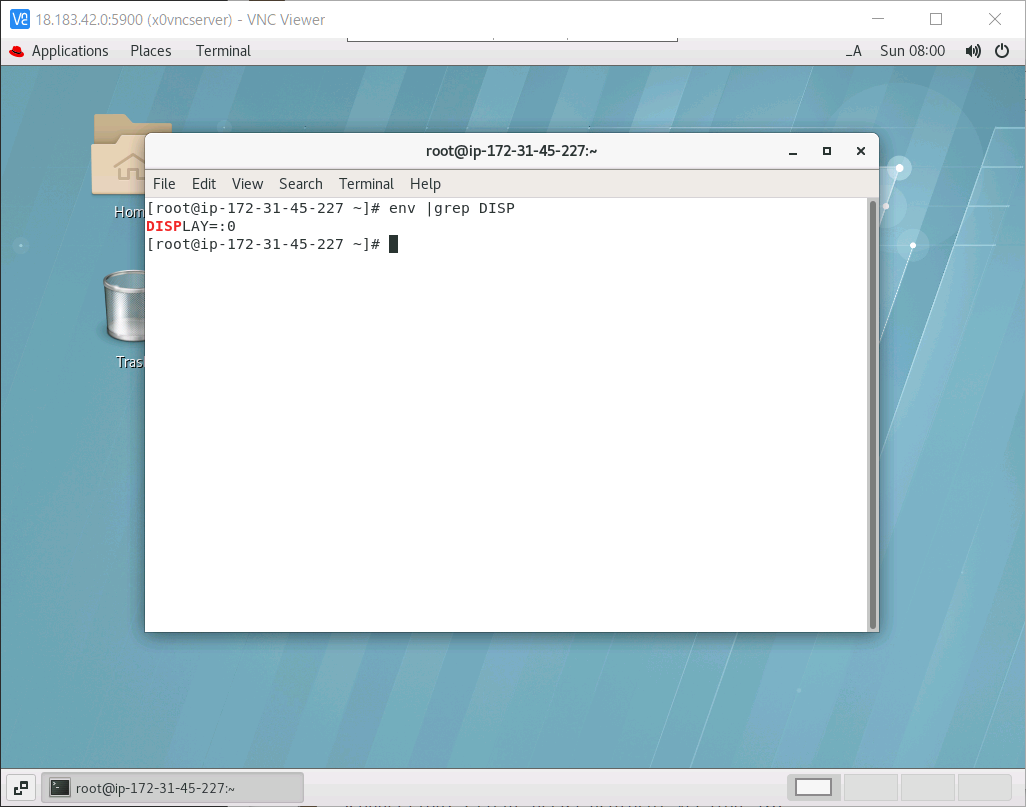
設定後、環境変数を見ると、コンソール「:0」に繋がっていることが分かる。
一般ユーザーで繋ぐ
ユーザーを追加
adduser user1
passwd user1
su - user1
vncpasswd
pam設定
vi /etc/pam.d/xerver
以下の行を修正 参考
# %PAM-1.0
auth sufficient pam_rootok.so
auth required pam_console.so  ⇐ pem_permit.soへ変更
account required pam_permit.so
SELinux停止
現状確認
getenforce
Enforcing
修正
vi /etc/selinux/config
既存の行 SELINUX=enforcing を SELINUX=disabled に変更
その後 reboot で再起動
再起動後再度getenforceで確認、Disabledになっているなら成功。
firewalld停止
systemctl stop firewalld
自動起動禁止もできるsystemctl disable firewalld
実行(user1で)
Xを起動
startx
別タームで
x0vncserver -display :0 -passwordfile ~/.vnc/passwd
クライアント側
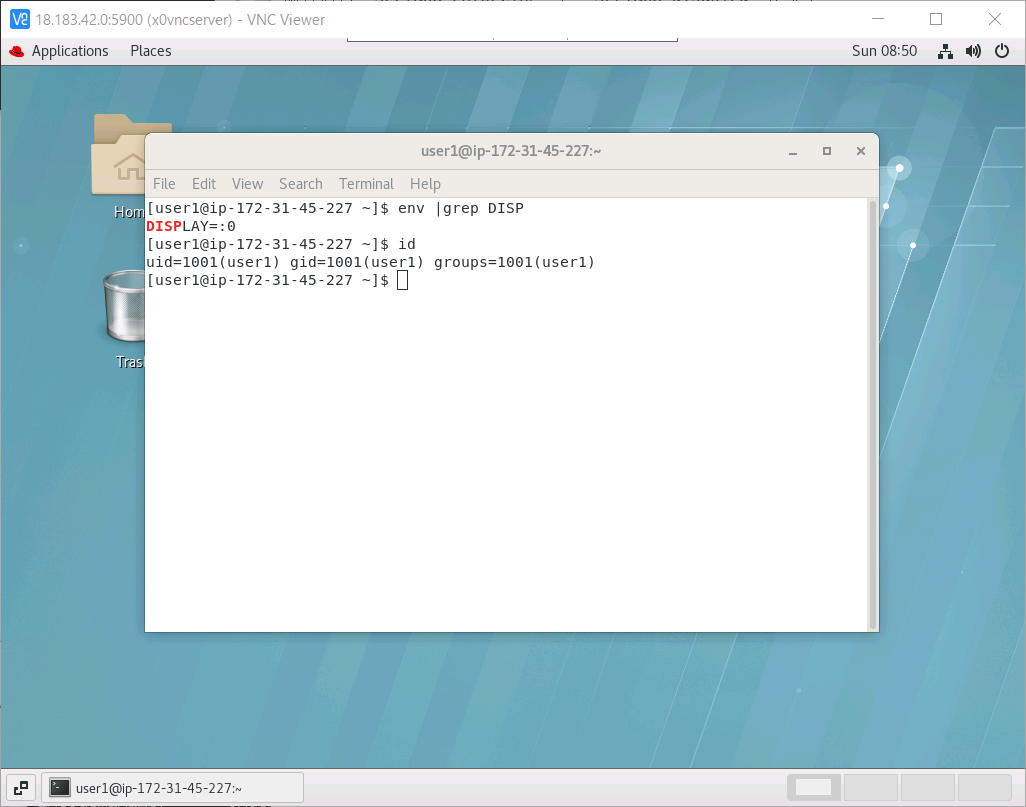
やはり、一般ユーザーuser1がコンソールに入っていることになります。
失敗例
/etc/pam.d/xerver未修正時
```text:/etc/pam.d/xerver未修正時startxすると
xauth: file /home/user1/.serverauth.15641 does not exist
xauth: file /home/user1/.Xauthority does not exist
xauth: file /home/user1/.Xauthority does not exist
(EE)
Fatal server error:
(EE) PAM authentication failed, cannot start X server.
Perhaps you do not have console ownership?
(EE)
(EE)
Please consult the The X.Org Foundation support
at http://wiki.x.org
for help.
(EE)
xinit: giving up
xinit: unable to connect to X server: Connection refused
xinit: server error
Couldn't get a file descriptor referring to the console
# CentOS 8の場合
同じ試験はCentos8環境でもやりました、一部違いだけを記載します。

```text:/etc/os-release
NAME="CentOS Linux"
VERSION="8 (Core)"
ID="centos"
ID_LIKE="rhel fedora"
VERSION_ID="8"
PLATFORM_ID="platform:el8"
PRETTY_NAME="CentOS Linux 8 (Core)"
ANSI_COLOR="0;31"
CPE_NAME="cpe:/o:centos:centos:8"
HOME_URL="https://www.centos.org/"
BUG_REPORT_URL="https://bugs.centos.org/"

CENTOS_MANTISBT_PROJECT="CentOS-8"
CENTOS_MANTISBT_PROJECT_VERSION="8"
REDHAT_SUPPORT_PRODUCT="centos"
REDHAT_SUPPORT_PRODUCT_VERSION="8"
EPELをインストール
追加パッケージの入手先
sudo rpm -ivh https://dl.fedoraproject.org/pub/epel/epel-release-latest-7.noarch.rpm
x0vncserverも問題なく使えるが、x11vncも使える、REHL7.8は以下のエラーでインストールできなかったけど
yum install x11vnc
Error: Package: x11vnc-0.9.13-11.el7.x86_64 (epel)
           Requires: Xvfb
pamの代わりにXwrapper記載
以下の行を追加
allowed_users = anybody
x11vnc起動
x11vnc -display :0 -nopw -forever -auth ~/.Xauthority
20/09/2020 18:22:59 x11vnc version: 0.9.16 lastmod: 2019-01-05  pid: 15614
20/09/2020 18:22:59 Using X display :0
20/09/2020 18:22:59 rootwin: 0x3a8 reswin: 0x2200001 dpy: 0xa71fd690
20/09/2020 18:22:59
20/09/2020 18:22:59 ------------------ USEFUL INFORMATION ------------------
20/09/2020 18:22:59 X DAMAGE available on display, using it for polling hints.
20/09/2020 18:22:59   To disable this behavior use: '-noxdamage'
20/09/2020 18:22:59
20/09/2020 18:22:59   Most compositing window managers like 'compiz' or 'beryl'
20/09/2020 18:22:59   cause X DAMAGE to fail, and so you may not see any screen
20/09/2020 18:22:59   updates via VNC.  Either disable 'compiz' (recommended) or
20/09/2020 18:22:59   supply the x11vnc '-noxdamage' command line option.
20/09/2020 18:22:59
20/09/2020 18:22:59 Wireframing: -wireframe mode is in effect for window moves.
20/09/2020 18:22:59   If this yields undesired behavior (poor response, painting
20/09/2020 18:22:59   errors, etc) it may be disabled:
20/09/2020 18:22:59    - use '-nowf' to disable wireframing completely.
20/09/2020 18:22:59    - use '-nowcr' to disable the Copy Rectangle after the
20/09/2020 18:22:59      moved window is released in the new position.
20/09/2020 18:22:59   Also see the -help entry for tuning parameters.
20/09/2020 18:22:59   You can press 3 Alt_L's (Left "Alt" key) in a row to
20/09/2020 18:22:59   repaint the screen, also see the -fixscreen option for
20/09/2020 18:22:59   periodic repaints.
20/09/2020 18:22:59
20/09/2020 18:22:59 XFIXES available on display, resetting cursor mode
20/09/2020 18:22:59   to: '-cursor most'.
20/09/2020 18:22:59   to disable this behavior use: '-cursor arrow'
20/09/2020 18:22:59   or '-noxfixes'.
20/09/2020 18:22:59 using XFIXES for cursor drawing.
20/09/2020 18:22:59 GrabServer control via XTEST.
20/09/2020 18:22:59
20/09/2020 18:22:59 Scroll Detection: -scrollcopyrect mode is in effect to
20/09/2020 18:22:59   use RECORD extension to try to detect scrolling windows
20/09/2020 18:22:59   (induced by either user keystroke or mouse input).
20/09/2020 18:22:59   If this yields undesired behavior (poor response, painting
20/09/2020 18:22:59   errors, etc) it may be disabled via: '-noscr'
20/09/2020 18:22:59   Also see the -help entry for tuning parameters.
20/09/2020 18:22:59   You can press 3 Alt_L's (Left "Alt" key) in a row to
20/09/2020 18:22:59   repaint the screen, also see the -fixscreen option for
20/09/2020 18:22:59   periodic repaints.
20/09/2020 18:22:59
20/09/2020 18:22:59 XKEYBOARD: number of keysyms per keycode 10 is greater
20/09/2020 18:22:59   than 4 and 100 keysyms are mapped above 4.
20/09/2020 18:22:59   Automatically switching to -xkb mode.
20/09/2020 18:22:59   If this makes the key mapping worse you can
20/09/2020 18:22:59   disable it with the "-noxkb" option.
20/09/2020 18:22:59   Also, remember "-remap DEAD" for accenting characters.
20/09/2020 18:22:59
20/09/2020 18:22:59 X FBPM extension not supported.
20/09/2020 18:22:59 X display is capable of DPMS.
20/09/2020 18:22:59 --------------------------------------------------------
20/09/2020 18:22:59
20/09/2020 18:22:59 Default visual ID: 0x21
20/09/2020 18:22:59 Read initial data from X display into framebuffer.
20/09/2020 18:22:59 initialize_screen: fb_depth/fb_bpp/fb_Bpl 24/32/4636
20/09/2020 18:22:59 WARNING: Width (1159) is not a multiple of 4. VncViewer has problems with that.
20/09/2020 18:22:59
20/09/2020 18:22:59 X display :0 is 32bpp depth=24 true color
20/09/2020 18:22:59
20/09/2020 18:22:59 Autoprobing TCP port
20/09/2020 18:22:59 Autoprobing selected TCP port 5900
20/09/2020 18:22:59 Autoprobing TCP6 port
20/09/2020 18:22:59 Autoprobing selected TCP6 port 5900
20/09/2020 18:22:59 listen6: bind: Address already in use
20/09/2020 18:22:59 Not listening on IPv6 interface.
20/09/2020 18:22:59
20/09/2020 18:22:59 Xinerama is present and active (e.g. multi-head).
20/09/2020 18:22:59 Xinerama: number of sub-screens: 1
20/09/2020 18:22:59 Xinerama: no blackouts needed (only one sub-screen)
20/09/2020 18:22:59
20/09/2020 18:22:59 fb read rate: 1518 MB/sec
20/09/2020 18:22:59 fast read: reset -wait  ms to: 10
20/09/2020 18:22:59 fast read: reset -defer ms to: 10
20/09/2020 18:22:59 The X server says there are 12 mouse buttons.
20/09/2020 18:22:59 screen setup finished.
20/09/2020 18:22:59

The VNC desktop is:      localhost.localdomain:0
PORT=5900

******************************************************************************
Have you tried the x11vnc '-ncache' VNC client-side pixel caching feature yet?

The scheme stores pixel data offscreen on the VNC viewer side for faster
retrieval.  It should work with any VNC viewer.  Try it by running:

    x11vnc -ncache 10 ...

One can also add -ncache_cr for smooth 'copyrect' window motion.
More info: http://www.karlrunge.com/x11vnc/faq.html#faq-client-caching
接続
クライアント側の写真は割愛
まとめ
今回サーバーの物理端末に相当するDISPLAY0にリモートで接続設定方法をRedHat7.8とCentOS8の2環境、特権ユーザーと一般ユーザーの例をご紹介しました。