こちらでCUDAのインストール方法を紹介しましたが、これではCUDA専用のプロジェクトとなってしまいます。この記事では、実装したCUDA関数をDLLライブラリとしてエクスポートして、他の通常のプロジェクトから呼び出せるようにします。
もっといい方法があればぜひ教えてください。DLLなので呼び出しコストが気になります。
環境
- Windows 10
- Visual Studio Community 2017
- CUDA Toolkit 9.0
目的
- 通常のアプリケーション(この記事ではWindows Console Applicationを使用)から、CUDAで実装した処理を呼び出せるようにする
- CUDAライブラリ側の独立性を高めて、チューニングやユニットテストをやりやすくする
- 通常のアプリケーション側ではCUDAに関する設定は一切不要にする
ソリューションとプロジェクトの用意
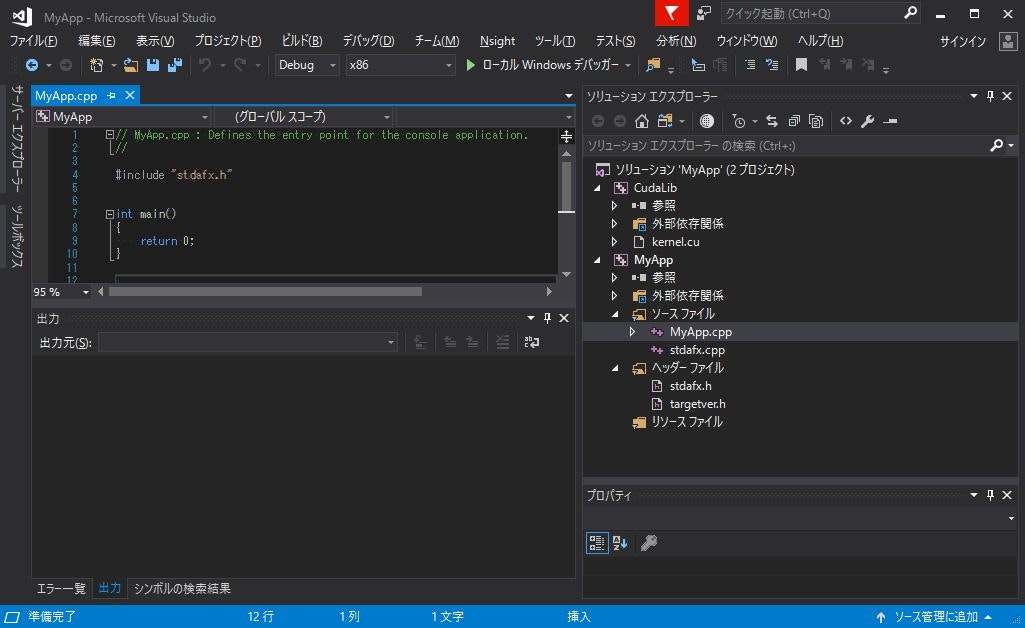
1つのソリューションの中に、2つのプロジェクトを作成する。一つは通常のアプリケーション、もう一つはCUDAライブラリ用のプロジェクト。
- ファイル -> 新規作成 -> プロジェクト -> Visual C++ -> Windows デスクトップ -> Windows コンソール アプリケーション
- ここでは、MyAppという名前にする
- MyAppソリューションと、MyAppソリューションの下にMyAppプロジェクトが生成される
- ソリューションエクスプローラ上でMyAppソリューションで右クリック -> 追加 -> 新しいプロジェクト -> NVIDIA -> CUDA 9.0 -> CUDA 9.0 Runtime
- ここでは、CudaLibという名前にする
- MyAppソリューションの下に、CudaLibプロジェクトが生成される
- 最終的には下記のような構成になります。
ソリューションの構成設定 (重要)
基本的に使用するのは、Debug/Releaseのx64。ビルド設定や、プロジェクトのプロパティを変更する際には、x64向け設定になっていることを確認する。
複数プロジェクトをまたぐので、スタートアッププロジェクトの設定を変更すると便利かも。
MyAppソリューションで右クリック -> プロパティ -> スタートアッププロジェクト -> 現在の選択
CudaLib
計算用関数とWrapperの実装
- CudaLib上で右クリック -> 新しい項目の追加 -> Visual C++ -> C++ファイル
- main.cpp
- CudaLib上で右クリック -> 新しい項目の追加 -> Visual C++ -> ヘッダーファイル
- CudaLib.h
- デフォルトで作られたkernel.cuはファイルは再利用するが中身は全てデリート
下記の実装で、まずはライブラリ関数単体として動作することを確認する。
CudaLib.h
# pragma once

namespace CudaLib
{
# if 0
}	// indent guard
# endif


# ifdef DLL_EXPORT
__declspec(dllexport) void complexCalcOriginal(int *in, int *out, int n);
__declspec(dllexport) void complexCalcFast(int *hIn, int *hOut, int n);
# else
__declspec(dllimport) void complexCalcOriginal(int *in, int*out, int n);
__declspec(dllimport) void complexCalcFast(int *in, int*out, int n);
# endif

}
main.cpp
/*
* Note:
* To switch output type (dll/exe), Project Configuration Properties -> Configuration Type
* *.exe for unit test
* *.dll for dll library
*/
# include "stdio.h"
# include "stdlib.h"

# include "CudaLib.h"

using namespace CudaLib;

bool unitTest(int n)
{
	int *in = new int[n];
	int *out1 = new int[n];
	int *out2 = new int[n];

	for (int i = 0; i < n; i++) in[i] = rand() % 100;

	complexCalcOriginal(in, out1, n);
	complexCalcFast(in, out2, n);

	int i;
	for (i = 0; i < n; i++) {
		if (out1[i] != out2[i]) {
			printf("error at index = %d\n", i);
			break;
		}
	}

	delete[] in;
	delete[] out1;
	delete[] out2;

	if (i == n) return true;
	return false;
}

int main()
{
	if (unitTest(10)) {
		printf("OK\n");
	} else {
		printf("ERROR\n");
	}


	return 0;
}
kernel.cu
# include "cuda_runtime.h"
# include "device_launch_parameters.h"

# include <stdio.h>

# include "CudaLib.h"

namespace CudaLib
{
# if 0
}	// indent guard
# endif


void complexCalcOriginal(int *in, int *out, int n)
{
	for (int i = 0; i < n; i++) {
		out[i] = in[i] * 2;
	}
}


__global__ void complexCalcFastLoop(int *in, int *out, int n)
{
	int i = threadIdx.x;
	if (i < n) {
		out[i] = in[i] * 2;
	}
}

void complexCalcFast(int *hIn, int *hOut, int n)
{
	int *dIn;
	int *dOut;
	cudaMallocHost((void**)&dIn, n * sizeof(int));
	cudaMallocHost((void**)&dOut, n * sizeof(int));
	cudaMemcpy(dIn, hIn, n * sizeof(int), cudaMemcpyHostToDevice);

	complexCalcFastLoop <<<1, n>>> (dIn, dOut, n);
	cudaDeviceSynchronize();

	cudaMemcpy(hOut, dOut, n * sizeof(int), cudaMemcpyDeviceToHost);
	cudaFree(dIn);
	cudaFree(dOut);
}

}
MyApp
インクルードパスとライブラリの参照設定
- MyAppで右クリック -> C/C++ -> 全般 -> 追加のインクルードパス
- ../CudaLib
- MyAppで右クリック -> リンカー -> 入力 -> 追加の依存ファイル
- ../x64/Debug/CudaLib.lib
- ../x64/Release/CudaLib.lib
MyAppからCUDAで実装したライブラリ関数を呼ぶ
通常の関数として呼べる。
MyApp.cpp
# include "stdafx.h"
# include "CudaLib.h"

int main()
{
	int n = 5;
	int *in = new int[n];
	int *out = new int[n];

	for (int i = 0; i < n; i++) in[i] = i;

	CudaLib::complexCalcFast(in, out, n);

	for (int i = 0; i < n; i++) {
		printf("%d -> %d\n", in[i], out[i]);
	}

	delete[] in;
	delete[] out;

    return 0;
}
普段の運用例
アルゴリズムを改良したい
- CudaLibプロジェクトをEXE形式にする
- CudaLibプロジェクトで右クリック -> 全般 -> 構成の種類
- ダイナミックライブラリ(.dll)をアプリケーション(.exe)に戻す
- CudaLibプロジェクトで右クリック -> 全般 -> 構成の種類
- 新規アルゴリズムを実装する
- 別プロジェクトになっているので、Nsightによるアナライズやユニットテストがやりやすい!!
- 満足する実装が出来たら、再度プロジェクトをDLLライブラリ形式にする
- CudaLibプロジェクトで右クリック -> 全般 -> 構成の種類
- アプリケーション(.exe)をダイナミックライブラリ(.dll)にする
- CudaLibプロジェクトで右クリック -> 全般 -> 構成の種類
実際のプロジェクトファイル

