NumPy
配列の初期化
NumPy行列計算をするためには、最初にNumPyの配列を生成(または初期化)する必要があります。 NumPy配列の実態は、numpy.ndarrayというオブジェクトです。
a = np.array([1, 2, 3, 4, 5])
print(a)
print(type(a))
[1 2 3 4 5]
<class 'numpy.ndarray'>
NumPyで二次元の配列を作成するには、以下のように記述します。
b = np.array([[1, 2, 3], [4, 5, 6]])
print(b)
[[1 2 3]
[4 5 6]]
np.zeros()関数を用いて配列を0で初期化することができます。
np.zeros()にてタプルで複数の値を指定することで、指定した次元の配列を作成し0で初期化できます。
print(np.zeros(10))
print(np.zeros((3, 2)))
[0. 0. 0. 0. 0. 0. 0. 0. 0. 0.]
[[0. 0.]
[0. 0.]
[0. 0.]]
np.ones関数を利用すると、1で初期化された配列を作成します。
print(np.ones(10))
print(np.ones((3, 2)))
[1. 1. 1. 1. 1. 1. 1. 1. 1. 1.]
[[1. 1.]
[1. 1.]
[1. 1.]]
np.arange関数を使うと、連番の配列を作成できます。
np.arange(開始,終了+1,加算値)の書式で利用します。
print(np.arange(5))
print(np.arange(2, 9))
print(np.arange(5, 8, 0.5))
[0 1 2 3 4]
[2 3 4 5 6 7 8]
[5. 5.5 6. 6.5 7. 7.5]
行列計算
a = np.arange(6)
b = a * 2
print(b)
[ 0 2 4 6 8 10]
x = np.arange(10)
y = 3 * x + 5
print(y)
[ 5 8 11 14 17 20 23 26 29 32]
NumPy配列の次元数を調べる
NumPy配列のshapeプロパティを調べることで、次元数を確認できます。
a = np.array([np.arange(1, 4), np.arange(4, 7)])
print(a.shape)

b = np.array([np.arange(1, 4), np.arange(4, 7), np.arange(7, 10)])
print(b.shape)
(2, 3)
(3, 3)
次元数の変換
flatten関数を使用することで、配列の次元数を手軽に変換できます。
a = np.array([np.arange(1, 4), np.arange(4, 7)])
print("a=", a)
b = a.flatten()
print("b=", b)
a= [[1 2 3]
[4 5 6]]
b= [1 2 3 4 5 6]
reshape関数を使うことでも、配列の次元数を任意の形状に変換できます。
a = np.array([np.arange(1, 4), np.arange(4, 7)])
print(a)
print(a.reshape(3, 2))
[[1 2 3]
[4 5 6]]
[[1 2]
[3 4]
[5 6]]
NumPy配列の要素へのアクセス
Python標準の配列と同じように、要素にアクセスしたり、特定の範囲を取り出す(スライス)処理が可能です。
v = np.array([np.arange(1, 4), np.arange(4, 7), np.arange(7, 10)])
print(v)
a = v[0]
b = v[1:]
c = v[:,0]
print("a=", a)
print("b=", b)
print("c=", c)
[[1 2 3]
[4 5 6]
[7 8 9]]
a= [1 2 3]
b= [[4 5 6]
[7 8 9]]
c= [1 4 7]
配列への次元の追加
np.newaxisを使用することで、次元に要素数1の新たな軸(axis)を追加できます。
x = np.arange(15).reshape(3, 5)

print(x)

x[np.newaxis, :, :]
[[ 0 1 2 3 4]
[ 5 6 7 8 9]
[10 11 12 13 14]]
array([[[ 0, 1, 2, 3, 4],
[ 5, 6, 7, 8, 9],
[10, 11, 12, 13, 14]]])
x = np.arange(15).reshape(3, 5)

print(x)

x[:, np.newaxis, :]
[[ 0 1 2 3 4]
[ 5 6 7 8 9]
[10 11 12 13 14]]
array([[[ 0, 1, 2, 3, 4]],
[[ 5, 6, 7, 8, 9]],
[[10, 11, 12, 13, 14]]])
線形の等間隔な配列の生成
np.logspace関数を用いることで、線形に等間隔な数列を生成できます。
np.linspace(開始,終了,要素数)の書式で使用します。
a = np.linspace(1, 5, 9)
print(a)
[1. 1.5 2. 2.5 3. 3.5 4. 4.5 5. ]
ログスケールに均等な配列の生成
np.logspace関数を用いることで、ログスケールに増減する配列を生成できます。
np.logspace(開始,終了,要素数,base=基数)の書式で使用します。
a = np.logspace(1, 5, 5, base=2)
print(a)
[ 2. 4. 8. 16. 32.]
リストやタプルからの配列の生成
np.asarray関数を用いることで、リストやタプルから配列を生成できます。
a = [1, 2, 3, 4]
print(a)
print(type(a))
b = np.asarray(a)
print(b)
print(type(b))
[1, 2, 3, 4]
<class 'list'>
[1 2 3 4]
<class 'numpy.ndarray'>
a = (1, 2, 3, 4)
print(a)
print(type(a))
b = np.array(a)
print(b)
print(type(b))
(1, 2, 3, 4)
<class 'tuple'>
[1 2 3 4]
<class 'numpy.ndarray'>
配列のソート
一次元配列の場合、np.sort関数を用いることで要素を昇順にソートできます。
a = np.array([3,5,4,1,0,2])
print(a)
b = np.sort(a)
print(b)
[3 5 4 1 0 2]
[0 1 2 3 4 5]
np.sort関数には引数reverseが存在しないため、降順にしたい場合はスライス[::-1]を使います。
a = np.array([3,5,4,1,0,2])
print(a)
b = np.sort(a)[::-1]
print(b)
[3 5 4 1 0 2]
[5 4 3 2 1 0]
多次元配列の場合、引数axisでソートする軸を選択します。
二次元配列を例にとると、axis=0で列を、axis=1で行をソートできます。
a = np.array([[1,2,3],[2,3,1],[3,1,2]])
print(a)
b = np.sort(a, axis=0)
print(b)
c = np.sort(a, axis=1)
print(c)
[[1 2 3]
[2 3 1]
[3 1 2]]
[[1 1 1]
[2 2 2]
[3 3 3]]
[[1 2 3]
[1 2 3]
[1 2 3]]
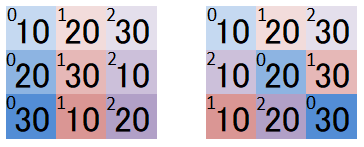
np.argsort関数は、値ではなく並び替えたインデックスのndarrayを返します。
引数axisなどの考え方は、np.sortと同様です。
a = np.array([[10,20,30],[20,30,10],[30,10,20]])
print(a)
b = np.argsort(a, axis=0)
print(b)
c = np.argsort(a, axis=1)
print(c)
[[10 20 30]
[20 30 10]
[30 10 20]]
[[0 2 1]
[1 0 2]
[2 1 0]]
[[0 1 2]
[2 0 1]
[1 2 0]]


