はじめに
Pythonのモジュールのプログラムをpytestを用いてデバッグする方法についてまとめる.
課題
以下のPythonモジュールにおいて,テストされる関数はload_numbers_sorted()であり,この関数をtest_load_numbers_sorted()とtxt()を用いてテストする.
# test_load_numbers.py

import pytest
import os
from typing import List

def load_numbers_sorted(txt: str) -> List[int]:
    with open(txt) as f:
        numbers = sorted(int(line) for line in f)
    return numbers

@pytest.fixture
def txt() -> str:
    with open(f'{os.path.dirname(__file__)}/numbers.txt', 'w') as f:
        for n in [2, 5, 4, 3, 1]:
            f.write('{}\n'.format(n))
    yield f'{os.path.dirname(__file__)}/numbers.txt'
    os.remove(f'{os.path.dirname(__file__)}/numbers.txt')

def test_load_numbers_sorted(txt):
    assert load_numbers_sorted(txt) == [1, 2, 3, 4, 5]
Pythonモジュールに対してvscodeのデフォルトのデバッグを行う際,通常のPythonプログラムと同様にデバッグ(デバッグウィンドウで再生ボタンを押したとき)される.
この時,以下のコマンドが実行される.
> '現在の環境で利用しているPython.exeのパス\python.exe' 'c:\Users\~~\debugpy\launcher' 'xxxxx'(デバッグセッションのポート番号) '--' '~~\debugged.py'
しかし,この場合,関数が定義されるのみであり,pytestを利用してPythonプログラムをデバッグすることができない.
pytestコマンドを利用しないでPythonプログラムとしてデバッグを行う方法
以下のようにpytest.main([__file__])でPythonプログラムによってファイル自体をpytestで実行するという方法もある.PythonプログラムをPythonのデバッグ機能を用いてデバッグしているので,普段通りの要領でデバッグできる.
# test_load_numbers.py

import pytest
import os
from typing import List

def load_numbers_sorted(txt: str) -> List[int]:
    with open(txt) as f:
        numbers = sorted(int(line) for line in f)
    return numbers

@pytest.fixture
def txt() -> str:
    with open(f'{os.path.dirname(__file__)}/numbers.txt', 'w') as f:
        for n in [2, 5, 4, 3, 1]:
            f.write('{}\n'.format(n))
    yield f'{os.path.dirname(__file__)}/numbers.txt'
    os.remove(f'{os.path.dirname(__file__)}/numbers.txt')

def test_load_numbers_sorted(txt):
    assert load_numbers_sorted(txt) == [1, 2, 3, 4, 5]

if __name__ == "__main__":
    pytest.main([__file__]) # これを追加
手順
pytestコマンドを用いてデバッグができるようにvscodeの設定(launch.json)を作成・編集する.
- launch.jsonの作成と編集
-
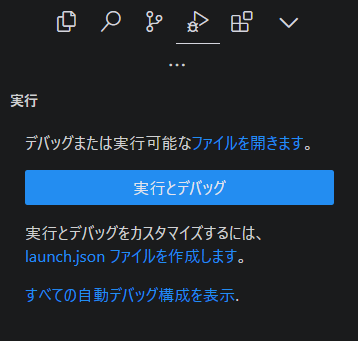
初期状態
pythonプロジェクト(.vscodeフォルダがあるディレクトリ)にlaunch.jsonがまだない場合は、以下のようになっているはず.
-
pythonプロジェクト\.vscode\launch.jsonの作成
青文字の「launch.json ファイルを作成します。」をクリックすると、以下のようなlaunch.jsonが作成される。{ "version": "0.2.0", "configurations": [ { "name": "Python: 現在のファイル", "type": "python", "request": "launch", "program": "${file}", "console": "integratedTerminal", "justMyCode": true } ] }これを,以下のようにpytestの項目も追加する。
{ "version": "0.2.0", "configurations": [ { "name": "Python: 現在のファイル", "type": "python", "request": "launch", "program": "${file}", "console": "integratedTerminal", "justMyCode": true }, { "name": "Python: pytest", "type": "python", "request": "launch", "module": "pytest", "args": [ "${file}" ], "console": "integratedTerminal", "justMyCode": true } ] }-
justMyCodeの意味
justMyCodeはデバッグ設定の一つで、以下のような意味を持つ:- true:標準ライブラリやサードパーティのライブラリのコードにはステップインしない。自分が書いたコードのみにステップインする。
- false:全てのコード(標準ライブラリやサードパーティのライブラリ含む)にステップインする。
-
-
- デバッグ構成の選択:
-
左側のデバッグアイコンをクリックしてデバッグビューを開き、デバッグ構成から「Python: pytest」を選択します。
-
注意:"Python Debugger"という拡張機能が必要かも
デバッグの構成の変更は以下のようなプルダウンから行える."Python"拡張機能を追加するだけで,この変更機能が付与されるかもしれないが、当環境では"Python Debugger"という拡張機能を追加しないと出てこなかった.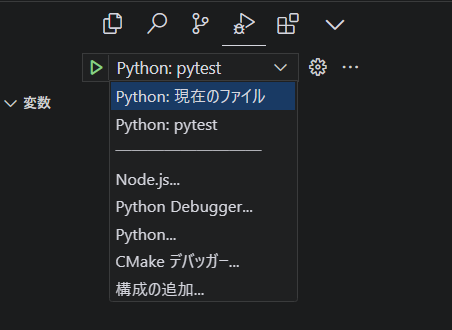
-
- デバッグの開始:
- 「再生ボタン」をクリックすれば,デバッグがpytestコマンドを使って実行される.