はじめに
RxDataSourcesはRxSwiftCommunityが出している差分管理ライブラリでtableView,collectionView周りのinsert,delete,moveが使いやすくなるものです
今回ProductにRxSwiftを導入するとともにRxDataSourcesで差分管理をしようという経緯で色々試してみることにしました。
考え方
RxDataSouceはSectionModelを用いた考え方で実装されています。
イメージとして
SectionModel = TableView(CollectionView)のセクション単位のモデル
items = TableView(CollectionView)のセル単位のモデル
といったような感じです。RxDataSourcesでのSectionModelの実装は以下のようになってます。
public struct SectionModel<Section, ItemType> {
    public var model: Section
    public var items: [Item]

    public init(model: Section, items: [Item]) {
        self.model = model
        self.items = items
    }
}
実装
このSectionModelを使った実装はRxDataSourcesのREADMEのHOWで書かれているので今回は説明しません。
今回はAnimatableSectionModelを使った実装を説明します。READMEにはざっくりこんな感じにかかれています。
▼RxDataSources/README.md
Animated Data Sources
RxDataSourcesには、バインドされたデータソースの変更のアニメーション化を自動的に処理する2つの特別なデータソースタイプRxTableViewSectionedAnimatedDataSource、RxCollectionViewSectionedAnimatedDataSourceがあります。
2つのアニメーション化されたデータソースのいずれかを使用するには、上で概説したものの上にいくつかの追加ステップを実行する必要があります。
- SectionOfCustomDataはAnimatableSectionModelTypeに準拠する必要があります
- データモデルは以下に準拠しなければなりません
- IdentifiableType: モデルを一意に表す不変の識別子identityを提供するプロトコル
- Equatable: Equtableに準拠させることでどのセルが変更されたかを判断するのに役立ち、特定のセルのみをアニメーション化することができます。つまり、モデルのプロパティのいずれかを変更すると、そのセルのアニメーションによるリロードがトリガーされます。
それでは早速実装を見ていきます。
まずSectionModelについてですが上記を見るとAnimatableSectionModelTypeに準拠する必要があると書いていますがもともとAnimatableSectionModelはAnimatableSectionModelTypeに準拠しているので今回はこれを使います。
Section単位でもっとカスタムしたいという時にはAnimatableSectionModelTypeに準拠してモデルを自前でつくってください。
AnimatableSectionModelの実装は下記のようになっておりGentricsの第一引数はIdentifiableTypeに準拠したものとなっています。これはSectionのIdentityを決定しSectionModelを一意に決めるためのものです。第二引数はSection内のitem(つまりテーブルビューでいうセル単位のモデル)の型が入ります。上記で説明しているようにセルの変更を判断させるためにEqutableにも準拠していなければなりません。
public struct AnimatableSectionModel<Section: IdentifiableType, ItemType: IdentifiableType & Equatable> {
    public var model: Section
    public var items: [Item]

    public init(model: Section, items: [ItemType]) {
        self.model = model
        self.items = items
    }

}

extension AnimatableSectionModel
    : AnimatableSectionModelType {
    public typealias Item = ItemType
    public typealias Identity = Section.Identity

    public var identity: Section.Identity {
        return model.identity
    }

    public init(original: AnimatableSectionModel, items: [Item]) {
        self.model = original.model
        self.items = items
    }

    public var hashValue: Int {
        return self.model.identity.hashValue
    }
}
AnimatableSectionModelは宣言が長くなるのでtypealiasで宣言してやると使いやすくなります。
typealias SampleSectionModel = AnimatableSectionModel<SectionID, SampleSectionItem>
今回SectionIDは以下のようにenum定義しています。
enum SectionID: String, IdentifiableType {
    case section1
    case section2
    case section3

    var identity: String {
        return self.rawValue
    }
}
StringであればRxDataSourcesのExtension中でIdentifiableTypeに準拠するようになっているのでそのまま使えます。
extension String : IdentifiableType {
    public typealias Identity = String

    public var identity: String {
        return self
    }
}
次にitemの方の実装に移っていきます。itemはstructで定義してもよいのですが、今回はいろんなタイプのセルに対応するようにenumで実装しました。itemはモデルデータをenumの引数で受け取ります(data)。このモデルに一意の値(id)をもたせ、それをidentityでcomputed propertyとして返してやります。equatableに関してはidentityの比較で良いでしょう。
enum SampleSectionItem: IdentifiableType, Equatable {

    case type1(data: SampleData)
    case type2(data: SampleData)

    var identity: String {
        switch self {
        case .type1(let data):
            return data.id
        case .type2(let data):
            return data.id
        }
    }

    static func == (lhs: SampleSectionItem, rhs: SampleSectionItem) -> Bool {
        return lhs.identity == rhs.identity
    }
}
ここまでで、SectionModel,SectionItemの実装ができました。
次はDataSourceの実装をしていきます。DataSourceはDelegateの中で作るようにしました。
DataSourceのconfigureCellの中で,書くitemのtypeを見て処理を分けています。これにより、簡単に違う種類のcellでも追加することができるようになります。
final class SampleDelegate: NSObject, UITableViewDelegate {
    lazy var dataSource = RxTableViewSectionedAnimatedDataSource<SampleSectionModel>.init(animationConfiguration: AnimationConfiguration(insertAnimation: .fade, reloadAnimation: .none, deleteAnimation: .fade), configureCell: { [weak self] dataSource, table, indexPath, item in
        guard let me = self else { return UITableViewCell() }
        switch item {
        case .type1(let data):
            let cell = table.dequeueReusableCell(withIdentifier: "SampleType1Cell", for: indexPath) as! SampleType1Cell
            cell.data = data
            return cell
        case .type2(let data):
            let cell = table.dequeueReusableCell(withIdentifier: "SampleType2Cell", for: indexPath) as! SampleType2Cell
            cell.data = data
            return cell
        }
    })
}
これでデータに関しては準備ができましたので、実際にViewModel,ViewControllerの中でどのように使うか見ていきます。
//
//  SampleViewModel.swift
//
//
//  Created by Itsuki Tanaka on 2018/07/09.
//  Copyright © 2018年 Itsuki Tanaka. All rights reserved.
//

import Foundation
import RxSwift
import RxCocoa
import RxDataSources

struct SampleData {
    let id = UUID().uuidString
    let name: String
    let image: UIImage?
}

class SampleViewModel {

    var sampleData: Observable<[SampleSectionModel]> {
        return sampleDataRelay.asObservable()
    }

    private let sampleDataRelay = BehaviorRelay<[SampleSectionModel]>(value: [])

    private func fetch(shouldRefresh: Bool = false, type: SampleSectionItem) {
        var preItems = sampleDataRelay.value.first?.items ?? []
        preItems.append(type)
        let items = shouldRefresh ? [type] : preItems
        let sectionModel = SampleSectionModel(model: .section1, items: items)
        sampleDataRelay.accept([sectionModel])
    }

    func addType1() {
        let preItems = sampleDataRelay.value.first?.items ?? []
        let data = SampleData(name: "data\(preItems.count)", image: UIImage(named: "kendama"))
        fetch(type: .type1(data: data))
    }

    func addType2() {
        let preItems = sampleDataRelay.value.first?.items ?? []
        let data = SampleData(name: "data\(preItems.count)", image: UIImage(named: "kendama"))
        fetch(type: .type2(data: data))
    }

    func remove(model: SampleSectionItem) {
        var preItems = sampleDataRelay.value.first?.items ?? []
        guard let index = preItems.index(of: model) else { return }
        preItems.remove(at: index)
        let sectionModel = SampleSectionModel(model: .section1, items: preItems)
        sampleDataRelay.accept([sectionModel])
    }
}
//
//  SampleViewController.swift
//
//
//  Created by Itsuki Tanaka on 2018/07/09.
//  Copyright © 2018年 Itsuki Tanaka. All rights reserved.
//

import Foundation
import RxSwift
import RxCocoa
import RxDataSources

class SampleViewController: UIViewController {

    private var delegate = SampleDelegate()
    private let viewModel = SampleViewModel()
    private let disposeBag = DisposeBag()

    @IBOutlet weak var tableView: UITableView! {
        didSet {
          tableView.registerCel(UINib(nibName:"SampleType1Cell", bundle: nil), "SampleType1Cell")
          tableView.registerCel(UINib(nibName:"SampleType2Cell", bundle: nil), "SampleType2Cell")
        }
    }

    override func viewDidLoad() {
        super.viewDidLoad()
        viewModel.sampleData.bind(to: tableView.rx.items(dataSource: delegate.dataSource)).disposed(by: disposeBag)

        tableView.rx.modelSelected(SampleSectionItem.self)
        .subscribe(onNext: { [weak self] item in
            self?.viewModel.remove(model: item)
        }).disposed(by: disposeBag)
    }

    @IBAction func addType1(_ sender: UIButton) {
        viewModel.addType1()
    }

    @IBAction func addType2(_ sender: UIButton) {
        viewModel.addType2()
    }
}
順を追って説明すると、まずViewModel側では
SampleSectionModelをVCに通知するObservableのsampleData
SampleSectionModelのイベントをVM内部で発行するBehaviorRelayのsampleDataRelay
があり、fetch関数の中でSectionModelを更新しイベントを発行しています。
private func fetch(shouldRefresh: Bool = false, type: SampleSectionItem) {
        var preItems = sampleDataRelay.value.first?.items ?? []
        preItems.append(type)
        let items = shouldRefresh ? [type] : preItems
        let sectionModel = SampleSectionModel(model: .section1, items: items)
        sampleDataRelay.accept([sectionModel])
}
(今回はサンプルなのでモデルは関数の中で作っています。本来はAPIなどから取得してモデル化する処理などが入ります。)
このように、SectionModelもしくはSectionModel内のitemsを更新するとidentityを見て内部でよしなに差分更新してくれます。
ViewController側では先ほど定義したDelegateとViewModelを定義し、ViewModelのsampleDataをDelegateのdatasourceを使ってtableViewにbindしています。(他の処理はRxDataSourcesと関係ないので割愛)
viewModel.sampleData.bind(to: tableView.rx.items(dataSource: delegate.dataSource)).disposed(by: disposeBag)
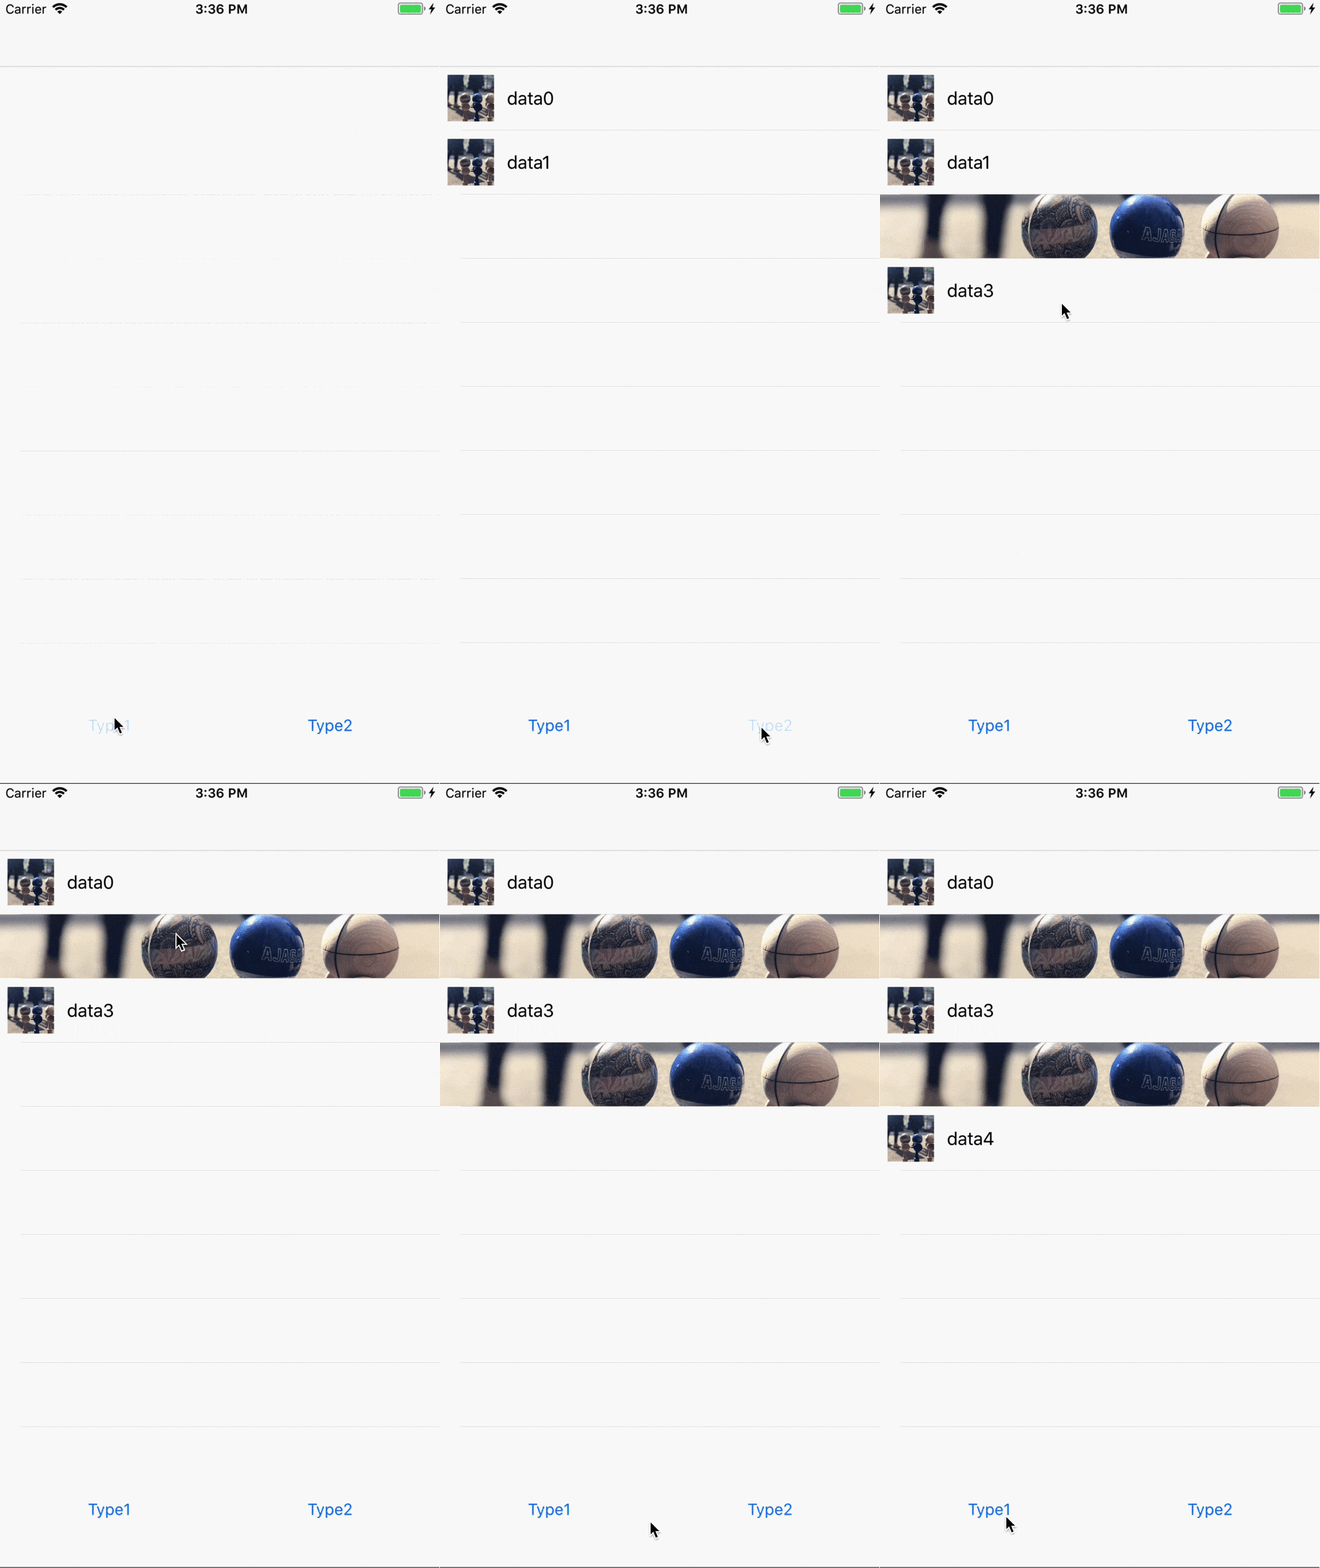
スクリーンショット
Github
- master branch: 今回説明した基本的な実装
- ComplexViewCase branch: Viewが複雑場合の応用的な実装
感想
このようにRxDataSourcesを使うことで差分更新アルゴリズムを自前で実装することなくよしなに差分更新をしてくれるのでテーブルビューやコレクションビューの動作がサクサクしたアプリを簡単に実装できるようになります。
更新頻度が高いビューなどにうまく使えばクオリティの高いプロダクトが作れそうですね。
