はじめに
SonarQube と github actions の言語別の連携方法のまとめを書きます
SonarQube CommunityEdition(無償版)想定です
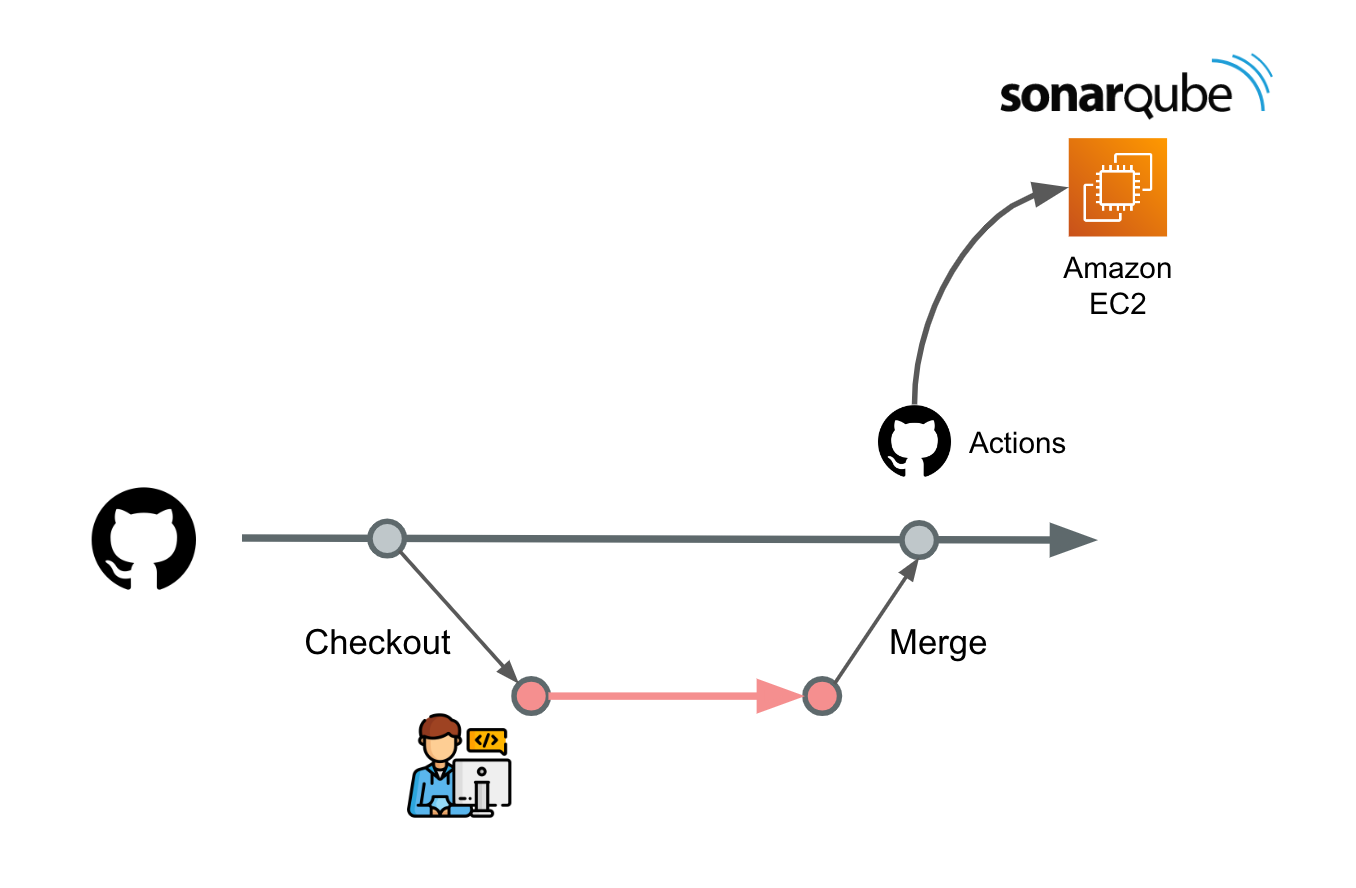
環境
- SonarQube は AWS EC2 で立てている
- master に PR が merge された時に github actions が発火して、SonarQube の静的解析をキックする
前提
- 既に SonarQube は起動済みの状態
- SonarQube 内でプロジェクトが作成済みで、key と token が発行されている
※ このあたりは他の色んな記事で丁寧に解説されていると思います。
github actions の secret 設定
| 項目 | 値 |
|---|---|
| SONAR_HOST_URL | SonarQube(EC2)の HOST URL 例: http://hoge.ap-northeast-1.compute.amazonaws.com/
|
| SONAR_TOKEN | SonarQube のプロジェクト Token |
Typescript
React(cra)をサンプルとしてますが、カバレッジと lint のレポートが吐き出せれば良いので他のフレームワークでも応用利くと思います。
プロジェクト設定
ライブラリ
- カバレッジ取得には
jest-sonar-reporterを使います
npm i --dev jest-sonar-reporter
package.json
- script とカバレッジと reporter の設定
- report ディレクトリの中に各種実行結果のファイルが格納される
- coverage ディレクトリの中にカバレッジファイルが格納される
- lint:ciのscriptで
exit 0としているのはLintでエラーとなった場合も正常終了させてactionsのジョブを継続させたいため
package.json
{
  "scripts": {
    "lint:ci": "eslint src/**/*.tsx src/**/*.ts -f json -o ./report/eslint-report.json || exit 0",
    "test:ci": "CI=true react-scripts test --watchAll=false --coverage --testResultsProcessor jest-sonar-reporter"
  },
  "jest": {
    "collectCoverageFrom": ["src/**/*.{jsx,ts,tsx}", "!src/**/jest.config.js"]
  },
  "testResultsProcessor": "jest-sonar-reporter",
  "jestSonar": {
    "reportPath": "report",
    "reportFile": "test-report.xml",
    "reportedFilePath": "relative",
    "relativeRootDir": "<rootDir>/../",
    "indent": 4
  },
  "devDependencies": {
    "jest-sonar-reporter": "^2.0.0"
  }
}
sonar-project.properties
- プロジェクト直下に
sonar-project.propertiesを作成する - カバレッジファイルやレポートファイルの場所を相対パスで指定している
sonar-project.properties
sonar.projectKey=[SonarQubeのプロジェクトkey]
sonar.language=ts
sonar.sourceEncoding=UTF-8
sonar.sources=./src
sonar.tests=./src
sonar.test.inclusions=**/*.test.tsx,**/*.test.ts
sonar.eslint.reportPaths=report/eslint-report.json
sonar.testExecutionReportPaths=report/test-report.xml
sonar.javascript.lcov.reportPaths=coverage/lcov.info
sonar.exclusions=node_modules
sonar.exclusions=**/build/**,**/test/**,**/public/**,**/css/**
github actions
actions.yml
- 各種レポートファイルの出力
- scanner 自体は github actions plugin を使う
actions.yml
name: SonarQube Check

on:
  push:
    branches: [main]

permissions:
  id-token: write
  contents: read

jobs:
  sonarqube:
    name: send report to sonarqube
    runs-on: ubuntu-latest

    steps:
      - name: Checkout
        uses: actions/checkout@v2

      - name: Setup
        uses: actions/setup-node@v1
        with:
          node-version: "16"

      - name: npm settings
        run: |
          npm install

      - name: Test
        run: |
          npm run test:ci

      - name: Lint
        run: |
          npm run lint:ci

      - name: SonarQube Scan
        uses: sonarsource/sonarqube-scan-action@master
        env:
          SONAR_TOKEN: ${{ secrets.SONAR_TOKEN }}
          SONAR_HOST_URL: ${{ secrets.SONAR_HOST_URL }}
Python
プロジェクト設定
sonar-project.properties
- プロジェクト直下に
sonar-project.propertiesを作成する - カバレッジファイルやレポートファイルの場所を相対パスで指定している
sonar-project.properties
sonar.projectKey=[SonarQubeのプロジェクトkey]
sonar.language=py
sonar.projectName=dispatcher-api
sonar.sources=./src
sonar.exclusions=**/setup.py,**/test_*.py
sonar.python.version=3.8
sonar.tests=./tests
sonar.sourceEncoding=UTF-8
sonar.python.coverage.reportPaths=coverage.xml
github actions
actions.yml
- カバレッジファイルの出力(
pytest-covを使う) - scanner 自体は github actions plugin を使う
actions.yml
name: SonarQube Check

on:
  push:
    branches: [master]

permissions:
  id-token: write
  contents: read

jobs:
  sonarqube:
    name: send report to sonarqube
    runs-on: ubuntu-latest

    steps:
      - name: Checkout
        uses: actions/checkout@v3

      - name: Setup
        uses: actions/setup-python@v4
        with:
          python-version: "3.8"

      # カバレッジを出力するためにpytest-covライブラリが必要
      - name: Test
        run: |
          pip install pytest-cov

      - name: Test
        run: |
          pytest ./tests -v --cov=./src --cov-report=term-missing --cov-report=xml

      # xmlの中のテストのパスをgithub pluginのsonarqube用に加工する
      - name: Override Coverage Source Path for plugin Sonar
        run: |
          sed -i 's/home\/runner\/work\/[リポジトリ名]\/[リポジトリ名]/github\/workspace/' coverage.xml

      - name: SonarQube Scan
        uses: sonarsource/sonarqube-scan-action@master
        env:
          SONAR_TOKEN: ${{ secrets.SONAR_TOKEN }}
          SONAR_HOST_URL: ${{ secrets.SONAR_HOST_URL }}
Go
プロジェクト設定
sonar-project.properties
- プロジェクト直下に
sonar-project.propertiesを作成する - カバレッジファイルやレポートファイルの場所を相対パスで指定している
sonar-project.properties
sonar.projectKey=[SonarQubeのプロジェクトkey]
sonar.projectName=[SonarQubeのプロジェクト名]
sonar.projectVersion=1.0
sonar.language=go
sonar.sources=.
sonar.exclusions=**/sonarscanner/**,**/*_test.go,
sonar.tests=.
sonar.test.inclusions=**/*_test.go
sonar.sourceEncoding=UTF-8
sonar.go.coverage.reportPaths=./coverage.out
sonar.go.tests.reportPaths=./test.json
github actions
actions.yml
- 各種レポートファイルの出力
- go 用の github actions plugin は無いので、公式から sonarscanner を DL して叩く
- リポジトリを main ディレクトリ配下に pull し、scanner と別階層に配置するようにしている
actions.yml
name: SonarQube Check

on:
  push:
    branches: [main]

permissions:
  id-token: write
  contents: read

jobs:
  sonarqube:
    name: send report to sonarqube
    runs-on: ubuntu-latest

    steps:
      - name: Checkout
        uses: actions/checkout@v3
        with:
          path: main

      - name: Set up Go
        uses: actions/setup-go@v2
        with:
          go-version: 1.18

      # scannerを公式からDLする
      - name: Download sonarscanner and unzip
        run: |
          wget -O sonarscanner.zip https://binaries.sonarsource.com/Distribution/sonar-scanner-cli/sonar-scanner-cli-4.7.0.2747-linux.zip
          7z x sonarscanner.zip

      - name: make testfile & coverage
        run: |
          cd main
          go test ./... -coverprofile=coverage.out -json > test.json

      - name: SonarQube Scan
        run: |
          cd main
          ../sonar-scanner-4.7.0.2747-linux/bin/sonar-scanner -Dproject.settings=./sonar-scanner.properties -Dsonar.host.url=${{ secrets.SONAR_HOST_URL }} -Dsonar.login=${{ secrets.SONAR_TOKEN }}
C++
SonarQube 公式では DevelopersEdition(有料版)対応の言語で、公式の導入ドキュメントも有料版想定の記載ですが、
オープンソースプラグインを使うことで CommunityEdition でも解析ができるようになります。
SonarQube 設定
plugin の DL
- 立てている SonarQube のバージョンにあった plugin のバージョンを DL する。Matrixを見て確認する。
-
Releaseから
sonar-cxx-plugin-[version].jarを DL する
plugin を SonarQube の拡張用ディレクトリに配置する
- FileZilla などを使って SonarQube の立っているサーバの中に ssh 接続する
- 格納する場所は
SONARQUBE_HOME/extensions/plugins配下 - 本記事の場合、EC2 インスタンスに bitnami SonarQube のマーケットプレースのものを使っているのですが、その場合のパスは
/bitnami/sonarqube/extensions/pluginsになります。
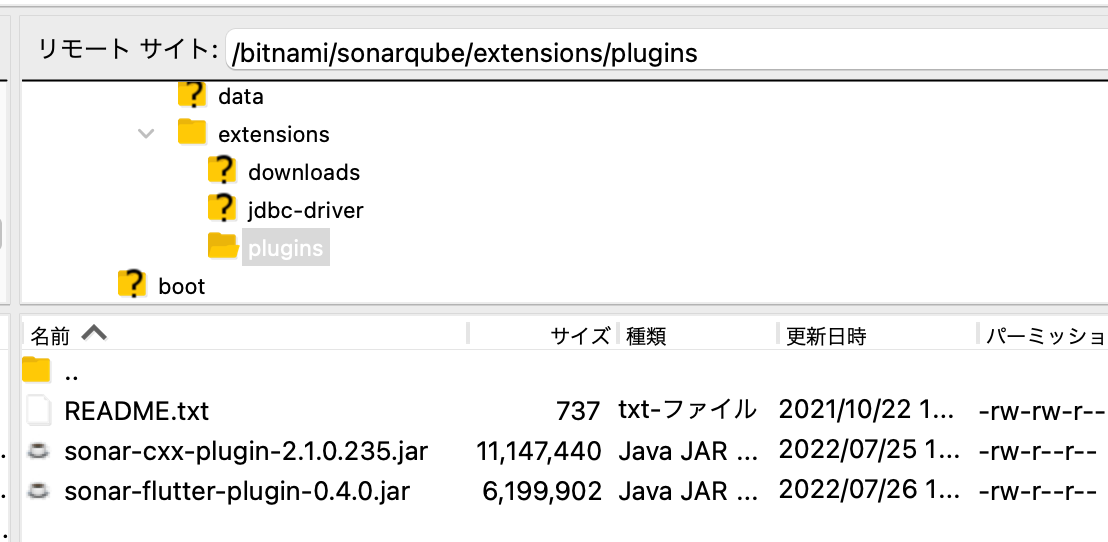
※後述する Flutter 用の plugin も一緒に格納しています
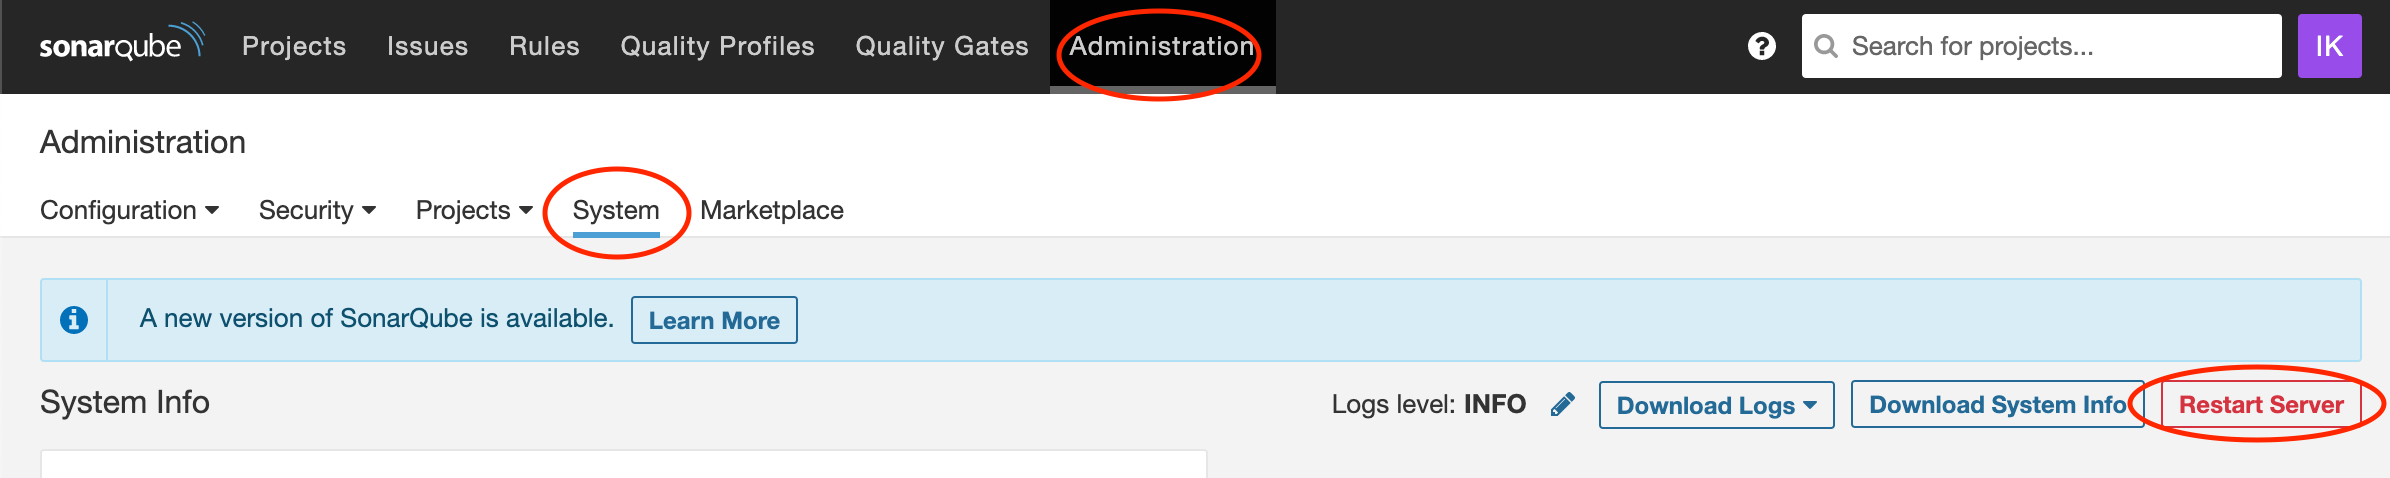
SonarQube の再起動&設定
-
SonarQube にログイン
-
Administration > System > RestartServer から再起動
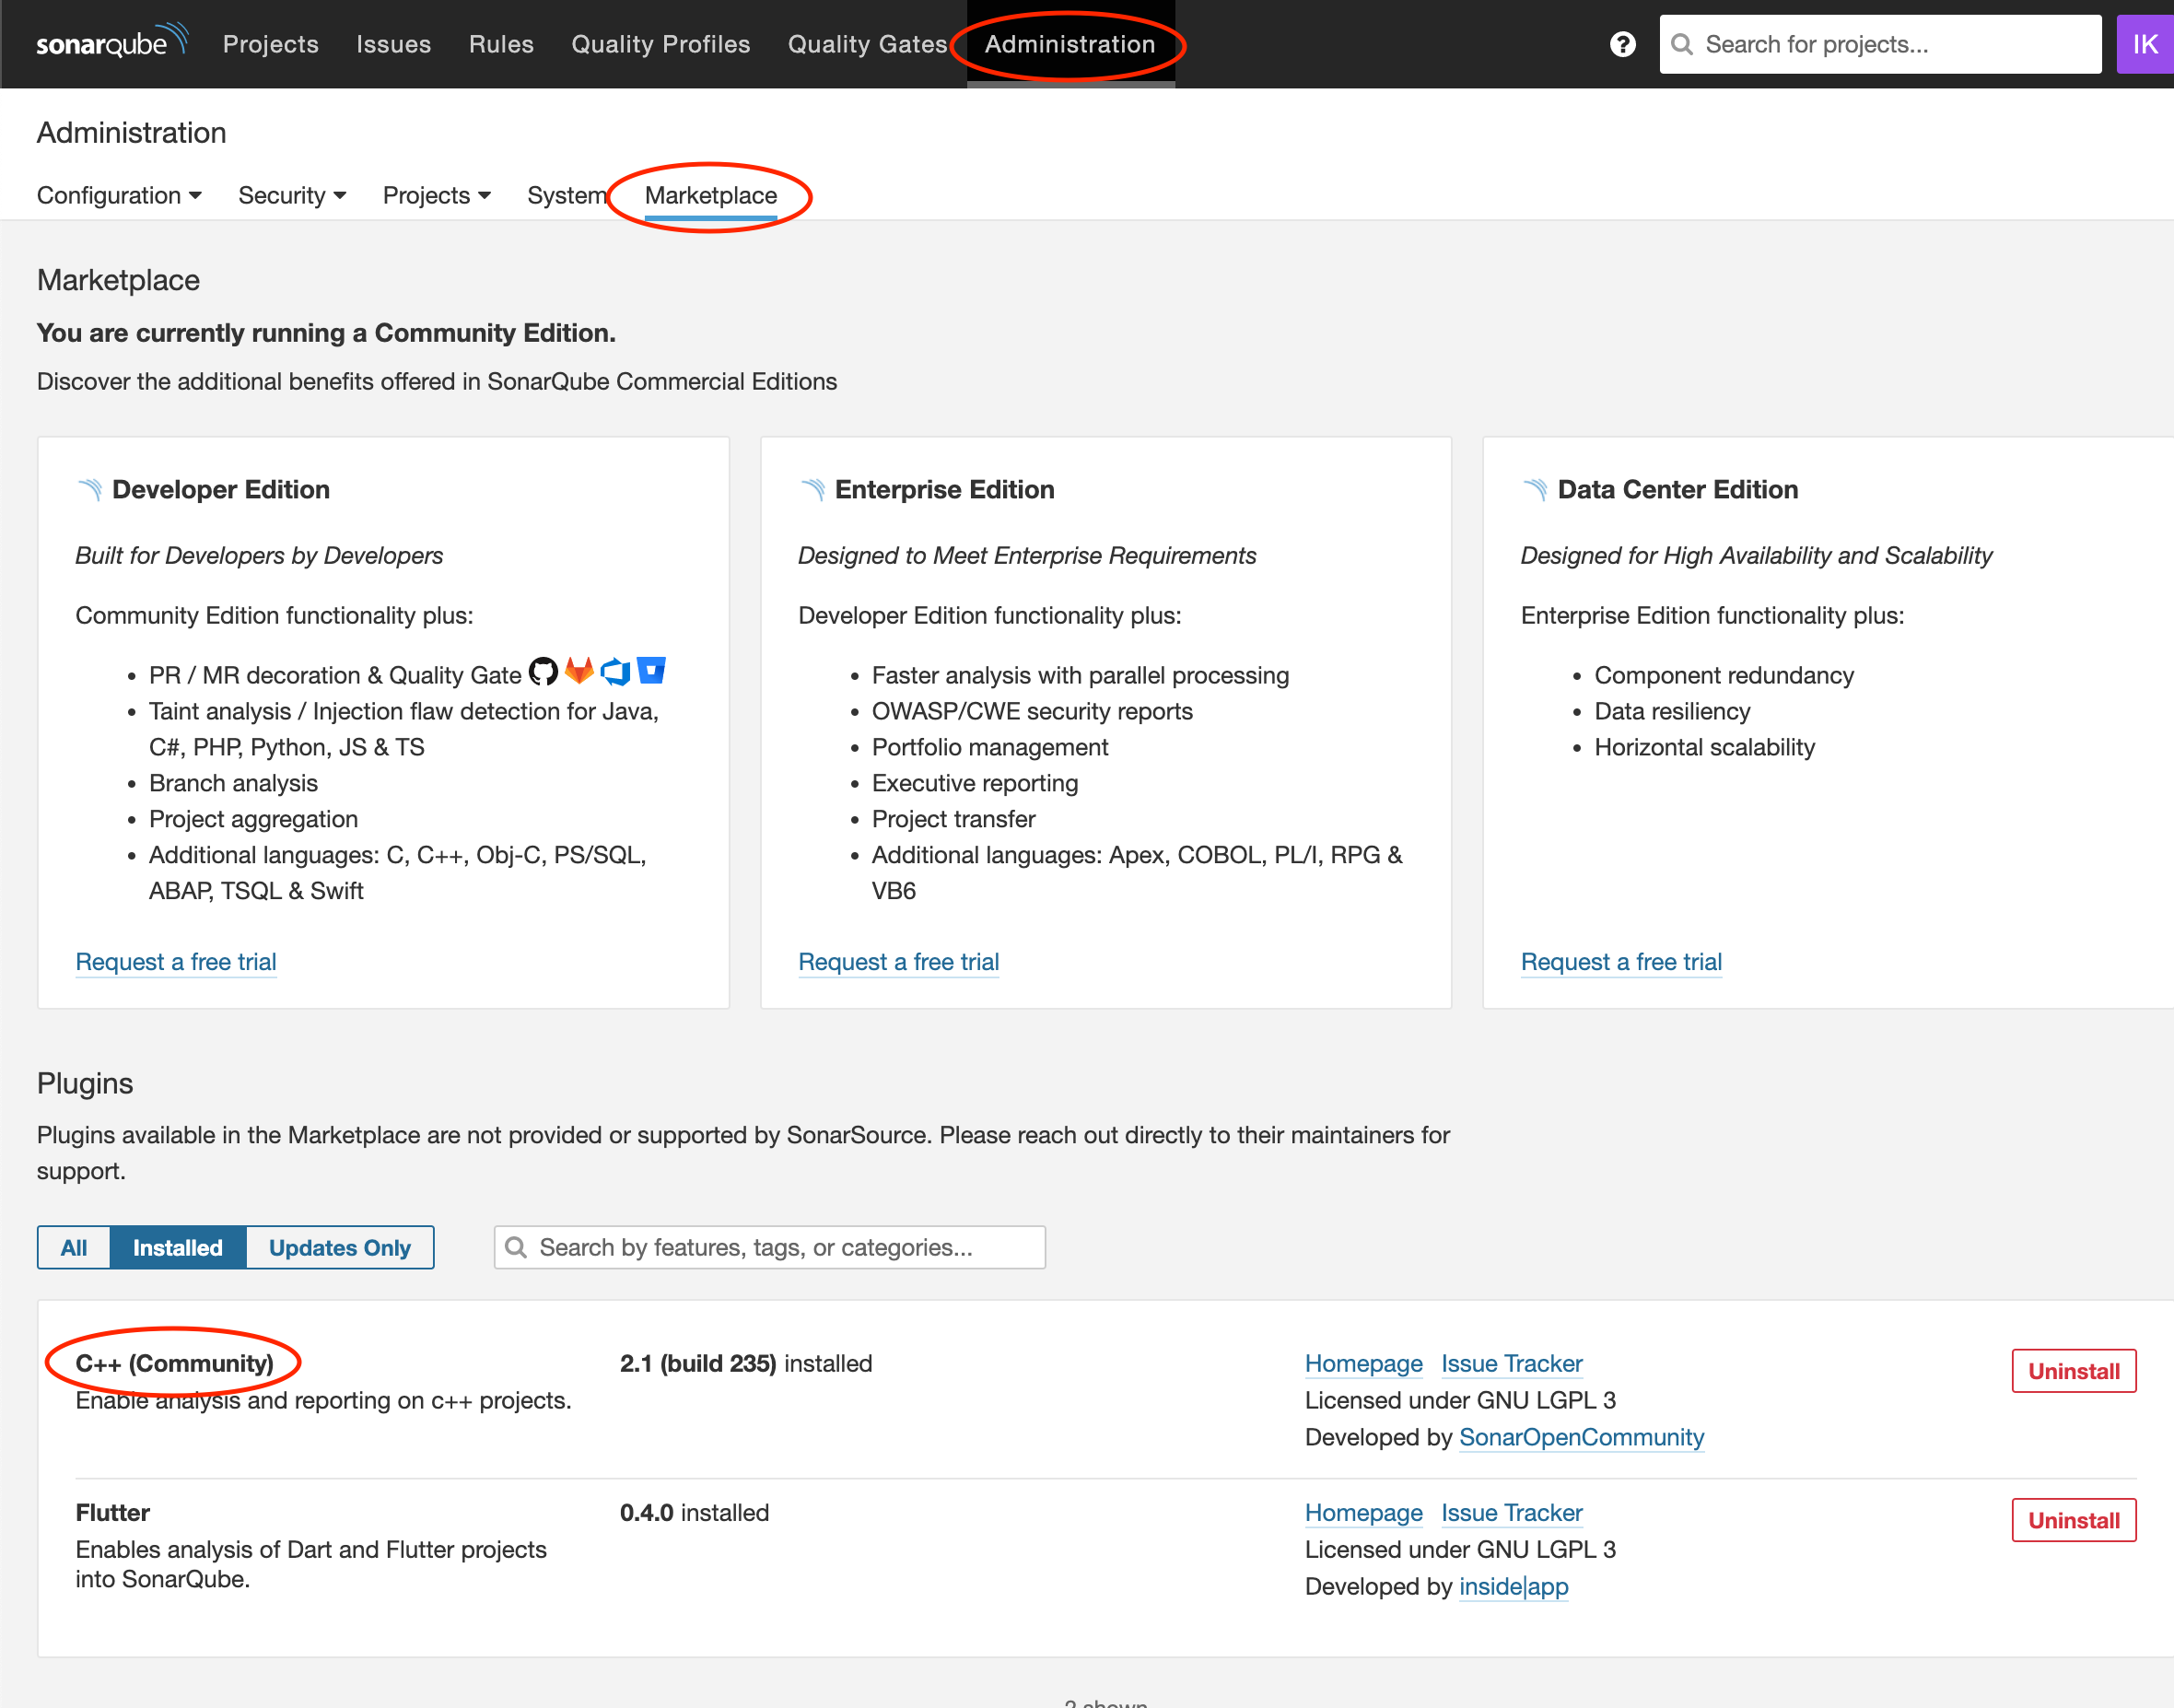
-
Administration > Marketplace でインストール済みの plugin に C++が表示されていればインストールは成功
-
QualityProfile はデフォルトの SonarWay だと Rule が定義されていないので、新しく QualityProfile を作り Rule を設定

-
新しく作った QualityProfile を Default に設定
プロジェクト設定
sonar-project.properties
- プロジェクト直下に
sonar-project.propertiesを作成する - カバレッジファイルやレポートファイルの場所を相対パスで指定している
sonar-project.properties
sonar.sourceEncoding=UTF-8

sonar.projectName=[SonarQubeのプロジェクトkey]
sonar.projectKey=[SonarQubeのプロジェクト名]
sonar.sources=.
sonar.exclusions=**/proto/**,**/build/**
sonar.cxx.file.suffixes=.h,.cpp

# カバレッジファイル(see https://github.com/SonarOpenCommunity/sonar-cxx/wiki/sonar.cxx.other.reportPaths)
# sonar.cxx.other.reportPaths=report.xml
github actions
actions.yml
- C++ 用の github actions plugin は無いので、公式から sonarscanner を DL して叩く
- リポジトリを main ディレクトリ配下に pull し、scanner と別階層に配置するようにしている
- test で report 結果は googleTest などで出力できる(この actions 上では report 出力していません)
actions.yml
name: send sonarqube

on:
  push:
    branches: [master]

permissions:
  id-token: write
  contents: read

jobs:
  sonarqube:
    name: send report to sonarqube
    runs-on: ubuntu-latest

    steps:
      - name: Checkout
        uses: actions/checkout@v3
        with:
          path: main

      # scannerを公式からDLする
      - name: Download sonarscanner and unzip
        run: |
          wget -O sonarscanner.zip https://binaries.sonarsource.com/Distribution/sonar-scanner-cli/sonar-scanner-cli-4.7.0.2747-linux.zip
          7z x sonarscanner.zip

      - name: SonarQube Scan
        run: |
          cd main
          ../sonar-scanner-4.7.0.2747-linux/bin/sonar-scanner -Dproject.settings=./sonar-scanner.properties -Dsonar.host.url=${{ secrets.SONAR_HOST_URL }} -Dsonar.login=${{ secrets.SONAR_TOKEN }}
Flutter(Dart)
SonarQube 公式では未対応の言語ですが、オープンソースプラグインを使うことで解析ができるようになります。
SonarQube 設定
plugin の DL
- 立てている SonarQube のバージョンにあった plugin のバージョンを DL する。Resease note のサポート情報を見て確認する。
-
Releaseから
sonar-flutter-plugin-[version].jarを DL する
plugin を SonarQube の拡張用ディレクトリに配置する
- C++の説明と同じ作業をする
SonarQube の再起動&設定
- C++の説明と同じ作業をする
Dart の場合は QualityProfile はデフォうとの状態で Rules が設定されたと思います。

プロジェクト設定
sonar-project.properties
- プロジェクト直下に
sonar-project.propertiesを作成する - カバレッジファイルやレポートファイルの場所を相対パスで指定している
sonar-project.properties
sonar.projectKey=[SonarQubeのプロジェクトkey]
sonar.projectName=[SonarQubeのプロジェクト名]
sonar.projectVersion=1.0

sonar.sources=lib
sonar.tests=test
sonar.test.inclusions=**/*test.dart
sonar.sourceEncoding=UTF-8
sonar.dart.analysis.reportPath=reports.output

sonar.flutter.analyzer.mode=flutter
sonar.dart.analysis.useExistingOptions=true
github actions
actions.yml
- Dart 用の github actions plugin は無いので、公式から sonarscanner を DL して叩く
- リポジトリを main ディレクトリ配下に pull し、scanner と別階層に配置するようにしている
actions.yml
name: send sonarqube

on:
  push:
    branches: [master]

permissions:
  id-token: write
  contents: read

jobs:
  test:
    name: test and sonar
    runs-on: ubuntu-latest
    steps:
      - uses: actions/checkout@v3
        with:
          path: main

      # scannerを公式からDLする
      - name: Download sonarscanner and unzip
        run: |
          wget -O sonarscanner.zip https://binaries.sonarsource.com/Distribution/sonar-scanner-cli/sonar-scanner-cli-4.7.0.2747-linux.zip
          7z x sonarscanner.zip

      - name: install flutter
        uses: subosito/flutter-action@v1
        with:
          flutter-version: "3.0.5"
          channel: "stable"

      - name: flutter pub get
        run: |
          cd main
          flutter pub get

      - name: flutter test
        id: test
        run: |
          cd main
          flutter test --coverage > reports.output

      - name: flutter test result
        if: ${{ always() }}
        run: |
          cd main
          cat reports.output

      - name: SonarQube Scan
        run: |
          cd main
          ../sonar-scanner-4.7.0.2747-linux/bin/sonar-scanner -Dproject.settings=./sonar-scanner.properties -Dsonar.host.url=${{ secrets.SONAR_HOST_URL }} -Dsonar.login=${{ secrets.SONAR_TOKEN }}
まとめ
- 多言語のプロジェクトの品質を一括で確認・管理できるSonarQubeはUIも見やすくてかなり使い勝手が良いと思います。
- 静的解析の結果を取得して、品質が良い時と悪い時の状態でそのままデプロイするかどうかといったこともgithub actions上でできるので便利です。
- ブランチごとでの静的解析など有料版でないとかゆいところに手が届かないところもありますが、無料版でも十分にチーム開発に耐えられるものだと思います。
- チーム開発の品質向上にSonarQube、アリだと思います。