1. はじめに
久しぶりに Rclone を Oracle Cloud (以降 OCIと記載します) を使いました。以前使ったときとは OCI 側の設定項目名が変わっていたので、この際なので記事にまとめようと思います。
1-1. Rclone とは
ローカルのディレクトリやファイルとクラウドの Object Storage の間で手軽にコピーや同期をすることができるオープンソース(MIT ライセンス)のソフトウェアです。
Rclone は Windows や MacOS、Linux など様々なプラットフォームで利用することが可能です。
Linux の rsync のような感じで Object Storage を気軽に使えるので気に入っています。
1-2. OCI の Object Storage とは
OCI の Object Storage は Oracle が独自に作り上げた Object Storage ですが、S3 や Swift との 互換 API があります。
また、ストレージのタイプとして普通の Standard とアーカイブ用途の Archive の2種類がありますが、Rclone では Standard のみ対応ですのでご注意ください。
2. OCI の準備
OCI 側では主に以下を行います。
- access_key と secret_access_key の作成
- Object Storage の Buket 作成
- Endpoint の確認
2-1. リージョンの確認
OCI では現状、以下のリージョンにリソースを作成できます。
- フランクフルト
- アシュバーン
- ロンドン
- フェニックス
- トロント
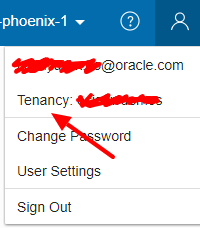
OCI にログインしたあと、右上に現在のリージョンが表示されます。

今回は、上記のように US の Phoenix を利用します。
2-2. Customer Secret Key の作成
S3 API でアクセスする際の、access_key と secret_access_key を作成します。
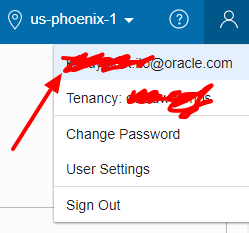
OCI へのログイン後の画面右上のアイコンをクリックし、矢印の Username をクリックします。
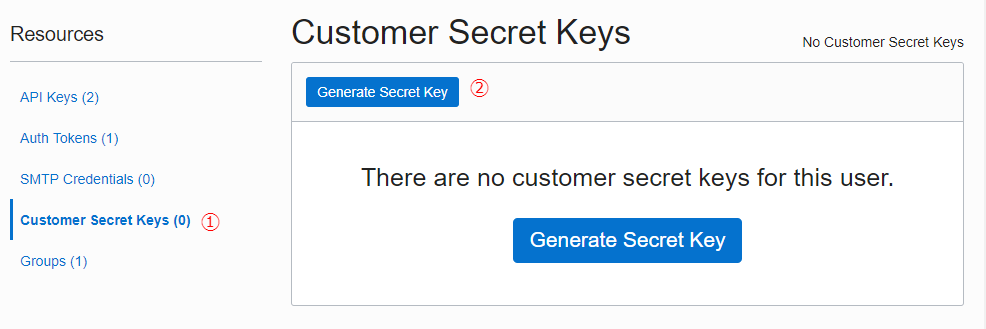
右下の Resources メニューから Customer Secret Key をクリックし、 Generate Secret Key をクリックます。
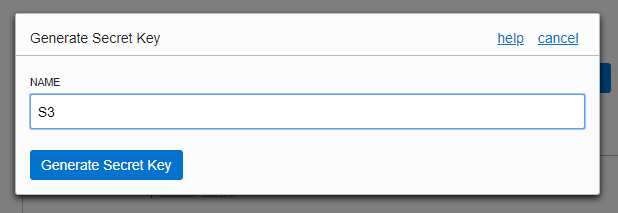
Secret Key が表示されるのでメモします ※あとで再確認できないので必ずメモすること!
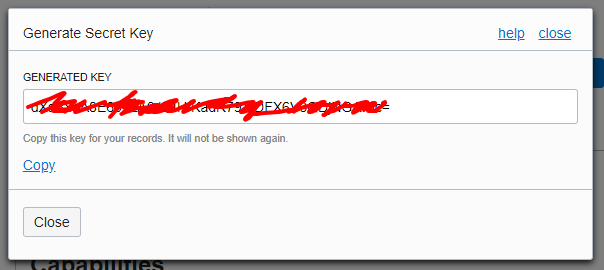
↓ 作成されたら、矢印の Copy をクリックし、Access_Key をコピーし、メモしておきます

2-3. Object Storage の Buket 作成
続いて、データを放り込む Buket を作成します。
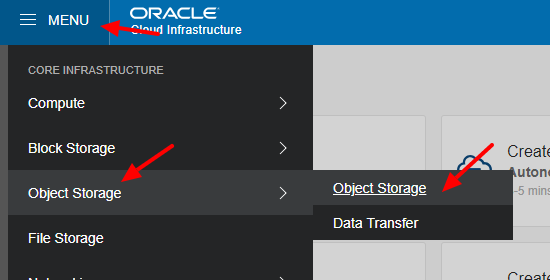
画面右上のメニューから Object Storage → Object Storage を選択します。
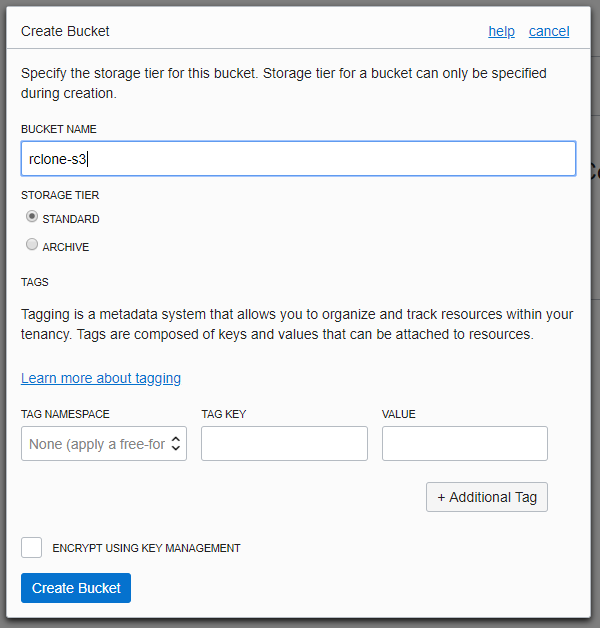
BUKET NAME を任意で設定します。 STORAGE TERI は Standard を選択します。
2-4. Endpoint URL の確認
最後に API アクセス先の Endpoint を確認します。
Endpoint はこちらのドキュメントに記載されています。https://docs.cloud.oracle.com/iaas/Content/API/Concepts/apiref.htm
Object Storage and Archive Storage → Amazon S3 Compatibility API の順に展開すると以下のように書かれています。
https://<object_storage_namespace>.compat.objectstorage.ca-toronto-1.oraclecloud.com
https://<object_storage_namespace>.compat.objectstorage.eu-frankfurt-1.oraclecloud.com
https://<object_storage_namespace>.compat.objectstorage.uk-london-1.oraclecloud.com
https://<object_storage_namespace>.compat.objectstorage.us-ashburn-1.oraclecloud.com
https://<object_storage_namespace>.compat.objectstorage.us-phoenix-1.oraclecloud.com
3. Rclone の準備
Rclone はインストール、設定が非常にシンプルです。
3-1. インストール
今回は Linux でインストールをしていきたいと思います。
3-1-1. Linux
Linux の場合、Source、パッケージがありますが、以下のコマンドでインストールするのが、一番カンタンです(インターネットに接続されていれば・・)。
$ curl https://rclone.org/install.sh | sudo bash
  % Total    % Received % Xferd  Average Speed   Time    Time     Time  Current
                                 Dload  Upload   Total   Spent    Left  Speed
100  4276  100  4276    0     0   4155      0  0:00:01  0:00:01 --:--:--  4155
  % Total    % Received % Xferd  Average Speed   Time    Time     Time  Current
                                 Dload  Upload   Total   Spent    Left  Speed
100    13  100    13    0     0     12      0  0:00:01  0:00:01 --:--:--    12
  % Total    % Received % Xferd  Average Speed   Time    Time     Time  Current
                                 Dload  Upload   Total   Spent    Left  Speed
100 8642k  100 8642k    0     0  5150k      0  0:00:01  0:00:01 --:--:-- 5147k
Archive:  rclone-current-linux-amd64.zip
   creating: rclone-v1.45-linux-amd64/
  inflating: rclone-v1.45-linux-amd64/rclone.1
  inflating: rclone-v1.45-linux-amd64/rclone
  inflating: rclone-v1.45-linux-amd64/README.txt
  inflating: rclone-v1.45-linux-amd64/README.html
  inflating: rclone-v1.45-linux-amd64/git-log.txt
Processing manual pages under /usr/share/man...
Updating index cache for path `/usr/share/man/man4'. Wait...done.
Checking for stray cats under /usr/share/man...
Checking for stray cats under /var/cache/man...
Processing manual pages under /usr/share/man/fi...
~省略~
Processing manual pages under /usr/local/man...
Updating index cache for path `/usr/local/man/man1'. Wait...done.
Checking for stray cats under /usr/local/man...
Checking for stray cats under /var/cache/man/oldlocal...
73 man subdirectories contained newer manual pages.
3097 manual pages were added.
0 stray cats were added.
0 old database entries were purged.

rclone v1.45 has successfully installed.
Now run "rclone config" for setup. Check https://rclone.org/docs/ for more details.
3-1-2. Oracle Linux
Oracle Linux の場合、ol7_developer というリポジトリにパッケージがあるので yum からインストールが可能です。
[opc@ol-rclone ~]$ sudo yum install rclone
Loaded plugins: langpacks, ulninfo
Resolving Dependencies
--> Running transaction check
---> Package rclone.x86_64 0:1.42-1.0.1.el7 will be installed
--> Finished Dependency Resolution

Dependencies Resolved

========================================================================================================================
 Package                 Arch                    Version                           Repository                      Size
========================================================================================================================
Installing:
 rclone                  x86_64                  1.42-1.0.1.el7                    ol7_developer                  5.6 M

Transaction Summary
========================================================================================================================
Install  1 Package

Total download size: 5.6 M
Installed size: 22 M
Is this ok [y/d/N]: y
Downloading packages:
rclone-1.42-1.0.1.el7.x86_64.rpm                                                                 | 5.6 MB  00:00:00
Running transaction check
Running transaction test
Transaction test succeeded
Running transaction
  Installing : rclone-1.42-1.0.1.el7.x86_64                                                                         1/1
  Verifying  : rclone-1.42-1.0.1.el7.x86_64                                                                         1/1

Installed:
  rclone.x86_64 0:1.42-1.0.1.el7

Complete!
3-2. Rclone 設定
OCI の Object Storage に接続する設定を入れていきます。
rclone config とすると対話形式で設定をできますが、OCI の場合設定後に修正が必要なので、以下のファイルに直接記述していきます。
デフォルトの設定ファイルは以下のように確認できます。
$ rclone config file
Configuration file doesn't exist, but rclone will use this path:
/home/opc/.config/rclone/rclone.conf
まだファイルが存在しないので、vi で作成していきます。
$ vi /home/opc/.config/rclone/rclone.conf
[oci-s3]
type = s3
env_auth = false
access_key_id = xxxxxxxxxxxxxxxxxxxxxxxxxxxxxx
secret_access_key = yyyyyyyyyyyyyyyyyyyyyyyyyyyyyy
region = us-phoenix-1
endpoint = https://ociadwdemos.compat.objectstorage.us-phoenix-1.oraclecloud.com
location_constraint = us-phoenix-1
acl = private
[] の中がアクセスするときの接続名なので、適当に変更してください。
access_key_id と Secret_access_key は 2-2 で作成したものをコピーしてください。
リージョンは region とlocation_constraint に記載します。
他の値は上記のままで OK です。
これで設定完了です。
ちなみに Proxy 経由で利用する場合、Linux であれば以下の環境変数が設定されている必要があります。
export http_proxy=http://xx.xx.xx.xx:xx
export https_proxy=http://xx.xx.xx.xx:xx
4. Rclone 使い方
4-1. 基本的な使い方
なにもないので、まずはローカルファイルをコピーしてみます。ローカルにある以下のようなディレクトリ・ファイルを対象とします。
$ tree dir1
dir1
├── dir1-1
│   ├── file1-1
│   ├── file1-2
│   └── file1-3
├── file1
├── file2
└── file3

1 directory, 6 files
それでは rclone でコピーします。
構文は rclone copy dir1 <接続名>:<Bunet名> のようになります。
$ rclone copy dir1 oci-s3:rclone-s3
これで rclone-s3 Buket にファイルがコピーされました。
確認をしてみます。ここでは lsf オプションで確認します。
$ rclone lsf oci-s3:rclone-s3
dir1-1/
file1
file2
file3
同期もしてみましょう。
ローカルの dir1/file1 に追記します。
$ echo test2 >> dir1/file1
今度は copy を sync に変えて実行します。今回は -v をつけることで詳細を表示させ、変更を加えたfile1 だけコピーされるかを確認してみます。
$ rclone sync dir1 oci-s3:rclone-s3 -v
2019/01/22 04:21:51 INFO  : S3 bucket rclone-s3: Waiting for checks to finish
2019/01/22 04:21:51 INFO  : file1: Copied (replaced existing)
2019/01/22 04:21:51 INFO  : S3 bucket rclone-s3: Waiting for transfers to finish
2019/01/22 04:21:51 INFO  : Waiting for deletions to finish
2019/01/22 04:21:51 INFO  :
Transferred:     11 Bytes (51 Bytes/s)
Errors:                 0
Checks:                 6
Transferred:            1
Ela
psed time:       200ms
file1 のみコピーされたことが分かります。
次は Object Storage からローカルにコピーしてみます。以下のように copy のあとのオプションの順番を入れ替えるだけです。
$ mkdir /tmp/dir1
$ rclone copy oci-s3:rclone-s3 /tmp/dir1
$ tree /tmp/dir1/
/tmp/dir1/
├── dir1-1
│   ├── file1-1
│   ├── file1-2
│   └── file1-3
├── file1
├── file2
└── file3

1 directory, 6 files
最後に削除をしてみます。削除には delete を使います。 -v をつけて詳細も確認してみます。
$ rclone delete oci-s3:rclone-s3 -v
2019/01/22 06:40:33 INFO  : Waiting for deletions to finish
2019/01/22 06:40:33 INFO  : file2: Deleted
2019/01/22 06:40:33 INFO  : file1: Deleted
2019/01/22 06:40:33 INFO  : file3: Deleted
2019/01/22 06:40:33 INFO  : dir1-1/file1-1: Deleted
2019/01/22 06:40:33 INFO  : dir1-1/file1-2: Deleted
2019/01/22 06:40:33 INFO  : dir1-1/file1-3: Deleted

$ rclone lsf oci-s3:rclone-s3
4-2. リファレンス
4-2-1. リスト
Linux コマンドでいう ls です。オプションがいくつかあり
lsf オプション
ディレクトリとファイル名のみをシンプルにリストします。
$ rclone lsf oci-s3:
rclone-s3/
ls オプション
ファイルサイズとファイル名のみが表示されます。
$ rclone ls oci-s3:rclone-s3
        5 file1
        5 file2
        5 file3
        5 dir1-1/file1-1
        5 dir1-1/file1-2
        5 dir1-1/file1-3
lsl
ファイルサイズ、タイムスタンプ、ファイル名が表示されます。
$ rclone lsl oci-s3:rclone-s3
        5 2019-01-22 04:10:46.994906801 file1
        5 2019-01-22 04:10:49.790037476 file2
        5 2019-01-22 04:10:50.812085260 file3
        5 2019-01-22 04:11:12.893117559 dir1-1/file1-1
        5 2019-01-22 04:11:15.023217143 dir1-1/file1-2
        5 2019-01-22 04:11:16.020263755 dir1-1/file1-3
lsjson
JSON 形式で表示されます。
$ rclone lsjson oci-s3:rclone-s3
[
{"Path":"dir1-1","Name":"dir1-1","Size":0,"MimeType":"inode/directory","ModTime":"2019-01-22T04:16:14.926782538Z","IsDir":true},
{"Path":"file1","Name":"file1","Size":5,"MimeType":"application/octet-stream","ModTime":"2019-01-22T04:10:46.994906801Z","IsDir":false},
{"Path":"file2","Name":"file2","Size":5,"MimeType":"application/octet-stream","ModTime":"2019-01-22T04:10:49.790037476Z","IsDir":false},
{"Path":"file3","Name":"file3","Size":5,"MimeType":"application/octet-stream","ModTime":"2019-01-22T04:10:50.81208526Z","IsDir":false}
]
tree
ツリー形式で表示されます。
$ rclone tree oci-s3:rclone-s3
/
├── dir1-1
│   ├── file1-1
│   ├── file1-2
│   └── file1-3
├── file1
├── file2
└── file3

1 directories, 6 files
4-2-2. 同期
$ rclone sync dir1 oci-s3:rclone-s3
4-2-3. コピー
$ rclone copy dir1 oci-s3:rclone-s3
4-2-4. 削除
4-3. その他
4-3-1. ログを保存させたい
定期的にローカルと Object Storage で同期をするとき、ログを取得したい場合があると思います。
--log-file と --log-level を使うことで、sync のログを取得することができます。
$ rclone sync dir1 oci-s3:rclone-s3 --log-file sync.log --log-level DEBUG
$ cat sync.log
2019/01/22 06:45:09 DEBUG : rclone: Version "v1.42" starting with parameters ["rclone" "sync" "dir1" "oci-s3:rclone-s3" "--log-file" "sync.log" "--log-level" "DEBUG"]
2019/01/22 06:45:09 DEBUG : Using config file from "/home/opc/.config/rclone/rclone.conf"
2019/01/22 06:45:10 DEBUG : file2: Size and modification time the same (differ by 0s, within tolerance 1ns)
2019/01/22 06:45:10 DEBUG : file2: Unchanged skipping
2019/01/22 06:45:10 INFO  : S3 bucket rclone-s3: Waiting for checks to finish
2019/01/22 06:45:10 DEBUG : file1: Size and modification time the same (differ by 0s, within tolerance 1ns)
2019/01/22 06:45:10 DEBUG : file1: Unchanged skipping
2019/01/22 06:45:10 DEBUG : file3: Size and modification time the same (differ by 0s, within tolerance 1ns)
2019/01/22 06:45:10 DEBUG : file3: Unchanged skipping
2019/01/22 06:45:10 DEBUG : dir1-1/file1-2: Size and modification time the same (differ by 0s, within tolerance 1ns)
2019/01/22 06:45:10 DEBUG : dir1-1/file1-2: Unchanged skipping
2019/01/22 06:45:10 DEBUG : dir1-1/file1-3: Size and modification time the same (differ by 0s, within tolerance 1ns)
2019/01/22 06:45:10 DEBUG : dir1-1/file1-3: Unchanged skipping
2019/01/22 06:45:10 DEBUG : dir1-1/file1-1: Size and modification time the same (differ by 0s, within tolerance 1ns)
2019/01/22 06:45:10 DEBUG : dir1-1/file1-1: Unchanged skipping
2019/01/22 06:45:10 INFO  : S3 bucket rclone-s3: Waiting for transfers to finish
2019/01/22 06:45:10 INFO  : Waiting for deletions to finish
2019/01/22 06:45:10 INFO  :
Transferred:      0 Bytes (0 Bytes/s)
Errors:                 0
Checks:                 6
Transferred:            0
Elapsed time:       200ms

2019/01/22 06:45:10 DEBUG : 13 go routines active
2019/01/22 06:45:10 DEBUG : rclone: Version "v1.42" finishing with parameters ["rclone" "sync" "dir1" "oci-s3:rclone-s3" "--log-file" "sync.log" "--log-level" "DEBUG"]
4-3-2. テキストファイルの中身を見たい
Object Storage に保存されているファイルがテキストの場合、cat コマンドで中身を確認することができます。
$ rclone cat oci-s3:rclone-s3/file1
test
test2
4-3-3. Buket の使用量を見たい
$ rclone size oci-s3:rclone-s3/dir1-1
Total objects: 3
Total size: 15 Bytes (15 Bytes)
