1. はじめに
Singularity について触れる機会がありましたので、インストールからマルチノードでの MPI サンプル実行まで実施したことをまとめておきたいと思います。
2. Singularity とは
Singularity は、2016年に Lawrence Berkeley Labs が Open Source でリリースしたコンテナ技術です。
主な特徴としては HPC 領域において重要な Infiniband や OpenMPI などのハイパフォーマンスなインターコネクトをサポートしている点です。またコンテナの起動に root 権限は不要です。
これらにより、これまで Docker では難しかった HPC 領域においてもコンテナの可搬性を活かすことが可能となりました。
Singularity の特徴をまとめると以下のようになるかと思います。
- OpenMPI をサポートしている
- 一般ユーザで実行可能
- Docker イメージを流用可能
- イメージが1ファイルで管理される
- ユーザのホームディレクトリや /tmp を共有可能
Singularity の動作検証を Oracle Cloud (Oracle Cloud Infrastructure) で実施してみます。
OS の設定から進めたい方は 「5. ホスト OS の設定」から進めてください。
3. 検証環境について
これから作成する全体図は以下のようになります。
4. Oracle Cloud (OCI) のセットアップ
Oracle が提供している IaaS である Oracle Cloud Infrastructure (以降 OCI と記載します)にて Singularity を動かすためのコンポーネントを準備していきます。
ちなみに、今回はロンドンのリージョンに環境を構築していきます。
4.1. Virtual Cloud Networks (VCN) の作成
AWS で言う VPC で、VM インスタンスなどを接続するネットワークを構築していきます。
OCI ログイン後、画面左上の MEMU から Network → Virtual Cloud Networks を選択します。

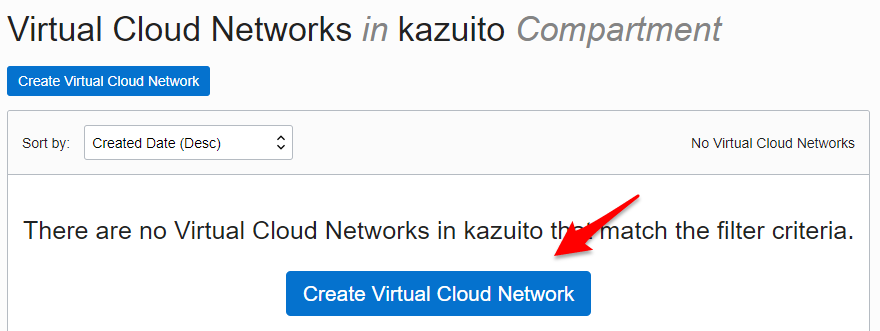
VCN はまだ作成されていない状態なので、Create Virtual Cloud Network ボタンを選択します。

まず NAME を任意で入力します。今回は singularity-vcn とします。
また CREATE VIRTUAL CLOUD NETWORK PLUS RELATED RESOURCES にチェックをします。
これをチェックすると自動的に Subnet を3つ作成し、Internet から SSH に必要なコンポーネントが自動で設定されます。今回は検証なので、こちらが非常にラクチンです。

下までスクロールして Create Virtual Cloud Network ボタンをクリックします。

ここで作成されたネットワーク構成は以下のようになります。
4.2. セキュリティリストの設定
続いて、セキュリティリストに設定を追加します。インスタンス間で MPI 通信をするので、作成したSubnet内はどのポートでも接続できるように設定を追加します。
作成したVCNの右側にある・・・をクリックし、View Virtual Cloud Network Datails をクリックします。

画面が切り替わり、作成した VCN 内のリソースが表示されます。上から5個目の Security Lists をクリックします。

セキュリティリスト(SL)が表示されるので、・・・から View Security List Details をクリックします。

Ingress Rule 3 の下辺りにある + Another Ingress Rule ボタンをクリックします。

Ingress Rule 4 が追加されるので、SOURCE TYPE を CIDR、SOURCE CIDR に 10.0.0.0/16、IP PROTOCOL に All Protocols を選択します。

下までスクロールして、Save Security List Rules をクリックします。

これで VCN の設定は完了です。
4.3. インスタンスの作成
続いて VM インスタンスを作成していきます。
画面左上のMENU から Compute → Instances をクリックします。

まだ何もインスタンスがない状態なので、Create Instance をクリックします。

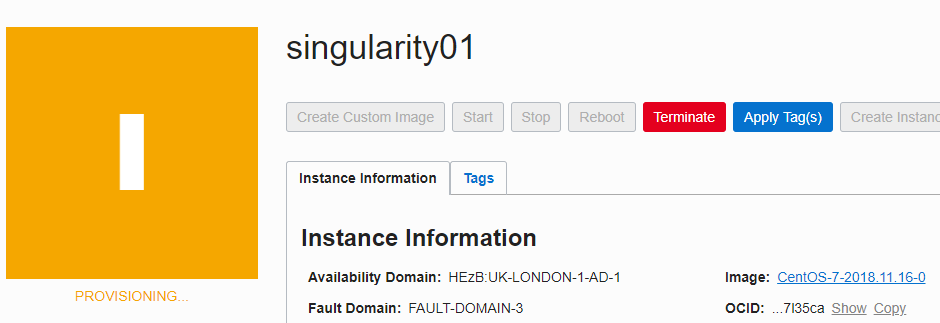
まず、Name を任意で入力します。これがインスタンスのホスト名になります。今回は、singularity01 とします。
Availability Domain で AD1 を選択します。OS は CentOS7 とします。
Instance Type は VM を選択します。

Shape というのは作成する VM インスタンスのスペックです。VM.Standard2.1 という 1 Core 15GB Memory の VM を選択します。小さいですが動作検証としては十分です。
SSH Key で作成済みの SSH Public Key を追加します。

数分すれば SSH できるようになるので、接続してみます。Public IP アドレスは以下に表示されます。

CentOS や OracleLinux ではデフォルトで opc ユーザでログインしていきます。
$ ssh opc@132.145.25.239
The authenticity of host '132.145.25.239 (<no hostip for proxy command>)' can't be established.
ECDSA key fingerprint is SHA256:s/lqavh0nU4DDQvroWZt5DHllr//cuZ0cuifqGDmyWw.
Are you sure you want to continue connecting (yes/no)?
Warning: Permanently added '132.145.25.239' (ECDSA) to the list of known hosts.
$
$  cat /etc/redhat-release
CentOS Linux release 7.5.1804 (Core)
以上で VM インスタンスが作成できました。
同様に singularity02 を作成します。
4.4. File Storage の作成
続いてマルチノードで MPI を実行するときに必要な共有領域を準備します。OCI には File Storage というサービスがあり、簡単に NFS Share を作成することができます。これを1つ作成し、両ノードでマウントし、Singularity イメージを置く共有領域とします。
画面左上の MENU から File Storage をクリックします。

NAME に share を入力し、Availability Domain に AD-1 を選択し、Create File System をクリックします。

1分もせずに NFS Filesystem が作成が作成されます。

以上で Singularity を動かすための OCI 側の準備が完了しました。
5. ホスト OS の設定
作成したインスタンスに SSH で接続して、Singularity のインストールを進めていきます。また以降の作業はデフォルトである opc ユーザにて作業をしていきます。必要に応じて sudo で実行します。
5.1. 必要なパッケージのインストール
まず Singularity のインストールに必要なパッケージをインストールします。
$ sudo yum groupinstall -y "Development Tools"
$ sudo yum install -y git libuuid-devel openssl-devel libseccomp-devel rpm-build
5.2. Singularity インストール
今回は2018年11月26日現在の Latest Version である v3.0.1 をインストールします。
公式ページにある手順の通り進めていきます。
$ wget https://github.com/sylabs/singularity/releases/download/v3.0.1/singularity-3.0.1.tar.gz
$ rpmbuild -tb singularity-3.0.1.tar.gz
$ sudo yum install -y rpmbuild/RPMS/x86_64/singularity-3.0.1-1.el7.x86_64.rpm
$ singularity version
3.0.1-1.el7
5.3. OpenMPI のインストール
続いて、OpenMPI をインストールします。Singularity がサポートしている OpenMPI は ver2.1.x とのことですが、今回は ver 3 をインストールしていきます。
$ sudo yum install -y openmpi3.x86_64 openmpi3-devel.x86_64
インストールすると /usr/lib64/openmpi3 配下にインストールされます。.bashrc に以下のように PATH と LD_LIBRARY_PATH を追加します。MPI との Integration については公式ページのこちらに書かれています。
PATH=$PATH:/usr/lib64/openmpi3/bin
LD_LIBRARY_PATH=/usr/lib64/openmpi3/lib

export PATH LD_LIBRARY_PATH
設定した環境変数を読み込みます。
$ . .bashrc
6. イメージの作成
Singularity には Singularity Hub というリポジトリがあり、今回はここにある CentOS のイメージを利用したいと思います。

このイメージ自体は Minimal なものなので、ここに OpenMPI や動作確認に必要なサンプルコードを追加していきます。
sandobox としてイメージを作成します。sandobox にすることでイメージへの書き込みが可能になります。この作業はどちらかのインスタンスで実行します。
$ sudo singularity build --sandbox sandbox-centos shub://singularityhub/centos
WARNING: Authentication token file not found : Only pulls of public images will succeed
INFO:    Starting build...
 109.74 MiB / 109.74 MiB [====================================================] 100.00% 27.30 MiB/s 4s
INFO:    Creating sandbox directory...
INFO:    Build complete: sandbox-centos
完了するとカレントディレクトリに sandbox-centos というディレクトリが作成されます。
$ ls -ld sandbox-centos/
dr-xr-xr-x. 18 root root 4096 Mar 14  2018 sandbox-centos/
では、この Sandbox イメージにパッケージなどをインストールしていくので、sudo で shell に書き込みモード(-w) で実行します。するとコンテナ内でのユーザは root になります。
$ sudo singularity shell -w sandbox-centos/
Singularity sandbox-centos:~> cat /etc/redhat-release
CentOS Linux release 7.4.1708 (Core)
まずは、お決まりで yum update します。
Singularity sandbox-centos:~> yum update
Singularity sandbox-centos:~> cat /etc/redhat-release
CentOS Linux release 7.5.1804 (Core)
6.1. OpenMPI のインストール
続いてコンテナイメージ内にも OpenMPI をインストールします。
Singularity sandbox-centos:~> yum install -y openmpi3.x86_64 openmpi3-devel.x86_64
Singularity sandbox-centos:~> /usr/lib64/openmpi3/bin/mpirun -V
mpirun (Open MPI) 3.0.0
6.2. サンプルコードのダウンロードとコンパイル
サンプルコードには MPI Tutorial の MPI Hello World を使いたいと思います。実行結果として、実行したホスト名も表示されるので、マルチノードで動いている確認もできます。
Singularity sandbox-centos:~> curl -O https://raw.githubusercontent.com/wesleykendall/mpitutorial/gh-pages/tutorials/mpi-hello-world/code/mpi_hello_world.c
Singularity sandbox-centos:~> /usr/lib64/openmpi3/bin/mpicc mpi_hello_world.c -o mpi_hello_world
Singularity sandbox-centos:~> ls -l mpi_hello_world
-rwxr-xr-x. 1 root root 8728 Nov 26 06:38 mpi_hello_world
Singularity sandbox-centos:~> cp mpi_hello_world /usr/bin
以上でイメージの作成が完了しました。
6.3. Build
Sandbox イメージから simg ファイルを Build します。これでコンテナイメージが1ファイルとして作成されます。
$ sudo singularity build mpi_centos.simg sandbox-centos
WARNING: Authentication token file not found : Only pulls of public images will succeed
INFO:    Starting build...
INFO:    Creating SIF file...
INFO:    Build complete: mpi_centos.simg
$ ls -lh mpi_centos.simg
-rwxr-xr-x. 1 opc opc 215M Nov 26 06:48 mpi_centos.simg
7. OpenMPI マルチノードで動かすための準備
OpenMPI でマルチノード実行させるために必要な設定をホストOSに実施していきます。
7.1. NFS マウント
作成した File System を NFS マウントしていきます。
作成した File System(FS) の右側の・・・をクリックし、 View File System Details をくりっくします。

Mount Target が表示されるので、右側の・・・をクリックし、 Mount Commands をクリックします。

INSTALL COMMAND は今回は不要なので、マウントポイントの作成とマウントコマンドをコピペしていきます。HPC 環境を考えるとこの共有領域はユーザのホームディレクトリとすべきですが、今回は省略します。
$ sudo mkdir -p /mnt/share
$ sudo mount 10.0.0.5:/share /mnt/share
$ df -h /mnt/share
Filesystem       Size  Used Avail Use% Mounted on
10.0.0.5:/share  8.0E     0  8.0E   0% /mnt/share
$ sudo chown opc:opc /mnt/share
先程 Build した mpi_centos.simg をマウントした /mnt/share 配下にコピーします。
$ cp mpi_centos /mnt/share/
7.2. ssh パスフレーズなし接続
mpirun を実行する singularity01 から singularity02 へ ssh でパスフレースなしで接続できるように設定します。
singularity01 で ssh key を作成します。
$ ssh-keygen -t rsa -b 2048 -N ''
Generating public/private rsa key pair.
Enter file in which to save the key (/home/opc/.ssh/id_rsa):
Your identification has been saved in /home/opc/.ssh/id_rsa.
Your public key has been saved in /home/opc/.ssh/id_rsa.pub.
The key fingerprint is:
SHA256:3duW0Ofy845TTClKsRdtoS32LwOje3Edhry71JXYjmE opc@singularity01
The key's randomart image is:
+---[RSA 2048]----+
|              ...|
|           . .oo |
|            +++..|
|         . +.*=+o|
|        S o BE=B+|
|           ooB*+*|
|          . .=O+o|
|           .oo.B |
|          .. .oo*|
+----[SHA256]-----+

$ cat .ssh/id_rsa.pub
ssh-rsa AAAAB3NzaC1yc2EAAAADAQABAAABAQDCMV4Dvd0c64peZglYon9UXnrS28zVygPxoL7oXNrKdW5Rd4HFTmDcdzR6EBU00cIpVALwi00CsuJ9aDi+2mKuPNt4vQMs/2hNlx8JbKWUFgcjMFSYlta1fFtF4VbnTyDC799DMabhNsb5ZoES3FfqtOO1xGpLDXHPOF8462oKevnOlP4VK7Xl82kMGYWyUIxXbpLtqoU1Y+4y7FrOrvGyII5BpQ4RXnqSCGEIfXpznUNvXAF8usW8E/nMepMjbtA2/G0I1h5ZMtYaSHWUei3AhLIBO42aS9QZFfYY7WCZ7lTqNPsHDaozo6d3KRUM7KJABErDOXzjJ35pAVm511fz opc@singularity01
singularity02 にログインし、singularity01 の id_rda.pub を .ssh/authorized_keys に追加します。
$ vi .ssh/authorized_keys
パスフレーズなしで接続できるか確認をします。
$ ssh singularity02 uname -a
The authenticity of host 'singularity02 (10.0.0.3)' can't be established.
ECDSA key fingerprint is SHA256:nCkxYhS/aBKYWC00vXckna0CTBp8NeqRoHa4uIqt8lQ.
ECDSA key fingerprint is MD5:c4:cb:14:08:15:67:1c:15:b1:de:79:2b:58:10:8d:5e.
Are you sure you want to continue connecting (yes/no)? yes
Warning: Permanently added 'singularity02,10.0.0.3' (ECDSA) to the list of known hosts.
Linux singularity02 3.10.0-862.14.4.el7.x86_64 #1 SMP Wed Sep 26 15:12:11 UTC 2018 x86_64 x86_64 x86_64 GNU/Linux
7.3. Firewalld
OpenMPI に必要なポートを firewalld に開けます。
デフォルトでは 1024-65535 を使用するので、とりあえずこれを public zone に開けていきます。
$ sudo firewall-cmd --permanent --zone=public --add-port=1024-65535/tcp
$ sudo firewall-cmd --reload
7.4 /etc/hosts
ホスト名で接続できるように両インスタンスの /etc/hosts に書きます。
[opc@singularity01 ~]$ sudo vi /etc/hosts
127.0.0.1   localhost localhost.localdomain localhost4 localhost4.localdomain4
::1         localhost localhost.localdomain localhost6 localhost6.localdomain6
10.0.0.2 singularity01.sub11260528470.singularityvnc.oraclevcn.com singularity01
10.0.0.3 singularity02.sub11260528470.singularityvnc.oraclevcn.com singularity02
7.5 MPI Hostfile
mpirun 実行する際に動かすノードを記載する hostfile を作成します。置き場所はどこでもよいのですが、singularity のイメージと同様に NFS 領域におきます。
vi /mnt/share/mpi_hosts

singularity01
singularity02
8. 動作確認
これで動かせるはずなので、動作確認をしていきます。
8.1. 事前動作確認
マルチノードで動かすまえに、事前確認をシングルノードでしていきます。
8.1.1. シングルノードでホストOSから実行
[opc@singularity01 ~]$ mpirun singularity exec sandbox-centos /usr/bin/mpi_hello_world
Hello world from processor singularity01, rank 0 out of 1 processors
無事動きました。
8.2. マルチノードで動作確認
最後にマルチノードで動作させてみます。
$ mpirun -np 2 --hostfile /mnt/share/mpi_hosts singularity exec /mnt/share/mpi_centos /usr/bin/mpi_hello_world
Hello world from processor singularity01, rank 0 out of 2 processors
Hello world from processor singularity02, rank 1 out of 2 processors
こちらも無事動きました!
9. Cloud で動かすときの注意点
今回、OnP ではなく Cloud 上で動かしたので普段とは違う点があり、いくつかつまずくポイントがありました。
うまく動かないときは以下をチェックしてみてください。
- firewalld で MPI のポートが空いているか?
- Cloud のネットワークのセキュリティリストも MPI 通信ができるように設定されているか?
10. 最後に
OCI には 25Gb x2 を利用できるベアメタルインスタンスや 100Gb RDMA を利用できる HPC インスタンス、また GPU 搭載のベアメタルインスタンスなど様々な HPC ワークロードに対応することができます。
今度は Singularity から GPU の利用や RDMA の利用、またはベアメタルとSingularityでのパフォーマンス比較など行ってみたいと思います。
11. 参考リンク
Singularity について
OCI の使い方を知りたい


