
この記事は Ateam LifeDesign Advent Calendar 2023 の 14日目の記事です。
WordPress、あなたはもう休んでいいんです
長年愛用してきたが更新の途絶えたWordPress。
保守管理の工数やストレスを考えるともはや静かに眠らせたい。
ただし保管されていたデータには、参照される価値は残っています。
そこでhtml形式で抜き出したデータを、ローカル環境で簡単に
検索・表示できるような仕組みをお伝えします。
挙動の紹介
やり方より先に成果物の挙動をご紹介します。
- index.htmlをブラウザで開くと下記の画面が立ち上がり、
「検索」ボタンをクリックするとローカルに存在する記事htmlがリストとして表示されます。

- ファイル名で検索することも可能です。
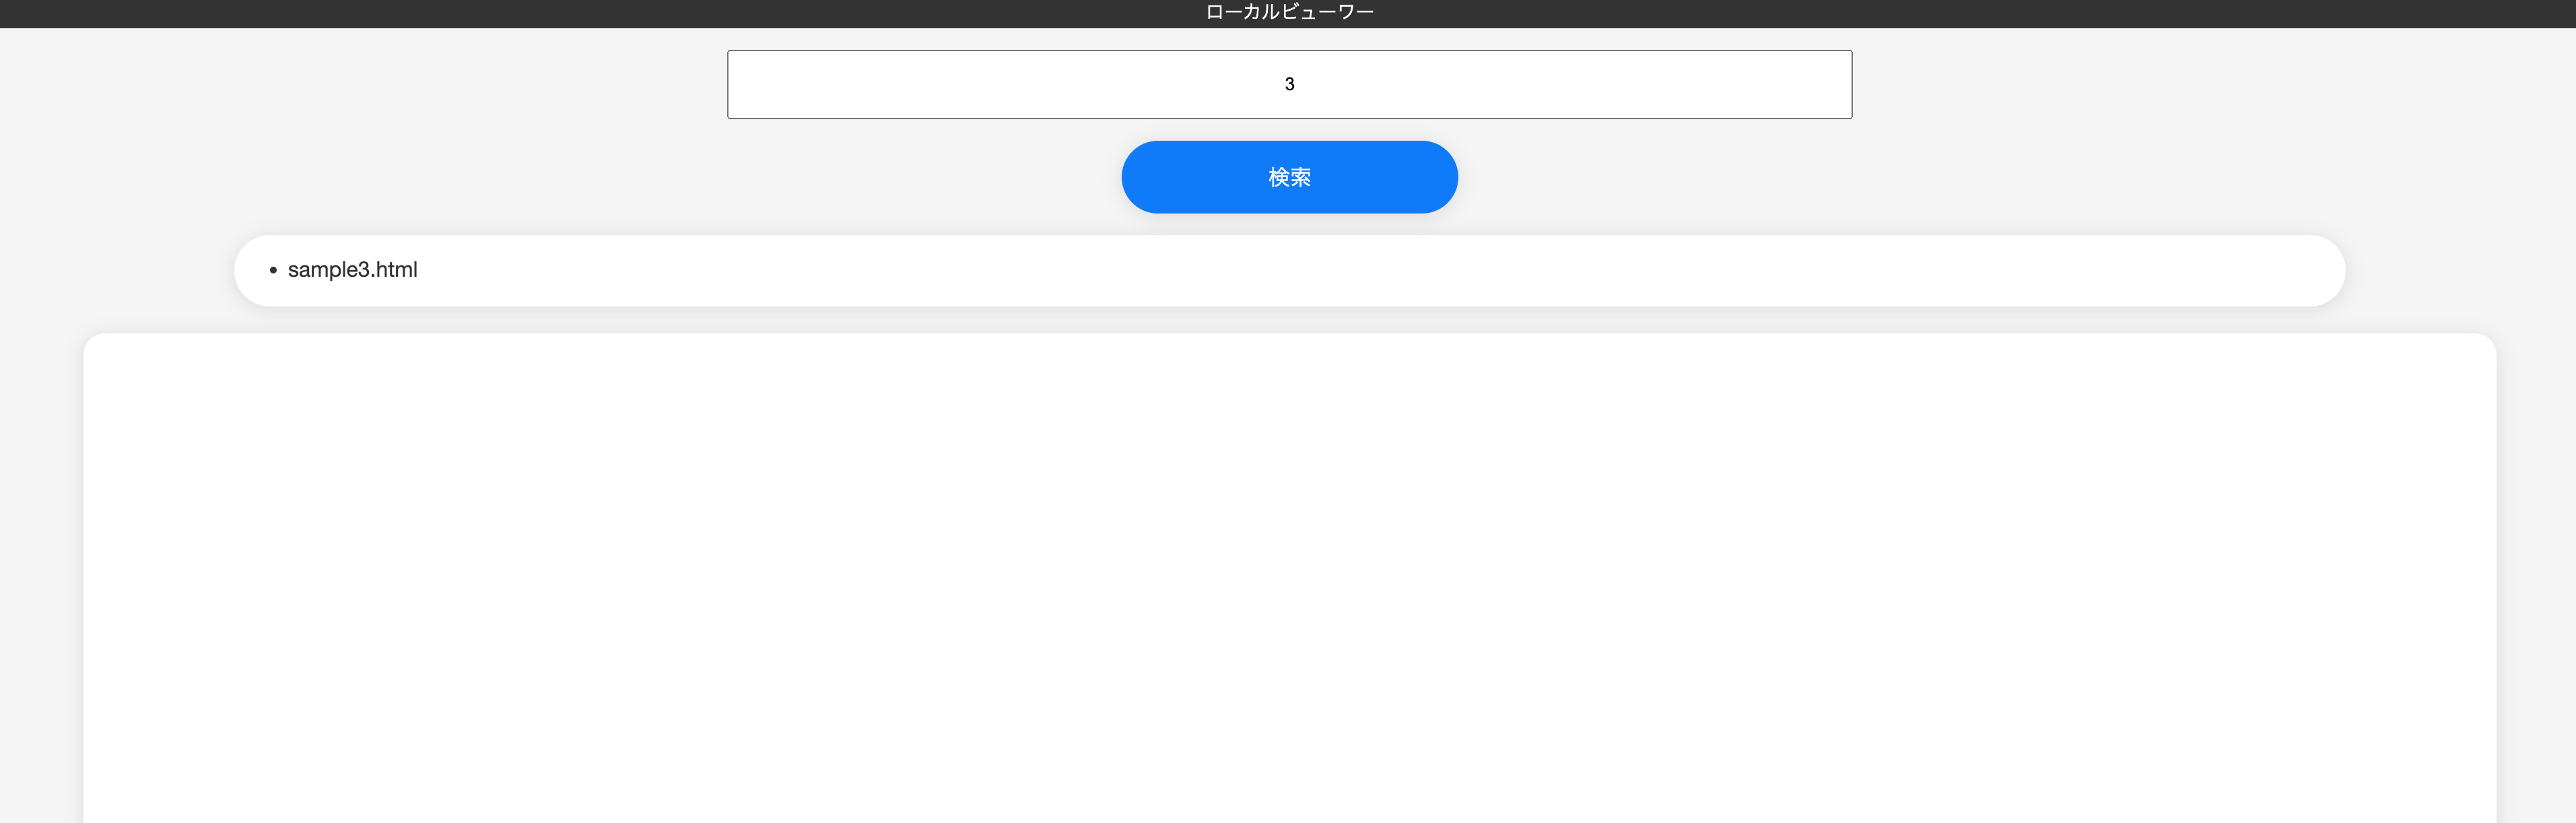
- ファイル名をクリックすると下部にファイル内容が表示されます。
- ※ 内容はGPT謎ポエム

このように、
ローカルにあるので当然ですが、とてつもない速度で表示されます。
では、やり方を紹介して参ります。
前準備
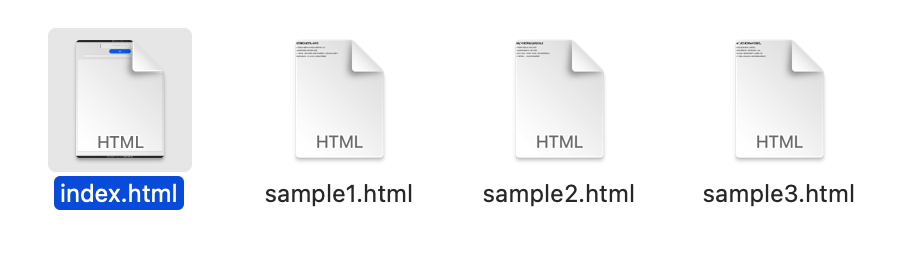
まず、WordPressから記事データをhtmlファイルでエクスポートし、ローカルに保管。
すべてをまとめて1つのフォルダに入れます。
その後、いかなる方法かにより、すべてのファイル名をテキストとして取得してください。
<例> sample1.html,sample2.html,sample3.html
サンプルコード
下記コードをhtml形式で、
WordPressからエクスポートしたhtmlらと同じフォルダに格納します。
index.html
<!DOCTYPE html>
<html>
<head>
    <meta charset="utf-8">
    <title>HTML Viewer</title>
    <script src="https://ajax.googleapis.com/ajax/libs/jquery/3.5.1/jquery.min.js"></script>
    <style>
        body {
            font-family: 'San Francisco', 'Helvetica Neue', Helvetica, sans-serif;
            background-color: #f5f5f5;
            margin: 0;
            padding: 0;
            color: #333;
            text-align: center;
            position: relative;
        }

        #fileInput, #myFile, button {
            background-color: #fff;
            margin: 1em auto;
            padding: 15px;
            font-size: 1em;
            border: none;
            border-radius: 16px;
            outline: none;
            box-shadow: 0px 2px 15px rgba(0, 0, 0, 0.1);
        }

        #content {
            text-align: initial;
            width: 90%;
            margin: 0 auto;
            padding: 2em;
            background-color: #fff;
            border-radius: 16px;
            box-shadow: 0px 2px 15px rgba(0, 0, 0, 0.1);
            margin-bottom: 64px;
            border: none;
        }

        #resultArea {
            width: 80%;
            margin: 0 auto 20px auto;
            padding: 16px;
            background-color: #fff;
            border-radius: 36px;
            box-shadow: 0px 2px 15px rgba(0, 0, 0, 0.1);
        }

        #resultArea li {
            text-align: initial;
            margin-left: 24px;
            padding-bottom: 2px;
            font-size: 1em;
            cursor: default;
            text-decoration: none;
        }
        #resultArea li:hover {
            color:#007BFF;
        }
        #htmlFileInput {
            padding: 16px 32px;
            width: 40%;
            text-align: center;
            margin-top: 16px;;
        }

        button {
            cursor: pointer;
            background-color: #007BFF;
            color: white;
        }

        button:hover {
            background-color: #0056b3;
        }

        .searchBtn button {
            width: 250px;
            border-radius: 36px;
        }
        #myFile {
            padding-left: 32px;
            width: 600px;
        }
        header,footer {
            font-size: 14px;
            padding: 2px;
            background-color: #333;
            color: #fff;
        }
        footer {
            position: fixed;
            bottom: 0;
            width: 100%;
        }
        footer a {
            color: #fff;
            text-decoration: underline;
        }
    </style>
</head>
<body>
    <header>Local Viewer</header>
    <div>
        <input type="text" id="htmlFileInput" placeholder="探したい記事名を入力してください">
    </div>
    <div class="searchBtn">
        <button onclick="onSearchButtonClicked()">検索</button>
    </div>
    <ul id="resultArea"></ul>
    <iframe id="content" style="height:1000px;"></iframe>

<script>
    // 事前に検索にヒットするhtml名をリスト化しておく必要がある
    const htmlFiles = ['sample1.html', 'sample2.html','sample3.html'];

    const searchHtmlFiles = () => {
        const input = document.getElementById('htmlFileInput').value;
        return htmlFiles.filter(file => file.includes(input));
    }

    const onSearchButtonClicked = () => {
        const files = searchHtmlFiles();
        displayFilesList(files);
    }

    const displayFilesList = files => {
        const resultArea = document.getElementById('resultArea');
        resultArea.innerHTML = '';
        files.forEach(file => {
            let listItem = document.createElement('li');

            let filenameSpan = document.createElement('span');
            filenameSpan.textContent = file;

            listItem.appendChild(filenameSpan);

            listItem.addEventListener('click', function () {
                loadHtmlFile(file);
            });

            resultArea.appendChild(listItem);
        });
    }

    const loadHtmlFile = filename => {
        // Load HTML file into iframe
        $('#content').attr('src', filename);
    }
</script>
</body>
</html>
※ 「前準備」で取得したhtmlファイル名は、
// 事前に検索にヒットするhtml名をリスト化しておく必要がある const htmlFiles = ['sample1.html', 'sample2.html','sample3.html'];
のファイル名部分に入力します。
※ スタイリングは本当ざっくりなのでご参考までに…。
お好きなようにUIを改善してください。
さあ、WordPressよ、安らかに眠れ
サーバーの停止ボタンを押すのは少し寂しいですが、
新しい技術のスタートです。
過去のデータに会いたくなった時は写真を見返すように、
このビューアーを使ってください。
