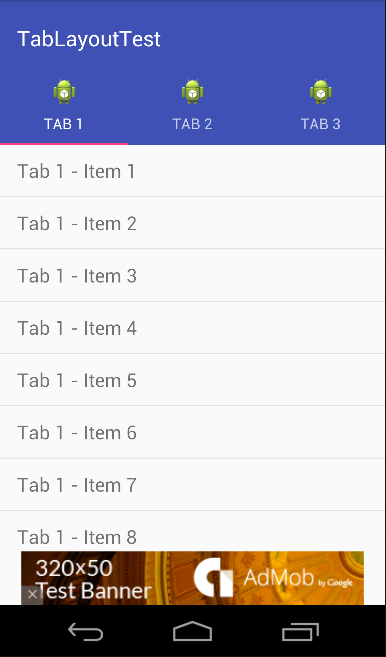
TabLayout + ViewPagerを使用して画面の下部にAdMobを貼り付けるようなレイアウトを構築する例です。下図のようなレイアウトです。
Layout
activity_main.xml
<?xml version="1.0" encoding="utf-8"?>
<RelativeLayout xmlns:android="http://schemas.android.com/apk/res/android"
    xmlns:app="http://schemas.android.com/apk/res-auto"
    xmlns:tools="http://schemas.android.com/tools"
    xmlns:ads="http://schemas.android.com/apk/res-auto"
    android:id="@+id/main_content"
    android:layout_width="match_parent"
    android:layout_height="match_parent"
    android:fitsSystemWindows="true"
    tools:context="itmammoth.tablayouttest.MainActivity">

    <android.support.design.widget.AppBarLayout
        android:id="@+id/appbar"
        android:layout_width="match_parent"
        android:layout_height="wrap_content"
        android:paddingTop="@dimen/appbar_padding_top"
        android:theme="@style/AppTheme.AppBarOverlay">

        <android.support.v7.widget.Toolbar
            android:id="@+id/toolbar"
            android:layout_width="match_parent"
            android:layout_height="?attr/actionBarSize"
            android:background="?attr/colorPrimary"
            app:layout_scrollFlags="scroll|enterAlways"
            app:popupTheme="@style/AppTheme.PopupOverlay">

        </android.support.v7.widget.Toolbar>

        <android.support.design.widget.TabLayout
            android:id="@+id/tabs"
            android:layout_width="match_parent"
            android:layout_height="wrap_content">
        </android.support.design.widget.TabLayout>

    </android.support.design.widget.AppBarLayout>

    <android.support.v4.view.ViewPager
        android:id="@+id/container"
        android:layout_width="match_parent"
        android:layout_height="match_parent"
        app:layout_behavior="@string/appbar_scrolling_view_behavior"
        android:layout_below="@+id/appbar"
        android:layout_above="@+id/adView" />

    <com.google.android.gms.ads.AdView
        android:id="@+id/adView"
        android:layout_width="wrap_content"
        android:layout_height="wrap_content"
        android:layout_centerHorizontal="true"
        android:layout_alignParentBottom="true"
        ads:adSize="BANNER"
        ads:adUnitId="@string/banner_ad_unit_id">
    </com.google.android.gms.ads.AdView>
</RelativeLayout>
fragment_main.xml
<ListView xmlns:android="http://schemas.android.com/apk/res/android"
    android:layout_width="match_parent"
    android:layout_height="match_parent">
</ListView>
Java
MainActivity.java
public class MainActivity extends AppCompatActivity {

    @Override
    protected void onCreate(Bundle savedInstanceState) {
        super.onCreate(savedInstanceState);
        setContentView(R.layout.activity_main);

        Toolbar toolbar = (Toolbar) findViewById(R.id.toolbar);
        setSupportActionBar(toolbar);

        SectionsPagerAdapter sectionsPagerAdapter = new SectionsPagerAdapter(getSupportFragmentManager());

        ViewPager viewPager = (ViewPager) findViewById(R.id.container);
        viewPager.setAdapter(sectionsPagerAdapter);

        TabLayout tabLayout = (TabLayout) findViewById(R.id.tabs);
        tabLayout.setupWithViewPager(viewPager);
        tabLayout.getTabAt(0).setText("Tab 1").setIcon(android.R.drawable.sym_def_app_icon);
        tabLayout.getTabAt(1).setText("Tab 2").setIcon(android.R.drawable.sym_def_app_icon);
        tabLayout.getTabAt(2).setText("Tab 3").setIcon(android.R.drawable.sym_def_app_icon);

        AdView mAdView = (AdView) findViewById(R.id.adView);
        AdRequest adRequest = new AdRequest.Builder()
                .addTestDevice(AdRequest.DEVICE_ID_EMULATOR)
                .build();
        mAdView.loadAd(adRequest);
    }


    public class SectionsPagerAdapter extends FragmentPagerAdapter {

        public SectionsPagerAdapter(FragmentManager fm) {
            super(fm);
        }

        @Override
        public Fragment getItem(int position) {
            return PlaceholderFragment.newInstance(position + 1);
        }

        @Override
        public int getCount() {
            return 3;
        }

        @Override
        public CharSequence getPageTitle(int position) {
            return null;
        }
    }


    /**
     * データ表示のためのダミーフラグメント
     */
    public static class PlaceholderFragment extends Fragment {

        private static final String ARG_SECTION_NUMBER = "section_number";

        public static PlaceholderFragment newInstance(int sectionNumber) {
            PlaceholderFragment fragment = new PlaceholderFragment();
            Bundle args = new Bundle();
            args.putInt(ARG_SECTION_NUMBER, sectionNumber);
            fragment.setArguments(args);
            return fragment;
        }

        @Override
        public View onCreateView(LayoutInflater inflater,
                                 ViewGroup container, Bundle savedInstanceState) {
            ListView listView = (ListView) inflater.inflate(R.layout.fragment_main, container, false);
            int sectionNumber = getArguments().getInt(ARG_SECTION_NUMBER);

            List<String> data = new ArrayList<>();
            for (int i = 0; i < 30; i++) {
                data.add(String.format("Tab %d - Item %d", sectionNumber, i + 1));
            }
            ArrayAdapter<String> adapter = new ArrayAdapter<>(
                    getContext(), android.R.layout.simple_list_item_1, data);
            listView.setAdapter(adapter);

            return listView;
        }
    }
}
この他に、AdMobを表示するためのAndroidManifest.xmlやbuild.gradleの編集も必要ですが、ここでは省略しています。
