はじめに
素のSpringBootアプリを GAE/FE(Custom Runtime) へデプロイするまでを軽くまとめます。
本来は Java Runtime を使えばいいんですがそこは個人的な事情(?)がありまして。
事前準備
- 適当なGCPプロジェクト
- JDK
- Maven
- Cloud SDK ( ひとまずインストールまで )
- 適当な素のSpringBootサンプル
プロジェクト ~ Cloud SDK まではリンク先などを参考に用意してください。
今回プロジェクト名(ID)は springboot-webapp-project にしました。
SpringBootサンプルソースは上記リンク先にあります。
GAEにデプロイするための前提条件は8080番をLISTENしてることぐらい。
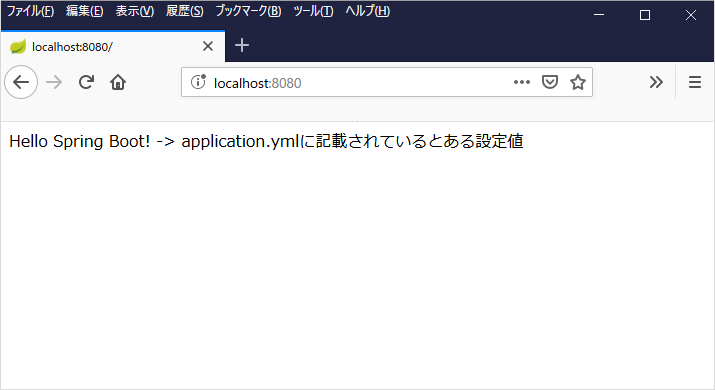
試しにローカルで動かしてみると次のような感じ。
ソースを修正する
GAEにデプロイできるようにするため、素のソースにGAE向け設定やデプロイ用プラグインを追加します。
具体的には次の3点です。
- app.yaml を追加
- Dockerfile を追加 ※ Java Runtime にデプロイするなら要らない
- pom.xml にプラグインを追記
なお修正済みの ソースはこちら にあります。
app.yaml を追加
公式を参考 に app.yaml を作成して src\main\appengine\ に設置します。
これには使用するGAEの種類やその設定を記載します。
今回作成した内容は次のような感じ。
runtime: custom
env: flex
api_version: 1

handlers:
  - url: .*
    script: dynamic

env_variables:
  SPRING_PROFILES_ACTIVE: 'prod'

resources:
  cpu: 1
  memory_gb: 2
設定値の詳細については公式を参照してください。
Dockerfile を追加
GAE Custom Runtime は開発者が作成した Dockerimage を動かしてくれます。
開発者側は イメージの元になる Dockerfile を用意して src\main\docker\ に設置します。
今回作成した内容は次のような感じ。
FROM gcr.io/google-appengine/openjdk:8
EXPOSE 8080

RUN /bin/cp -f /usr/share/zoneinfo/Asia/Tokyo /etc/localtime
RUN groupadd ore_group && useradd -g ore_group wai_user
USER wai_user

ENV JAVA_OPTS=""
ADD springboot-webapp-*.jar app.jar

ENTRYPOINT [ "sh", "-c", "java $JAVA_OPTS -Djava.security.egd=file:/dev/./urandom -jar /app.jar" ]
pom.xml にプラグインを追記
pom.xml に GAEにデプロイしてくれるプラグイン を追記します。
このプラグイン導入して mvn appengine:deploy を実行すると
gcloudコマンド が叩かれデプロイが行われます。
このプラグインは頻繁にアップデートされているのか(?)たまに見ると
書き方が変わっている気がするのですが現在は次のような感じでいいようです。
<!-- mvn clean package appengine:deploy -->
<plugin>
    <groupId>com.google.cloud.tools</groupId>
    <artifactId>appengine-maven-plugin</artifactId>
    <version>2.0.0</version>
    <configuration>
        <deploy.projectId>GCLOUD_CONFIG</deploy.projectId>
        <deploy.version>GCLOUD_CONFIG</deploy.version>
    </configuration>
</plugin>
プラグインについてより詳しくは こことか こことか にあるようです。
pom.xml の 全体はこちら。
以上でソース修正は完了です。
Cloud SDK を初期化する
gcloudコマンドはインストール後、実際に使用可能にするまでに次の2つの作業が必要です。
- configをいい感じに設定する
- 認証する
上記は gcloud init で行うか、または gcloud config set + gcloud auth login で行います。
configをいい感じに設定する
config には具体的には account と project (ここの AVAILABLE PROPERTIES 参照)の
2つを設定すれば取り合えずOKです。
CUIで行います。
コマンドは次のような感じ。
# まずはconfig値を確認してみる
> gcloud config list
[compute]
region = asia-northeast1
zone = asia-northeast1-a
[core]
account = wai@gmail.com
disable_usage_reporting = False
project = ore-no-project

Your active configuration is: [default]

# 今回使用するaccountを設定
> gcloud config set account xxxxx@gmail.com
Updated property [core/account].

# 今回使用するprojectを設定
> gcloud config set project springboot-webapp-project
Updated property [core/project].

# config値を再確認
> gcloud config list
[compute]
region = asia-northeast1
zone = asia-northeast1-a
[core]
account = xxxxx@gmail.com
disable_usage_reporting = False
project = springboot-webapp-project

Your active configuration is: [default]
以上で config がいい感じになりました。
認証する
config に指定した account で GCP を操作できるようにするため認証を行います。
# 次のコマンドを叩くとブラウザが開いて認証画面が出てくる。(出なければURLをブラウザにコピペ)
> gcloud auth login
Your browser has been opened to visit:

    https://accounts.google.com/o/oauth2/auth?redirect_uri=http%3A%2F%2F...[以下略]

WARNING: `gcloud auth login` no longer writes application default credentials.
If you need to use ADC, see:
  gcloud auth application-default --help

You are now logged in as [xxxxx@gmail.com].
Your current project is [springboot-webapp-project].  You can change this setting by running:
  $ gcloud config set project PROJECT_ID
以上で gcloudコマンド 経由で GCP が操作できるようになりました。
GAEのリージョンを指定する
GAEはプロジェクト毎に初回利用時にデプロイ先の リージョンを指定する 必要があります。
これは一度設定するとその後変更できないため、本番では慎重に決める必要があります。
リージョン指定は WEBコンソール または gcloud app create でできます。
後者を使うと次のような感じ。
> gcloud app create
You are creating an app for project [springboot-webapp-project].
WARNING: Creating an App Engine application for a project is irreversible and the region
cannot be changed. More information about regions is at
<https://cloud.google.com/appengine/docs/locations>.

Please choose the region where you want your App Engine application
located:

 [1] asia-east2    (supports standard and flexible)
 [2] asia-northeast1 (supports standard and flexible)
 [3] asia-northeast2 (supports standard and flexible)
 [4] asia-south1   (supports standard and flexible)
 [5] australia-southeast1 (supports standard and flexible)
 [6] europe-west   (supports standard and flexible)
 [7] europe-west2  (supports standard and flexible)
 [8] europe-west3  (supports standard and flexible)
 [9] europe-west6  (supports standard and flexible)
 [10] northamerica-northeast1 (supports standard and flexible)
 [11] southamerica-east1 (supports standard and flexible)
 [12] us-central    (supports standard and flexible)
 [13] us-east1      (supports standard and flexible)
 [14] us-east4      (supports standard and flexible)
 [15] us-west2      (supports standard and flexible)
 [16] cancel
Please enter your numeric choice:  2

Creating App Engine application in project [springboot-webapp-project] and region [asia-northeast1]....done.
Success! The app is now created. Please use `gcloud app deploy` to deploy your first app.
以上でデプロイ可能になりました。
デプロイする
全て準備が整ったので このへんを参考 に mvn package appengine:deploy でデプロイします。
ざっくり10分程度かかります。
# GAEにデプロイする
> mvn clean package appengine:deploy
[INFO] Scanning for projects...
[INFO]
[INFO] -------------------< com.example:springboot-webapp >--------------------
[INFO] Building springboot-webapp 0.1.0
[INFO] --------------------------------[ jar ]---------------------------------
[INFO]
(中略)
[INFO] GCLOUD: ...................................done.
[INFO] GCLOUD: Deployed service [default] to [https://springboot-webapp-project.appspot.com]
[INFO] GCLOUD:
[INFO] GCLOUD: You can stream logs from the command line by running:
[INFO] GCLOUD:   $ gcloud app logs tail -s default
[INFO] GCLOUD:
[INFO] GCLOUD: To view your application in the web browser run:
[INFO] GCLOUD:   $ gcloud app browse
[INFO] ------------------------------------------------------------------------
[INFO] BUILD SUCCESS
[INFO] ------------------------------------------------------------------------
[INFO] Total time: 07:24 min
[INFO] Finished at: 2019-08-05T12:35:49+09:00
[INFO] ------------------------------------------------------------------------
デプロイしたアプリにアクセスしてみる
WEBコンソール を下記スクショの通りたどるか、またはCUIから gcloud app browse でデプロイしたアプリにアクセスできます。
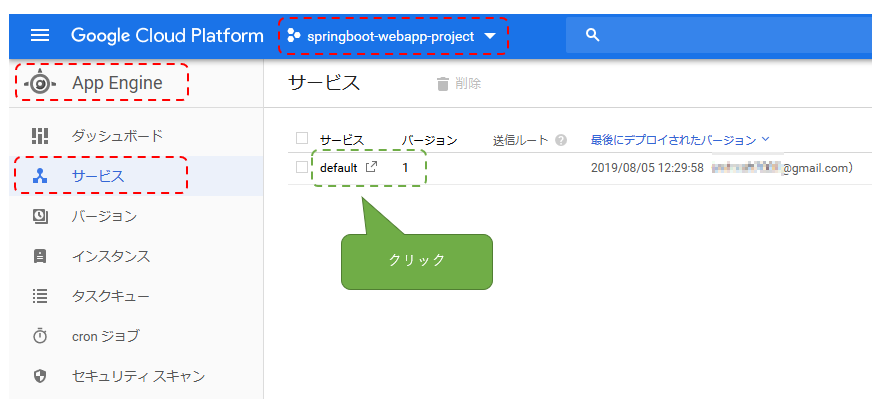
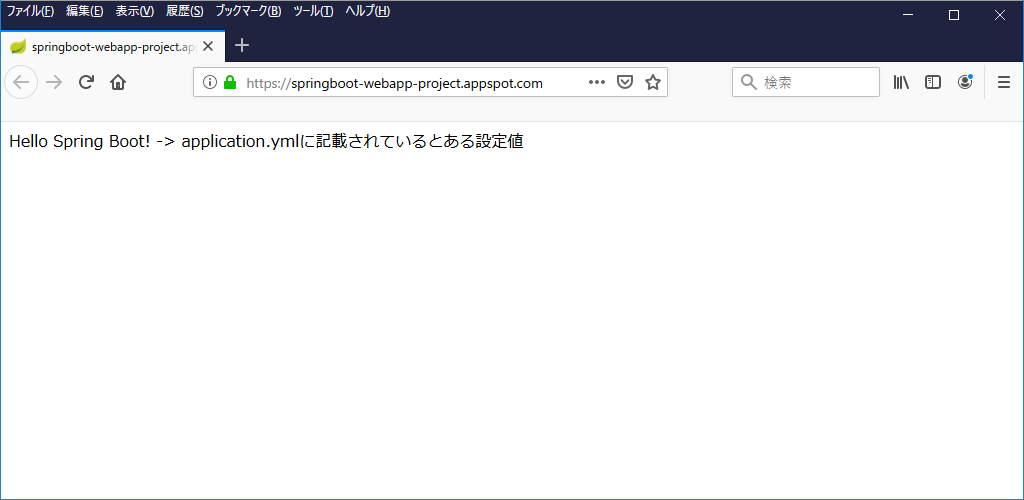
GAE上のアプリにアクセスした結果
デプロイしたアプリを停止する
今回デプロイしたアプリはサービス名が未指定のため「default」となり、これは削除できません。
その代わりにサービスを停止させます。(今回はWEBコンソールでポチポチやります)
次の通りサービス「default」は削除できない。
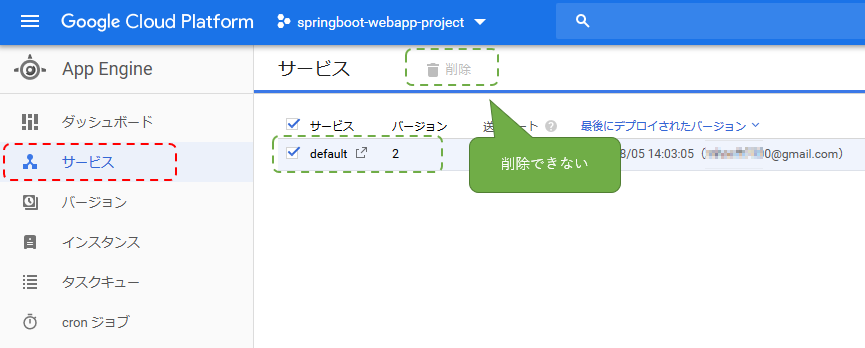
代わりに バージョン タブで稼働中のものを選択して停止させる。
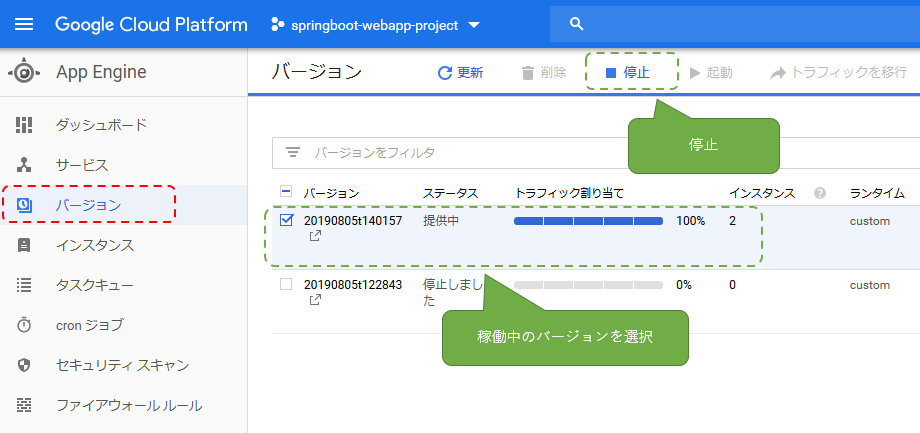
以上で完了です。
おまけ1
さきほどサービスとかバージョン(とかインスタンス)という用語が
出てきましたが、これは 公式のこのへん で解説されています。
上記の中に次のような図が出てきます。
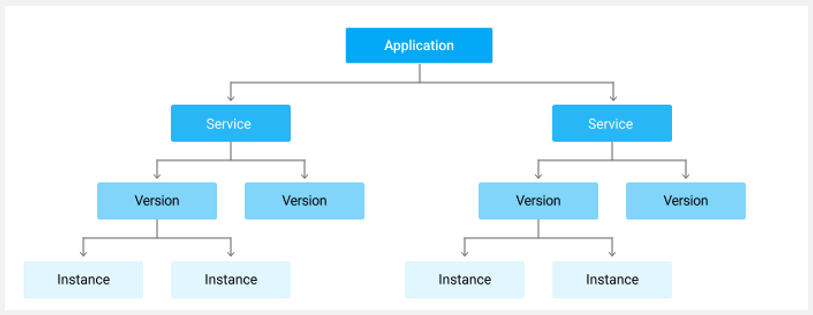
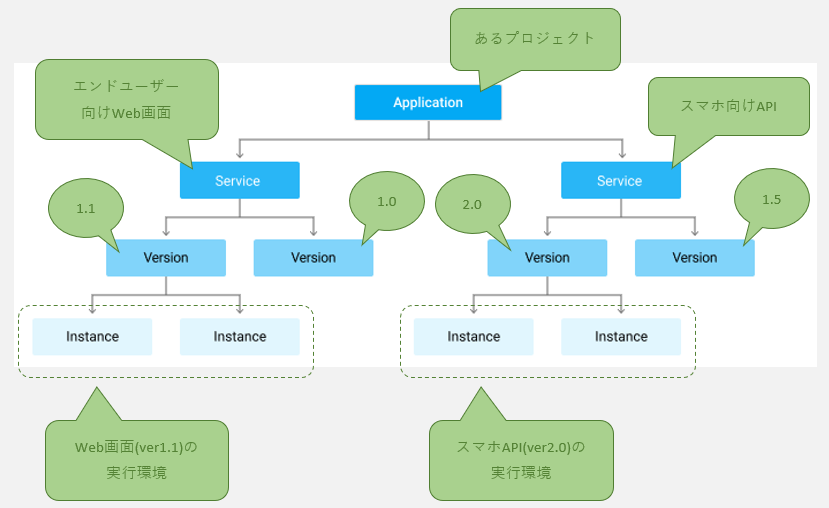
これをよくあるような案件に当てはめると、次のように対応します。
おまけ2
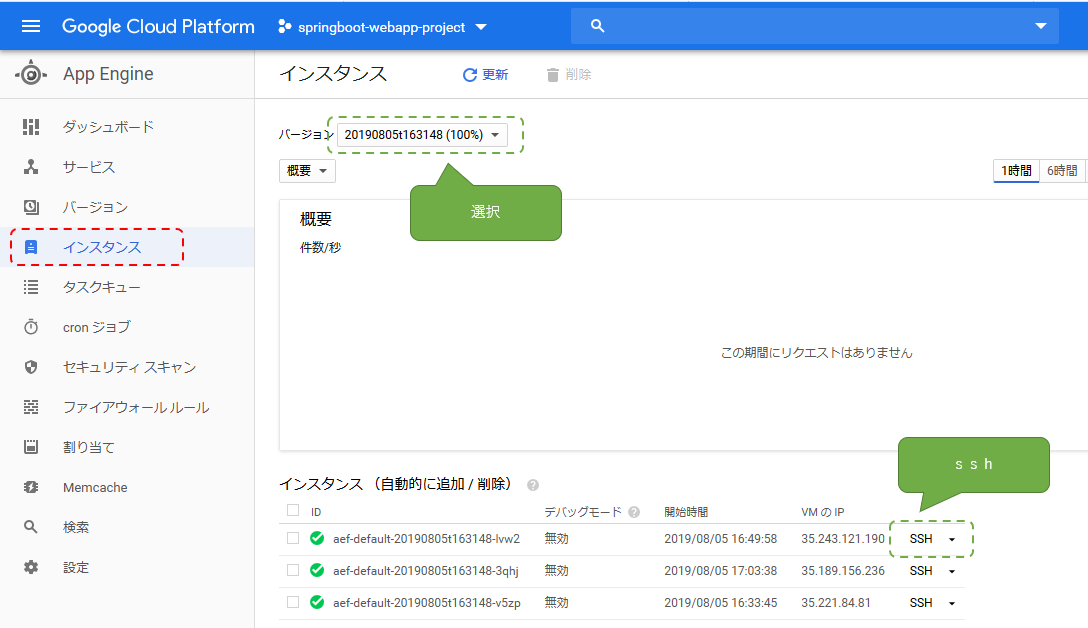
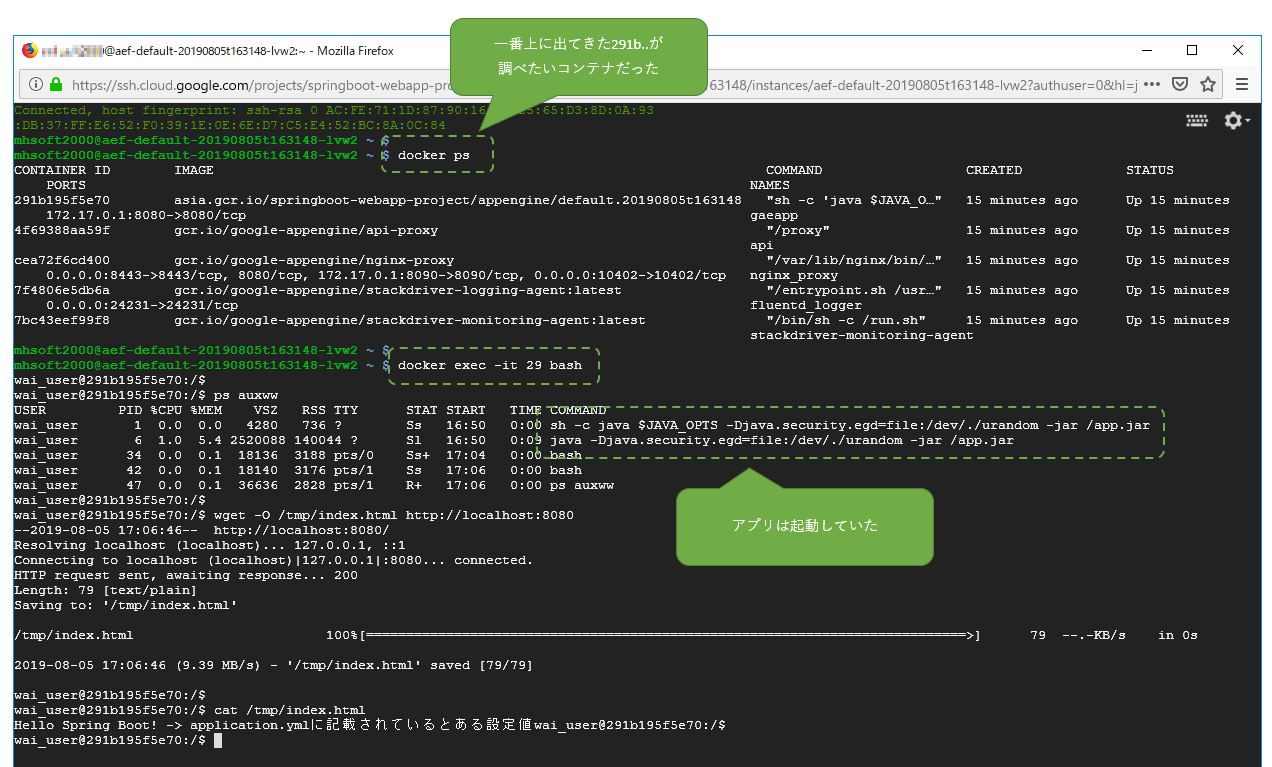
なんかよくわからないけど動かないぞーといった場合は、インスタンスにログインして様子をみましょう。
次の通り。
以上です。