はじめに
ReactNativeはFacebook社が作成したオープンソースのモバイルアプリケーションフレームワークです。クロスプラットフォームと呼ばれる、アンドロイドやiOSなど異なるプラットフォーム上で実行できるプログラムを作ることができます。
今回は、ペイントアプリを作成したので紹介します。
概要
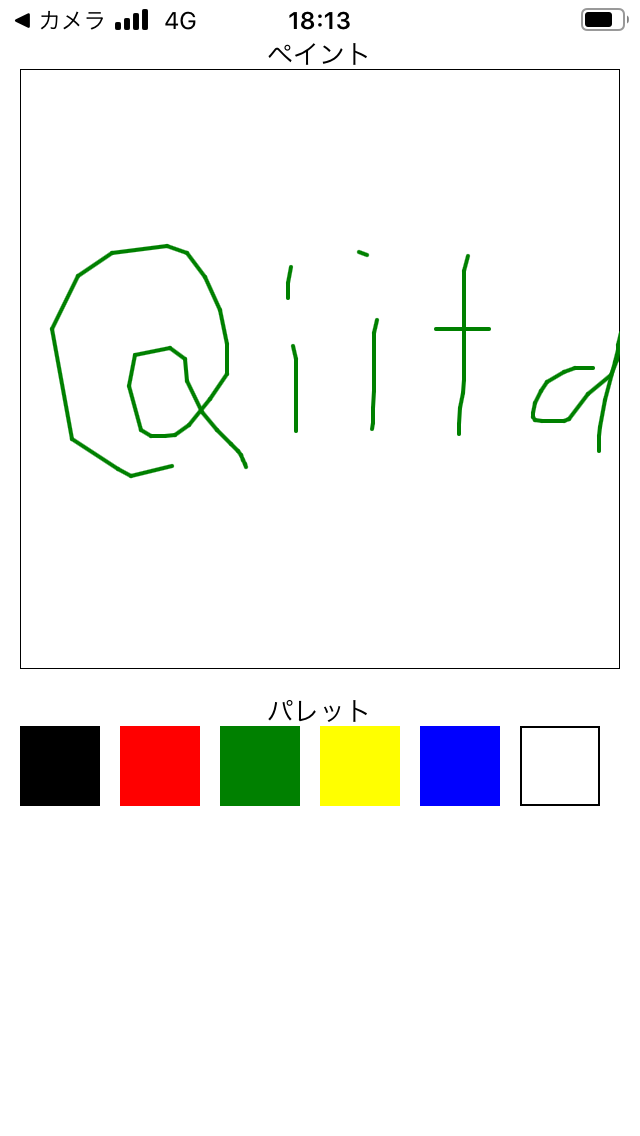
下の写真が起動時の画面です。パレットからペンの色が変えられ、白いボタンを押すとキャンバスがリセットされます。

文字を描いてみました。

実行環境
iPhone SE (iOS 13.3.1)
Expo SDK 36.0.1
コード
import React, { Component } from 'react';
import {TouchableOpacity,View, Text, StyleSheet} from 'react-native';
import Canvas from 'react-native-canvas';

export default class App extends Component {
  constructor(props){
    super(props);
    this.state = {
      color: "black",
      previousX: "",
      previousY: "",
      currentX: "",
      currentY: "",
      drawFlag: false,
    };
    this.canvas = React.createRef();
    this.onTouch = this.onTouch.bind(this);
    this.onMove = this.onMove.bind(this);
    this.onTouchEnd = this.onTouchEnd.bind(this);
    this.clear = this.clear.bind(this);
    this.changeColor = this.changeColor.bind(this);
  }

  componentDidMount() {
    this.updateCanvas();
  }

  updateCanvas() {
    const ctx = this.canvas.current.getContext('2d');
    this.canvas.current.width = 300;  //キャンバスの横幅
    this.canvas.current.height = 300; //キャンバスの高さ
    ctx.strokeStyle = 'rgb(00, 00, 00)'; //枠線の色は黒
    ctx.strokeRect(0,0,300,300);
  }

  //画面がタッチされたときに実行
  onTouch(e){
    this.setState({ drawFlag: true });  //フラグをオンにする
    this.setState({ previousX: e.nativeEvent.locationX });
    this.setState({ previousY: e.nativeEvent.locationY });
  }

  //タッチした状態で指を動かしたときに実行
  onMove(e){
    if(!this.state.drawFlag) return;  //フラグがオフのときは実行しない
    const ctx = this.canvas.current.getContext('2d');
    ctx.beginPath();

    if(this.state.currentX === ''){

      this.setState({ currentX: this.state.previousX });
      this.setState({ currentY: this.state.previousY });

    } else {
      this.setState({ previousX: e.nativeEvent.locationX });
      this.setState({ previousY: e.nativeEvent.locationY });
      ctx.moveTo(this.state.previousX, this.state.previousY);
    }

    ctx.lineTo(this.state.currentX, this.state.currentY);
    ctx.lineCap = "round";
    ctx.lineWidth = 2;
    ctx.strokeStyle = this.state.color;
    ctx.stroke();
    ctx.closePath();

    this.setState({ currentX: this.state.previousX});
    this.setState({ currentY: this.state.previousY});
  }

  //指を画面から離したときに実行
  onTouchEnd(){
    this.setState({ drawFlag: false }); //フラグをオフにする
    this.setState({ previousX: '' });
    this.setState({ previousY: '' });
    this.setState({ currentX: '' });
    this.setState({ currentY: '' });
  }

  //キャンバスを白紙にする
  clear() {
    const ctx = this.canvas.current.getContext('2d');
    this.canvas.current.width = 300;  //キャンバスの横幅
    this.canvas.current.height = 300; //キャンバスの高さ
    ctx.strokeStyle = 'rgb(00, 00, 00)'; //枠線の色は黒
    ctx.strokeRect(0,0,300,300);
  }

  //ペンの色を変える
  changeColor() {
    this.setState({ color: "red"})
  }

  render() {
    return (
      <View style = {{top: 20}} >
        <View style = {{ flexDirection: 'column', alignItems: 'center'}}>
        <Text>ペイント</Text>
          <View
            style = {{width: 300, height: 300}}
            onTouchStart = {this.onTouch}
            onTouchMove = {this.onMove}
            onTouchEnd = {this.onTouchEnd}>
            <Canvas ref = {this.canvas}/>
          </View>
          <Text></Text>
          <Text>パレット</Text>
          <View style={{flex: 1, justifyContent: 'center', alignItems: 'flex-start', flexDirection: 'row', width: 300}}>
            <View style={{flex: 1}}>
              <TouchableOpacity style={styles.black} onPress={() => this.setState({ color: "black"})} />
            </View>
            <View style={{flex: 1}}>
              <TouchableOpacity style={styles.red} onPress={() => this.setState({ color: "red"})} />
            </View>
            <View style={{flex: 1}}>
              <TouchableOpacity style={styles.green} onPress={() => this.setState({ color: "green"})} />
            </View>
            <View style={{flex: 1}}>
              <TouchableOpacity style={styles.yellow} onPress={() => this.setState({ color: "yellow"})} />
            </View>
            <View style={{flex: 1}}>
              <TouchableOpacity style={styles.blue} onPress={() => this.setState({ color: "blue"})} />
            </View>
            <View style={{flex: 1}}>
              <TouchableOpacity style={styles.clear} onPress={this.clear} />
            </View>
          </View>
        </View>
      </View>
    );
  }
}

//スタイルシート
const styles = StyleSheet.create({
  container: {
    flex: 1,
    alignItems: 'center',
    justifyContent: 'center',
  },
  black: {
    backgroundColor: 'black',
    height: 40,
    width: 40
  },
  red: {
    backgroundColor: 'red',
    height: 40,
    width: 40
  },
  green: {
    backgroundColor: 'green',
    height: 40,
    width: 40
  },
  yellow: {
    backgroundColor: 'yellow',
    height: 40,
    width: 40
  },
  blue: {
    backgroundColor: 'blue',
    height: 40,
    width: 40
  },
  clear: {
    height: 40,
    width: 40,
    borderColor: "black",
    borderWidth: 1
  },
});
工夫した点
・キャンバスをリセットできる機能を組み込んだ
・パレットから複数の色が選択可能、TouchableOpacityによりボタンの様に押せる
・react-native-webviewを使わず、キャンバスの上にViewコンポーネントを重ねて実装
開発途中でつまずいた点と対応
ペイント自体は以前JavaScriptで作ったことがあり、取り掛かりハードルは低かったと思います。ただ、作成過程で2つの壁に当たりました。
1つ目は、キャンバスの設定です。react-native-canvasで作成したキャンバスに幅と高さが設定できませんでした。それに関しては、当初と書いており、ドキュメントの構文と違っていたため、以下の様に修正しました。
const ctx = this.canvas.current.getContext('2d');
this.canvas.current.width = 300;
this.canvas.current.height = 300;
2つ目は、線がつながってしまう問題です。描画を始めると必ずキャンバスの左上と繋がり、さらに、二度目の描画以降は最後に指を離した場所と繋がりました(下図参照)。
調べてみると、setStateが問題らしく、「インタラクションのハンドラで this.setState したとして、そのハンドラ内でthis.state を参照しても、まだ更新後の値は取れない。[[1]](https://likealunatic.jp/2015/07/reactjs-setstate)」とのことで、onTouchStartとonTouchMoveが連続イベントとして扱われ、発生時に座標初期値として設定した('','')が0として読み込まれるのではないかと考えました。そのため、条件分岐で次の座標がない=ペイント開始と仮定し、描画実行のタイミングをずらしました。また、最後の場所と繋がる問題は、タッチ終了時に変数を初期化することで対応しました。 # おわりに まだまだ改善の余地が多くあるプログラムですが、最低限の機能は組み込めたと思います。これからもReactNativeの勉強を続けたいと思います。最後までご覧いただきありがとうございました。感想やご指摘等ありましたら、コメント欄にお願いします。
参照URL
[1]https://likealunatic.jp/2015/07/reactjs-setstate
[2]https://www.npmjs.com/package/react-native-canvas
