こんにちわ。
@isnot_naoto (GitHub/isnot) です。
Mapbox Advent Calendar 2020の、16日目の記事を投稿します。
私はMapbox GL JSが気に入っており、このアドベントカレンダーのことを知って、記事を投稿しようと思いました。
今回の記事は、私がこの夏に作成した地図※から、実際に使っているテクニックを切り出して、サンプルに再構成したものになります。
特に断りがない限り、実装はES2018準拠を基本としています。
Class userLocationHistory
位置情報の履歴を保持するためのクラスを作ります。
userLocationHistory コード
class userLocationHistory {
  constructor() {
    this.history = new Set();
    this.last_location = undefined;
    this.min_duration = 2;
    this.max_history = 150;
    this.time_exceed = 3600;
  }

  _hasProperty(obj, prop) {
    return Object.prototype.hasOwnProperty.call(obj, prop);
  }

  _add(geolocate) {
    if (this._hasProperty(geolocate, 'timestamp')) {
      this.history.add(geolocate);
      this.last_location = geolocate;
    }
  }

  size() {
    return this.history.size;
  }

  getLast(size = 1) {
    const asize = this.size < size ? this.size : parseInt(size, 10);
    if (asize === 1) {
      return this.last_location;
    }
    return Array.from(this.history).slice(-1 * asize);
  }

  reduce(size) {
    if (this.size < 2) {
      return;
    }
    if (size === 0) {
      this.history.clear();
    } else {
      this.history = new Set(this.getLast(size));
    }
    return;
  }

  elapseTimeInSeconds(geolocate) {
    if (this.last_location === undefined) {
      return 0;
    }
    if (!this._hasProperty(geolocate, 'timestamp')) {
      return 0;
    }
    return parseInt((geolocate.timestamp - this.last_location.timestamp) / 1000, 10);
  }

  addGeolocate(geolocate) {
    // console.debug(geolocate, this.history);
    const elapse = this.elapseTimeInSeconds(geolocate);

    if (this.last_location === undefined) {
      this._add(geolocate);
    } else if (elapse > this.min_duration) {
      this._add(geolocate);
    }
    const new_size = elapse > this.time_exceed ? 0 : this.max_history;
    this.reduce(new_size);
  }

  getUserTrack() {
    const t = [];
    for (const item of this.getLast(this.max_history)) {
      t.push([item.coords.longitude, item.coords.latitude]);
    }
    return t;
  }
}
コンストラクタの中で、いくつかの定数を決めています。その意味は以下の通りです。
より実践的な実装とするためには、このような数値を外部から設定できるような作りにすると良いかと思います。
- min_duration 位置情報を保持する最小の間隔 (2 [seconds])
- max_history 位置情報を保持する最大の件数 (150 [count])
- time_exceed 位置情報を保持する期限 (3600 [seconds])
メソッド
- addGeolocate(geolocate)
- geolocateで渡した位置情報を、履歴に追加する
- getUserTrack()
- 保持している履歴を、[ [lon, lat], ... ] で返す
- size()
- 保持している履歴の件数を返す
- getLast(size = 1)
- 保持している履歴を、新しい方から順に、size件を返す
- reduce(size)
- 新しい方からsize件を残して、古い履歴を破棄する
- elapseTimeInSeconds(geolocate)
- geolocateで渡した位置情報について、保持している最後の履歴からの経過時間を秒単位で返す
- _add(geolocate)
- 位置情報の履歴を新しく追加する (private)
- _hasProperty(obj, prop)
- 組み込みの hasOwnProperty へのショートカットです (private)
userLocationHistory 工夫したところ
履歴に保持する位置情報について、それぞれの隣接するアイテムの間隔が、あまり細かくなりすぎないように、最小の秒数を決めて、抑制するようにしました。
また、件数についても、最大値となる件数を決めて、それより多くならないようにしています。
さらに、一定時間を経過した履歴は、破棄するようにしました。
位置情報をたくさん溜め込み過ぎると、それらを地図内に描画する際に、ゴチャゴチャとし過ぎるかなと思ったのと、「重くなる」のを防ぐために、上記のような工夫を入れています。
地図内に、geojson型式のラインを描画する
function setupGeoLine() {
  map.addSource('route', {
    'type': 'geojson',
    'data': {
      'type': 'Feature',
      'properties': {},
      'geometry': {
        'type': 'LineString',
        'coordinates': []
      }
    }
  });
  map.addLayer({
    'id': 'route',
    'type': 'line',
    'source': 'route',
    'layout': {
      'line-join': 'round',
      'line-cap': 'round'
    },
    'paint': {
      'line-color': '#888',
      'line-width': 4
    }
  });
}

function updateGeoLine(coordinates) {
  map.getSource('route').setData({
    'type': 'Feature',
    'properties': {},
    'geometry': {
      'type': 'LineString',
      'coordinates': coordinates
    }
  });
}

map.on('load', () => {
  setupGeoLine();
});
最初に地図を読み込んだ際に、setupGeoLine() でLayerを追加しておきます。
最初は、描画するコンテンツは無くて、画面上の変化はありません。
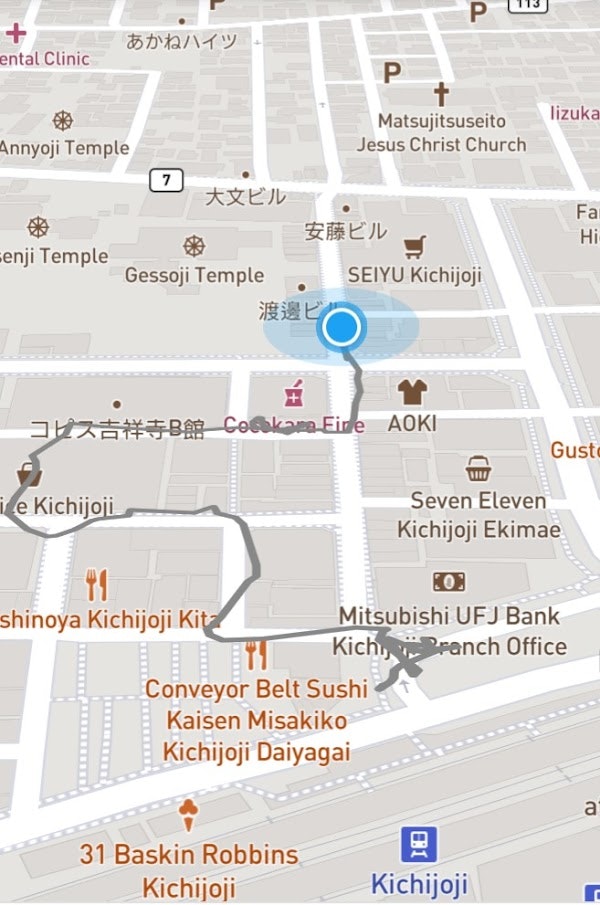
その後適宜に updateGeoLine() を実行すると、渡した位置情報の配列を使い、グレーのラインを描画します。
単純に、連続した座標同士を繋ぐ(辿る)ような線になります。
GeolocateControl を使って、位置情報を所得する
const userTrack = new userLocationHistory();

function onGeolocate(pos) {
  userTrack.addGeolocate(pos);
  updateGeoLine(userTrack.getUserTrack());
}

const geolocate = new mapboxgl.GeolocateControl({
  positionOptions: {
    enableHighAccuracy: true
  },
  trackUserLocation: true
});
map.addControl(geolocate);
geolocate.on('geolocate', onGeolocate);
ユーザーの位置情報を所得するには、Mapbox GL JSの、GeolocateControl を使います。
map.addControl() することで、地図内にコントロール(ボタン)が追加されます。
地図右上の、灯台の地図記号のような見た目のボタンです。
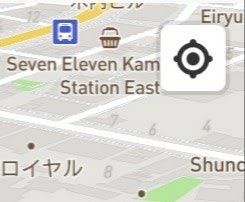
初期状態では位置情報にアクセスしません。
ボタンを押すと、ユーザーの許可を得て、位置情報が取得できる状態になります。
具体的には、位置情報が変化する度に、geolocate イベントが発生するので、それをフックするようにコールバックを登録しておくことで、位置情報(緯度、経度、タイムスタンプ)を得ます。
地図を初期化
参考:Display a map, Use locally generated ideographs
const home_loc = {
  center: [139.7454511, 35.6585648],
  zoom: 17,
  pitch: 60,
  bearing: 0
};

mapboxgl.accessToken = 'pk.your_accesstoken_here';
const map = new mapboxgl.Map({
  container: 'map',
  style: 'mapbox://styles/mapbox/streets-v11',
  center: home_loc.center,
  zoom: home_loc.zoom,
  pitch: home_loc.pitch,
  minZoom: 4,
  hash: true,
  localIdeographFontFamily: "'Noto Sans CJK JP', 'Noto Sans', sans-serif"
});
Mapbox GL JSではお馴染みの部分です。
「localIdeographFontFamily」というのは、フォントデータをサーバーからダウンロードするかわりに、ローカル(ブラウザ)のフォントを使ってレンダリングするようになるというもののようです。これにより、地図を最初にロードする時間が、速くなることを期待しています。
HTMLとスタイルシート
<link rel="stylesheet" type="text/css" href="https://api.mapbox.com/mapbox-gl-js/v2.0.0/mapbox-gl.css" />
<style>
  #map { height: 600px; }
</style>
<div id="map"></div>
<script src="https://api.mapbox.com/mapbox-gl-js/v2.0.0/mapbox-gl.js"></script>
おわりに
このサンプルは、技術的なデモンストレーションとして、また、一部もしくは全ての部分を、自由に再利用されることを意図して公開しております。
詳しくはREADME.mdとLICENSE(MIT License)をご覧ください。