この記事で扱う内容
ListViewのアイテムを文字列検索してUIを更新できる機能
を実装します。外部プラグインは使用しないので気軽に実装が可能です。
開発環境
- MacBook Pro : 11.6
- Flutter : 2.5.3
- Dart : 2.14.4
- XCode : 13.0
開発ツールはVSCodeです。
完成品の動作とソースコード
完成品は以下です。
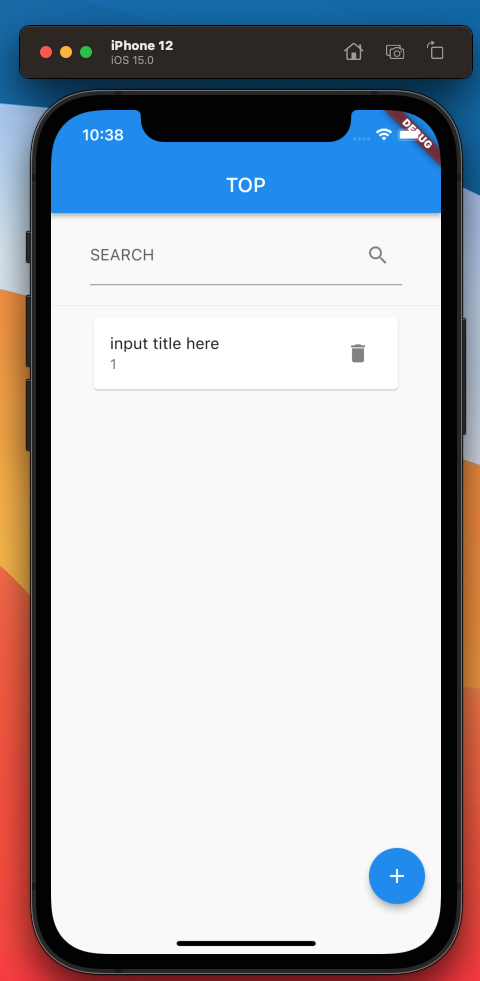
トップページ
文字列を入力できるフォームがトップに表示され、作成するアイテムはフォームの下部に追加されます。
フォーム入力時には、入力した文字列を含むアイテムのみが下部に表示されます。
アイテム作成ページ
トップページのFAB( FloatingActionButton )をクリックするとアイテム作成ページに遷移します。
フォームにタイトルを入力して「CREATE」をタップするとアイテムを作成します。
フォームに何も入力されていない状態では「CREATE」ボタンが無効です。

フォームに文字列を入力すると「CREATE」が有効になります。
CREATEをクリックするとトップページに戻ります。
戻ると作成したアイテムが追加されて表示されます。
検索を確認するため以下画像のようにアイテムを増やします。
絞り込み機能
フォームに文言をアイテムが絞り込み表示されます。
例えばhogeと入力するとhogeが含まれるアイテムのみ表示されます。
ソース
フォルダ構成は以下です。
lib内のみいじったので他のフォルダ構成は省略します。
ソースはそれぞれ以下です。
- main.dart
import 'package:flutter/material.dart';
import 'package:listview_filter_app/view/create_item.dart';
import 'package:listview_filter_app/view/top.dart';

void main() {
  runApp(const MyApp());
}

class MyApp extends StatelessWidget {
  const MyApp({Key? key}) : super(key: key);

  @override
  Widget build(BuildContext context) {
    return MaterialApp(
      title: 'ListView Search App',
      theme: ThemeData(
        primarySwatch: Colors.blue,
      ),
      initialRoute: "/top",
      routes: {
        "/top": (context) => TopPage(),
        "/create_item": (context) => CreateItemPage(),
      },
    );
  }
}
- top.dart
import 'package:flutter/material.dart';

class TopPage extends StatefulWidget {
  const TopPage({Key? key}) : super(key: key);

  @override
  _TopPageState createState() => _TopPageState();
}

class _TopPageState extends State<TopPage> {
  int _counter = 1;
  List _allItemList = [];
  List _displayItemList = [];
  var tfcontroller = TextEditingController();

  void addItem(String? title) {
    if (title != null) {
      setState(() {
        _allItemList.add({"id": _counter, "title": title});
        _counter += 1;
        _displayItemList = _allItemList;
      });
    }
  }

  void runFilter(String inputKeyword) {
    List results = [];
    if (inputKeyword.isEmpty) {
      results = _allItemList;
    } else {
      results = _allItemList
          .where((item) => item["title"].toLowerCase().contains(inputKeyword))
          .toList();
    }
    setState(() {
      _displayItemList = results;
    });
  }

  @override
  Widget build(BuildContext context) {
    Size ui_size = MediaQuery.of(context).size;
    double ui_height = ui_size.height;
    double ui_width = ui_size.width;

    initState() {
      super.initState();
      _displayItemList = _allItemList;
    }

    ;

    return Scaffold(
      appBar: AppBar(
        title: const Text("TOP"),
      ),
      body: Container(
        height: ui_height,
        child: SingleChildScrollView(
          child: Column(
            children: [
              Container(
                height: ui_height * 0.1,
                padding: EdgeInsets.only(
                    right: ui_width * 0.1, left: ui_width * 0.1),
                child: Center(
                    child: TextField(
                  controller: tfcontroller,
                  onChanged: (inputKeyword) => runFilter(inputKeyword),
                  decoration: const InputDecoration(
                      labelText: "SEARCH", suffixIcon: Icon(Icons.search)),
                )),
              ),
              Divider(),
              Container(
                padding: EdgeInsets.only(
                    right: ui_width * 0.1, left: ui_width * 0.1),
                height: ui_height * 0.6,
                child: ListView.builder(
                    itemCount: _displayItemList.length,
                    itemBuilder: (context, index) {
                      return Card(
                        child: ListTile(
                          subtitle:
                              Text(_displayItemList[index]["id"].toString()),
                          title: Text(_displayItemList[index]["title"]),
                          trailing: IconButton(
                            icon: Icon(Icons.delete),
                            onPressed: () {
                              setState(() {
                                _allItemList.removeAt(index);
                                _displayItemList = _allItemList;
                              });
                            },
                          ),
                        ),
                      );
                    }),
              )
            ],
          ),
        ),
      ),
      floatingActionButton: FloatingActionButton(
          child: const Icon(Icons.add),
          onPressed: () async {
            setState(() {
              tfcontroller.text = "";
            });

            final _newItemTitle =
                await Navigator.of(context).pushNamed("/create_item");

            if (_newItemTitle is String && _newItemTitle != "") {
              addItem(_newItemTitle);
            }
          }),
    );
  }
}
- create_item.dart
import 'package:flutter/material.dart';

class CreateItemPage extends StatefulWidget {
  const CreateItemPage({Key? key}) : super(key: key);

  @override
  _CreateItemPageState createState() => _CreateItemPageState();
}

class _CreateItemPageState extends State<CreateItemPage> {
  String _inputTitle = "";

  @override
  Widget build(BuildContext context) {
    return Scaffold(
      body: Container(
        height: MediaQuery.of(context).size.height,
        child: SingleChildScrollView(
          child: Padding(
            padding:
                EdgeInsets.only(top: MediaQuery.of(context).size.height * 0.2),
            child: Column(
              mainAxisAlignment: MainAxisAlignment.center,
              children: [
                Text(
                  "Create Item",
                  style: TextStyle(fontSize: 40, fontWeight: FontWeight.w800),
                ),
                SizedBox(height: 20),
                Container(
                  padding: EdgeInsets.only(
                      right: MediaQuery.of(context).size.width * 0.2,
                      left: MediaQuery.of(context).size.width * 0.2),
                  child: TextField(
                    onChanged: (input) {
                      setState(() {
                        _inputTitle = input;
                      });
                    },
                    decoration: InputDecoration(labelText: "title"),
                  ),
                ),
                SizedBox(height: 20),
                SizedBox(height: 20),
                Row(
                  mainAxisAlignment: MainAxisAlignment.center,
                  children: [
                    TextButton(
                        onPressed: () {
                          Navigator.of(context).pop();
                        },
                        child: Text("CANCEL")),
                    SizedBox(width: 30),
                    TextButton(
                        // style: ButtonStyle,
                        onPressed: _inputTitle == ""
                            ? null
                            : () {
                                Navigator.of(context).pop(_inputTitle);
                              },
                        child: Text("CREATE")),
                  ],
                )
              ],
            ),
          ),
        ),
      ),
    );
  }
}
次に上記のコードに関して解説します。
コード解説
本記事ではListViewのアイテムを文字列入力で絞り込みできる機能に関してですので、
基本的なFlutterの内容に関しては触れません。コードを見て頂ければと思います。
では絞り込み機能に関して説明します。
絞り込み機能はrunFilter関数が担っています。
引数に渡されたinputKeyWordで検索を行います。重要な部分は下記です。
results = _allItemList
          .where((item) => item["title"].toLowerCase().contains(inputKeyword))
          .toList();
全てのアイテムをリストに対して.where()メソッドで絞り込みを行います。
使い方の詳細はリンク先の記述を見ていただきたいのですが、簡単に説明しますと
引数にコールバック関数を取り、コールバック関数の引数でリストのアイテムが一つずつ渡されます。
その引数で渡されたアイテムを何かしら処理してreturnでtrueまたはfalseを返却するように実装します。
trueのアイテムのみが残って戻り値のオブジェクトに含まれます。
このオブジェクトはIterableと呼ばれます。
ただしこのままでは使いにくいので.toList()でリストに変換します。
.where() メソッド内では .toLowerCase() を使用して文字列を全て小文字に変換します。
これは大文字と小文字が混ざっている状態だと検索結果に揺らぎが発生してしまうので、
それを抑えるために全て小文字にしています。
次に.contains()でinputKeywordが含まれている場合にtrueを返します。
上記の実装で簡単に絞り込み機能を実装できます。
気をつけるポイントとしては setState() を少なくすることです。
少なくする必要がある理由は、無駄に setState() をコールすると
ウィジェットを際ビルドする回数が多くなるのでアプリのパフォーマンスが悪くなります。
絞り込みした際には表示されるリストを再描画する必要があるので setState()
の使用回数には注意しましょう。
まとめ
今回はListViewのアイテムを絞り込み機能の実装手順を説明しました。
追加のライブラリが不要で、ロジックもシンプルなので割と使いやすい実装かと思います。
以上になります。


