背景
最近Golangの勉強をしています。業務で若干触るもまだまだ表面的な理解しかできていない気がしており、色々手を動かしてもっと慣れたいと思ったのでCLI Applicationから作ってみようと思いました。
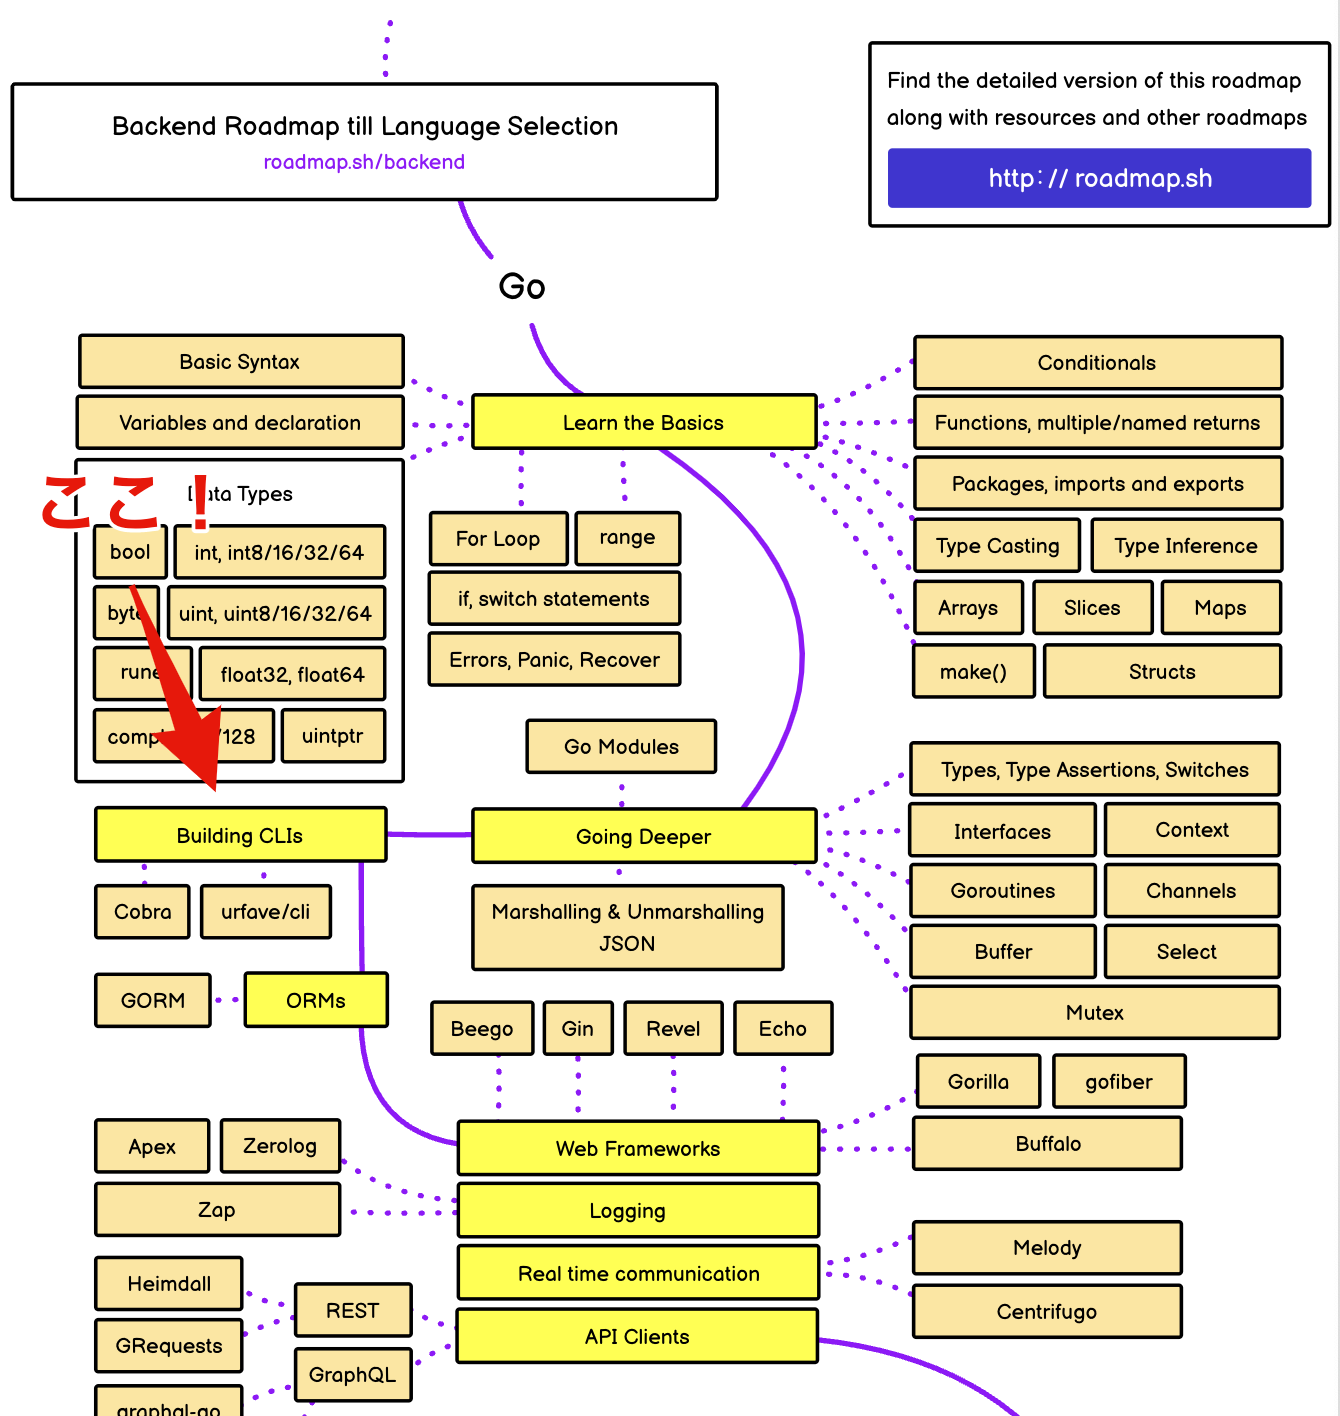
Golang roadmapのここです!
今回開発したレポジトリはこちらです。
https://github.com/ishidao0910/valint
準備
開発を進めるための準備をします。
- goのイニシャライズ
- cobra cliのインストール
ご自身でレポジトリを用意していただくのがいい気がします。
この先何度か出てきて面倒なので、
- ishidao0910: ご自身のgithubユーザー名
- valint: ご自身のレポジトリ名
で読み替えて進めてください。
$ git clone https://github.com/ishidao0910/valint.git
$ cd valint
$ go mod init github.com/ishidao0910/valint
go: creating new go.mod: module github.com/ishidao0910/valint
若干分かりにくく書いていますが、go.modのinitializeをしているだけです。
cobraのインストールはこちらのオープンソースの下の方に原文があります。
https://github.com/spf13/cobra
$ go install github.com/spf13/cobra-cli@latest
$ cobra-cli init --pkg-name github.com/ishidao0910/valint
Your Cobra application is ready at
/Users/{にんいのばしょ}
後々使うので、root配下にbinディレクトリも作っておいてください。
そうすると現状のディレクトリ構成はこんな感じになります。
.
├── LICENSE
├── bin
├── cmd
│   └── root.go
├── go.mod
├── go.sum
└── main.go
準備おしまい。
作りたいものの確認
cobra-cliのチュートリアルとしていくつか転がっていますが、せっかくなのでまだ出回っていないものを作りたい!
っていうモチベーションから、型付け言語の変数の命名規則を整えるリンターを作ってみようかなと思います。開発しながら記事を書いているので現段階では作れるか分かりませんが、、、笑
使い方のイメージとしては、
$ valint run test.go
◯: 〇〇行目のtestInt1
x: 〇〇行目のTestInt2     // 先頭も大文字
x: 〇〇行目のtest_int3    // スネークケース
◯: 〇〇行目のtestInt4
.
.
.
みたいな感じを目指します!
オプションで言語を決めたりするもの面白そう(-gでgolang、-cでC言語みたいな)ですが、一旦はシンプルに行きます。
手を動かしていく流れとしては、
- cmd/root.go触る
- cli commandの名前決める
- 実装を書き書きする
- 変数を検知
- golangの仕様に合わせた変数名にする←ここが肝
- ファイルを保存して標準出力書く
- テスト
- ビルドする
で、いきましょう!
手を動かしていく!
早速手を動かしていきましょう!
とはいえcobraが便利すぎので、途中まではチュートリアルみたいな感じ。
最初にCLIの説明書きを整えたいですねということで、cmd/root.goを書いていきます。
// rootCmd represents the base command when called without any subcommands
var rootCmd = &cobra.Command{
	Use:   "valint",
	Short: "Golang variables' linter",
	Long:  `Golang CLI application for linting variables' name written in GO.`,
	// Uncomment the following line if your bare application
	// has an action associated with it:
	// Run: func(cmd *cobra.Command, args []string) { },
}
lintコマンドの作成
そしたら、今回作成するコマンドの名前を、runとしてcobra-cli addを打ちます。
$ cobra-cli add run
run created at {今いる場所}
したらこんな感じで、run.goが自動生成されていますねー。
.
├── LICENSE
├── bin
├── cmd
│   ├── run.go
│   └── root.go
├── go.mod
├── go.sum
└── main.go
ここでmain.goを実行してみましょう
$ go run main.go
Golang CLI application for linting variables' name written in GO.

Usage:
  valint [command]

Available Commands:
  completion  Generate the autocompletion script for the specified shell
  help        Help about any command
  run         A brief description of your command

Flags:
  -h, --help     help for valint
  -t, --toggle   Help message for toggle

Use "valint [command] --help" for more information about a command.
cliの使い方がもうでるの凄すぎですよね。go run main.go runと実行すると、今作ったコマンドが呼び出されます。runが被っているのが気持ち悪いですがビルドしたらスッキリするのでそれまで耐えてください。。。
中身の実装
やりたいことをもう一度確認しておくと、引数で受け取った.goファイルの変数名をまず検知したい。なので、そんな感じで書いていきます。
まず出来上がったものがこちら。
var runCmd = &cobra.Command{
	Use:   "run",
	Short: "This command will lint the .go file's variables",
	Long: `This run command checks and corrects if you are
	following the variable naming conventions correctly`,
	Run: func(cmd *cobra.Command, args []string) {

		fmt.Println("valinter called")

		var fileName = "main.go" // default
		var newLine string

		if len(args) >= 1 && args[0] != "" {
			fileName = args[0]
		}

		// 読み込み用のファイル
		fp, err := os.Open(fileName)
		if err != nil {
			panic(err)
		}
		defer fp.Close()

		// 書き込み用のファイル
		file, err := os.Create("./output.go")
		if err != nil {
			panic(err)
		}
		defer file.Close()

		scanner := bufio.NewScanner(fp)
		for scanner.Scan() {
			oneLine := scanner.Text()
			if isVariablesLine(oneLine) {
				newLine = fixedLineWithCorrectVariables(oneLine)
			} else {
				newLine = oneLine
			}
			_, err = file.WriteString(newLine + "\n")
			if err != nil {
				panic(err)
			}
		}

		fmt.Println(fileName)
	},
}

func isVariablesLine(text string) bool {
	// 変数宣言のある行だったらtrue
	if strings.Contains(text, "var") {
		return true
	}
	return false
}

func fixedLineWithCorrectVariables(text string) string {
	// 変数がキャメルケースかどうかを確認、修正して行を返す
	var fixedVariable string
	variables := strings.Split(text, "=")[0]        // =の左側取得
	variables = strings.Split(variables, "var ")[1] // varより右側取得
	variables = strings.Split(variables, " ")[0]    // 一旦1つの変数のみ
	variable := strings.Replace(variables, ",", "", -1)

	// 最初の1文字目が大文字だった場合
	r := rune(variable[0])
	if unicode.IsUpper(r) {
		temp_var := variable[1:]
		firstCharacter := strings.ToLower(string(variable[0]))
		fixedVariable = firstCharacter + temp_var
		fmt.Println("x : " + variable + " -> " + fixedVariable)
	} else if strings.Contains(variable, "_") {
		temp_var_arr := strings.Split(variable, "_")
		firstCharacter := strings.ToUpper(string(variable[strings.Index(variable, "_")+1]))
		fixedVariable = temp_var_arr[0] + firstCharacter + temp_var_arr[1][1:]
		fmt.Println("x : " + variable + " -> " + fixedVariable)
	} else {
		fixedVariable = variable
		fmt.Println("◯ : " + fixedVariable)
	}

	newText := strings.Replace(text, variable, fixedVariable, -1)

	return newText

}

func writeNewFile(text string) {
	fmt.Println(text)
	// 1行ずつ新しい行として書き込んでcopyファイルを作成する
	file, err := os.Create("./output.go")
	if err != nil {
		panic(err)
	}
	defer file.Close()

	_, err = file.WriteString(text)
	if err != nil {
		panic(err)
	}
}
順を追って補足します。
まずrunコマンドが呼び出されて実行されるのがvar runCmd = &cobra.Commandのブロックです。
Short, Longの説明文はいいとして、実際に実行されているのがRun: func ... 以降ですね。
コマンド引数で受け取ったファイルを1行ずつ見ていきます。
関数は全部で3つ。
- isVariableLine
- fixedLineWithCorrectVariables
- writeNewFile
を書きました。
まず読み込んだ行に変数宣言があるか、そしてあった場合は、変数を読み込んで、それがgoのデファクトであるキャメルケースに沿っているかどうかを確認します。確認した後は、新しくroot配下にoutput.goという名前で書き込みます。
それでは実際に正しく修正できているか確認してみましょう!
テスト
テスト用に、このようなファイルを用意します。
package main

import "fmt"

func test() {
	var testString string = "Go programming"	// OK
	var TestString2 string = "Go programming"	// Wrong
	var testInt int = 10						// OK
	var testInt2 int = 10						// OK
	var test_int3 int = 10						// Wrong

	fmt.Println(testString)
	fmt.Println(TestString2)
	fmt.Println(testInt)
	fmt.Println(testInt2)
	fmt.Println(test_int3)
}
コメント通りなので、2行目と5行目が修正されて欲しいですね。
それでは実行...
$ go run main.go run test.go
valinter called
◯ : testString
× : TestString2 -> testString2
◯ : testInt
◯ : testInt2
× : test_int3 -> testInt3
test.go
ちゃんと検出できています!
output.goとして新しく書き込まれていることが分かります。
ビルドする!
CLIツールの準備ができたのでビルドしましょう。
ここで、Taskfileというビルドツールを使いますが、興味のない方は下記のビルドコマンドだけ実行して読み飛ばしてください。
go build -o bin/valint main.go
さぁここでいきなりTaskfileの話を始めますが、TaskfileってのはMakefileの代替となるビルドツールのことです。
https://taskfile.dev/
Taskfile.ymlにビルドタスクを、Makefileよりもシンプルに記載することができます。
makeとtask両者にメリデメがあるのですが、yamlの読み書きに慣れてる人だったら結構分かりやすいのでは。そして、コードは読みやすくてなんぼだろうという筆者の意見だけ主張しておきます。
brewでインストールできるので、入ってない方はインストールしてからお使いください。
こちらが今回使うTaskfileです。
version: "3"

tasks:
    build:
        desc: Build the app
        cmds:
        - GOFLAGS=-mod=mod go build -o bin/valint main.go

    run:
        desc: Run the app
        cmds:
        - GOFLAGS=-mod=mod go run main.go

    clean:
        desc: Remove output.go file
        cmds:
        - rm output.go
このTaskfileを使ってbuildしてみましょう。
$ task build
task: [build] GOFLAGS=-mod=mod go build -o bin/valint main.go
bin配下に実行可能なバイナリファイルが生成されたと思います。
$ go run main.go run test.py
と実行していたコマンドも
$ bin/valint run test.go
valinter called
◯ : testString
x : TestString2 -> testString2
◯ : testInt
◯ : testInt2
x : test_int3 -> testInt3
test.go
と実行できました!
$ task clean
task: [clean] rm output.go
こちらで生成されたoutput.goを削除することができます。
以上です!
改善点
今回の機能実装は一旦ここまでですが、
- varを用いない変数宣言
:=の対応 - output.goに書き込む際、宣言以外で用いられている部分の置換
- 変数以外の命名規則対応
などが考えられますね。
次はwebフレームを触ってみたいと思います。
お読みいただきありがとうございました。