導入
こちらの記事でも取り上げましたが、LangGraphのバージョンが0.1以降になりました。
それと合わせてなのか、ドキュメントがかなりわかりやすく整備されています。
特に、How-to GuideやConceptual Guidesはかなり丁寧に作られており、非常に勉強になります。いろいろ知らない機能や概念があることに気づけました。
以前からLangGraphは使ってはみていたのですが、しっかりと学び直したいと思いましたので、公式ドキュメントをウォークスルーする形で学びを記事にしてみようと思います。
ウォークスルーはDatabricksを使って行います。
その際に、なるべくDatabricksのサービスも生かす形で修正しながらやっていこうと思います。
今回はHow-to Guideの以下内容より、LangGraphのサブグラフ利用をウォークスルーします。
検証はDatabricks on AWS、DBRは15.3MLを使いました。
LangGraphのサブグラフとは
サブグラフは、名前の通り、LangGraphのグラフにおいて階層構造でグラフオブジェクトを構成できる機能です。
あったらいいなーと思っていたらいつの間にか実装されていました。
以下、公式ドキュメントの序文を邦訳。
サブグラフの作り方
StateGraphのようなグラフは自然に合成できます。サブグラフを作成すると、マルチエージェントチームのようなものを構築して、各チームが独自の状態を追跡できます。
StateGraphインスタンスをノードとして追加するには、まずインスタンスをコンパイルして、下位レベルのPregel操作に変換します。注意すべき主なことは、呼び出し元のグラフから呼び出されたグラフへの「ハンドオフ」が期待どおりに動作することを確認することです。
以下は、その方法を示すいくつかの例です。
というわけで、公式ドキュメントで示されている例をDatabricks上で実装・実行します。
なお、LangSmithでのトレーシングをする部分などは省略し、逆にMLflow Tracingが使えるように変更しています。
Step1. パッケージインストール
LangGraphやLangChainなど、必要なパッケージをインストール。
%pip install -U langgraph==0.1.4 langchain==0.2.6 langchain-community==0.2.6 mlflow-skinny[databricks]==2.14.1 pydantic==2.7.4
dbutils.library.restartPython()
Step2. サブグラフを組み込んだグラフを作成
サブグラフを組み込んだグラフを作成します。
from typing import Annotated
from typing_extensions import TypedDict
from langgraph.graph import StateGraph

import mlflow

@mlflow.trace(span_type="node")
def reduce_list(left: list | None, right: list | None) -> list:
    """2つのリストを結合します。"""
    if not left:
        left = []
    if not right:
        right = []
    return left + right


class ChildState(TypedDict):
    name: str
    path: Annotated[list[str], reduce_list] # reduce_listを呼び出すことで、リストを結合


class ParentState(TypedDict):
    name: str
    path: Annotated[list[str], reduce_list] # reduce_listを呼び出すことで、リストを結合

# サブグラフのビルダー
child_builder = StateGraph(ChildState)

child_builder.add_node("child_start", lambda state: {"path": ["child_start"]})
child_builder.set_entry_point("child_start")
child_builder.add_node("child_middle", lambda state: {"path": ["child_middle"]})
child_builder.add_node("child_end", lambda state: {"path": ["child_end"]})
child_builder.add_edge("child_start", "child_middle")
child_builder.add_edge("child_middle", "child_end")
child_builder.set_finish_point("child_end")

# 親グラフのビルダー
builder = StateGraph(ParentState)

builder.add_node("grandparent", lambda state: {"path": ["grandparent"]})
builder.set_entry_point("grandparent")
builder.add_node("parent", lambda state: {"path": ["parent"]})
builder.add_node("child", child_builder.compile()) # サブビルダーからのグラフをノードとして追加
builder.add_node("sibling", lambda state: {"path": ["sibling"]})
builder.add_node("fin", lambda state: {"path": ["fin"]})

# Add connections
builder.add_edge("grandparent", "parent")
builder.add_edge("parent", "child")
builder.add_edge("parent", "sibling")
builder.add_edge("child", "fin")
builder.add_edge("sibling", "fin")
builder.set_finish_point("fin")
graph = builder.compile()
作成したグラフを可視化します。
childの部分がサブグラフとして作成したところですね。
from IPython.display import Image, display

# グラフの内部構造を表示するためにxrayを1に設定します
display(Image(graph.get_graph(xray=1).draw_mermaid_png()))

では、実行してみましょう。
# mlflow tracingでトレースして表示

with mlflow.start_span("graph", span_type="AGENT") as span:
    result = graph.invoke({"name": "test"}, debug=True)

    print()
    print("--- 結果 ---")
    print(result)
[0:tasks] Starting step 0 with 1 task:
- __start__ -> {'name': 'test'}
[0:writes] Finished step 0 with writes to 1 channel:
- name -> 'test'
[1:tasks] Starting step 1 with 1 task:
- grandparent -> {'name': 'test', 'path': []}
[1:writes] Finished step 1 with writes to 1 channel:
- path -> ['grandparent']
[2:tasks] Starting step 2 with 1 task:
- parent -> {'name': 'test', 'path': ['grandparent']}
[2:writes] Finished step 2 with writes to 1 channel:
- path -> ['parent']
[3:tasks] Starting step 3 with 2 tasks:
- child -> {'name': 'test', 'path': ['grandparent', 'parent']}
- sibling -> {'name': 'test', 'path': ['grandparent', 'parent']}
[3:writes] Finished step 3 with writes to 2 channels:
- name -> 'test'
- path -> ['grandparent', 'parent', 'child_start', 'child_middle', 'child_end'], ['sibling']
[4:tasks] Starting step 4 with 1 task:
- fin -> {'name': 'test',
 'path': ['grandparent',
          'parent',
          'grandparent',
          'parent',
          'child_start',
          'child_middle',
          'child_end',
          'sibling']}
[4:writes] Finished step 4 with writes to 1 channel:
- path -> ['fin']

--- 結果 ---
{'name': 'test', 'path': ['grandparent', 'parent', 'grandparent', 'parent', 'child_start', 'child_middle', 'child_end', 'sibling', 'fin']}
※ MLflow Tracingのトレーシング結果も表示されます。

実行した結果、ノードの名前が状態に追加され、最終的に全てのノード名の一覧が最終状態として出力されました。
※ また、各ノードにMLflow Tracingの設定はしなかったのですが、reduce_listにTracing設定をしたことで状態の変化は終えるようになりました。
このように、別で作成したグラフを別のグラフのノードとして容易に組み込むことができます。
しかし、おかしいところがありますね。
さて、ここで公式ドキュメントを邦訳。
ここで、
["grandparent", "parent"]シーケンスが複製されていることに注目してください。これは、子ステートが完全な親ステートを受け取り、終了すると完全な親ステートを返すためです。状態の重複や競合を回避するには、通常、次から1つ以上の操作を行います。
- 重複を
reducer関数内で処理します。- 子グラフを Python 関数内から呼び出します。その関数で、必要に応じて状態を処理します。
- 競合を避けるために、子グラフのキーを更新します。ただし、出力が親によって解釈されることを確認する必要があります。
テクニック1を使用してグラフを再実装し、リスト内のすべての値に一意のIDを追加しましょう。これは、
MessageGraphで行われていることです。
というわけで、上記に記載されているように出力結果では["grandparent", "parent"]が重複しています。
これは親グラフと子グラフの状態が分かれており、親グラフと子グラフでそれぞれ["grandparent", "parent"]のパスを状態として保持し、最後どちらもマージしてしまうためです。(たぶん)
では、重複を解消するように修正してみます。
Step3. 重複を解消する
上記手段の1. 重複をreducer関数内で処理するように、reduce_listを変更します。
import uuid


@mlflow.trace(span_type="node")
def reduce_list(left: list | None, right: list | None) -> list:
    """右側のリストを追加し、左側のリスト内の同じidを持つ要素を置き換えます。"""
    if not left:
        left = []
    if not right:
        right = []
    left_, right_ = [], []

    for orig, new in [(left, left_), (right, right_)]:
        for val in orig:
            if not isinstance(val, dict):
                val = {"val": val}
            if "id" not in val:
                val["id"] = str(uuid.uuid4())
            new.append(val)
    # 2つのリストをマージします
    left_idx_by_id = {val["id"]: i for i, val in enumerate(left_)}
    merged = left_.copy()
    for val in right_:
        if (existing_idx := left_idx_by_id.get(val["id"])) is not None:
            merged[existing_idx] = val
        else:
            merged.append(val)
    return merged


class ChildState(TypedDict):
    name: str
    path: Annotated[list[str], reduce_list]


class ParentState(TypedDict):
    name: str
    path: Annotated[list[str], reduce_list]
グラフを再作成。内容は最初のものと同じです。
from IPython.display import Image, display

# グラフ自体は前回と同じ。再度構築する。

child_builder = StateGraph(ChildState)

child_builder.add_node("child_start", lambda state: {"path": ["child_start"]})
child_builder.set_entry_point("child_start")
child_builder.add_node("child_middle", lambda state: {"path": ["child_middle"]})
child_builder.add_node("child_end", lambda state: {"path": ["child_end"]})
child_builder.add_edge("child_start", "child_middle")
child_builder.add_edge("child_middle", "child_end")
child_builder.set_finish_point("child_end")

builder = StateGraph(ParentState)

builder.add_node("grandparent", lambda state: {"path": ["grandparent"]})
builder.set_entry_point("grandparent")
builder.add_node("parent", lambda state: {"path": ["parent"]})
builder.add_node("child", child_builder.compile())
builder.add_node("sibling", lambda state: {"path": ["sibling"]})
builder.add_node("fin", lambda state: {"path": ["fin"]})

# Add connections
builder.add_edge("grandparent", "parent")
builder.add_edge("parent", "child")
builder.add_edge("parent", "sibling")
builder.add_edge("child", "fin")
builder.add_edge("sibling", "fin")
builder.set_finish_point("fin")
graph = builder.compile()

# グラフの内部構造を表示するためにxrayを1に設定します
display(Image(graph.get_graph(xray=1).draw_mermaid_png()))

では、実行してみましょう。
# mlflow tracingでトレースして表示

with mlflow.start_span("graph", span_type="AGENT") as span:
    result = graph.invoke({"name": "test"}, debug=True)

    print()
    print("--- 結果 ---")
    print(result)
[0:tasks] Starting step 0 with 1 task:
- __start__ -> {'name': 'test'}
[0:writes] Finished step 0 with writes to 1 channel:
- name -> 'test'
[1:tasks] Starting step 1 with 1 task:
- grandparent -> {'name': 'test', 'path': []}
[1:writes] Finished step 1 with writes to 1 channel:
- path -> ['grandparent']
[2:tasks] Starting step 2 with 1 task:
- parent -> {'name': 'test',
 'path': [{'id': 'edeade63-369b-4b19-80d3-81acf655cf08', 'val': 'grandparent'}]}
[2:writes] Finished step 2 with writes to 1 channel:
- path -> ['parent']
[3:tasks] Starting step 3 with 2 tasks:
- child -> {'name': 'test',
 'path': [{'id': 'edeade63-369b-4b19-80d3-81acf655cf08', 'val': 'grandparent'},
          {'id': '5476c340-0ca2-436b-9914-0e6d46b280b1', 'val': 'parent'}]}
- sibling -> {'name': 'test',
 'path': [{'id': 'edeade63-369b-4b19-80d3-81acf655cf08', 'val': 'grandparent'},
          {'id': '5476c340-0ca2-436b-9914-0e6d46b280b1', 'val': 'parent'}]}
[3:writes] Finished step 3 with writes to 2 channels:
- name -> 'test'
- path -> [{'id': 'edeade63-369b-4b19-80d3-81acf655cf08', 'val': 'grandparent'},
 {'id': '5476c340-0ca2-436b-9914-0e6d46b280b1', 'val': 'parent'},
 {'id': 'ffe7945d-3cb9-4ed3-8190-9f207796d1c0', 'val': 'child_start'},
 {'id': 'b551c24e-e739-44c7-920a-4afcd0e1e0f0', 'val': 'child_middle'},
 {'id': '52cf78c1-cd78-48b9-a692-b885311ea1a2', 'val': 'child_end'}], ['sibling']
[4:tasks] Starting step 4 with 1 task:
- fin -> {'name': 'test',
 'path': [{'id': 'edeade63-369b-4b19-80d3-81acf655cf08', 'val': 'grandparent'},
          {'id': '5476c340-0ca2-436b-9914-0e6d46b280b1', 'val': 'parent'},
          {'id': 'ffe7945d-3cb9-4ed3-8190-9f207796d1c0', 'val': 'child_start'},
          {'id': 'b551c24e-e739-44c7-920a-4afcd0e1e0f0', 'val': 'child_middle'},
          {'id': '52cf78c1-cd78-48b9-a692-b885311ea1a2', 'val': 'child_end'},
          {'id': '365d3970-9c63-46d1-a178-f2f03859267e', 'val': 'sibling'}]}
[4:writes] Finished step 4 with writes to 1 channel:
- path -> ['fin']

--- 結果 ---
{'name': 'test', 'path': [{'val': 'grandparent', 'id': 'edeade63-369b-4b19-80d3-81acf655cf08'}, {'val': 'parent', 'id': '5476c340-0ca2-436b-9914-0e6d46b280b1'}, {'val': 'child_start', 'id': 'ffe7945d-3cb9-4ed3-8190-9f207796d1c0'}, {'val': 'child_middle', 'id': 'b551c24e-e739-44c7-920a-4afcd0e1e0f0'}, {'val': 'child_end', 'id': '52cf78c1-cd78-48b9-a692-b885311ea1a2'}, {'val': 'sibling', 'id': '365d3970-9c63-46d1-a178-f2f03859267e'}, {'val': 'fin', 'id': '9349731f-5224-48ba-8bed-8a949e47bfa8'}]}
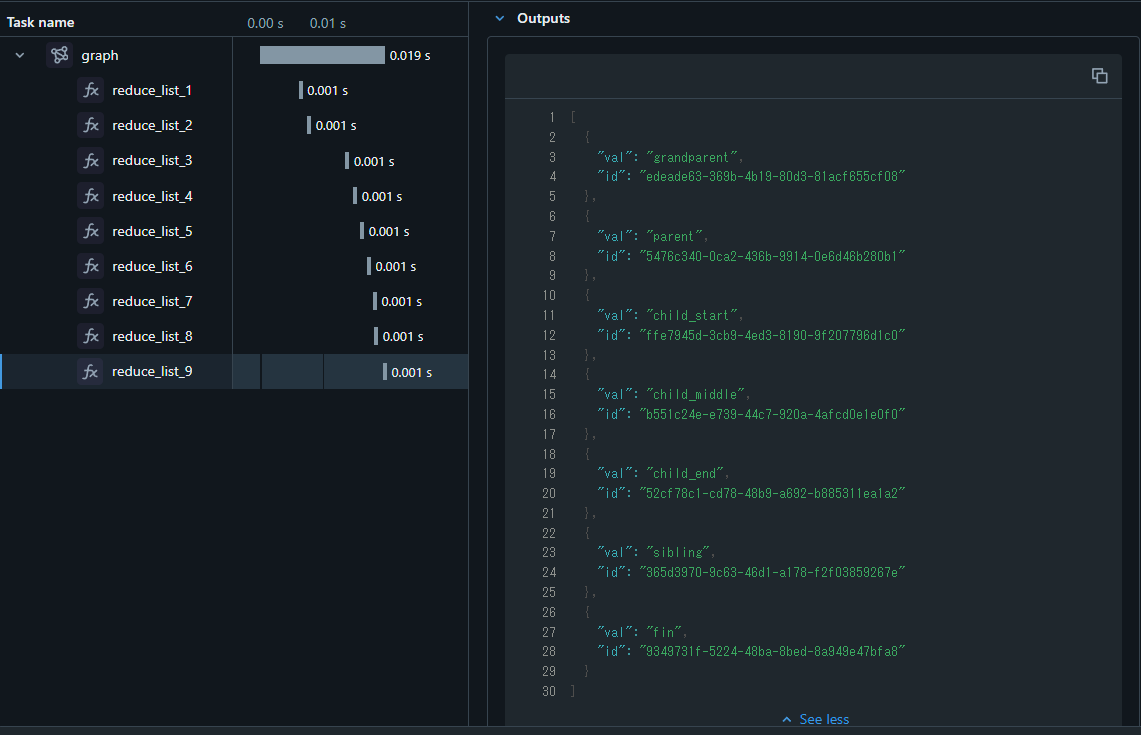
重複が解消されました。
これはreduce_list関数の中で、同一IDの内容を同一のものとしてマージするようになったからです。
そのため、finノードで重複した内容がマージされて、["grandparent", "parent"]```シーケンスの重複が解消されます。
まとめ
LangGraphのサブグラフ作成について、公式ドキュメントの内容をウォークスルーしてみました。
注意点含めて、丁寧に解説されていると感じます。
(ただ、例がわかりやすいかどうかはさておき。。。)
こんな感じで、LangGraphのドキュメント内容をDatabricks上で実行して理解を深めていこうと思います。