この方向に機能拡張してくれているのは非常にありがたい。
導入
先日、MLflowの2.8がリリースされました。
詳しくはDatabricks社が出しているblogやその翻訳記事を参照いただきたいのですが、LLMのQAやRAGの性能評価に関する機能が拡張されています。
今まで、LLMの回答やRAGを使った回答内容の妥当性評価はかなり面倒くさかったのですが、それを標準的に実行する仕組が整ったことになります。
今回は以下の公式ドキュメントの一部をかいつまんでやってみます。
RAGの評価となるとコードが長すぎるので、LLMに対するQAの評価をやってみます。
検証はDatabricks on AWS上で実施しました。DBRは14.1 MLです。
Step1. 環境準備
必要なモジュールをインストール。mlflowを最新化します。
合わせてtransformersの最新化、autoawqをインストール。
さらに、自動評価の際に利用するtextstatも追加インストール。
%pip install -U -qq mlflow transformers accelerate autoawq textstat

dbutils.library.restartPython()
Pandasとmlflowをインポート。今回はUnity Catalogへのモデル保管は行わないのですが、念のためregistry_rulをUnity Catalog対応のものへ設定しておきます。
import pandas as pd
import mlflow
mlflow.set_registry_uri("databricks-uc")
Step2. 評価対象のモデルを準備
こちらの記事で利用したZephyr 7B betaを利用します。
huggingface transformersでモデルとトークナイザを読み込み。
from transformers import AutoModelForCausalLM, AutoTokenizer, AwqConfig, GenerationConfig, pipeline
from transformers import TextStreamer, TextIteratorStreamer
from transformers import AutoConfig, AwqConfig

UC_VOLUME = "/Volumes/training/llm/model_snapshots"
MODEL_DIR = "models--TheBloke--zephyr-7B-beta-AWQ"
model_path = f"{UC_VOLUME}/{MODEL_DIR}"

# AWQを読み込むための設定
quantization_config = AwqConfig(
    bits=4,
    group_size=128,
    zero_point=True,
    version="gemm",
    backend="autoawq",
)

config = AutoConfig.from_pretrained(model_path)
config.quantization_config = quantization_config.to_dict()

model = AutoModelForCausalLM.from_pretrained(model_path, config=config, device_map="cuda")
tokenizer = AutoTokenizer.from_pretrained(model_path)
Step3. mlflowにモデルを登録するための各種情報作成
MLflowの評価機能はMLflowに登録済みのモデルが対象となるため、上で読み込んだモデルをMLflowに登録する準備を行います。
主にinput_exampleやmodel_config、signatureなどを作成します。
from mlflow.models import infer_signature
from mlflow.transformers import generate_signature_output

DEFAULT_SYSTEM_PROMPT = """\
You are a helpful, respectful and honest assistant. Always answer as helpfully as possible, while being safe. Your answers should not include any harmful, unethical, racist, sexist, toxic, dangerous, or illegal content. Please ensure that your responses are socially unbiased and positive in nature.

If a question does not make any sense, or is not factually coherent, explain why instead of answering something not correct. If you don't know the answer to a question, please don't share false information."""
def build_qa_prompt(question:str) -> str:
    messages = [
        {"role": "system", "content": DEFAULT_SYSTEM_PROMPT},
        {"role": "user", "content": question},
    ]
    prompt = tokenizer.apply_chat_template(
        messages, tokenize=False, add_generation_prompt=True
    )
    return prompt

# 入力サンプル
prompt = build_qa_prompt("What is Databricks?")
input_example = {"prompt": prompt}

# model configの定義
model_config = {
    "return_full_text": False,
}

# 推論パラメータの定義
inference_params = {
    "max_new_tokens": 256,
    "do_sample": True,
    "temperature": 1.0,
    "top_k": 50,
    "top_p": 1.0,
    "repetition_penalty": 1.0,
    "length_penalty": 1.0,
}

# Infer the signature including params
signature_with_params = infer_signature(
    prompt,
    "Databricks is ...",
    params=inference_params,
)
Step4. 評価用データセットの準備
自動評価を行うための、Questionと正解Answerのペアデータを作成します。
今回はオリジナルで3セットほど用意してみました。正解はChatGPT(GPT-3.5-turbo)に作ってもらいました。
# 評価用データセット
eval_df = pd.DataFrame(
    {
        "inputs": [
            "What is Databricks?",
            "What is the highest mountain in Japan?",
            "データブリックスとは何の会社ですか?"
        ],
        "ground_truth": [
            "Databricks is a company that provides a platform for data, analytics, and AI. It is based on Apache Spark, an open-source framework for distributed computing and big data processing. Databricks offers a unified and collaborative environment for data scientists, data engineers, and business analysts to work with various types of data and analytics workloads. Databricks also supports popular machine learning frameworks and libraries, such as TensorFlow, PyTorch, and Scikit-learn.",
            "The highest mountain in Japan is Mount Fuji, also called Fuji-san. It stands at 3,776 meters (12,389 feet) and is an iconic symbol of Japan. Mount Fuji is an active stratovolcano located on Honshu Island, about 100 kilometers southwest of Tokyo. It's a popular destination for hikers and tourists, renowned for its symmetrical cone shape and cultural significance in Japanese art and literature.",
            "データブリックス (Databricks) は、ビッグデータ処理やデータ分析のためのクラウドベースのプラットフォームを提供する企業です。データブリックスは、Apache Sparkをベースにしたクラウドサービスを提供し、大規模なデータ処理や機械学習のためのツールやリソースを提供しています。企業やデータサイエンティストが大量のデータを処理し、分析するための効率的な手段を提供しており、クラウド上でのデータの管理や処理をサポートしています。",
        ],
    }
)
# 今回は評価データセットにテンプレートを適用。実際にはモデル処理の中で適用する方がよい。
eval_df["inputs"] = eval_df["inputs"].apply(build_qa_prompt)
Step5. モデルロギングと評価
さて、準備は整いましたのでモデルのロギングと評価を実行します。
with mlflow.start_run() as run:
    # transformersモデルをmlflowにロギング
    basic_qa_model = mlflow.transformers.log_model(
        transformers_model={
            "model": model,
            "tokenizer": tokenizer,
        },
        task="text-generation",
        artifact_path="model",
        pip_requirements=["torch==2.0.1+cu118", "transformers==4.35.0", "accelerate==0.24.1", "torchvision==0.15.2+cu118", "autoawq==0.1.5"],
        input_example=input_example,
        signature=signature_with_params,
        model_config=model_config,
        metadata={"task": "llm/v1/completions"}
    )

    # 評価データセットを与えて自動評価
    results = mlflow.evaluate(
        basic_qa_model.model_uri,
        eval_df,
        targets="ground_truth",  # 正しい回答を保持した列
        model_type="question-answering",  # 評価種別。この内容で計算されるMetricsが変わる。他にtext-summarization, textが現時点で設定可能
        extra_metrics=[mlflow.metrics.latency()], # 追加評価メトリクスの指定
        evaluators="default",
    )

# 各種メトリクスの評価結果表示
results.metrics
mlflow.transformers.log_modelがモデルのロギング処理、mlflow.evaluateがログインぐしたモデルを評価データセットを使って評価する処理です。
mlflow.evaluateはmodel_type引数の設定内容によって標準で評価する内容が変わります。
詳細はこちらを確認ください。
標準外の評価内容を計測したい場合、extra_metrics引数に内容を指定します。今回はレイテンシ計測を追加してみました。
実行すると、例えばtransformersのバージョンが範囲外などのWARNINGが出ますが、処理自体は完了できるはずです。
最後に、辞書形式で評価した各種メトリクスの統計値が表示されます。
{'toxicity/v1/mean': 0.0005710956368905803,
 'toxicity/v1/variance': 2.8206687788545636e-07,
 'toxicity/v1/p90': 0.0011037331860279664,
 'toxicity/v1/ratio': 0.0,
 'flesch_kincaid_grade_level/v1/mean': 8.566666666666666,
 'flesch_kincaid_grade_level/v1/variance': 15.92888888888889,
 'flesch_kincaid_grade_level/v1/p90': 12.620000000000001,
 'ari_grade_level/v1/mean': 14.200000000000001,
 'ari_grade_level/v1/variance': 36.60666666666666,
 'ari_grade_level/v1/p90': 18.96,
 'exact_match/v1': 0.0}
詳細結果は下記を実行すると参照できます。
# 各種メトリクスの評価結果をテーブル表示
results.tables["eval_results_table"]
Step6. 評価にGenerative AI Metricsを追加する
標準ではtoxicityなどが評価結果として取得できます。
これはこれで役に立つのですが、例えば「LLMの回答が、真の回答と同様か?」は判定してくれません。(exact_matchはありますが、LLMの回答でこれを使えるシチュエーションは少ないでしょう)
MLflow 2.8では、LLMに類似性など評価させる仕組も用意されています。
サンプルとして、回答の類似性のスコアを付けるメトリクスを作成してみます。
from mlflow.metrics.genai import EvaluationExample, answer_similarity

# 回答の類似性をどのように判断させるかといったプロンプトの元となるExampleを作成
example = EvaluationExample(
    input="What is MLflow?",
    output="MLflow is an open-source platform for managing machine "
    "learning workflows, including experiment tracking, model packaging, "
    "versioning, and deployment, simplifying the ML lifecycle.",
    score=4,
    justification="The definition effectively explains what MLflow is "
    "its purpose, and its developer. It could be more concise for a 5-score.",
    grading_context={
        "targets": "MLflow is an open-source platform for managing "
        "the end-to-end machine learning (ML) lifecycle. It was developed by Databricks, "
        "a company that specializes in big data and machine learning solutions. MLflow is "
        "designed to address the challenges that data scientists and machine learning "
        "engineers face when developing, training, and deploying machine learning models."
    },
)

# 回答の類似性を判断するメトリクスを作成
# modelにgpt-4を指定すると、gpt-4を使って評価される。API KEYがあるならこれが確実。
#answer_similarity_metric = answer_similarity(model="openai:/gpt-4", examples=[example])

# モデルにmlflowのモデルを与えてもエラーは出ないが、今回の実験ではうまくいかず。
answer_similarity_metric = answer_similarity(model=basic_qa_model.model_uri, examples=[example])

# どのようなプロンプトで判定させようとしているか確認できる
print(answer_similarity_metric)
作成したanswer_similarity_metricを使って、再度評価を実行します。
with mlflow.start_run() as run:
    results = mlflow.evaluate(
        basic_qa_model.model_uri,
        eval_df,
        targets="ground_truth",
        model_type="question-answering",
        evaluators="default",
        extra_metrics=[answer_similarity_metric],  # 先ほど作成したメトリクスを指定
    )
results.metrics
{'toxicity/v1/mean': 0.0005710956368905803,
 'toxicity/v1/variance': 2.8206687788545636e-07,
 'toxicity/v1/p90': 0.0011037331860279664,
 'toxicity/v1/ratio': 0.0,
 'flesch_kincaid_grade_level/v1/mean': 8.566666666666666,
 'flesch_kincaid_grade_level/v1/variance': 15.92888888888889,
 'flesch_kincaid_grade_level/v1/p90': 12.620000000000001,
 'ari_grade_level/v1/mean': 14.200000000000001,
 'ari_grade_level/v1/variance': 36.60666666666666,
 'ari_grade_level/v1/p90': 18.96,
 'exact_match/v1': 0.0,
 'answer_similarity/v1/mean': nan,
 'answer_similarity/v1/variance': nan}
うまくいっていませんが、結果にanswer_similarityが追加されました。
今回GPT-4が使える環境の方はgpt-4を使って評価をしてみてください。
私も利用できる環境ではあるのですが、今回は見送りしました。
Step7. MLflowのUI上で結果を確認する
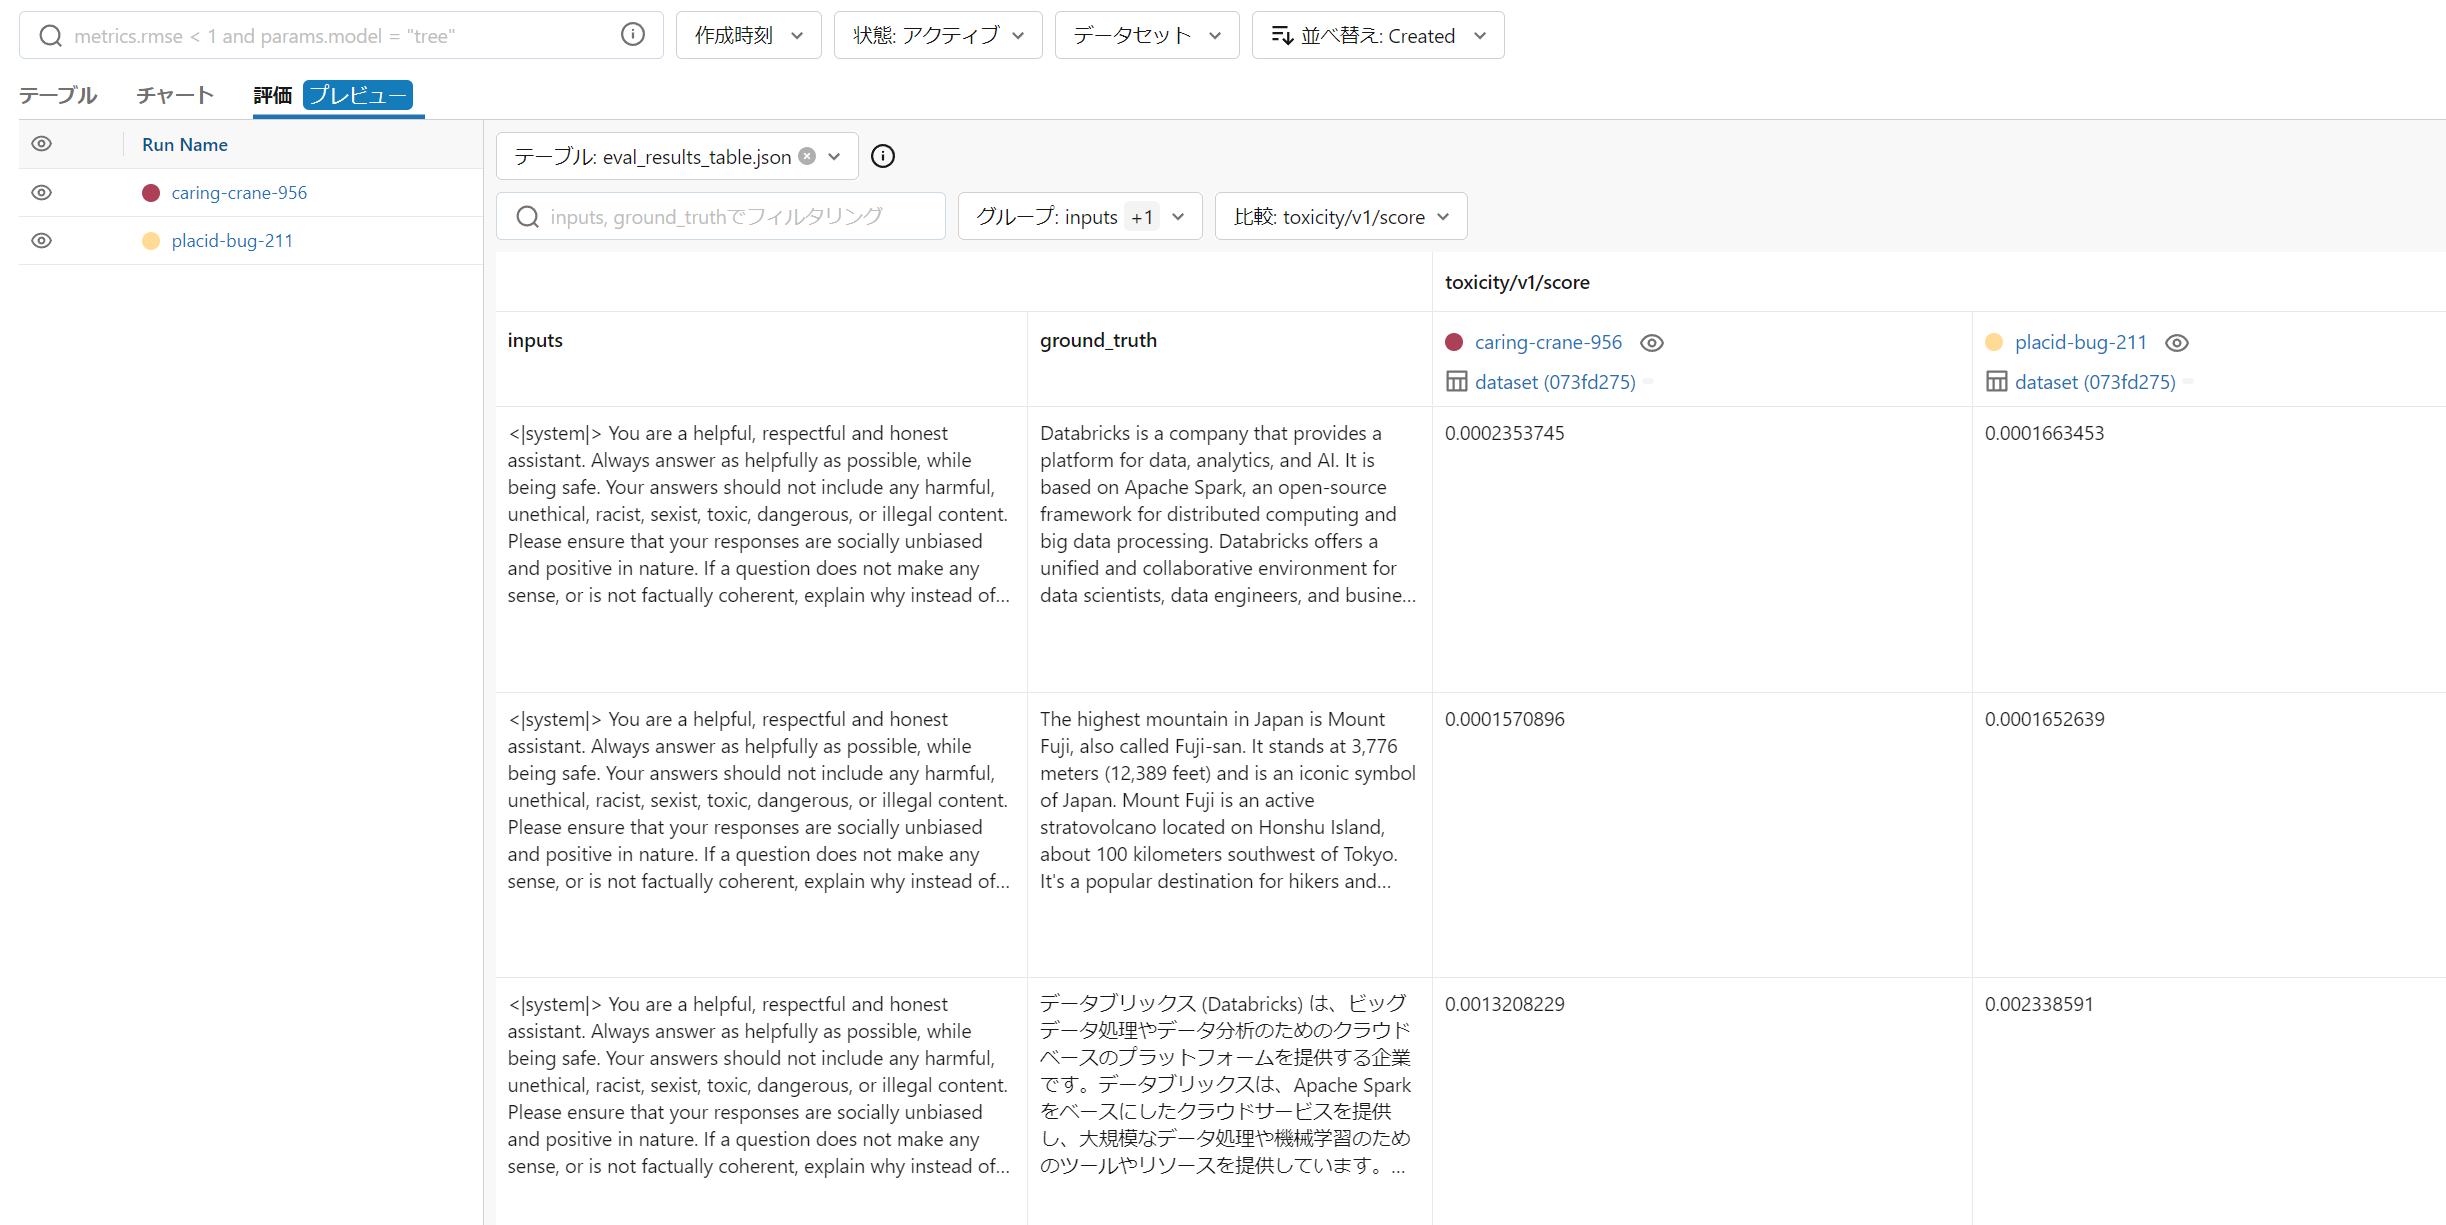
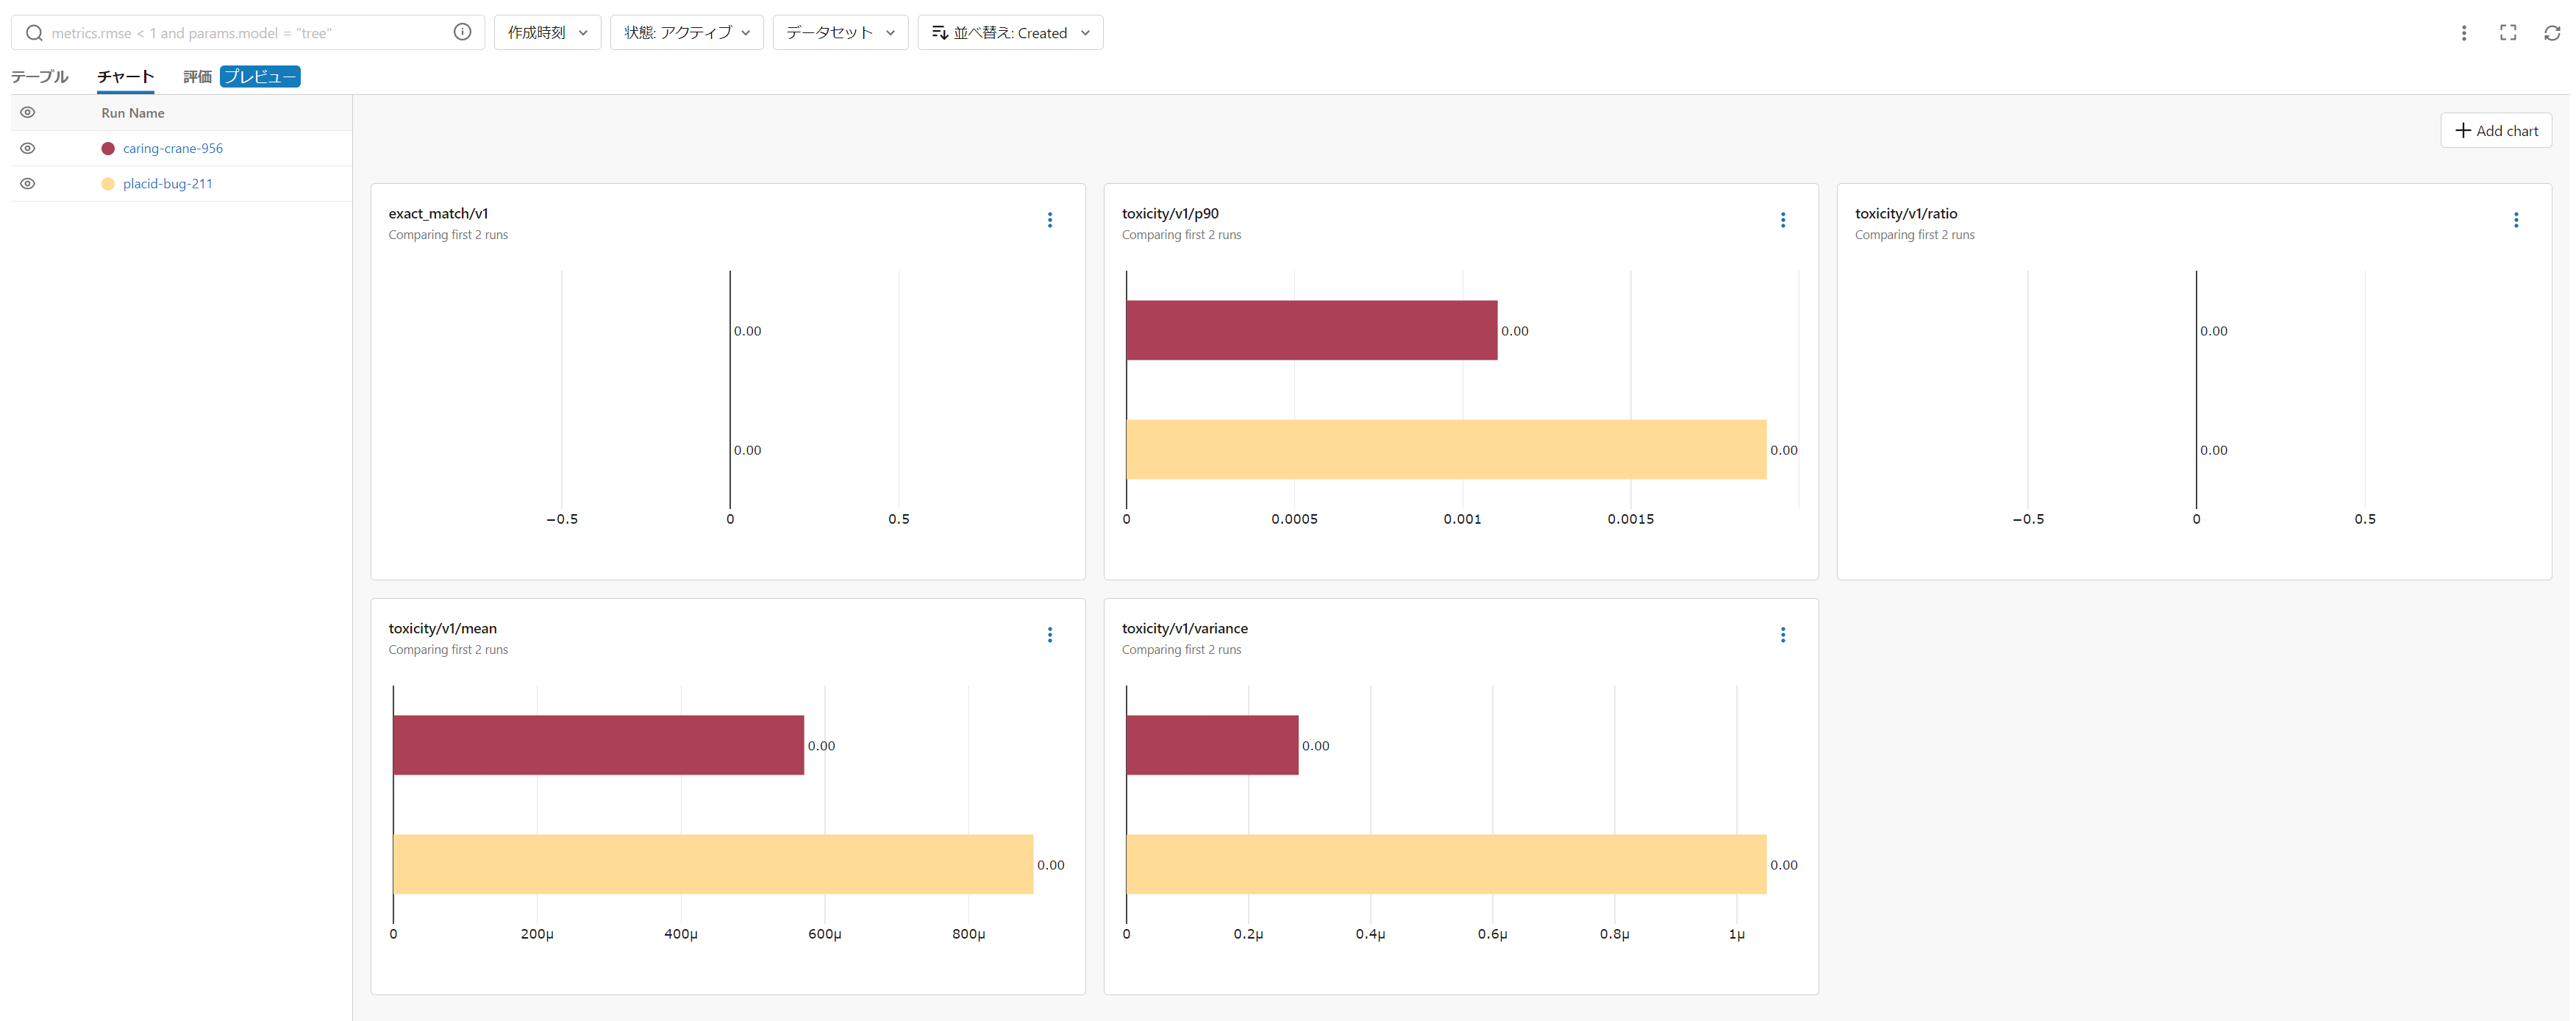
ノートブック上で評価結果を確認するのもいいですが、MLflowのエクスペリメントラン上で「評価タブ」を選ぶことで、各評価結果の確認できます。
例えば正解(ground_truth)と、各評価時のアウトプットの比較。
これを見るとZephyrの日本語能力が不十分なのはわかります。でも富士山の説明は正しいですね。
toxicityの比較。
「チャート」タブからは、メトリクスの統計値を実験間で比較できます。
かなり便利ですね。
まとめ
MLflow 2.8の新規のであるLLM自動評価を試してみました。
QAシステムやRAGを使ったアプリなどを継続的な運用・開発していく際にはこういった評価システムは非常に重要だと思いますので、MLflowがここに力を入れているのは非常に好感を持っています。
うまく使いこなしていきたいですね!


