以前書いた下の記事の続き?です。勉強中の内容なので、間違いありましたらご指摘ください。
導入
MLflowはDatabricksの中でも重要なモジュール・コンポーネントだと思います。
以前はloader_moduleの設定を用いたカスタムモデルを試しましたが、今回は別のやり方でカスタムモデルを作成して登録・管理してみます。
DatabricksのDBRは13.3LTS MLを使っています。
MLflowのカスタムPythonモデルとは
Custom Python Modelsの説明部をdeeplで翻訳するとこんな感じ。
mlflow.pyfunc モジュールは、ユーザー指定のコードとアーティファクト(ファイル)の依存関係を含む python_function フレーバーで MLflow モデルを作成するための save_model() と log_model() ユーティリティを提供します。これらのアーティファクト依存関係には、任意の Python ML ライブラリによって生成されたシリアライズされたモデルを含めることができます。
これらのカスタムモデルには python_function フレーバーが含まれるため、SageMaker、AzureML、またはローカルの REST エンドポイントなど、MLflow がサポートする本番環境にデプロイすることができます。
以下の例では、mlflow.pyfunc モジュールを使用してカスタム Python モデルを作成する方法を示します。MLflow の python_function ユーティリティを使用したモデルのカスタマイズの詳細については、python_function custom models のドキュメントを参照してください。
具体的には、これに続く以下リンク先のExampleを参考に実装していきます。
Step1. 必要なモジュールインストール
MLflowは2.7が出ていますが、Unity Catalogへのモデル登録でエラーを出したので、2.6のままでインストールしています。
%pip install -U -qq "mlflow==2.6.0" ctranslate2 langchain transformers accelerate
dbutils.library.restartPython()
モデルの管理先をUnity Catalogに変更しておきます。
import mlflow
mlflow.set_registry_uri("databricks-uc")
Step2. カスタムモデルを定義
こちらで作成したCTranslate2StreamLLMクラスを再利用し、mlflow.pyfunc.PythonModelを継承したカスタムクラスQAModelを作成します。
import mlflow
import pandas as pd
import torch
import ctranslate2
import transformers
from typing import Optional, Dict, Any

from ctranslate2llm import CTranslate2StreamLLM

from langchain.llms.base import LLM
from langchain import PromptTemplate
from langchain.chains import LLMChain
from langchain.callbacks.base import BaseCallbackHandler

# Define a custom PythonModel
class QAModel(mlflow.pyfunc.PythonModel):
    def load_context(self, context):
        """モデルを初期化する。モデルのパスはartifactsから取得"""

        model_path_local = context.artifacts["ct2-model"]

        device = "cuda" if torch.cuda.is_available() else "cpu"
        generator = ctranslate2.Generator(model_path_local, device=device)
        tokenizer = transformers.AutoTokenizer.from_pretrained(
            model_path_local, use_fast=False
        )

        self.generator = generator
        self.tokenizer = tokenizer
        self.callbacks = []
        self.verbose = False

    def set_callbacks(self, callbacks: list[BaseCallbackHandler]):
        # 後からコールバックを指定できるようにsetterを準備
        self.callbacks = callbacks

    def predict(
        self,
        context,
        model_input: pd.DataFrame,
        params: Optional[Dict[str, Any]] = None,
    ) -> pd.DataFrame:

        template = params["template"]
        temperature = params["temperature"]

        instructions = model_input[["instruction"]].to_dict(orient="records")
        prompt = PromptTemplate(input_variables=["instruction"], template=template)

        llm = CTranslate2StreamLLM(
            generator=self.generator,
            tokenizer=self.tokenizer,
            verbose=self.verbose,
            callbacks=self.callbacks,
        )

        chain = LLMChain(llm=llm, prompt=prompt)

        results = chain.apply(instructions)

        return pd.DataFrame(
            {
                "instruction": [q["instruction"] for q in instructions],
                "answer": [r["text"] for r in results],
            }
        )
Step3. モデルのロギング
以下のコードを実行し、モデルをロギングします。
ポイントは、以下の内容です。
-
python_model引数に、先ほど作成したカスタムモデルのインスタンスを指定 -
artifactsにCT2変換済みモデルのパスを指定- (指定内容によりますが、ロギング時に該当場所のファイルがartifactsとしてコピーされます)
-
registered_model_nameにUnity Catalogでのモデル保管先を指定 - 以前の記事で用いた
loader_moduleやdata_pathといったパラメータは使いません
# sample inputとsignatureを作成
import pandas as pd
from mlflow.models.signature import infer_signature

sample_input = pd.DataFrame(
    {
        "instruction": [
            "LLMとは何ですか?",
        ]
    }
)

sample_output = pd.DataFrame(
    {
        "instruction": [
            "LLMとは何ですか?",
        ],
        "answer": [
            "LLMとは大規模言語モデルのことです。"
        ]
    }
)

default_params = {"template": "ユーザー: {instruction}<NL>システム: ", "temperature": 0.5}

signature = infer_signature(sample_input, sample_output, default_params)

# mlflowにモデルを永続化
with mlflow.start_run() as run:
    _ = mlflow.pyfunc.log_model(
        artifact_path="model",
        python_model=QAModel(),
        extra_pip_requirements=[
            "mlflow==2.6.0",
            "langchain>=0.0.291",
            "ctranslate2==3.19.0",
            "sentencepiece==0.1.99",
            "transformers>=4.33.1",
            "accelerate>=0.23.0",
        ],  # 依存ライブラリ
        signature=signature,
        artifacts={"ct2-model": "/Volumes/CT2モデルの保管場所"},
        await_registration_for=1200,  # モデルサイズが大きいので長めの待ち時間にします
        input_example=sample_input,
        registered_model_name="training.llm.ct2model2",  # 登録モデル名 in Unity Catalog
    )
今回の実験でも、以前同様、rinna/japanese-gpt-neox-3.6b-instruction-ppoをCTranslate2で変換したモデルを使いました。
Step4. モデルの読み込み・推論
読み込んでみます。
model_name = "training.llm.ct2model2"
model_uri = f"models:/{model_name}/1"

# mlflowからモデルを取得
model = mlflow.pyfunc.load_model(model_uri)
# 質問入力の構築
queries = pd.DataFrame({'instruction':[
  "大規模言語モデルとは?",
  "AIの今後はどうなる?"
]})

result = model.predict(
    queries, params={"temperature": 0.4}
)

display(result)
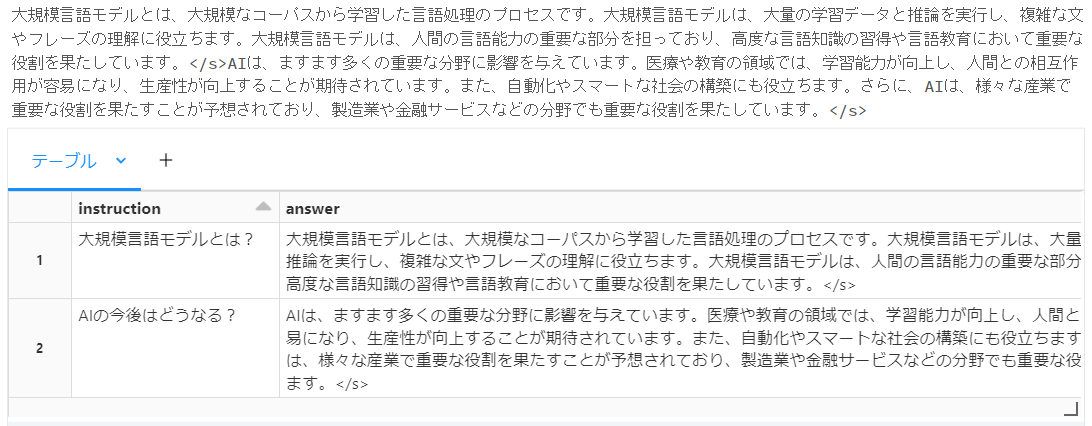
以下のように推論結果を得られました。
Step5. コールバックを設定
Step4.までは、以前の記事と同様の結果ですが、今回はこれに加えて固有の処理を実行します。
unwrap_python_modelメソッドを実行するとmlflow.pyfunc.PythonModelではなく、元クラスのインスタンスを取得することができます。
この仕組を使ってコールバック設定を外から設定します。
# 標準出力にストリーム出力するコールバックハンドラ
from langchain.callbacks.streaming_stdout import StreamingStdOutCallbackHandler

model.unwrap_python_model().set_callbacks([StreamingStdOutCallbackHandler()])

# 質問入力の構築
queries = pd.DataFrame({'instruction':[
  "大規模言語モデルとは?",
  "AIの今後はどうなる?"
]})

result = model.predict(
    queries, params={"temperature": 0.4}
)

display(result)
想定通り、標準出力にストリームで推論結果が表示され、最後に全ての結果をテーブル表示できました。
まとめ
MLflowのPythonカスタムモデルを利用することで、pyfuncモデルを容易に拡張できます。
DatabricksのModel Servingでもカスタムモデルは利用できるようなので、いろいろ応用は効くんじゃないかと期待しています。(まだModel Servingは試せていないため、早く使えるようになりたい)
また、今回のカスタムモデルを利用した記事を今後書く予定です。(たぶん)

