動機
Auth0を最近社内外でよく聞くので、ちょっと触ってみておこうと思いSPA ApplicationのQuick Startを見るとAngular, JavaScript, React, Vueでサンプルがありました。
ClojureScriptは原理的にReact, JavaScriptで書かれたものは表現できるはずなのでClojureScriptのの勉強を兼ねてこのシナリオの認証の実装をClojureでラップして書いて動作するか検証しようと思いました。
https://auth0.com/docs/architecture-scenarios/spa-api
Ringとre-frameでQuick Startと同様のことができたので復習を兼ねてメモします。この記事ではフレームワークに依存させたくないためre-frameではなくReagentのみを使用しました。
私自身がJavaScript<=>ClojureScriptの変換に慣れていないので時間がかかりました。同じくらいのレベル感の人に参考になれば幸いです。
なお、ここではシンプルな実装部分を記述したものなので、実際に使用するには2要素認証などさらにセキュリティに考慮したものを検討すべきなのはいうまでもありません。(Auth0では2要素認証も簡単に組み込めます。)
※以下記事内で「Quick Startでは、、」とあるものはQuick Start内の記事全般のことを指します。
この記事で扱うこと
- ReagentでフロントエンドをSPAとして実装、ログインし、リソースサーバーにアクセストークンを保持してAPIサーバーにリクエストする。
- Ringではリクエストに含まれるアクセストークンを検証し、認可、または拒否する。
この記事ではreagentを使った実装を行っていますが、実際には先にre-frameで検証しており、re-frameを使ったAPIアクセスの方が責任が分離してコードの見通しが良くていいと思いました。
この記事で扱わないこと
- auth0でのアプリケーションの登録(Single Page Applicationとして登録)の方法。
- googleでのソーシャルログインの設定の方法。
- oauthの文脈で使われる用語(クレーム、アクセストークン 、スコープなど)の説明。
上記は言語に関係なく情報があると思いますので説明は割愛します。
対象
- ClojureScriptでjsをやり始めようかなくらいの方に参考になれば。
- ReagentでAuth0ってどんな感じでできるのか手っ取り早く知りたい。
- ClojureのサーバサイドでAuth0を認可プロバイダーとしたアクセストークン の検証で例えばどんな?
環境
- Intellij IDEA + Cursive (Server side)
- VsCode + Calva (Front end)
- Java8
- npm 6.14.8
- node v14.9.0
本題
Part1
ログインの実装
フロントの準備
lein new reagent-frontend auth0-login
npm install @auth0/auth0-react
https://auth0.com/docs/quickstart/spa/react#rate-limiting
この辺りまではauth0のQuick Startに従って、Auth0のセットアップをします。
ライブラリの追加
{:source-paths ["src"]
 :dependencies [[binaryage/devtools "1.0.2"]
                [nrepl "0.8.3"]
                [reagent "1.0.0"]
                [cljs-ajax "0.7.5"]
                [com.wsscode/async "1.0.12"]]
 :builds       {:app {:target     :browser
                      :output-dir "public/js"
                      :asset-path "/js"
                      :modules    {:app {:entries [auth0-login.core]}}
                      :devtools   {:after-load auth0-login.core/mount-root}}}

 :dev-http     {8280 {:root    "public"
                      :handler user/app}}}
com.wsscode/async はAuth0のライブラリを使用したときのpromiseを扱うために使用します。
core.cljsにて以下を使用
(ns auth0-login.core
  (:require
   [reagent.core :as r]
   [reagent.dom :as d]
   ["@auth0/auth0-react" :refer (Auth0Provider useAuth0)]
   [cljs.core.async :refer [<!] :as a]
   [com.wsscode.async.async-cljs :refer [go-promise <!p]]
   [ajax.core :refer [ajax-request json-request-format json-response-format]]))
エントリーポイントのラップ
(def origin (.. js/window -location -origin))

;; :> は Reactコンポーネントに対して使います。
(defn auth0-provider [home-page]
  [:> Auth0Provider
   {:domain      "YOUR_AUTH0_DOMAIN"
    :clientId    "YOUR_CLIENT_ID"
    :redirectUri origin}
   [home-page]])
ログインボタンの実装
(defn login-button []
  (let [{:strs [loginWithRedirect]} (js->clj (useAuth0))]
    [:button {:on-click #(loginWithRedirect)} "Login"])
useAuth0を(js->cljs)としないとcljsとして扱えないため変換します。マップ{key value}のオブジェクトを取得できますが、キーが文字列なので{:strs[...]}として取得します。
この時点で適切なAuth0の設定、またソーシャルログインの場合、プロバイダー側の設定が適切にできていたらログイン画面が表示できるようになります。
ReactのQuick Startでは画面の実装はありませんが、簡単に実装します。
なお、Quick Startから完全なサンプルを落とすことができますが、すべてreagentでラップするのはこの記事の趣旨と違うため以下のように最低限の実装にします。
画面の実装(Quick Startには記載されていない)
;; :f> について 参考
;; https://github.com/reagent-project/reagent/blob/master/doc/ReactFeatures.md#hooks
;; 確認ように最低限のview
(defn home-page []
  [:div
   [:h2 "Welcome to Reagent"]
   [:f> login-button]])

(defn mount-root []
  (d/render [auth0-provider home-page] (.getElementById js/document "app")))

(defn ^:export init! []
  (mount-root))
:f>はreagent1.0.0から導入されました。これは React hookが使われる場合、
reagent側で関数コンポーネントとして扱えるようにするためのものです。(hookは関数コンポーネントでしか動かないため)useAuth0はフックです。なので必要です。いままでas-elementを使っていましたがこの中ではreagent/atomが動かなかったよう?です。後述しますが、1.0.0になる前、この記事と同様にログインの実装をしていましたが、やはりas-elementが原因?でうまく扱えない部分があり、auth0-spa-jsを使って実装をしていました。
上で書いた関数auth0-provider関数の引数としてhome-pageを渡します。
ログアウトボタンの実装
(defn logout []
  (let [{:strs [logout]} (js->clj (useAuth0))]
    [:button {:on-click #(logout #js {:returnTo origin})} "Log Out"]))
プロファイル表示部分の実装
Quick Start では userのname, email, pictureしか表示していませんが、userは他の情報も保持しています。
(defn profile []
  (let [{:strs [user, isAuthenticated, isLoading]}
        (js->clj (useAuth0))
        user-as-js (clj->js user)]
    (if isLoading
      [:div "Loading..."]
      (when isAuthenticated
         ;; 参考 https://clojurescript.org/guides/externs
         ;; pictureだけこのようにしているのは 他と同じようにアクセスすると
         ;; `Cannot infer target type in expression `と警告が出るため
        (let [picture
              ((fn [^js/user-as-js.picture user] (. user -picture)) user-as-js)]
          [:div
           [:img {:src picture :alt (. user-as-js -name)}]
           [:h2 (. user-as-js -name)]
           [:p  (. user-as-js -email)]])))))
画面描写部分の修正
(defn home-page []
  [:div
   [:h2 "Welcome to Reagent"]
   [:f> login-button]
   ;; 追加
   [:f> logout]
   [:f> profile]])
これでログイン、ログアウトと、ユーザープロファイルの表示ができるようになりました。
ログインすると情報が表示されます。
実行方法は
npx shadow-cljs watch app
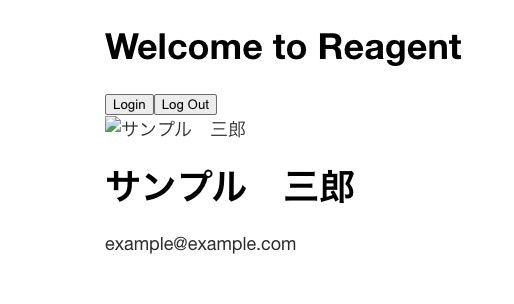
以上でログインをするとAuth0のログイン画面にリダイレクトされ、ログインするとユーザー情報が画面に表示されるようになります。
うまくいかない場合はAuth0のエラー画面で詳細の確認、ログの確認ができます。私が遭遇したエラーは大体アプリケーションセッティングの[Allowed Callback URLs][Allowed Logout URLs][Allowed Web Origins]などに設定したURLに間違いがあったり、ソーシャルLoginをしている場合、そのプロバイダーに設定している情報が間違えている時です。
ここまで ReactのQuick Startをreagentで記述しましたがJavaScriptのQuick Startをreagentに適用してみたものもあります。
この方法では:> :f> を使う必要はありません。
auth0-spa-jsのライブラリを使った例。
https://auth0.com/docs/quickstart/spa/vanillajs
(ns my-project.views
  (:require
    [reagent.core :as r]
    ["@auth0/auth0-spa-js" :as createAuth0Client]
    [cljs.core.async :refer [go <!] :as a]
    [com.wsscode.async.async-cljs :refer [go-promise <!p chan? promise?]]
    [cljs-http.client :as http]
    [ajax.core :refer [ajax-request json-request-format json-response-format]]
    [clojure.walk :as walk]
    [debux.cs.core :as debux]))

(def auth0 (atom nil))

(def authenticated? (r/atom false))
(def hidden (r/atom ""))
(def access-token (r/atom ""))
(def user (r/atom ""))

(defn fetch-auth-config []
  ;; サーバーに設定情報があるとする。
  (http/get "http://localhost:3000/auth0_config.edn"
            {:with-credentials? false}))

(def origin (-> js/document .-location .-origin))

(defn login []
  (go-promise
    (<!p (-> @auth0 (.loginWithRedirect #js{:redirect_uri origin})))))

(defn logout []
  (go-promise
    (<!p (-> @auth0
             (.logout #js {:returnTo origin})))))

(defn update-ui []
  (go-promise
    (reset! authenticated? (<!p (.isAuthenticated @auth0)))
    (if @authenticated?
      (do (reset! hidden "")
          (reset! access-token (<!p (.getTokenSilently @auth0)))
          (reset! user (walk/keywordize-keys (js->clj (<!p (.getUser @auth0))))))
      (reset! hidden "none"))))

(defn configure-client []
  (go-promise
    (let [config (:body (<! (fetch-auth-config)))
          config-js (clj->js {:domain    (:domain config)
                              :client_id (:clientId config)})]
      (reset! auth0 (<!p (createAuth0Client config-js))))))

(set! (. js/window -onload)
      (go-promise
        (<! (configure-client))
        (update-ui)
        (when authenticated?
          (<!p (.isAuthenticated @auth0))
          (let [query (-> js/window .-location .-search)]
            (when (and (.includes query "code=") (.includes query "state="))
              (<!p (.handleRedirectCallback @auth0))
              (update-ui)
              (.replaceState (. js/window -history) #js {} (. js/document -title) "/"))))))

(defn main-panel []
  [:div
   [:h2 "SPA Authentication Sample"]
   [:p "Welcome to our page!"]
   [:button {:id "btn-login" :disabled @authenticated? :on-click #(login)} "Log in"]
   [:button {:id "btn-logout" :disabled (not @authenticated?) :on-click #(logout)} "Log out"]
   [:div#gated-content {:style {:display (str @hidden)}}
    [:p
     "You're seeing this content because you're currently"
     [:strong " logged in "]]
    [:label
     (str "Access token:" @access-token)
     [:pre#ipt-access-token]]
    [:label
     [:pre#ipt-user-profile (str @user)]]]])
Part2へ
APIの呼び出しの実装をしていきます。
https://auth0.com/docs/quickstart/spa/react/02-calling-an-api
APIはringで作ります。
URIのエンドポイントのパスやhandler名はauth0のspring-bootのQuick Startで使われているものを参考にしてます。
https://auth0.com/docs/quickstart/backend/java-spring-security5
さきにauth0上でAPIサーバーの設定をしておきます。
左の[Application > Apis]から 右画面の [+ create API]を押下

以下のようにします。
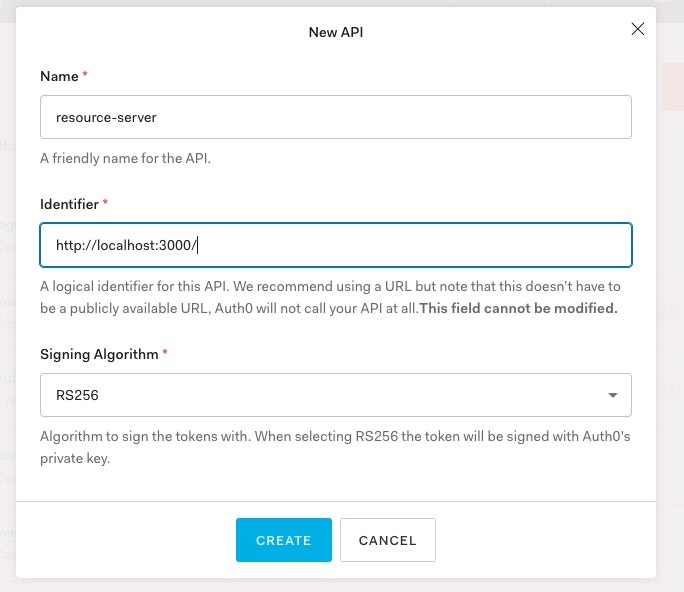
カスタムスコープで以下read:gmailとして作っておきます。この名前に特に意味はありません。今回検証として使うために適当に設定しました。

これでauth0上でのAPIサーバ用の設定は終わりです。
フロントの実装に戻ります。
audienceを追加します。これは後ほどつくるAPIサーバーのアドレスです。
scopeはQuick Startではフロントエンドで情報を表示するために書いてありますが、この記事ではそれは行わないので空でよいです。
(defn auth0-provider [home-page]
  [:> Auth0Provider
   {:domain      "YOUR_AUTH0_DOMAIN"
    :clientId    "YOUR_CLIENT_ID"
    :redirectUri origin
    :audience "http://localhost:3000/"
    ;:scope "read:current_user update:current_user_metadata"
    :scope "read:gmail"
    }
   [home-page]])
access-tokenの取得
https://auth0.com/docs/quickstart/spa/react/02-calling-an-api#get-an-access-token
Quick Start内ではuseEffectフックを使って取得していますが、それをラップするのは手間だったのでライブラリで追加した、
[com.wsscode.async.async-cljs :refer [go-promise <!p]]
を使います。
getAccessTokenSilently はJavaScriptなのでJavaScriptのPromiseを扱える<!pを使いました。
(defn get-access-token [getAccessTokenSilently]
  (go-promise
   (<!p (getAccessTokenSilently
         (clj->js
          {:audience "http://localhost:3000/"
           :scope "read:gmail"})))))
APIサーバーへのリクエスト部分です。かなりややこしいのですが、get-access-tokenはgo-promiseの結果であり、
これはJavaScriptのPromiseではありません、なので<!を使います。
この辺りClojureの非同期の扱いの知識が曖昧なためうまく説明ができません。今後学習していきます。
リクエストヘッダに取得した access-tokenを使います。
;; 結果を受け取るためのreagent/atom
(def response (r/atom ""))
(defn request-resource [path getAccessTokenSilently]
  (go-promise
   ;; <!p でなく <!
   (let [access-token  (<! (get-access-token getAccessTokenSilently))]
     (ajax-request
      {:with-credentials? false
       :uri (str  "http://localhost:3000/api/" (name path))
       :format (json-request-format)
       :response-format (json-response-format {:keywords? true})
       :method            :get
       ;; access-tokenをヘッダに追加
       :headers           {"Authorization" (str "Bearer " access-token)}
       :handler (fn [[ok result]]
                  (reset! response result))}))))
これらを使ってリクエストするボタンを作ります。
(defn request-button [path]
  (let [{:strs [isAuthenticated, getAccessTokenSilently]} (js->clj (useAuth0))]
    [:div
     [:button
      {:on-click #(request-resource path getAccessTokenSilently)} (name path)]]))
画面にボタンを追加し、APIサーバーの結果を表示して確認できるようにします。
(defn home-page []
  [:div
   [:h2 "Welcome to Reagent"]
   [:f> login-button]
   [:f> logout]
   [:f> profile]
   [:f> request-button :public]
   [:f> request-button :private]
   [:f> request-button :private-scope]
   ;; レスポンス確認用
   [:p (str  @response)]]
これでフロントエンドでの準備は完了です。
APIサーバー(リソースサーバー)の実装
このシナリオにおいて
https://auth0.com/docs/architecture-scenarios/spa-api
また サーバーにおいて行うのはAuth0を認可サーバーとし、署名されたアクセストークン の検証、をおこなってエンドポイントを認可する、ということになります。
以上を実現したいのですが、Auth0にはAPIサーバーのQuick StartにおいてJavaを使った場合はSpringを使ったものしかありません。
jwt.ioのライブラリを使えよ、ということなのでサイトにいき、Javaのライブラリを選び、middlewareとしてトークンの検証を行う関数を書いて検証を行えるようにします。
この記事ではAuth0製のjava-jwtを使います。
Ring サーバーの準備
lein new resource-server
依存ライブラリとして以下を追加
  :dependencies [[org.clojure/clojure "1.10.1"]
                 [ring "1.8.2"]
                 [ring-cors "0.1.13"]
                 [ring/ring-json "0.5.0"]
                 [ring-logger "1.0.1"]
                 [metosin/reitit-ring "0.5.10"]
                 [cheshire "5.10.0"]
                 [com.auth0/java-jwt "3.10.3"]
                 [com.auth0/jwks-rsa "0.13.0"]]
普通?の開発では責務ごとにネームスペースを分けると思いますが、この記事ではcore.cljに実装を全部書きます。
(:requireと(:importで以下を読み込み
(ns resource-server.core
  (:require
    [ring.adapter.jetty :as jetty]
    [ring.logger :refer [wrap-with-logger]]
    [ring.middleware.json :refer [wrap-json-response]]
    [ring.util.response :refer [response bad-request]]
    [reitit.ring :as ring]
    [ring.middleware.cors :as r.m.cors]
    [cheshire.core :as cheshire])
  (:import [com.auth0.jwt JWT]
           [com.auth0.jwt JWTVerifier]
           [com.auth0.jwk Jwk]
           [com.auth0.jwk JwkException]
           [com.auth0.jwk JwkProvider]
           [com.auth0.jwk UrlJwkProvider]
           [com.auth0.jwt.algorithms Algorithm]
           [com.auth0.jwt.exceptions JWTVerificationException]
           [com.auth0.jwt.interfaces DecodedJWT]
           [java.util Base64]))
サーバーの実装、
Part2: Ring について知る
リンクの記事をほぼそのまま使わせていただきました。日本語の情報ありがとうございます。
(defonce server (atom nil))

(defn start []
  (when-not @server
    (reset! server
      (jetty/run-jetty app
                       {:host  "localhost"
                        :port  3000
                        :join? false}))))
(defn stop []
  (when @server
    (.stop @server)
    (reset! server nil)))

(defn restart []
  (when @server
    (stop)
    (start)))

(start)
handler(メッセージはspring bootのQuick Startを参考)
(defn public-handler [request]
  (response
    {:message "All good. You DO NOT need to be authenticated to call /api/public."}))

(defn private-handler [request]
  (response
    {:message "All good. You can see this because you are Authenticated."}))

(defn private-scope-handler [request]
  (response
    {:message "All good. You can see this because you are Authenticated with a Token granted the 'read:messages' scope."}))
すべてのエンドポイントで使うmiddleware。こちらを参考に学びました。ありがとうございます!
Clojure Ring Middleware大全
(def middlewares
     [[r.m.cors/wrap-cors
       :access-control-allow-origin [#"http://localhost:8280"]
       :access-control-allow-headers #{:accept :content-type :authorization}
       :access-control-allow-methods #{:get :post}]
      [wrap-json-response]
      [wrap-with-logger]])
ルーターと アプリケーションの設定
ルーターはmetosin/reititのRing-routerを使用しました。
(def router
     (ring/router
       ["/api"
        ["/public" {:get public-handler}]
         ;; wrap-verify-tokenは後述
        ["/private" {:get private-handler :middleware [[wrap-verify-token]]}]
         ;; wrap-verify-scopeは後述
         ;; このエンドポイントはtokenの検証とスコープの所有確認を行う。
        ["/private-scope" {:get private-scope-handler
                           :middleware [[wrap-verify-token]
                                        [wrap-verify-scope]]}]]))

(def app
     (ring/ring-handler
       router
       (constantly {:status 404 :body "not found."})
       {:middleware middlewares}))
共通で使用するmiddlewareと別に個別でmiddlewareを設定しました。
リクエストからトークンを取り出し、デコードするユーティリティ。クレームなどもここで取り出せます。
;; tokenをデコードし、含まれるpayloadを取得。payloadにはクレーム情報が記されている。
(defn- decode-token-by-key [token k]
  (let [jwt (JWT/decode token)
        getter (k {:payload #(.getPayload %)
                   :header  #(.getHeader %)
                   :token   #(.getToken %)})]
    (cheshire/parse-string (String. (.decode (Base64/getDecoder) (getter jwt))))))

;; リクエストヘッダーからaccess-tokenを取り出す。
(defn- retrieve-access-token [headers]
  (let [authorization (get-in headers ["authorization"])]
    (when authorization
      (second (clojure.string/split authorization #" ")))))

;; access-tokenとpayloadを取得する。
(defn- retrieve-token-payload [request]
  (let [token (retrieve-access-token (some-> (:headers request)))
        payload (decode-token-by-key token :payload)]
    [token payload]))
ペイロードの中身は以下のような感じです。(Intellij IDEAでデバッグ)
クレーム iss, sub, aud, scopeなどが確認できます。https://...で始まっているものはAuth0の設定でmailを含むように設定したら追加されました。

トークンを検証するメソッド
参考Verify JWT token received from auth0
(.verify verifier token)の部分でもしトークンが不正な状態(改竄、期限切れ)であれば例外が発生します。
この実装ではmiddlewareに処理させたいのでスローしています。
(defn- verify-token [token]
  (let [issuer "YOUT_AUTH0_ISSUER"
        audience "http://localhost:3000/"
        ^JwkProvider provider (new UrlJwkProvider issuer)]
    (try
      (let [^DecodedJWT jwt (JWT/decode token)
            ^Jwk jwk (.get provider (.getKeyId jwt))
            ;; ここで行うのは公開鍵によるトークンの検証なので、秘密鍵は必要ありません。
            ^Algorithm algorithm (Algorithm/RSA256 ^RSAPublicKey (.getPublicKey jwk) nil)
            ^JWTVerifier verifier (-> (JWT/require algorithm)
                                      (.withIssuer (into-array String [issuer]))
                                      (.withAudience (into-array String [audience]))
                                      (.build))]
        (.verify verifier token))
      (catch JWTVerificationException e
        (throw (JWTVerificationException. "invalid signature")))
      (catch JwkException e
        (throw (JwkException. "invalid JWT token"))))))
上記verify-token関数を使ったmiddlwareを作ります。
スコープは使用したライブラリには検証するものが用意されておらず、また専用の例外がないためスコープのみ手書きしました。
※以下の実装はこのようにできる、というものでありClojureにおけるベストな書き方ではないと思います。
私はClojureで仕事をしたりすることはありませんので、勉強不足な点がある旨ご承知ください。
ここはtokenの検証とは別で、要件や方針に応じていろいろな書き方があるでしょう。
(defn- error-response [error description]
  {:body    {:message description
             :error   error}
   :headers {"WWW-Authenticate: Bearer error" error
             "error-description"              description}})

;; middleware
;; トークンの検証を行うミドルウェア。
(defn wrap-verify-token [handler]
  (fn [request]
    (try
      (let [[token payload] (retrieve-token-payload request)
            {:strs [scope]} payload]

        (verify-token token)
        ;; tokenが正しければそのままhandlerを適用する。
        (handler request))
      (catch JWTVerificationException e
        (assoc (error-response "invalid_token" (.getMessage e))
          :status 401))
      (catch JwkException e
        (assoc (error-response "invalid_request" (.getMessage e))
          :status 400))
      (catch NullPointerException e
        (assoc (error-response "invalid_verify" (.getMessage e))
          :status 500)))))

;; 使用したライブラリにスコープの検証が見当たらなかったので自作
(defn valid-scope? [scope require]
  (some #(= require %) (clojure.string/split scope #" ")))

;; スコープを検証するmiddleware
(defn wrap-verify-scope [handler]
  (fn [request]
    (let [[_ payload] (retrieve-token-payload request)
          {:strs [scope]} payload]
      (if-not (valid-scope? scope "read:gmail")
        (assoc (error-response "insufficient_scope" "")
          :status 403)
        (handler request)))))
これでサーバー側の実装も終わりました。
動作確認
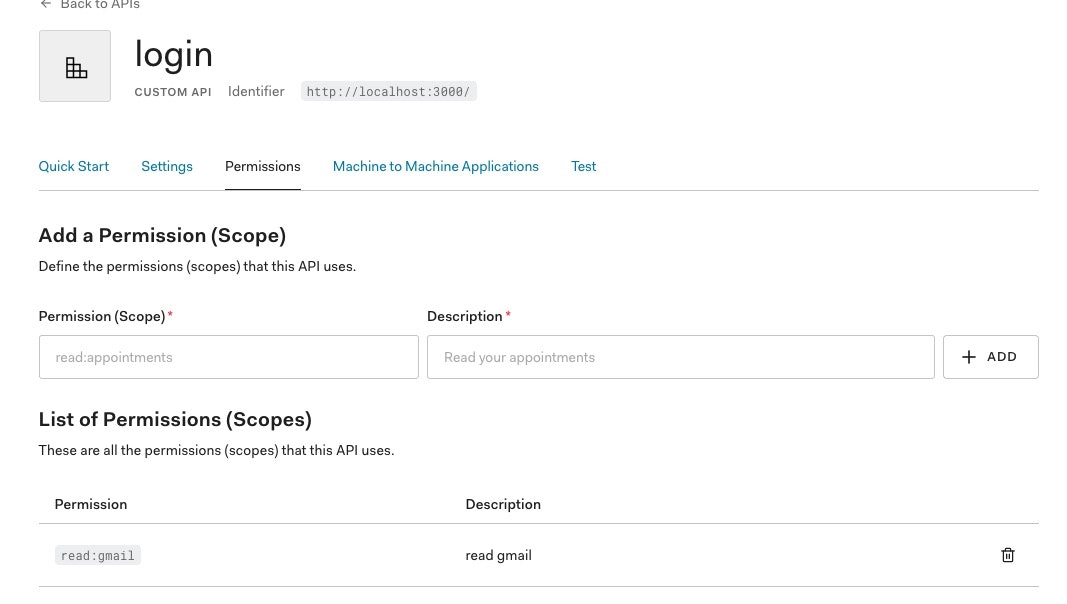
Auth0でロールの作成
scopeの検証を行えるようにAuth0でどのユーザーが指定したスコープを持てるか設定しておきます。
Auth0の管理画面で
Applications > Apis > settings で RBAC setting を enableにします。

User Management > Roles > create roleでロールを作り
Permissions にて APIの管理画面であたえたread:gmailを与えます。
APIの管理画面
Roleの管理画面
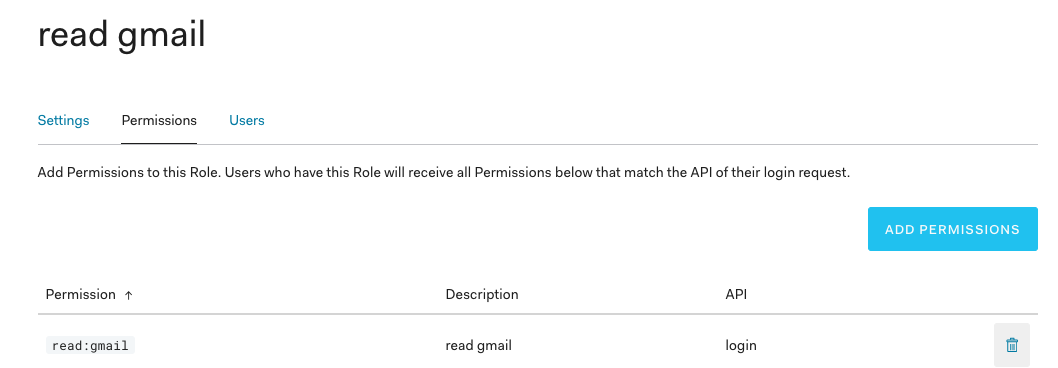
Usersでロールを割り振り、スコープを所持できるユーザーを作っておきます。
ログイン、ログアウトボタンの活性、非活性ができるように修正
ログイン時にログアウトボタンが押せるように、
ログアウト時にログインボタンが押せるようにしておきます。
(defn login-button []
  (let [{:strs [isAuthenticated loginWithRedirect]} (js->clj (useAuth0))]
    [:button {:on-click #(loginWithRedirect)
              :disabled isAuthenticated } "Login"]))

(defn logout []
  (let [{:strs [isAuthenticated logout]} (js->clj (useAuth0))]
    [:button {:on-click #(logout #js {:returnTo origin})
              :disabled (not isAuthenticated)} "Log Out"]))
サーバー起動
APIサーバーをreplで動かします。
lein repl
画面確認
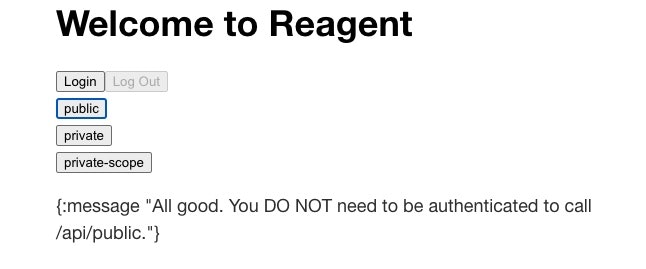
ログアウトの状態の時
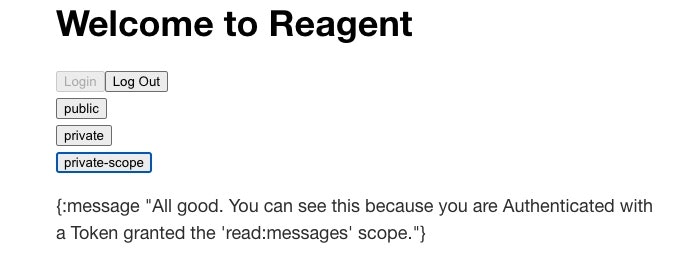
publicボタン押下時
設定したメッセージがそのまま帰ってきます。
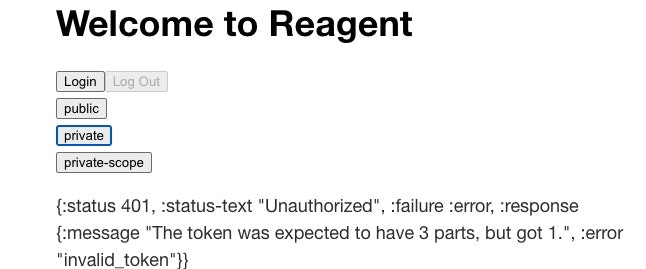
privateボタン押下時
トークンを保持していないのでエラーのメッセージが返却されます。
private-scopeボタン押下時
privateボタン押下時と同じです。
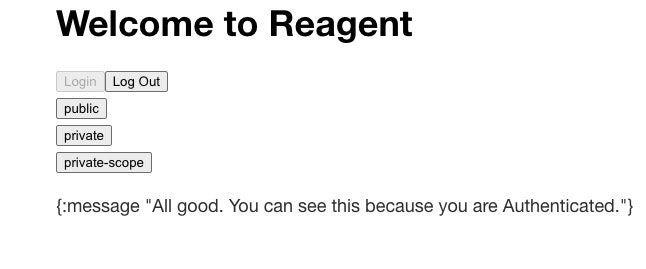
スコープread:gmailの権利を持っていないユーザーがログインした時
private ボタンを押した時
アクセストークン を保持しているので通常時(アクセス認可された)メッセージが返却されます。
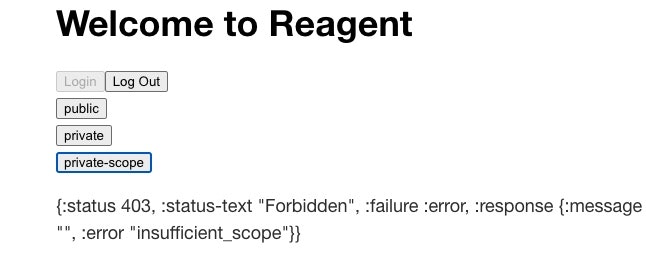
private-scopeボタンを押した時
スコープread:gmailを取得できる役割を与えられていないため、scopeがないためにエラーになります。
スコープread:gmailの権利がある役割のユーザーがログインした時。
private-scopeボタンを押した時
スコープread:gmailがトークンに含まれるため成功します。
以上で実装と検証を終わります。
フロントエンドの実装の全体
(ns auth0-login.core
  (:require
   [reagent.core :as r]
   [reagent.dom :as d]
   ["@auth0/auth0-react" :refer (Auth0Provider useAuth0)]
   [cljs.core.async :refer [<!] :as a]
   [com.wsscode.async.async-cljs :refer [go-promise <!p]]
   [ajax.core :refer [ajax-request json-request-format json-response-format]]))

;; -------------------------
;; Views

(def origin (.. js/window -location -origin))

;; :> は Reactコンポーネントに対して使います。
(defn auth0-provider [home-page]
  [:> Auth0Provider
   {:domain      "YOUR_AUTH0_DOMAIN"
    :clientId    "YOUR_AUTH0_CLIENT_ID"
    :redirectUri origin
    :audience "http://localhost:3000/"
    ;:scope "read:current_user update:current_user_metadata"
    :scope "read:gmail"}
   [home-page]])

(defn login-button []
  (let [{:strs [isAuthenticated loginWithRedirect]} (js->clj (useAuth0))]
    [:button {:on-click #(loginWithRedirect)
              :disabled isAuthenticated } "Login"]))

(defn logout []
  (let [{:strs [isAuthenticated logout]} (js->clj (useAuth0))]
    [:button {:on-click #(logout #js {:returnTo origin})
              :disabled (not isAuthenticated)} "Log Out"]))

(defn profile []
  (let [{:strs [user, isAuthenticated, isLoading]}
        (js->clj (useAuth0))
        user-as-js (clj->js user)]
    (if isLoading
      [:div "Loading..."]
      (when isAuthenticated
        (let [picture
              ((fn [^js/user-as-js.picture user] (. user -picture)) user-as-js)]
          [:div
           [:img {:src picture :alt (. user-as-js -name)}]
           [:h2 (. user-as-js -name)]
           [:p  (. user-as-js -email)]])))))

(defn get-access-token [getAccessTokenSilently]
  (go-promise
   (<!p (getAccessTokenSilently
         (clj->js
          {:audience "http://localhost:3000/"
           :scope "read:gmail"})))))

(def response (r/atom ""))
(defn request-resource [path getAccessTokenSilently]
  (go-promise
   (let [access-token  (<! (get-access-token getAccessTokenSilently))]
     (ajax-request
      {:with-credentials? false
       :uri (str  "http://localhost:3000/api/" (name path))
       :format (json-request-format)
       :response-format (json-response-format {:keywords? true})
       :method            :get
       :headers           {"Authorization" (str "Bearer " access-token)}
       :handler (fn [[ok result]]
                  (reset! response result))}))))

(defn request-button [path]
  (let [{:strs [isAuthenticated, getAccessTokenSilently]} (js->clj (useAuth0))]
    [:div
     [:button
      {:on-click #(request-resource path getAccessTokenSilently)} (name path)]]))


;; :f> について 参考
;; https://github.com/reagent-project/reagent/blob/master/doc/ReactFeatures.md#hooks
;;
(defn home-page []
  [:div
   [:h2 "Welcome to Reagent"]
   [:f> login-button]
   [:f> logout]
;   [:f> profile]
   [:f> request-button :public]
   [:f> request-button :private]
   [:f> request-button :private-scope]
   [:p (str  @response)]])

;; -------------------------
;; Initialize app

(defn mount-root []
  (d/render [auth0-provider home-page] (.getElementById js/document "app")))

(defn ^:export init! []
  (mount-root))
APIサーバの実装の全体
(ns resource-server.core
  (:require
    [ring.adapter.jetty :as jetty]
    [ring.logger :refer [wrap-with-logger]]
    [ring.middleware.json :refer [wrap-json-response]]
    [ring.util.response :refer [response bad-request]]
    [reitit.ring :as ring]
    [ring.middleware.cors :as r.m.cors]
    [cheshire.core :as cheshire])
  (:import [com.auth0.jwt JWT]
           [com.auth0.jwt JWTVerifier]
           [com.auth0.jwk Jwk]
           [com.auth0.jwk JwkException]
           [com.auth0.jwk JwkProvider]
           [com.auth0.jwk UrlJwkProvider]
           [com.auth0.jwt.algorithms Algorithm]
           [com.auth0.jwt.exceptions JWTVerificationException]
           [com.auth0.jwt.interfaces DecodedJWT]
           [java.util Base64]))

(defn- decode-token-by-key [token k]
  (let [jwt (JWT/decode token)
        getter (k {:payload #(.getPayload %)
                   :header  #(.getHeader %)
                   :token   #(.getToken %)})]
    (cheshire/parse-string (String. (.decode (Base64/getDecoder) (getter jwt))))))

(defn- retrieve-access-token [headers]
  (let [authorization (get-in headers ["authorization"])]
    (when authorization
      (second (clojure.string/split authorization #" ")))))

(defn- retrieve-token-payload [request]
  (let [token (retrieve-access-token (some-> (:headers request)))
        payload (decode-token-by-key token :payload)]
    [token payload]))

;; 参考 https://community.auth0.com/t/verify-jwt-token-received-from-auth0/35581/4
;; トークンが正しいか検証する。不正であれば例外をスローする。
(defn- verify-token [token]
  (let [issuer "YOUR_ISSUER"
        audience "http://localhost:3000/"
        ^JwkProvider provider (new UrlJwkProvider issuer)]
    (try
      (let [^DecodedJWT jwt (JWT/decode token)
            ^Jwk jwk (.get provider (.getKeyId jwt))
            ;; ここで行うのは公開鍵によるトークンの検証なので、秘密鍵は必要ありません。
            ^Algorithm algorithm (Algorithm/RSA256 ^RSAPublicKey (.getPublicKey jwk) nil)
            ^JWTVerifier verifier (-> (JWT/require algorithm)
                                      (.withIssuer (into-array String [issuer]))
                                      (.withAudience (into-array String [audience]))
                                      (.build))]
        (.verify verifier token))
      (catch JWTVerificationException e
        ;; invalid signature/claims
        (throw (JWTVerificationException. "can't verify token.")))
      (catch JwkException e
        ;; invalid JWT token
        (throw (JwkException. "Bad request."))))))

(defn- error-response [error description]
  {:body    {:message description
             :error   error}
   :headers {"WWW-Authenticate: Bearer error" error
             "error-description"              description}})

;; middleware
;; トークンの検証を行うミドルウェア。
(defn wrap-verify-token [handler]
  (fn [request]
    (try
      (let [[token payload] (retrieve-token-payload request)
            {:strs [scope]} payload]

        (verify-token token)
        ;; tokenが正しければそのままhandlerを適用する。
        (handler request))
      (catch JWTVerificationException e
        (assoc (error-response "invalid_token" (.getMessage e))
          :status 401))
      (catch JwkException e
        (assoc (error-response "invalid_request" (.getMessage e))
          :status 400))
      (catch NullPointerException e
        (assoc (error-response "invalid_verify" (.getMessage e))
          :status 500)))))

(defn valid-scope? [scope require]
  (some #(= require %) (clojure.string/split scope #" ")))

(defn wrap-verify-scope [handler]
  (fn [request]
    (let [[_ payload] (retrieve-token-payload request)
          {:strs [scope]} payload]
      (if-not (valid-scope? scope "read:gmail")
        (assoc (error-response "insufficient_scope" "")
          :status 403)
        (handler request)))))

;; handlers------------------------------------------
;; auth0 の APIの作成のspring boot チュートリアルにあるcontrollerのメソッド名とメッセージと合わせた。
(defn public-handler [request]
  (response
    {:message "All good. You DO NOT need to be authenticated to call /api/public."}))

(defn private-handler [request]
  (response
    {:message "All good. You can see this because you are Authenticated."}))

(defn private-scope-handler [request]
  (response
    {:message "All good. You can see this because you are Authenticated with a Token granted the 'read:messages' scope."}))

;; common middleware---------------------------------------
(def middlewares
     [[r.m.cors/wrap-cors
       :access-control-allow-origin [#"http://localhost:8280"]
       :access-control-allow-headers #{:accept :content-type :authorization}
       :access-control-allow-methods #{:get :post}]
      [wrap-json-response]
      [wrap-with-logger]])

(def router
     (ring/router
       ["/api"
        ["/public" {:get public-handler}]
        ["/private" {:get private-handler :middleware [[wrap-verify-token]]}]
        ["/private-scope" {:get private-scope-handler
                           :middleware [[wrap-verify-token]
                                        [wrap-verify-scope]]}]]))

(def app
     (ring/ring-handler
       router
       (constantly {:status 404 :body "not found."})
       {:middleware middlewares}))

(defonce server (atom nil))

(defn start []
  (when-not @server
    (reset! server
      (jetty/run-jetty app
                       {:host  "localhost"
                        :port  3000
                        :join? false}))))
(defn stop []
  (when @server
    (.stop @server)
    (reset! server nil)))

(defn restart []
  (when @server
    (stop)
    (start)))

(start)
(restart)
まとめ、感想
- Auth0の設定は簡単で魅力的
- Reagentそのまま使うよりre-frame使った方が明快になりそう
- ClojureScript, ClojureのRing, middlewareの理解がすすんだ
Auth0を使用した認証の仕組みはQuick Start通りにやれば簡単と感じました。また設定で2要素認証やアプリケーションのユーザーのロールなども簡単に設定でき、魅力的な基盤と感じました。しかしQuick Startやサンプルは人気のあるフレームワークに限られ(ビジネスとしては当然ですが)Clojureにて使用できる理解を得るまで時間かかりました。
別の目的としてClojureScriptのフレームワークre-frameとRingを使用したアプリケーション作成の習得をしてみたくその認証としてAuth0を選んだところがあります。Auth0よりもre-frame、Ringの理解(特にre-frame)に時間がかかりましたが、今回reagentで実装しなおしてみて改めてre-frameの考えかたによる実装が明快で保守しやすいと思いました。
以上です。