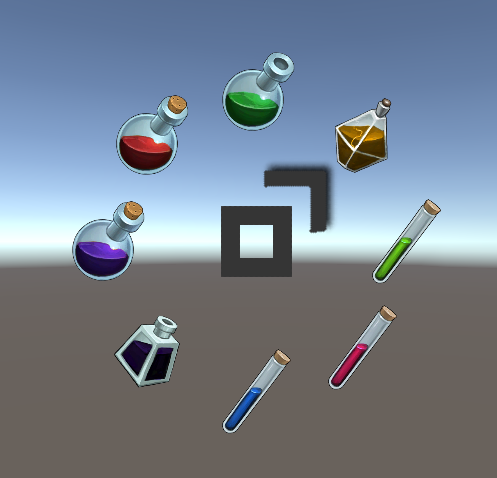
最近のモンスターハンターではパレットというアイテムショートカット機能があります。
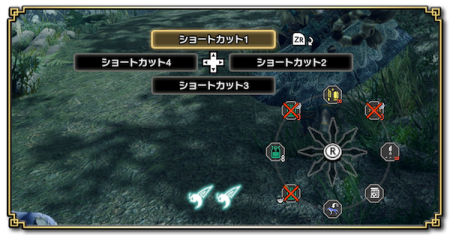
このパレットのような機能を、以下のようにUnityで実装したので紹介します。
https://twitter.com/__iroha__1/status/1535920124322258944?s=20&t=KR1O7yYhDFBJbKQSLpT3Dg
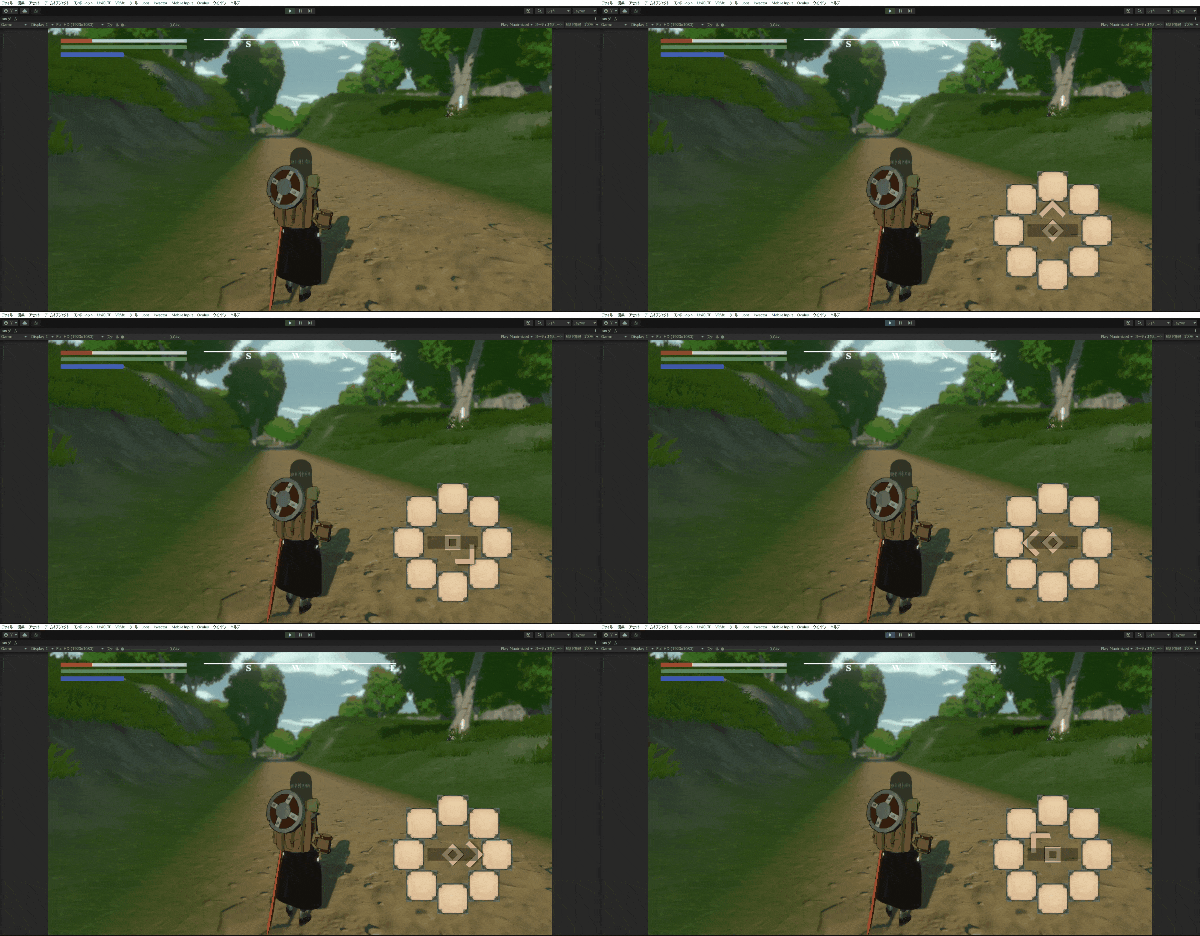
この記事ではもう少し簡略化し、以下機能を実装したいと思います。
UIの準備
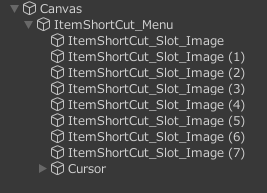
- Canvasを配置し、その子要素として空オブジェクトを作成します(画像の
ItemShortCut_Menu)。 -
ItemShortCut_Menu直下に2種類の要素を作成します。
| オブジェクト名 | 概要 |
|---|---|
ItemShortCut_Slot_Image ~ (7) |
円形に並ぶアイテムを表示するスロットです。示したいアイテム数分配置します。(数は任意) |
Cursor |
メニューの中心にあるアイテム選択用のカーソルです。 |
| ヒエラルキー | Scene View |
|---|---|
 |
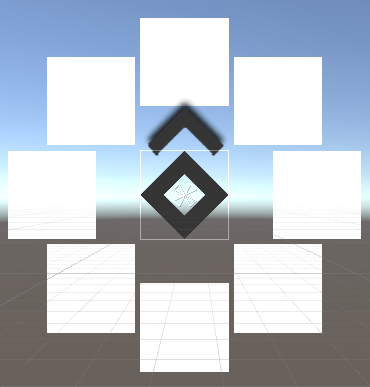 |
- アイテムスロットを円形に並べる必要はありません。画像では既に円形ですが、こちらはスクリプトで円形配置を行います。
アイテム情報保持スクリプトの作成
-
ItemSlot.csというスクリプトを作成し、各アイテムスロット(ItemShortCut_Slot ~ ItemShortCut_Slot (7))にアタッチします。 - これはアタッチされたアイテムスロットにどのアイテムが格納されているかという情報を保持します。
- スクリプトでは簡単にItemというクラスを用意して使っていますが、こちらは各々のアイテムクラスに置き換えてください。
ItemSlot.cs
using System.Collections;
using System.Collections.Generic;
using UnityEngine;
using UnityEngine.UI;

/// <summary>
/// スロットに格納されているアイテム情報を保持する
/// </summary>
public class ItemSlot : MonoBehaviour
{
    /// <summary>
    /// スロットに格納されているアイテム
    /// </summary>
    public Item Item { get; private set; }
    /// <summary>
    /// アイテムアイコン表示用Image
    /// </summary>
    private Image image;

    void Start() {
        image = GetComponent<Image>();
    }

    /// <summary>
    /// スロットの保持情報を更新する
    /// </summary>
    /// <param name="item">更新後アイテム</param>
    public void UpdateItem(Item item) {
        image.sprite = item.icon;
        Item = item;
    }
}

public class Item {
    public int id;
    public string name;
    public Sprite icon;

    public void Use() {
        Debug.Log($"{name}が使用されました。");
    }

    public Item(int id, string name, Sprite icon) {
        this.id = id;
        this.name = name;
        this.icon = icon;
    }
}
パイメニューの実装
パイメニューのスクリプトの全体コードを載せます。次項から主だった機能の説明をします。
- このスクリプトは前項で作成した空オブジェクト
ItemShortCut_Menuにアタッチします。 - アタッチ後、インスペクタ上から
itemSlotsにItemShortCut_Slot_Image ~ (7)を設定します。 - Unityを実行後、右クリック中にマウスドラッグで選択カーソルを回転、Tabキーで選択中のアイテムを使用(ログを表示)します。
PiMenuController.cs
using System.Collections;
using System.Collections.Generic;
using UnityEngine;
using UnityEngine.UI;
using System;

/// <summary>
/// アイテム使用ショートカットのパイメニューを実装する
/// </summary>
public class PiMenuController : MonoBehaviour
{
    /// <summary>
    /// 所持アイテム
    /// </summary>
    public List<Item> items = new();

    /// <summary>
    /// メニューが開かれているか
    /// </summary>
    private bool isOpenedMenu = false;

    /// <summary>
    /// アイテム選択用カーソルImage
    /// </summary>
    [SerializeField] private RectTransform cursor;

    /// <summary>
    /// メニュー展開時のマウス位置
    /// </summary>
    private Vector2 mouseOriginPos;

    /// <summary>
    /// メニューで表示するアイテムスロット
    /// </summary>
    [SerializeField] private List<ItemSlot> itemSlots = new List<ItemSlot>();

    /// <summary>
    /// パイメニューの半径
    /// </summary>
    [SerializeField] private float radius = 20f;

    /// <summary>
    /// アイテムスロット同士の角度間隔
    /// </summary>
    private float anglePerSlot;

    // Start is called before the first frame update
    void Start()
    {
        InitMenuLayout();

        // 所持アイテムのロード
        for (int i = 0; i < 8; i++) {
            items.Add(new Item(i, $"アイテム{i}", Resources.Load<Sprite>($"Res_{i}")));
        }

        RefreshItemSlot();
    }

    // Update is called once per frame
    void Update()
    {
        if (Input.GetMouseButton(1) && !isOpenedMenu) {
            OpenMenu();
            isOpenedMenu = true;
        }

        if (Input.GetMouseButtonUp(1))
            isOpenedMenu = false;


        if (isOpenedMenu) {
            UpdateMenuDisplay();

            if (Input.GetKeyDown(KeyCode.Tab)) {
                UseSelectedItem();
            }
        }
    }

    #region 表示機能
    /// <summary>
    /// パイメニューのレイアウトを構築する
    /// </summary>
    private void InitMenuLayout() {
        anglePerSlot = 360f / itemSlots.Count;
        for (int i = 0; i < itemSlots.Count; i++) {
            float angle = anglePerSlot * i;
            angle += 90;
            itemSlots[i].GetComponent<RectTransform>().anchoredPosition = new Vector2(Mathf.Cos(angle * Mathf.Deg2Rad), Mathf.Sin(angle * Mathf.Deg2Rad)) * radius;
        }
    }

    /// <summary>
    /// メニュー内のアイテム描画を更新する
    /// </summary>
    private void RefreshItemSlot() {
        for (int i = 0; i < itemSlots.Count; i++) {
            itemSlots[i].UpdateItem(items[i]);
        }
    }

    /// <summary>
    /// メニューを開く
    /// </summary>
    private void OpenMenu() {
        if (isOpenedMenu)
            return;
        mouseOriginPos = Input.mousePosition;
        RefreshItemSlot();
    }
    #endregion

    #region マウスと選択カーソルの同期
    /// <summary>
    /// メニュー展開時のマウス座標と現在のマウス座標から、マウスが移動した角度を計算する
    /// </summary>
    /// <param name="originPoint">メニュー展開時のマウス座標</param>
    /// <param name="currentPosition">現在のマウス座標</param>
    /// <returns>メニュー展開時のマウス座標から移動した角度</returns>
    private Vector3 GetDirectionFromMouse(Vector3 originPoint, Vector3 currentPosition) {
        Quaternion mouseRotate = Quaternion.LookRotation(Vector3.forward, currentPosition - originPoint);

        return mouseRotate.eulerAngles;
    }

    /// <summary>
    /// 選択カーソルの角度やスロットの選択状態を更新する
    /// </summary>
    private void UpdateMenuDisplay() {
        Vector3 currentAngle = GetDirectionFromMouse(mouseOriginPos, Input.mousePosition);
        int selectedSlotIndex = GetSelectedSlot(currentAngle.z);
        currentAngle.z = selectedSlotIndex * anglePerSlot;
        cursor.eulerAngles = currentAngle;
    }
    #endregion

    #region
    /// <summary>
    /// 現在選択されているスロットを取得する
    /// </summary>
    /// <param name="cursorDegree">選択カーソルの角度</param>
    /// <returns>選択中のスロット番号</returns>
    private int GetSelectedSlot(float cursorDegree) {
        float currentIndex = cursorDegree / anglePerSlot;
        currentIndex = (float)Math.Round(currentIndex, MidpointRounding.AwayFromZero);
        if (currentIndex >= itemSlots.Count)
            currentIndex = 0;

        return (int)currentIndex;
    }

    /// <summary>
    /// 選択されたアイテムを使用する
    /// </summary>
    private void UseSelectedItem() {
        ItemSlot selectedSlot = itemSlots[GetSelectedSlot(cursor.eulerAngles.z)];
        if (selectedSlot.Item == null)
            return;

        // アイテム仕様処理(それぞれの環境で置き換えてください)
        selectedSlot.Item.Use();
    }
    #endregion
}
カーソルの方向算出
  /// <summary>
    /// メニューを開く
    /// </summary>
    private void OpenMenu() {
        if (isOpenedMenu)
            return;
        mouseOriginPos = Input.mousePosition;
        RefreshItemSlot();
    }

    /// <summary>
    /// メニュー展開時のマウス座標と現在のマウス座標から、マウスが移動した角度を計算する
    /// </summary>
    /// <param name="originPoint">メニュー展開時のマウス座標</param>
    /// <param name="currentPosition">現在のマウス座標</param>
    /// <returns>メニュー展開時のマウス座標から移動した角度</returns>
    private Vector3 GetDirectionFromMouse(Vector3 originPoint, Vector3 currentPosition) {
        Quaternion mouseRotate = Quaternion.LookRotation(Vector3.forward, currentPosition - originPoint);

        return mouseRotate.eulerAngles;
    }
-
Quaternion.LookRotationへ(目標座標 - 原点座標)の差分を渡すと目標座標への角度を取得することができます。 - 今回は右ドラック開始時のマウス座標を原点に設定し、原点設定後に移動したマウス座標との差分を求めることで、マウスの動きの角度を取得しました。
アイテム選択
    /// <summary>
    /// 現在選択されているスロットを取得する
    /// </summary>
    /// <param name="cursorDegree">選択カーソルの角度</param>
    /// <returns>選択中のスロット番号</returns>
    private int GetSelectedSlot(float cursorDegree) {
        float currentIndex = cursorDegree / anglePerSlot;
        currentIndex = (float)Math.Round(currentIndex, MidpointRounding.AwayFromZero);
        if (currentIndex >= itemSlots.Count)
            currentIndex = 0;

        return (int)currentIndex;
    }
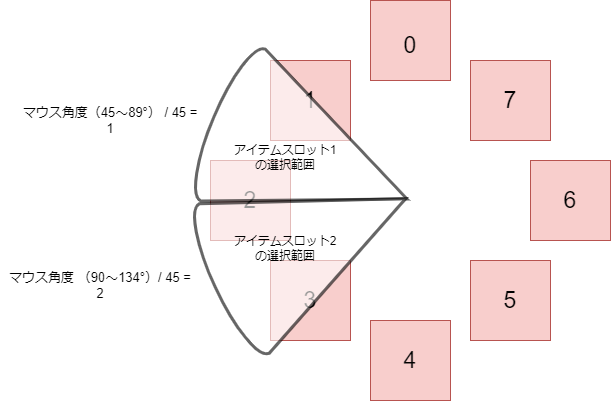
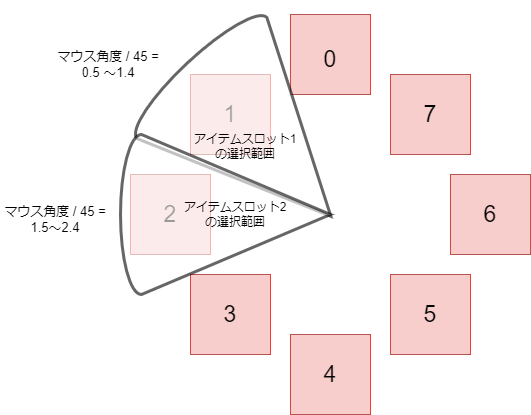
- 現在どのアイテムスロットが選択されているのかは、現在のマウス角度から内角を割り、さらにその商を四捨五入します。
- 例)スロット数8でマウス角度が63度になっている場合
- 60 / 45 = 1.4
- 1.4を四捨五入 = 1
- 選択中のアイテムスロット番号は1になります
- 例)スロット数8でマウス角度が63度になっている場合
- 四捨五入した理由はスロットの選択範囲をマウス角度 / 内角だけで設定してしまうと下図のように選択範囲のずれが生じるためです。
- イメージ通りの選択範囲にするためには下図のような範囲を値を設定する必要があります。
ゲームパッドの対応
今回はパッドの対応はしませんでしたが、GetDirectionFromMouse関数の部分を下記サイトのようにスティックの角度を算出するものに変更するという対応になると思います。
http://fanblogs.jp/gameprogramming/archive/124/0
参考
https://tsubakit1.hateblo.jp/entry/2016/04/11/070637
https://note.com/masataro5959/n/nbdc02c9683de
