前回の続き
Kotlinで実装したエニグマを、Webアプリにしてみたいと思います。
サーバーサイド
簡単!楽しい!速い!と三拍子揃ったフレームワーク、Ktorでサーバーサイドを実装していきます。
ロジック部分は前回のものをそのまま流用し、エニグマの設定にあたる、ローターやプラグボードの設定をJSONで定義し、POSTで受け取れるようにしていきましょう。
data class EnigmaRequest(
  val message: String,
  val setting: EnigmaSetting
)

data class EnigmaSetting(
  val rotors: List<RotorSetting>,
  val plugBoard: List<PlugBoardConnect>
)

data class RotorSetting(
  val scramblerId: Int,
  val initialRotate: Int
)

data class PlugBoardConnect(
  val from: Char,
  val to: Char
)
データクラスでJSONの型を定義します。
各ローターの設定、プラグボードの設定、暗号化したい文字列が入ります。
次に、ルーティングを実装します。
fun Application.module() {
  install(ContentNegotiation) {
    gson {
    }
  }

  routing {
    post ("/api/enigma") {
      val body = call.receive<EnigmaRequest>()

      val enigma = body.setting.run {
        val rotor1 = Rotor(scramblers[rotors[0].scramblerId], rotors[0].initialRotate, 0)
        val rotor2 = Rotor(scramblers[rotors[1].scramblerId], rotors[1].initialRotate, 1)
        val rotor3 = Rotor(scramblers[rotors[2].scramblerId], rotors[2].initialRotate, 2)
        val reflector = Reflector()
        val plugBoard = PlugBoard(plugBoard.associate { it.from to it.to })
        Enigma(rotor1, rotor2, rotor3, reflector, plugBoard)
      }

      val cypher = body.message
        .split(" ")
        .joinToString(" ") { m ->
          m.toCharArray()
            .map { encrypt(it, enigma) }
            .toCharArray()
            .concatToString()
        }

      call.respond(cypher)
    }
  }
}
val body = call.receive<EnigmaRequest>()の部分で、フロントから送られたJSONを受け取ります。
その後の流れは前回の記事と同様で、JSONで送られた設定をもとに、暗号化処理を行い、レスポンスを返します。
これでAPIはできあがり。
はやい!かんたん!たのしい!
フロントエンド
続いてフロントエンドを実装していきます。
今もっともモダンでかっこいいフロントエンドフレームワークである、Angular16を使って実装します。
Angular16では、今大注目のSignalsが開発者プレビューとして搭載されました。
https://angular.jp/guide/signals
zone.jsによる状態管理を捨て、RxJSに代わるコンポーネント間連携をもたらしてくれる、Signalsの強力なパワー、さっそく試していきましょう!
まずはスキーマ定義。
export type EnigmaRequest = {
  message: string,
  setting: EnigmaSetting
}

export type EnigmaSetting = {
  rotors: RotorSetting[],
  plugBoard: PlugBoardConnect[]
}

type RotorSetting = {
  scramblerId: number,
  initialRotate: number
}

type PlugBoardConnect = {
  from: string,
  to: string
}
サーバーサイドで定義したデータクラスと同じ形のJSONになるように、型を用意します。
続いてapiを叩くサービスを用意します。
@Injectable({
  providedIn: 'root'
})
export class HttpRequestService {
  constructor(private httpClient: HttpClient) {
  }

  postEnigma(body: EnigmaRequest): Promise<string> {
    return lastValueFrom(
      this.httpClient.post("/api/enigma", body, {responseType: "text"})
    );
  }
}
これで準備はOK。
コンポーネントを書いていきましょう。
EnigmaComponent
├── InputComponent
├── SettingComponent
└── ResultComponent
Enigmaコンポーネントが親で、その下に3つのコンポーネントがあります。
シグナルはEnigmaコンポーネントで生成し、下のコンポーネントに受け渡します。
まずは、暗号化したい文字列の入力を受け付ける、Inputコンポーネント。
import { Component, EventEmitter, Input, Output, signal, WritableSignal } from '@angular/core';

@Component({
  selector: 'app-input',
  templateUrl: './input.component.html',
  styleUrls: ['./input.component.css']
})
export class InputComponent {
  @Input() $message: WritableSignal<string> = signal("");
  @Output() sendButton: EventEmitter<any> = new EventEmitter();
}
<div>
  <h1>Input</h1>
</div>
<div>
  <label>
    Message
  </label>
  <input type="text"
         [ngModel]="$message()"
         (ngModelChange)="$message.set($event)"
  >
  <button (click)="sendButton.emit()">
    SEND
  </button>
</div>
$messageというのがシグナルです。
@Inputで親コンポーネントから実体を受け取り、inputの値を$message.set($event)の部分で代入します。
これは一種のオブザーバーパターンなので、子で代入すると自動的に親が持つ実体にも反映されます。
次に、エニグマの設定を行うSettingコンポーネント。
import { Component, Input, signal, WritableSignal } from '@angular/core';
import { EnigmaSetting } from "../../models/enigma";

@Component({
  selector: 'app-setting',
  templateUrl: './setting.component.html',
  styleUrls: ['./setting.component.css']
})
export class SettingComponent {
  @Input() $enigmaSetting: WritableSignal<EnigmaSetting> = signal<EnigmaSetting>({
    rotors: [
      {scramblerId: 0, initialRotate: 0},
      {scramblerId: 0, initialRotate: 0},
      {scramblerId: 0, initialRotate: 0}
    ],
    plugBoard: []
  });

  setScramblerId(idx: number, event: any) {
    this.$enigmaSetting.mutate(setting => {
      setting.rotors[idx].scramblerId = event.target.selectedIndex;
    });
  }

  setInitialState(idx: number, event: any) {
    this.$enigmaSetting.mutate(setting => {
      setting.rotors[idx].initialRotate = parseInt(event.target.value);
    });
  }
}
<div>
  <h1>Setting</h1>
</div>
<div>
  <div *ngFor="let rotor of $enigmaSetting().rotors; index as idx">
    <label>
      Rotor {{idx + 1}}
    </label>
    <label>
      Scrambler
    </label>
    <select
      [selectedIndex]="rotor.scramblerId"
      (change)="setScramblerId(idx, $event)"
    >
      <option>A</option>
      <option>B</option>
      <option>C</option>
    </select>
    <label>
      Initial Rotate
    </label>
    <input
      type="number"
      min="0"
      max="25"
      [ngModel]="rotor.initialRotate"
      (change)="setInitialState(idx, $event)"
    >
  </div>
</div>
こちらは$enigmaSettingがシグナルです。
スクランブラーの種類と、回転初期値を設定できるようにします。
次に暗号化結果を表示するResultコンポーネント。
import { Component, signal, WritableSignal, Input } from '@angular/core';

@Component({
  selector: 'app-result',
  templateUrl: './result.component.html',
  styleUrls: ['./result.component.css']
})
export class ResultComponent {
  @Input() $cypher: WritableSignal<string> = signal("");
}
<div>
  <h1>Result</h1>
</div>
<div>
  {{$cypher()}}
</div>
$cypherがシグナルです。
親から受け取り、画面に表示します。
最後に、親であるEnigmaコンポーネント。
import { Component, signal, WritableSignal } from '@angular/core';
import { HttpRequestService } from "../../services/http-request.service";
import { EnigmaSetting } from "../../models/enigma";

@Component({
  selector: 'app-enigma',
  templateUrl: './enigma.component.html',
  styleUrls: ['./enigma.component.css']
})
export class EnigmaComponent {
  $enigmaSetting: WritableSignal<EnigmaSetting> = signal<EnigmaSetting>({
    rotors: [
      {scramblerId: 0, initialRotate: 0},
      {scramblerId: 0, initialRotate: 0},
      {scramblerId: 0, initialRotate: 0}
    ],
    plugBoard: [
      {from: "A", to: "B"},
      {from: "C", to: "D"},
      {from: "E", to: "F"},
    ]
  });
  $message: WritableSignal<string> = signal("");
  $cypher: WritableSignal<string> = signal("");

  constructor(private httpRequestService: HttpRequestService) {
  }

  sendEnigma() {
    const regex: RegExp = /^[a-zA-Z\s]*$/;
    if (!regex.test(this.$message())) {
      window.alert("半角アルファベットで入力してください");
      return;
    }

    this.httpRequestService
      .postEnigma({
        message: this.$message(),
        setting: this.$enigmaSetting()
      })
      .then(d => {
        this.$cypher.set(d);
      });
  }
}
<section class="contents">
  <section class="main">
    <app-setting [$enigmaSetting]="$enigmaSetting"></app-setting>
    <app-input [$message]="$message" (sendButton)="sendEnigma()"></app-input>
    <hr/>
    <app-result [$cypher]="$cypher"></app-result>
  </section>
</section>
ここまで登場した3種類のシグナルの生成を行い、子コンポーネントに渡します。
そして、sendButtonのクリックイベントを受けて、APIをコールし、結果を受け取ります。
これで完成。
下のような画面になりました。
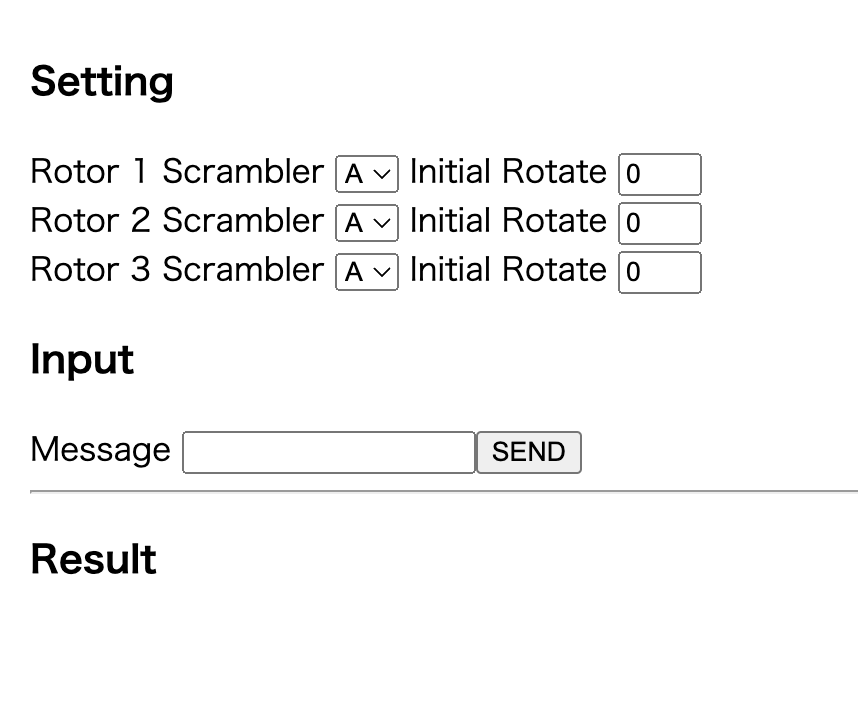
適当に入力してSENDしてみます。

無事に暗号化できました!
いかがでしょうか。
Signalsの登場によって、コンポーネント間のデータのやりとりがすっきりと記述できたのではないでしょうか。
Signalsには他にもcomputedやeffectなど便利な機能がたくさんあります。
Angularの進化に夢が広がりますね!
プラグボードの設定も入力できるようにしたかったけど、作業が深夜になりすぎるので断念しました。
今日のコードは以下のリポジトリにアップロードしています。