概略
技術者のためのレンタルサーバー Gehirn RS2 に nginx + unicorn 環境を構築します。
nginx は fakeroot は使わずにソースからインストールします。
Rails で使うデータベースには mysql を使いました。
環境だけ整えるのも寂しいのでおまけとして twitter-bootstrap-rails をいれて遊んでみました。
事前準備
公開鍵の登録
まず最初に公開鍵の登録をします。
Gehirn のコントロールパネルからログインしてSSHの項目より鍵の登録を行います。
データベースの作成
Rails で使うデータベースもここで作成しておきます。
同じくコントロールパネルのデータベースから"データベースを追加する"をクリックしてデータベースを作っておきます。
Rails では開発用、テスト用、本番用とデータベースを分けて運用するようになっているので3つ作っておきましょう。
名前は dev, test, pro とでもしておきます。
また Gehirn ではデータベースのユーザー名とデータベース名は一致するようになっています。
MySQL の動作確認
SSH でサーバーにログインして以下のコマンドを試してみます。
$ mysql -h localhost -u db_user_name -q db_user_name -p
データベースの確認をしてみます。
mysql> show databases;
+--------------------------------------------------------------------------------------------------------------------------------------------------------------------------------------------------+
| Database                                                                                                                                                                                         |
+--------------------------------------------------------------------------------------------------------------------------------------------------------------------------------------------------+
| information_schema                                                                                                                                                                               |
| database_name                                                                                                                                                                                   |
+--------------------------------------------------------------------------------------------------------------------------------------------------------------------------------------------------+
2 rows in set (0.00 sec)

mysql> quit
Bye
Rails および Ruby のインストール
Rails をインストールします。 (Rubyも同時にインストールされます)
$ rs2 install rails
$ rails -v
Rails 3.2.12
以下を行う必要はありませんがしておくと、gem のインストール時にドキュメントの生成が省略されるため時間が短縮され、嬉しかったりします。
install: --no-ri --no-rdoc
update: --no-ri --no-rdoc
nginx のインストールと設定
nginx のインストール先ディレクトリを作成します。
$ mkdir ~/opt
ソースをダウンロードしてインストールします。
$ mkdir ~/src
$ cd ~/src
$ wget "http://nginx.org/download/nginx-1.2.7.tar.gz"
$ tar xfzv nginx-1.2.7.tar.gz
$ cd nginx-1.2.7
$ ./configure --prefix=$HOME/opt --with-http_ssl_module
$ make && make install
これで ~/opt 配下に nginx がインストールされましたが PATH が通ってないので設定します。
export PATH=$PATH:$HOME/opt/sbin # opt
追加した PATH の反映をします。(ログアウト、ログインでも可)
$ source .zshrc
nginx の設定ファイル編集
~/opt/conf/nginx.conf に以下を追記します。
また nginx.conf の server セクションはコメントアウトします。
http {
   include       conf.d/*.conf;
以下略
}
unicorn 用の設定ファイルディレクトリを作成します。
$ mkdir ~/opt/conf/conf.d
unicorn 用の設定ファイルを書きます。
$ vim ~/opt/conf/conf.d/gehirn-unicorn.conf
upstream backend-unicorn {
    server 127.0.0.1:3000;
}

server {
    listen       61***; # Gehirn のプロキシ先ポート番号
    server_name  yourname.gehirn.ne.jp;

    # ドキュメントルートは Rails アプリの public ディレクトリを指定しておく
    root /home/<ユーザ名>/public_html/rails_app/public;

    location / {
        proxy_pass_header Server;
        proxy_set_header Host $host;
        proxy_set_header X-Forwarded-Host $host;
        proxy_set_header X-Forwarded-Server $host;
        proxy_set_header X-Forwarded-For $proxy_add_x_forwarded_for;
        proxy_read_timeout 75; # unicorn設定ファイルのtimeoutも忘れずに
        proxy_pass http://backend-unicorn; # upstreamで定義したバックエンド
    }
}
nginx の起動
$ nginx
ブラウザから確認して 502 Bad Gateway と表示されるとOK。
Rails プロジェクト作成
$ cd ~/public_html
$ rails new rails_app -d mysql
データベースファイルの編集
$ cd RAILS_ROOT
$ vim config/database.yml
データベース名とユーザー名は同じにします。
database: db_user_name
username: db_user_name
password: ********
host: localhost
Gemfile の編集
unicorn をインストールするために以下を追記します。
gem 'unicorn'
twitter-bootstrap-rails を使うなら以下も追記します。
gem "therubyracer"
gem "less-rails" #Sprockets (what Rails 3.1 uses for its asset pipeline) supports LESS
gem "twitter-bootstrap-rails"
bundle install します。
$ bundle install
unicorn の設定ファイル作成
$ vim ~/public_html/rails-app/config/unicorn-conf.rb
$timeout = 75
listen 3000 # by default Unicorn listens on port 8080
worker_processes 2 # this should be >= nr_cpus
pid "$HOME/public_html/rails-app/tmp/pids/unicorn.pid"
pid ディレクトリ作成
$ mkdir ~/public_html/rails-app/tmp/pids
unicorn の起動
productionモード(-E), デーモン化する(-D), 詳細をconfigファイルで指定
$ cd RAILS_ROOT
$ unicorn_rails -c config/unicorn-conf.rb -E production -D
production モードで起動すると public/ ディレクトリ以下は Rails が返さなくなるため、development で起動した時には public/index.html が返ってきますがこの場合 the page doesn't exist となり確認できません。
development 環境の場合は外しておきましょう。
確認
Web から接続して確認してみましょう。
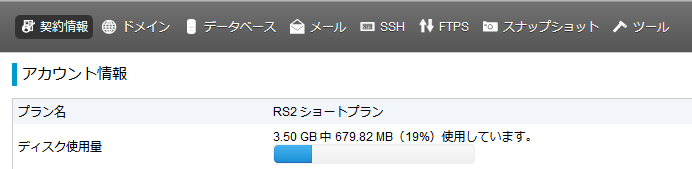
使用した容量
ここまでに使用した容量はこんな感じでした。
おまけ
ここから twitter-bootstrap-rails の設定に入ります。
assets に登録
$ cd RAILS_ROOT
$ rails g bootstrap:install less
レイアウトファイル作成
$ rails g bootstrap:layout application fluid
ページ作成と routes の設定
$ rails g scaffold Post title:string description:text
$ rake db:migrate
$ rails g bootstrap:themed Posts
$ rm public/index.html
$ vim config/routes.rb # 右記のように書き換えます。 root :to => 'posts#index'
これで終わりです。
これから頑張って Rails アプリを作っていきましょう!!
参考サイト
twitter bootstrap railsを使ったら職が見つかり彼女も出来て背も3センチ伸びました。
seyhunak / twitter-bootstrap-rails