https://www.gatsbyjs.org/docs/
ずっと気になっていたGatsby、やってみました!
ほとんど公式の訳となりますが、備忘録としてまとめておきます。
公式がかなり優しめだったので、優しすぎる部分(nodeの設定・reactについて等)は省いていきます。
1.Gatsbyチュートリアル基礎の基礎
GatsbyにはCLIがありますので、インストールします。
$ npm install -g gatsby-cli
ターミナル再起動後、以下のコマンドでインストールできたか確認してください。
コマンドの説明が出たら成功です!
$ gatsby --help
get Startedなので、すぐにギャツビーが試せるように、公式が専用のスターターなるものを準備してくれています。
スターターというのは、プロジェクトを作る際に指定するサイトの根幹部分です。公式のgatsby-starter-hello-worldスターターからサイトを作ります。
$ gatsby new hello-world https://github.com/gatsbyjs/gatsby-starter-hello-world
gatsby new でgatsbyのプロジェクトを作成できます。
hello-worldは任意のサイト名です。これがフォルダ名になります。
https://github.com/gatsbyjs/gatsby-starter-hello-worldはスターターがあるgithubのURLですね。
このURLを省略するとデフォルトスターターが割り当てられるようです。
次は下記のコマンドでフォルダ移動後、developモードをスタートします。
$ cd hello-world
$ gatsby develop
※エラーとなる場合、node modulesとpackage-lock.jsonを削除しnpm install
node_moduleやpublicがダウンロードされて、localhost:8000が立ち上がりました!
http://localhost:8000/ をみてみましょう。

殺風景!ここから始まるサクセスストーリーって感じです。
ちなみにGatsbyはホットリロードが標準で仕込まれています🎉
##2. react普通に使えちゃう&デプロイしてみる
Linkコンポーネントも標準で入っています。
import React from "react"
import { Link } from "gatsby"
import Header from "../components/header"
export default () => (
  <div style={{ color: `purple` }}>
    <Link to="/contact/">Contact</Link>
    <Header headerText="Hello Gatsby!" />
    <p>What a world.</p>
    <img src="https://source.unsplash.com/random/400x200" alt="" />
  </div>
)
import React from "react"

export default props => <h1>{props.headerText}</h1>
import React from "react"
import { Link } from "gatsby"
import Header from "../components/header"
export default () => (
  <div style={{ color: `teal` }}>
    <Link to="/">Home</Link>
    <Header headerText="Contact" />
    <p>Send us a message!</p>
  </div>
)
上記3ファイルを用意してください。
コンポーネントも使えるし、Linkがきちんと動いているのもわかると思います。
しかもルーティング勝手にやってくれていますね...すごい
デプロイしてみよう
surgeを使ってデプロイしてみます。
初めてsurge使ったんですけどお手軽めっちゃ便利でした。
$ npm i -g surge
ターミナル再起動後、
$ gatsby build   // buildファイル生成
$ surge public/  // デプロイ
surge public後はメールアドレスやパスワード設定を求められるので打ち込んでください。
生成できたら http:// surgeが吐き出した文字列 でアクセスできます。末尾がだいたいsurge.shぽいです。
3. スタイリングについて
###グローバルCSS
グローバルなスタイリングは何と言っても不可欠。
その簡単な解決法として、スタイルシートを用意することがチュートリアルでは進められています。
├── package.json
├── src
│   └── pages
│       └── index.js
│   └── styles
│       └── global.css
├── gatsby-browser.js
このようなファイル構成にします。
追加するのはstyleフォルダ,global.css,gatsby-browser.jsになります。
gatsby-browser.jsはこのファイル名じゃないといけないので注意です。
html {
  background-color: lavenderblush;
}
import "./src/styles/global.css"

// または:
// require('./src/styles/global.css')
gatsby develop で起動すると、ちゃんと背景にスタイルが効いていると思います。
今までのreactでの苦労がみるみる消えて無くなっていくような感覚です。
ただ公式曰く これは早く始めるためのものでもっといい方法あるぞ(共有レイアウトコンポーネント)とのことなので、ちょっと脱線して確認したい方はこちらをご覧ください。
###CSSモジュール
次はコンポーネント固有のCSSを実装していきます。
下記のコンポーネントを作成します。
import React from "react"
import containerStyles from "./container.module.css"
export default ({ children }) => (
  <div className={containerStyles.container}>{children}</div>
)
そして本命の container.module.cssを作成します。
.container {
  margin: 3rem auto;
  max-width: 600px;
}

.user {
  display: flex;
  align-items: center;
  margin: 0 auto 12px auto;
}

.user:last-child {
  margin-bottom: 0;
}

.avatar {
  flex: 0 0 96px;
  width: 96px;
  height: 96px;
  margin: 0;
}

.description {
  flex: 1;
  margin-left: 18px;
  padding: 12px;
}

.username {
  margin: 0 0 12px 0;
  padding: 0;
}

.excerpt {
  margin: 0;
}
拡張子を .css ではなく .module.css にすることによって、
GatsbyはこのファイルをグローバルCSSじゃなくてCSSモジュールね! と解釈してくれます。
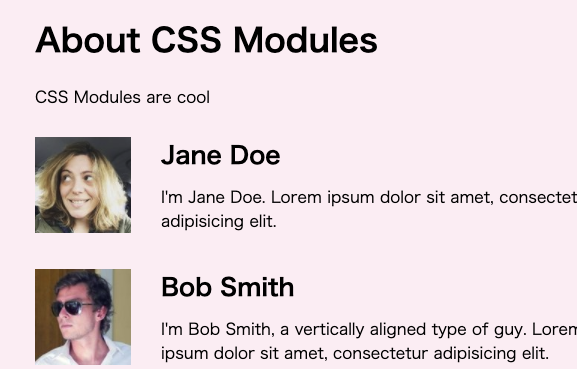
下記のファイルを作成し、 http://localhost:8000/about-css-modules をみてみましょう。
import React from "react"

import Container from "../components/container"

export default () => (
  <Container>
    <h1>About CSS Modules</h1>
    <p>CSS Modules are cool</p>
  </Container>
)
containerStyles.containerがちゃんと効いていることがわかると思います。
実際に開発者モードでスタイルを見ると、クラス名がめちゃめちゃ長い文字列担っているかと思います。
これは必ずユニークになるように生成されています。
about-css-modules.jsに下記のコードをコピペしてみてください。
スタイルがしっかり効いているのがわかると思います。
import React from "react"
import styles from "./about-css-modules.module.css"
import Container from "../components/container"

console.log(styles)

const User = props => (
  <div className={styles.user}>
    <img src={props.avatar} className={styles.avatar} alt="" />
    <div className={styles.description}>
      <h2 className={styles.username}>{props.username}</h2>
      <p className={styles.excerpt}>{props.excerpt}</p>
    </div>
  </div>
)

export default () => (
  <Container>
    <h1>About CSS Modules</h1>
    <p>CSS Modules are cool</p>
    <User
      username="Jane Doe"
      avatar="https://s3.amazonaws.com/uifaces/faces/twitter/adellecharles/128.jpg"
      excerpt="I'm Jane Doe. Lorem ipsum dolor sit amet, consectetur adipisicing elit."
    />
    <User
      username="Bob Smith"
      avatar="https://s3.amazonaws.com/uifaces/faces/twitter/vladarbatov/128.jpg"
      excerpt="I'm Bob Smith, a vertically aligned type of guy. Lorem ipsum dolor sit amet, consectetur adipisicing elit."
    />
  </Container>
)
CSS-in-JSについてはチュートリアルでは取り上げられていませんが、
ほとんどのCSSライブラリはgatsby用のプラグインが存在するらしいです (よかった...)
EmotionとStyled Componentについては別でチュートリアルが設けられているそうなのでよかったらみてみてください。
SassやStylusなんかもGatsbyではサポートされています。
3. Gatsbyの拡張機能について
Gastbyは拡張可能なように設計されています。Gatsby用のプラグインを使用することを学んでみます。
プラグインはコミュニティーメンバーが作成していて、
たくさんのプラグインが公開されているようです。
公式チュートリアルでは、Typography.js用のGatsbyプラグインを使用して学ぶ形になっています。
Typography.jsは、フォントのスタイルを簡単に設定できちゃうAPIです。
フォルダをたくさんいじってしまったので、新しいフォルダを作成します。
$ gatsby new tutorial-part-three https://github.com/gatsbyjs/gatsby-starter-hello-world
cd tutorial-part-three
まず、必要パッケージ群をインストールします。
インストールするべきパッケージは、プラグインのインストールページで紹介されています。
$ npm install --save gatsby-plugin-typography react-typography typography typography-theme-fairy-gates
そして、gatsby-config.jsファイルを下記のように変更します。
module.exports = {
  plugins: [
    {
      resolve: `gatsby-plugin-typography`,
      options: {
        pathToConfigModule: `src/utils/typography`,
      },
    },
  ],
}
くわしい書き方は公式のdocumentをみてください。
次は、typography.jsのための設定ファイルを書いていきます。
utilディレクトリを作成し、typography.jsを以下のように記述してください。
import Typography from "typography"
import fairyGateTheme from "typography-theme-fairy-gates"
const typography = new Typography(fairyGateTheme)
export const { scale, rhythm, options } = typography
export default typography
全てのファイルが準備できたら、一度立ち上げているサーバーを落として、再度
gatsby developで立ち上げてサイトにアクセスしてください。

typography.jsのスタイルが読み込まれています!good!
下記のコードを貼り付けてサイトを見ると、
素敵なフォントに仕上がっているのを実感できると思います。
import React from "react"
export default () => (
  <div style={{ margin: `3rem auto`, maxWidth: 600 }}>
    <h1>Hi! I'm building a fake Gatsby site as part of a tutorial!</h1>
    <p>
      What do I like to do? Lots of course but definitely enjoy building
      websites.
    </p>
  </div>
)
4. ギャツビーでのデータの扱い
ギャツビーではGraphQLを扱うとのこと。これはとても便利な予感ですね!
https://www.howtographql.com/
GraphQLについてはこちらのチュートリアルがおすすめだそうです。
ちょっとみた感じ、英語ですがわかりやすかったです。
非構造化データを直接Gatsbyに取り込む(小規模向け)こともできるし
GraphQLのプラグインを使うこともできるとのことです(大規模向け)。
ひとまずGraphQLでのやり方をやってみましょう!
まずは新しいプロジェクトを用意します。
$ gatsby new tutorial-part-four https://github.com/gatsbyjs/gatsby-starter-hello-world
$ cd tutorial-part-four
そしてtypography.jsのKirkhamテーマ、CSS-in-JSライブラリの Emotionをインストールします。
$ npm install --save gatsby-plugin-typography typography react-typography typography-theme-kirkham gatsby-plugin-emotion @emotion/core
https://kyleamathews.github.io/typography.js/
こちらのサイトの pick themeでTypographyのテーマの見た目を確認できます。
下記の4ファイルを準備します。ページコンポーネントが2つ、
レイアウトコンポーネントが1つ,
typographyの設定ファイルが1つです。
import React from "react"
import { css } from "@emotion/core"
import { Link } from "gatsby"
import { rhythm } from "../utils/typography"
export default ({ children }) => (
  <div
    css={css`
      margin: 0 auto;
      max-width: 700px;
      padding: ${rhythm(2)};
      padding-top: ${rhythm(1.5)};
    `}
  >
    <Link to={`/`}>
      <h3
        css={css`
          margin-bottom: ${rhythm(2)};
          display: inline-block;
          font-style: normal;
        `}
      >
        Pandas Eating Lots
      </h3>
    </Link>
    <Link
      to={`/about/`}
      css={css`
        float: right;
      `}
    >
      About
    </Link>
    {children}
  </div>
)
import React from "react"
import Layout from "../components/layout"
export default () => (
  <Layout>
    <h1>Amazing Pandas Eating Things</h1>
    <div>
      <img
        src="https://2.bp.blogspot.com/-BMP2l6Hwvp4/TiAxeGx4CTI/AAAAAAAAD_M/XlC_mY3SoEw/s1600/panda-group-eating-bamboo.jpg"
        alt="Group of pandas eating bamboo"
      />
    </div>
  </Layout>
)
import React from "react"
import Layout from "../components/layout"

export default () => (
  <Layout>
    <h1>About Pandas Eating Lots</h1>
    <p>
      We're the only site running on your computer dedicated to showing the best
      photos and videos of pandas eating lots of food.
    </p>
  </Layout>
)
import Typography from "typography"
import kirkhamTheme from "typography-theme-kirkham"

const typography = new Typography(kirkhamTheme)

export default typography
export const rhythm = typography.rhythm
そしてgatsby-config.jsを下記のように編集して、プラグインを設定をします。
module.exports = {
  plugins: [
    `gatsby-plugin-emotion`,
    {
      resolve: `gatsby-plugin-typography`,
      options: {
        pathToConfigModule: `src/utils/typography`,
      },
    },
  ],
}
その後`gatsby develop`を実行すると、パンダの画像があるページが出てくると思います。🐼
ここからクエリをやってみます!
http://localhost:8000/about/ をみてください。
About Pandas Eating Lots というタイトルが表示されています。
もしこのページ名を変更するときは、この部分を調整することになります。
しかし将来サイトがもっと大規模になり、タイトルがあちこちで使用されていたら、私たちは全ての該当箇所を探し出して修正しないといけませんね。大変ですしミスも増えます。
なので、そのようなデータは一纏めにし、そこからデータを持ってくる方が効率がいいです。
Gatsbyではatsby-config.jsのsiteMetadataオブジェクトに記述することでデータの一元管理が可能となります。
module.exports = {
  siteMetadata: {
    title: `Title from siteMetadata`,
  },
  plugins: [
    `gatsby-plugin-emotion`,
    {
      resolve: `gatsby-plugin-typography`,
      options: {
        pathToConfigModule: `src/utils/typography`,
      },
    },
  ],
}
上記ファイルでデータを定義した上で、データを使用するコンポーネントは以下のように
設定します。
import React from "react"
import { graphql } from "gatsby"
import Layout from "../components/layout"
export default function About({ data }) {
  return (
    <Layout>
      <h1>About {data.site.siteMetadata.title}</h1>
      <p>
        We're the only site running on your computer dedicated to showing the
        best photos and videos of pandas eating lots of food.
      </p>
    </Layout>
  )
}
export const query = graphql`
  query {
    site {
      siteMetadata {
        title
      }
    }
  }
`
gatsbyからgraphqlを読み込んでおり、それを元に const queryを作成しています。
これは pageコンポーネントでしか使えないので注意してください。
使用コンポーネントのpropsに、graphQLのデータが渡っていますね。
gatsby developでサイトを読み込み直し、aboutページにアクセスして確認してみてください。
staticQuery
staticQueryは、Gatsbyのv2から登場したpageコンポーネント以外でも使用可能なAPIです。
useStaticQueryを使用します。
下記のようにlayout.jsを書き直してください。
import React from "react"
import { css } from "@emotion/core"
import { useStaticQuery, Link, graphql } from "gatsby"
import { rhythm } from "../utils/typography"
export default function Layout({ children }) {
  const data = useStaticQuery(
    graphql`
      query {
        site {
          siteMetadata {
            title
          }
        }
      }
    `
  )
  return (
    <div
      css={css`
        margin: 0 auto;
        max-width: 700px;
        padding: ${rhythm(2)};
        padding-top: ${rhythm(1.5)};
      `}
    >
      <Link to={`/`}>
        <h3
          css={css`
            margin-bottom: ${rhythm(2)};
            display: inline-block;
            font-style: normal;
          `}
        >
          {data.site.siteMetadata.title}
        </h3>
      </Link>
      <Link
        to={`/about/`}
        css={css`
          float: right;
        `}
      >
        About
      </Link>
      {children}
    </div>
  )
}
gatsby-config.jsのtitleを書き直せば、すぐにその実行結果が反映されたものが確認できます。
##5.Source Pluginについて
Gatsbyのデータ取り込みを覚えるために、まず GraphiQLについて知る必要があります。
GraphiQLはGraphQLの統合開発環境(IDE)です。
Gatsbyはこれを標準で持っているので、http://localhost:8000/___graphql にアクセスすると確認できます。
option + space もしくは shift + spaceキーで自動補完機能が使えます。
command + enter キーで実行のショートカットです。めっちゃ便利。
Source Plugin
対応するソースプラグインがあれば、fileやCMSからデータを引っ張ってくることができます。
今回は例として gatsby-source-filesystemを使ってみます。
$ npm install --save gatsby-source-filesystem
gatsby-config.jsを編集します。
module.exports = {
  siteMetadata: {
    title: `Title from siteMetadata`,
  },
  plugins: [
    {
      resolve: `gatsby-source-filesystem`,
      options: {
        name: `src`,
        path: `${__dirname}/src/`,
      },
    },
    `gatsby-plugin-emotion`,
    {
      resolve: `gatsby-plugin-typography`,
      options: {
        pathToConfigModule: `src/utils/typography`,
      },
    },
  ],
}
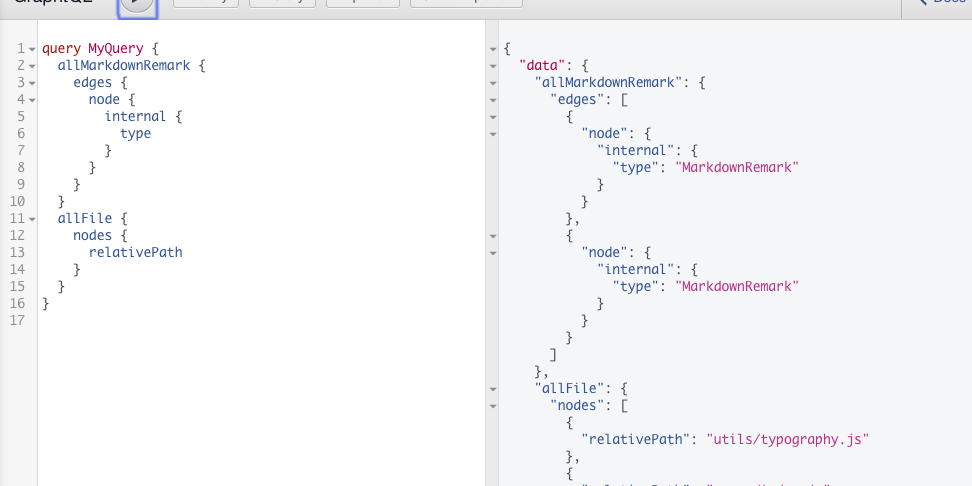
サーバーを立ち上げ直してもう一度http://localhost:8000/___graphqlにアクセスすると、
gatsby-source-filesystemによって allFile,fileの2項目が追加されているのがわかるかと思います。
allFileの項目をcommandキーを押しながらクリックしてください。
これによって、各ファイルのidが事前に入力されます。
node部分の項目を選択していくと、各node以下のアイテムを追加することができます。
実際にこれらの値をJSから取得してみましょう。
新しく my-file.jsを作成し、以下のように編集します。
import React from "react"
import { graphql } from "gatsby"
import Layout from "../components/layout"

export default ({ data }) => {
  console.log(data)
  return (
    <Layout>
      <div>Hello world</div>
    </Layout>
  )
}

export const query = graphql`
  query {
    allFile {
      edges {
        node {
          relativePath
          prettySize
          extension
          birthTime(fromNow: true)
        }
      }
    }
  }
`
実際にページを確認すると、allFile以下がコンソールで取得できているのがわかるかと思います。
これらを実際にビューに起こしたコードが以下になります。
import React from "react"
import { graphql } from "gatsby"
import Layout from "../components/layout"

export default ({ data }) => {
  console.log(data)
  return (
    <Layout>
      <div>
        <h1>My Site's Files</h1>
        <table>
          <thead>
            <tr>
              <th>relativePath</th>
              <th>prettySize</th>
              <th>extension</th>
              <th>birthTime</th>
            </tr>
          </thead>
          <tbody>
            {data.allFile.edges.map(({ node }, index) => (
              <tr key={index}>
                <td>{node.relativePath}</td>
                <td>{node.prettySize}</td>
                <td>{node.extension}</td>
                <td>{node.birthTime}</td>
              </tr>
            ))}
          </tbody>
        </table>
      </div>
    </Layout>
  )
}

export const query = graphql`
  query {
    allFile {
      edges {
        node {
          relativePath
          prettySize
          extension
          birthTime(fromNow: true)
        }
      }
    }
  }
`
http://localhost:8000/my-filesを確認してみてください。
以上がsource Pluginの使い方になります。次はTransformer Pluginについて学びます。
Transformer Pluginはsource Pluginで取得したデータを加工する役割を担っています。
6. Transformer Pluginについて
チュートリアルでは例として、markdownで書かれたファイルをTransformer Pluginを使ってHTMLに書き直します。
まずはマークダウンのファイルを準備します。
---
title: "Sweet Pandas Eating Sweets"
date: "2017-08-10"
---

パンダ超かわいい.

超かわいいパンダのビデオあるよ.

<iframe width="560" height="315" src="https://www.youtube.com/embed/4n0xNbfJLR8" frameborder="0" allowfullscreen></iframe>
再度http://localhost:8000/my-fileにアクセスすると、
sweet-pandas-eating-sweets.mdの情報が増えていることがわかると思います。
マークダウンファイルを変換するためのTransformer Pluginをインストールします。
npm i --save gatsby-transformer-remark
gatsby-configに以下を追加します。
チュートリアルではgatsby-plugin-emotion,の真上に差し込まれています。
階層はgatsby-plugin-emotion,と同様の階層です。
`gatsby-transformer-remark`,
gatsby-config後は gatsby developをし直す事を忘れないようにしてください。
GraphiQL(http://localhost:8000/___graphql)を見ると、
- allMarkdownRemark
- markdownRemark
の2項目が追加されているのがわかるかと思います。
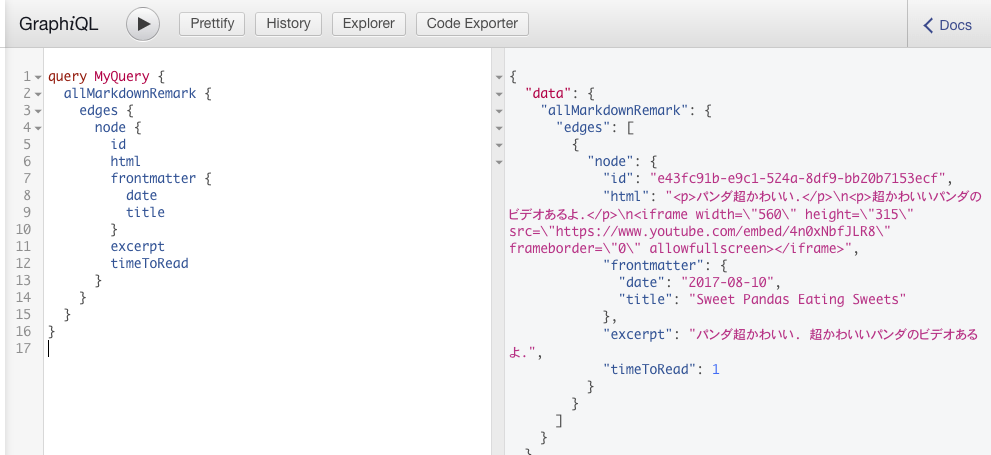
上記のように項目を洗濯していくと、マークアップのデータが取得できているのがわかると思います!
トップページを以下のようにすれば、自動で記事リストを生成することができます。
import React from "react"
import { graphql } from "gatsby"
import { css } from "@emotion/core"
import { rhythm } from "../utils/typography"
import Layout from "../components/layout"

export default ({ data }) => {
  console.log(data)
  return (
    <Layout>
      <div>
        <h1
          css={css`
            display: inline-block;
            border-bottom: 1px solid;
          `}
        >
          Amazing Pandas Eating Things
        </h1>
        <h4>{data.allMarkdownRemark.totalCount} Posts</h4>
        {data.allMarkdownRemark.edges.map(({ node }) => (
          <div key={node.id}>
            <h3
              css={css`
                margin-bottom: ${rhythm(1 / 4)};
              `}
            >
              {node.frontmatter.title}{" "}
              <span
                css={css`
                  color: #bbb;
                `}
              >
                — {node.frontmatter.date}
              </span>
            </h3>
            <p>{node.excerpt}</p>
          </div>
        ))}
      </div>
    </Layout>
  )
}

export const query = graphql`
  query {
    allMarkdownRemark {
      totalCount
      edges {
        node {
          id
          frontmatter {
            title
            date(formatString: "DD MMMM, YYYY")
          }
          excerpt
        }
      }
    }
  }
`
``
私はこのコードを読んだ時 frontmatterって何だ? となってしまいました。
https://www.gatsbyjs.org/docs/adding-markdown-pages/#frontmatter-for-metadata-in-markdown-files
先ほど mdファイルでダッシュ3つでくくった部分がfrontmatterとして解釈され、
メタデータとして使用することができるようになるそうです。
記事が1つだと寂しいのでマークアップのページを1つ増やしてみましょう。
---
title: "Pandas and Bananas"
date: "2017-08-21"
---

パンダはバナナを食べるの? このビデオを見れはそれが事実だとわかります。
パンダはバナナが大好きみたいです。

<iframe width="560" height="315" src="https://www.youtube.com/embed/4SZl1r2O_bY" frameborder="0" allowfullscreen></iframe>
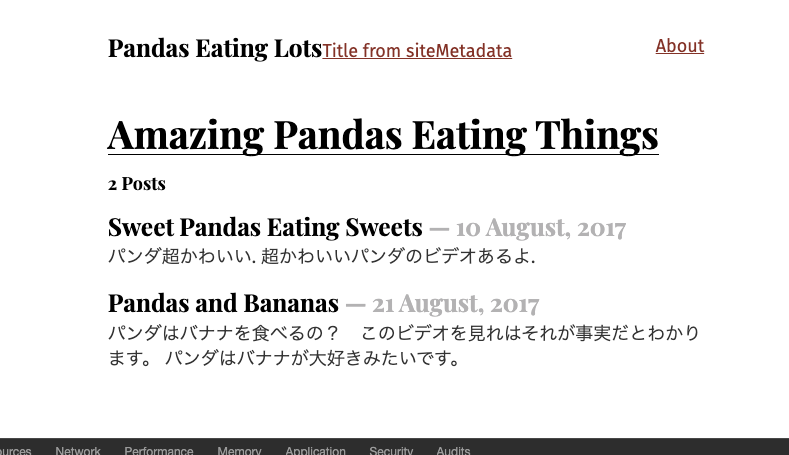
ちゃんと追加されましたね!
でも、新しい記事の方が上に来て欲しいですよね?
GraphQLに引数を渡すことでnodeを抽出したりソートしたり、フィルターをかけたりすることが可能です。
詳細は
https://www.gatsbyjs.org/docs/graphql-reference/
こちらの公式ガイドをみてください。
この場合であれば、index.jsのallMarkdownRemarkを以下のように書き換えればOKです。
export const query = graphql`
  query {
    allMarkdownRemark(sort: { fields: [frontmatter___date], order: DESC }) {
      totalCount
      edges {
...
現在はトップの記事リストのみですが、記事ページも必要になります。
1つ1つpageを追加していくこともできますが、ページを自動生成する方法を学習してみましょう。
7. データからページを自動生成する
###slugを作る
slugは https://www.gatsbyjs.org/tutorial/part-seven/で言う所の/tutorial/part-seven/の部分です。
マークダウンのHTMLページ生成では
- onCreateNode
-
createPages
の2つのgatsbyのAPIを学ぶ必要があります。
GatsbyのAPIを使用するには、 gatsby-node.jsファイルを作成し,functionをエクスポートします。
exports.onCreateNode = ({ node }) => {
  console.log(node.internal.type)
}
上記のonCreateNodeはnodeが更新、もしくは作成された時に呼ばれます。
gatsby developを実行すると、多くのNodeがconsole.logによってターミナル上に流れてくるのが確認できます。

gatsby-node.jsを以下のように書き換えてください。
exports.onCreateNode = ({ node, getNode }) => {
  if (node.internal.type === `MarkdownRemark`) {
    const fileNode = getNode(node.parent)
    console.log(`\n`, fileNode.relativePath)
  }
}
上記は何をしているかと言うと、まずMarkdownRemarkのnodeを取得します。
しかしMarkdownRemarkにはslugの情報が含まれていないので、その親ノードであるfileNodeから
relativePathを取得しています。
では、これを元にスラッグを生成します。実は上記部分はgatsby-source-filesystemがすでに持っている機能だったりします。
const { createFilePath } = require(`gatsby-source-filesystem`)

exports.onCreateNode = ({ node, getNode }) => {
  if (node.internal.type === `MarkdownRemark`) {
    console.log(createFilePath({ node, getNode, basePath: `pages` }))
  }
}
上記の実装で、前実装と同じように親ノードを探し出し、slugの生成までやってくれます。
slugが追加できたので、次はnodeを生成しましょう。createNodeFieldAPIを用います。
const { createFilePath } = require(`gatsby-source-filesystem`)

exports.onCreateNode = ({ node, getNode, actions  }) => {
  const { createNodeField } = actions
  if (node.internal.type === `MarkdownRemark`) {
    const slug = createFilePath({ node, getNode, basePath: `pages`})
    createNodeField({
      node,
      name: `slug`,
      value: slug
    })
  }
}
GraphiQLのallMarkdownRemark.edges.node.fields.slugに,新たなslugが加わっていることが確認できます。
次はページを生成します。
const path = require(`path`)
const { createFilePath } = require(`gatsby-source-filesystem`)
exports.onCreateNode = ({ node, getNode, actions }) => {
  const { createNodeField } = actions
  if (node.internal.type === `MarkdownRemark`) {
    const slug = createFilePath({ node, getNode, basePath: `pages` })
    createNodeField({
      node,
      name: `slug`,
      value: slug,
    })
  }
}
exports.createPages = async ({ graphql, actions }) => {
  const { createPage } = actions
  const result = await graphql(`
    query {
      allMarkdownRemark {
        edges {
          node {
            fields {
              slug
            }
          }
        }
      }
    }
  `)
  result.data.allMarkdownRemark.edges.forEach(({ node }) => {
    createPage({
      path: node.fields.slug,
      component: path.resolve(`./src/templates/blog-post.js`),
      context: {
        // Data passed to context is available
        // in page queries as GraphQL variables.
        slug: node.fields.slug,
      },
    })
  })
}
graphqlファンクションはPromiseを返すことに注意してください。
resultでgraphQLから取得したページをforEachで回して、createPageでページを生成しています。
contextで指定したデータは、そのページのデータとしてgraphQLから使用可能になります。
./src/templates/blog-post.jsを雛形としていますので、blog-post.jsを作成する必要があります。
import React from "react"
import { graphql } from "gatsby"
import Layout from "../components/layout"
export default function BlogPost({ data }) {
  const post = data.markdownRemark
  return (
    <Layout>
      <div>
        <h1>{post.frontmatter.title}</h1>
        <div dangerouslySetInnerHTML={{ __html: post.html }} />
      </div>
    </Layout>
  )
}
export const query = graphql`
  query($slug: String!) {
    markdownRemark(fields: { slug: { eq: $slug } }) {
      html
      frontmatter {
        title
      }
    }
  }
`
query($slug: String!)
!マークは値が必須であることを表しています。 文字列の型定義がなされていますね。
markdownRemark(fields: { slug: { eq: $slug } })
この部分は、MongoDBのような指定方法でオブジェクトをフィルタリングすることができる機能を使っています。
(私はMongoDBの書き方を知りませんが🙇♂️)
つまり、fieldsのslugが $slugと イコールであるもののみを取得しているということになります。
https://www.gatsbyjs.org/docs/graphql-reference/#query-variables
ここまで編集したら、gatsby developで再度立ち上げ直してください。
自動生成したページリストを取得するには、 http://localhost:8000/denden のように、存在しないページにアクセスするといいです。
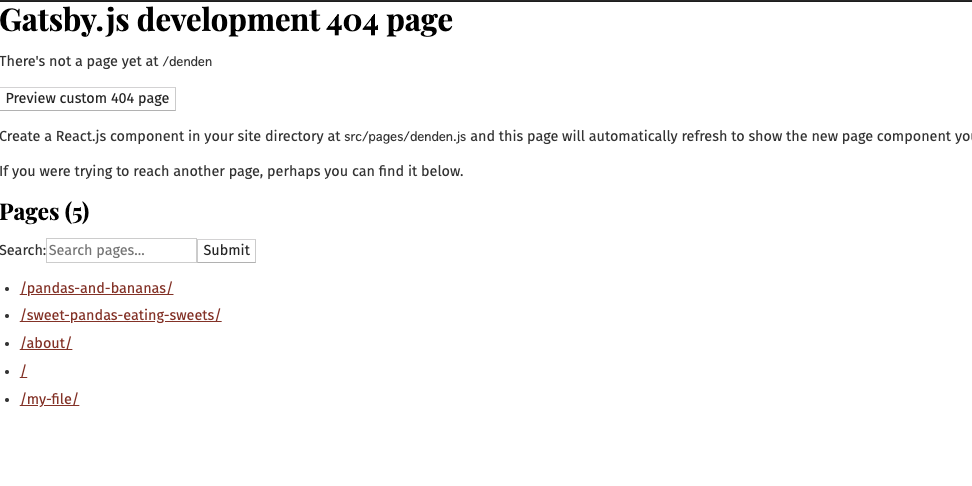
このようにページ一覧が表示されます。
各ページのリンクを押すと、ページが生成できていることが確認できるかと思います。
8. プロジェクトのbuildとLighthouseによるサイト診断
Lighthouseってなんだい?
(意訳) https://developers.google.com/web/tools/lighthouse/から
LighthouseはWebページの品質向上のためのオープンソースの自動ツールです。
パブリックなページ、認証が必要なページ、どんなページにでも使うことができます。
パフォーマンス・アクセシビリティ・PWAなどに関することを検査します。
まず、Gastbyのプロダクションが必要になるので、 buildを行います。
developを走らせてる場合はそれを一旦止めて、下記を実行します。
$ gatsby build
buildできたら、productionをローカルで確認するためのコマンドを打ちます。
$ gatsby serve
初期では http://localhost:9000/ に立ち上がります。
立ち上がったら、 ChromeのdevToolを開きます。
Auditsタブを開いてください。
Perform an audit… をクリックしてしばらくすると診断結果が表示されます。
とても便利ですね!
これらの値を向上させるために色々な改善を行う必要があります。
gatsbyには様々なプラグインが用意されているので、それらを使って改善するのもいいでしょう。
チュートリアルでは下記が紹介されていました。
- gatsby-plugin-manifest (PWAのためのmanifest.webmanifestファイルを作成するプラグイン)
- gatsby-plugin-offline(PWAのためのserver worker用のプラグイン)
- gatsby-plugin-react-helmet(メタデータ編集のためのプラグイン)
以上です、お疲れ様でした。