Tanzu Application Platform(以下TAP)を試しに動かしてみた時のメモ。
なお、手順を確認するにあたりmakingさんのTanzu Application Platform 1.6 (Full Profile) をKind on OrbStackにインストールするメモを参考にしている。
インストール要件
TAP1.6だとこちらに記載がある。
細かい部分は省いて、気をつけた方がいい点は以下あたりとなる。
- コンテナレジストリの用意
- コンテナレジストリには10G以上の空きがある
- ドメインの用意
- Gitリポジトリ
- fullで利用する場合は以下のリソースが必要
- 8GBメモリの空き/ノード
- 16vCPU/クラスタ
- 100GBストレージ/ノード
Tanzu PackageでHarborをデプロイした場合、PVのデフォルトサイズが10Gで最初からカツカツになってしまうため、ストレージのサイズを変更して対応すること。
ドメインはsslip.ioなどのドメイン名にIPを入れるとIPを返してくれるサービスを使えば準備は不要。
検証環境
今回は以下の環境で実施した。
- TKG2.2
-
type: LoadBalancerを使うためにMetalLBを導入済み - HarborはVM上に構築済み
- Harborの証明書はノード、kapp-controllerに導入済み
- GitはGiteaを構築済み、リポジトリも作成済み
イメージレジストリの証明書の登録はノードに関してはこちら、kapp-controllerに関してはこちらを参照するとよい。
Giteaに関してはインストール方法を最後に載せている。
インストール
環境変数の設定
インストール時に使う環境変数を設定しておく。
# VMware Tanzu Networkのログインで使うID
export TANZUNET_USERNAME=xxx@xxx.info
# VMware Tanzu Networkのログインで使うパスワード
export TANZUNET_PASSWORD=xxxx
# イメージレジストリのURI
export INSTALL_REGISTRY_HOSTNAME=myharbor.hogeeee.info
# イメージレジストリのログインID
export INSTALL_REGISTRY_USERNAME=admin
# イメージレジストリのログインパスワード
export INSTALL_REGISTRY_PASSWORD=xxxx
# インストールするTAPのバージョン
export TAP_VERSION=1.6.2
# TAPのイメージを格納するリポジトリ
export INSTALL_REPOSITORY=${INSTALL_REGISTRY_HOSTNAME}/tap/tap-packages
前提の準備
Airgap用の手順も用意されているが、ここではインターネット接続ありでのインストールを行う。
参考にする手順はこちら。
最初にEULAに承認する。
一旦VMware Tanzu Networkにアクセス・ログインする。
次に以下にそれぞれアクセスし、EULAを承認(AGREE)する。
次にTanzu CLIをダウンロードする。
TKG2.3以降であればクラスタ構築に使ったTanzu CLIでも問題ないが、TKG2.2などでは別途入手する必要がある。
wget https://github.com/vmware-tanzu/tanzu-cli/releases/download/v1.0.0/tanzu-cli-linux-amd64.tar.gz
tar xvzf tanzu-cli-linux-amd64.tar.gz -C /tmp
install /tmp/v1.0.0/tanzu-cli-linux_amd64 ~/bin/tanzu-v1.0.0
alias tanzu=tanzu-v1.0.0
rm tanzu-cli-linux-amd64.tar.gz
Tanzu CLIを使ってTAPのpluginをインストールする。
tanzu plugin install --group vmware-tap/default:v1.6.2
次にCluster Essentialsをインストールする手順になっているが、クラスタ内にsecretgen-controllerとkapp-controllerが入っている場合は飛ばすことが出来る。
TKGであれば飛ばせるため、ここでは飛ばして次のパッケージインストールに進む。
パッケージインストール前に、TAPに必要なイメージをプライベートリポジトリに移動させる。
これは必須作業ではないが、TAPのイメージレジストリの稼働時間が保証されていないため、信頼性向上の観点から実施する。
最初に、TAPのイメージ配布元レジストリ、転送先プライベートレジストリのそれぞれにログインする。
echo $TANZUNET_PASSWORD | docker login registry.tanzu.vmware.com -u $TANZUNET_USERNAME --password-stdin
echo $INSTALL_REGISTRY_PASSWORD | docker login $INSTALL_REGISTRY_HOSTNAME -u $INSTALL_REGISTRY_USERNAME --password-stdin
次にイメージを転送する。公式手順の記述だと自己署名証明書の利用を考慮していないので注意。
imgpkg copy -b registry.tanzu.vmware.com/tanzu-application-platform/tap-packages:${TAP_VERSION} --to-repo ${INSTALL_REPOSITORY} --registry-ca-cert-path=./harbor-vm/harbor/cert/ca.crt --registry-verify-certs=false
環境にもよるが、自分の環境では25分程度で転送が完了した。
TAPのインストール
Namespaceを作成し、TAPのイメージレジストリの認証情報(tap-registry)をSecretとして登録する。
kubectl create ns tap-install
tanzu secret registry add tap-registry \
  --username ${INSTALL_REGISTRY_USERNAME} --password ${INSTALL_REGISTRY_PASSWORD} \
  --server ${INSTALL_REGISTRY_HOSTNAME} \
  --export-to-all-namespaces --yes --namespace tap-install
次にエンドユーザが利用するイメージレジストリ(TBSで作成したイメージの格納先)を登録する。今回はエンドユーザも同じレジストリを使う想定なので、先程のSecret作成コマンドのSecret名だけ変更して実行しなおす。
tanzu secret registry add registry-credentials \
  --username ${INSTALL_REGISTRY_USERNAME} --password ${INSTALL_REGISTRY_PASSWORD} \
  --server ${INSTALL_REGISTRY_HOSTNAME} \
  --export-to-all-namespaces --yes --namespace tap-install
TAPのpackageを利用可能にするために、Packageリポジトリを追加する。
tanzu package repository add tanzu-tap-repository \
  --url ${INSTALL_REPOSITORY}:$TAP_VERSION \
  --namespace tap-install
問題なければ以下のようなメッセージが表示される。
Waiting for package repository to be added

2:15:16AM: Waiting for package repository reconciliation for 'tanzu-tap-repository'
2:15:16AM: Fetch started (1s ago)
2:15:17AM: Fetching
	    | apiVersion: vendir.k14s.io/v1alpha1
:(省略)
	    | 2:15:22AM: ---- applying complete [114/114 done] ----
	    | 2:15:22AM: ---- waiting complete [114/114 done] ----
	    | Succeeded
2:15:22AM: Deploy succeeded
なお、kapp-controllerにHarborの証明書を渡していない場合は以下のエラーとなる。
12:22:26AM: Fetch failed
	    | vendir: Error: Syncing directory '0':
	    |   Syncing directory '.' with imgpkgBundle contents:
	    |     Imgpkg: exit status 1 (stderr: imgpkg: Error: Fetching image:
	    |   Error while preparing a transport to talk with the registry:
	    |     Unable to create round tripper:
	    |       Get "https://oss-harbor.10.220.157.229.sslip.io/v2/": x509: certificate signed by unknown authority
	    | )
	    |
	    | Fetching resources: Error (see .status.usefulErrorMessage for details)
リポジトリの追加後、TAPパッケージをインストールする。
インストールにあたり、何をどのような設定でインストールするかを書いた設定ファイルを作成する。
なお、設定にあたりProfileを選択する必要があり、今回はfullを利用する。
Profileの公式な説明はこちらにあるが、目的別にインストールするパッケージを選択するためのグループみたいなものと考えるとよい。
full profileの公式サンプルをダウンロードして編集する。
設定値の意味はざっくりこんな感じ。
| パラメータ | 意味 | 設定例 |
|---|---|---|
| shared | 共通のセクション。設定した値が様々なコンポーネント・サービスでのデフォルト値となる | |
| shared.ingress_domain | 外部にサービスを公開する際のサブドメイン | tap.127.0.0.1.sslip.io |
| shared.ingress_issuer | cert-managerを使って自己署名証明書を使う際のClusterIssuerの名前 | tap-ingress-selfsigned |
| shared.image_registry.project_path | TBSなどで利用するイメージの格納先 | my-harbor.io/my-project/build-service |
| shared.image_registry.secret | 上記のproject_pathへアクセスするための認証情報のSecret | - |
| shared.kubernetes_version | K8sのバージョン | "1.25" |
| shared.ca_cert_data | 持ち込みの証明書を使う場合などに指定 | - |
| ceip_policy_disclosed | trueにしないとインストールに失敗するため、trueを書く | true |
| profile | Profile種別を指定 | full |
| supply_chain | コードコミット時に流すパイプラインの指定 | testing_scanning |
| ootb_supply_chain_basic | 上のsupply_chainで指定したパイプラインに関する設定。詳細はこちら ※パラメータ名(key)はootb_supply_chain_<上記で指定したパラメータ名>となる。上の例ではootb_supply_chain_testing_scanningになる |
- |
| contour | 一緒にデプロイするContourの設定 | - |
| buildservice.kp_default_repository | TBSで利用するイメージのリポジトリ。指定しなければsharedで書いたimage_registry.project_pathが使われる | my-harbor.io/my-project/build-service |
| buildservice.kp_default_repository_secret | TBSで利用するイメージのリポジトリの認証情報のSecret。指定しなければsharedで書いたimage_registry.secretが使われる | |
| local_source_proxy.repository | Local Source Proxyで使うソースコードのアップロード先リポジトリ。詳細な説明はこちら | my-harbor.io/my-project/local-source |
| local_source_proxy.push_secret | コードをPushするための認証情報を格納したSecret | - |
| local_source_proxy.push_secret.create_export |
kind: SecretExportオブジェクトを作成する |
true |
| tap_gui.metadataStoreAutoconfiguration | 接続用のServiceAccountの作成などを自動で行う | true |
| tap_gui.app_config.auth.allowGuestAccess | GUIに対してゲストログインを許可するかどうか | true |
| tap_gui.catalog | TAP展開時にデフォルトで認識させるカタログ情報を設定 | - |
| metadata_store.ns_for_export_app_cert | 開発者向けに証明書を展開するNamespaceを指定。"*"で全Namespaceに公開する。 |
|
| metadata_store.app_service_type | アプリケーション公開時のServiceのtype | LoadBalancer |
| scanning.metadataStore.url | Scan時のMetadata Storeとの接続で使うURL。基本的に空を指定する | "" |
| policy.tuf_enabled | Policy Controllerで署名する際に、The Update Framework (TUF) serverを利用する | true |
| tap_telemetry.customer_entitlement_account_number | TAPの使用状況を取得するTelemetry利用するための自身のAccount番号を指定 | "123456789" |
ここでは以下のようにProfileを作成した。shared.ca_cert_dataにはHarborのCA証明書を記載する。shared.ingress_domainはsslip.ioを使う場合、ドメイン名にsslip.ioが返すIPを含む必要があるが、現時点ではContourがインストールされておらずExternal IPが不明なため、一旦適当な値を設定しておき、IP取得後に更新する。
cat <<EOF > tap-values.yaml
shared:
  ingress_domain: "tap.127.0.0.1.sslip.io"
  ingress_issuer: tap-ingress-selfsigned

  image_registry:
    project_path: oss-harbor.10.220.157.229.sslip.io/tap
    secret:
      name: registry-credentials
      namespace: tap-install

  kubernetes_version: "1.25"
  ca_cert_data: |
    -----BEGIN CERTIFICATE-----
    MIIFyTCCA7GgAwIBAgIUVnUy+1PZ2cycIjXCNhLoFgsCw5cwDQYJKoZIhvcNAQEN
    :(省略)
    V73yewAQF+OECiocVi4OriKH+XaalpdD1VE6qjBaSEF45a0jRjwgRNPl0jFK
    -----END CERTIFICATE-----
ceip_policy_disclosed: true

profile: full

supply_chain: testing_scanning

contour:
  envoy:
    service:
      type: LoadBalancer

tap_gui:
  metadataStoreAutoconfiguration: true
  app_config:
    auth:
      allowGuestAccess: true

metadata_store:
  ns_for_export_app_cert: "*"
  app_service_type: ClusterIP

scanning:
  metadataStore:
    url: ""
EOF
作成したファイルを使ってインストールする。
tanzu package install tap -p tap.tanzu.vmware.com -v $TAP_VERSION --values-file tap-values.yaml -n tap-install
コンポーネントが多いので、インストールが完全に完了するまでに少し時間が掛かる。
今回検証した環境では10分弱掛かった。
インストールが終わると、tap-installのNamespaceにkind: appのオブジェクトが展開された状態となる。
$ kubectl get app -n tap-install
NAME                                 DESCRIPTION           SINCE-DEPLOY   AGE
accelerator                          Reconcile succeeded   7m2s           7m46s
api-auto-registration                Reconcile succeeded   8m56s          9m28s
api-portal                           Reconcile succeeded   6m15s          7m43s
appliveview                          Reconcile succeeded   6m             7m42s
appliveview-apiserver                Reconcile succeeded   7m58s          9m20s
appliveview-connector                Reconcile succeeded   36s            11m
appliveview-conventions              Reconcile succeeded   5m21s          7m36s
appsso                               Reconcile succeeded   7m11s          9m1s
base-jammy-builder-lite              Reconcile succeeded   7m9s           7m50s
base-jammy-stack-lite                Reconcile succeeded   9m15s          10m
bitnami-services                     Reconcile succeeded   5m16s          7m10s
buildservice                         Reconcile succeeded   65s            11m
cartographer                         Reconcile succeeded   8m47s          9m24s
cert-manager                         Reconcile succeeded   11m            11m
cnrs                                 Reconcile succeeded   6m58s          7m46s
contour                              Reconcile succeeded   8m49s          9m26s
crossplane                           Reconcile succeeded   11m            11m
developer-conventions                Reconcile succeeded   5m20s          7m33s
dotnet-core-lite-buildpack           Reconcile succeeded   9m13s          10m
eventing                             Reconcile succeeded   10m            11m
fluxcd-source-controller             Reconcile succeeded   9m40s          11m
go-lite-buildpack                    Reconcile succeeded   9m12s          10m
grype                                Reconcile succeeded   5m8s           6m13s
java-lite-buildpack                  Reconcile succeeded   9m17s          10m
java-native-image-lite-buildpack     Reconcile succeeded   9m6s           10m
learningcenter                       Reconcile succeeded   5m41s          7m40s
learningcenter-workshops             Reconcile succeeded   4m53s          4m55s
local-source-proxy                   Reconcile succeeded   9m34s          11m
metadata-store                       Reconcile succeeded   6m45s          7m44s
namespace-provisioner                Reconcile succeeded   9m30s          11m
nodejs-lite-buildpack                Reconcile succeeded   9m7s           10m
ootb-delivery-basic                  Reconcile succeeded   5m2s           5m5s
ootb-supply-chain-testing-scanning   Reconcile succeeded   4m56s          5m3s
ootb-templates                       Reconcile succeeded   5m25s          7m37s
policy-controller                    Reconcile succeeded   7m52s          9m19s
python-lite-buildpack                Reconcile succeeded   9m3s           10m
ruby-lite-buildpack                  Reconcile succeeded   9m4s           10m
scanning                             Reconcile succeeded   7m29s          9m16s
service-bindings                     Reconcile succeeded   9m26s          11m
services-toolkit                     Reconcile succeeded   8m26s          9m23s
source-controller                    Reconcile succeeded   7m41s          9m17s
spring-boot-conventions              Reconcile succeeded   5m28s          7m38s
tap                                  Reconcile succeeded   3m21s          12m
tap-auth                             Reconcile succeeded   9m23s          11m
tap-gui                              Reconcile succeeded   5m3s           5m19s
tap-telemetry                        Reconcile succeeded   116s           12m
tekton-pipelines                     Reconcile succeeded   44s            11m
web-servers-lite-buildpack           Reconcile succeeded   9m15s          10m
ただし、ドメインを適当に割り当てたため、これをContourのIPに変更する。現状は以下。
$ kubectl get httpproxy -A
NAMESPACE        NAME                     FQDN                                    TLS SECRET            STATUS   STATUS DESCRIPTION
api-portal       api-portal               api-portal.tap.127.0.0.1.sslip.io       api-portal-tls-cert   valid    Valid HTTPProxy
metadata-store   metadata-store-ingress   metadata-store.tap.127.0.0.1.sslip.io   ingress-cert          valid    Valid HTTPProxy
tap-gui          tap-gui                  tap-gui.tap.127.0.0.1.sslip.io          tap-gui-cert          valid    Valid HTTPProxy
tap-values.yamlを編集し、shared.ingress_domainを以下のように変更する。
shared:
  ingress_domain: "tap.10.220.157.170.sslip.io"
updateする。
tanzu package installed update --values-file tap-values.yaml tap -n tap-install
設定した値が確認できる。
$ kubectl get httpproxy -A
NAMESPACE        NAME                     FQDN                                         TLS SECRET            STATUS   STATUS DESCRIPTION
api-portal       api-portal               api-portal.tap.10.220.157.170.sslip.io       api-portal-tls-cert   valid    Valid HTTPProxy
metadata-store   metadata-store-ingress   metadata-store.tap.10.220.157.170.sslip.io   ingress-cert          valid    Valid HTTPProxy
tap-gui          tap-gui                  tap-gui.tap.10.220.157.170.sslip.io          tap-gui-cert          valid    Valid HTTPProxy
tap-guiにブラウザでアクセスすると、正常に表示される。

動作確認
Application Acceleratorを用いたAngular Frontendのデプロイ
Application Acceleratorはアプリ開発の際に使える雛形を提供する。これを使ってTAPでアプリをデプロイする。
TAPのGUIにアクセスし、左サイドバーの上から4つ目の⊕みたいなアイコンをクリックすると、利用可能なアプリケーション一覧が表示される。

今回はAngular Frontendでデプロイしてみる。
Angular Frontendを選択すると以下のような設定画面が出る。
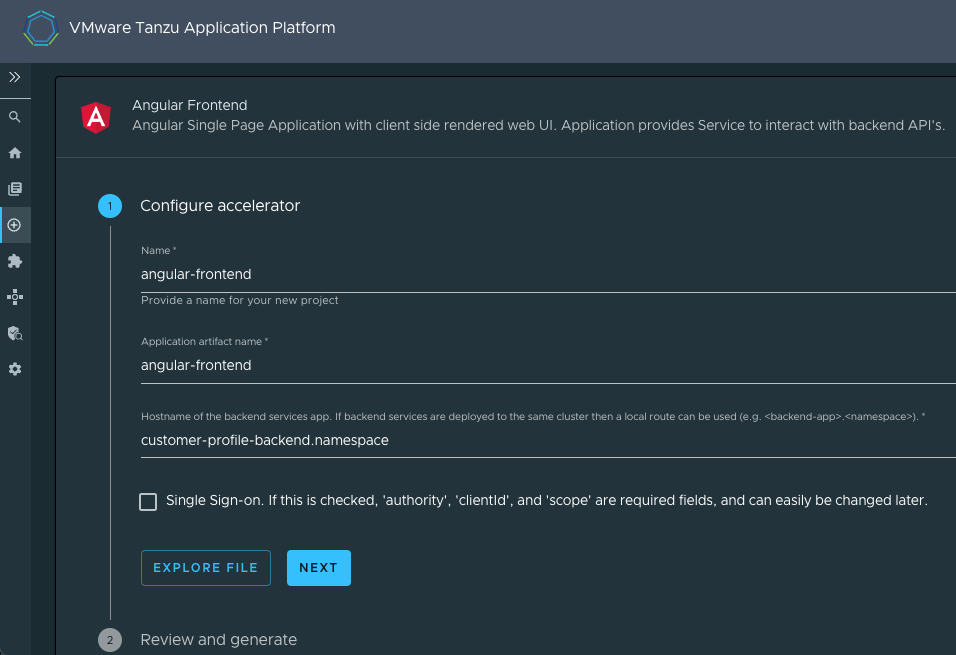
設定項目の意味は以下の通り。
-
Name: プロジェクト名。accelerator-info.yamlとaccelerator-log.mdのprojectNameに設定される。 -
Application artifact name: アーティファクト名。プロジェクトのID的に扱われる。accelerator-info.yamlとaccelerator-log.md以外にもworkload.yaml、catalog-info.yamlの名前やAnnotaionに設定される。 -
Hostname of the backend services app: Frontendの接続先のBackendのサービス名。nginx.confにproxy_pass http://customer-profile-backend.namespace/api/;のような感じで設定される
本来はバックエンドを適切に設定しないとアプリが動作しないが、ここではパイプラインを動かすことを目的として、特に設定値を変更せずに先に進み、GENERATE ACCELERATORをクリック後、DOWNLOAD ZIP FILEをクリックしてアプリのソースコードを生成する。
ダウンロードしたファイルを解凍すると、中にconfig/workload.yamlというファイルが配置されている。
これがTAPが使うWorkloadリソースの定義となる。
ファイルを開くとspec.source.git.urlが<https URL for your generated project's Git repository>となっているので、このソースを格納するGitリポジトリを指定する。
以下は指定例となる。
source:
    git:
      url: http://gitea.10.220.157.170.sslip.io/bn_user/angular-frontend
      ref:
        branch: main
ソースコードをGitにpushする。
git clone http://gitea.10.220.157.170.sslip.io/bn_user/angular-frontend.git angular-frontend-git
cp -r angular-frontend-git/.git angular-frontend
cd angular-frontend
git config --global user.email bn_user@hoge.com
git config --global user.name "bn_user"
git add .
git commit -m "first commit"
git checkout -b main
git push origin main
次にデプロイ先のNamespaceを作成する。
kubectl create ns tap-demo
作成したNamespaceに、TAPの各種リソースが動作できるようにRole等の設定をしていく。
公式手順によると、Namespace Provisionerを使ってNamespaceを設定することになっているため、こちらでNamespaceを設定する。
具体的な手順はこちらを参考にした。
GitのリポジトリのSecret作成が前提条件となっているので作成する。
export GIT_SERVER=gitea.10.220.157.170.sslip.io
export GIT_USER=bn_user
export GIT_PASSWORD=xxxx
tanzu secret registry add git-credentials \
  --server ${GIT_SERVER} \
  --username ${GIT_USER} \
  --password ${GIT_PASSWORD} \
  --namespace tap-install \
  --export-to-all-namespaces \
  -y
TAPのデプロイ先となるNamespaceがNamespace Provisionerの対象となるようラベルを設定する。
kubectl label namespaces tap-demo apps.tanzu.vmware.com/tap-ns=""
設定が反映されると、tap-namespace-provisioningというNamespaceにあるdesired-namespacesというConfigMapにNamespaceが追加される。
$ kubectl get cm -o jsonpath={.data} -n tap-namespace-provisioning desired-namespaces | jq
{
  "namespaces.yaml": "#@data/values\n---\nnamespaces:\n- name: tap-demo\n"
}
次にkind: Pipelineを作成する。TAPインストール時にsupply_chain: testing_scanningを指定すると、test用にkind: Pipelineで定義されたテスト用パイプラインを実行するのだが、今のままでは実行するパイプラインが1つもないので、以下のエラーを吐いて失敗する。
    message: 'unable to resolve selector [map[apps.tanzu.vmware.com/pipeline:test]],
      apiVersion [tekton.dev/v1beta1], kind [Pipeline]: selector did not match any
      objects'****
エラーにあるように、apps.tanzu.vmware.com/pipeline: testというラベルを持つPipelineリソースをダミーで用意する。
公式のサンプルを参考に以下のような感じで書く。
cat <<'EOF' > ./dummy-pipeline.yaml
apiVersion: tekton.dev/v1beta1
kind: Pipeline
metadata:
  name: skip-test-pipeline
  labels:
    apps.tanzu.vmware.com/pipeline: test
    apps.tanzu.vmware.com/language: skip
spec:
  params:
  - name: source-url
  - name: source-revision
  tasks:
  - name: test
    params:
    - name: source-url
      value: $(params.source-url)
    - name: source-revision
      value: $(params.source-revision)
    taskSpec:
      params:
      - name: source-url
      - name: source-revision
      steps:
      - name: test
        image: alpine
        script: |-
          echo 'skip'
EOF
作成後、applyする。
kubectl apply -f dummy-pipeline.yaml -n tap-demo
また、同様にイメージスキャンについてもScanPolicyが用意されていないため、このままだと以下のエラーとなって最後まで走りきらない。
  - error: ScanPolicy tap-demo/scan-policy not found
    lastTransitionTime: "2023-09-05T10:22:09Z"
    message: The scan job could not be started. ScanPolicy tap-demo/scan-policy not
      found
こちらのManifestを使ってScanPolicyを作成する。
cat << EOF > ./scan-policy.yaml
apiVersion: scanning.apps.tanzu.vmware.com/v1beta1
kind: ScanPolicy
metadata:
  name: scan-policy
  labels:
    'app.kubernetes.io/part-of': 'enable-in-gui'
spec:
  regoFile: |
    package main

    # Accepted Values: "Critical", "High", "Medium", "Low", "Negligible", "UnknownSeverity"
    notAllowedSeverities := ["Critical", "High", "UnknownSeverity"]
    ignoreCves := []

    contains(array, elem) = true {
      array[_] = elem
    } else = false { true }

    isSafe(match) {
      severities := { e | e := match.ratings.rating.severity } | { e | e := match.ratings.rating[_].severity }
      some i
      fails := contains(notAllowedSeverities, severities[i])
      not fails
    }

    isSafe(match) {
      ignore := contains(ignoreCves, match.id)
      ignore
    }

    deny[msg] {
      comps := { e | e := input.bom.components.component } | { e | e := input.bom.components.component[_] }
      some i
      comp := comps[i]
      vulns := { e | e := comp.vulnerabilities.vulnerability } | { e | e := comp.vulnerabilities.vulnerability[_] }
      some j
      vuln := vulns[j]
      ratings := { e | e := vuln.ratings.rating.severity } | { e | e := vuln.ratings.rating[_].severity }
      not isSafe(vuln)
      msg = sprintf("CVE %s %s %s", [comp.name, vuln.id, ratings])
    }
EOF
作成後、applyする。
kubectl apply -f ./scan-policy.yaml -n tap-demo
アプリをデプロイする。
tanzu apps workload create angular-frontend \
  --git-repo http://gitea.10.220.157.170.sslip.io/bn_user/angular-frontend \
  --git-branch main \
  --type web \
  --label app.kubernetes.io/part-of=angular-frontend \
  --label apps.tanzu.vmware.com/has-tests="true" \
  --yes \
  --namespace tap-demo
デプロイ後、tanzuコマンドでデプロイ状況が分かる。
$ tanzu apps workload get angular-frontend -n tap-demo
📡 Overview
   name:        angular-frontend
   type:        web
   namespace:   tap-demo

💾 Source
   type:       git
   url:        http://gitea.10.220.157.170.sslip.io/bn_user/angular-frontend
   branch:     main
   revision:   main@sha1:e3993727678e5df64775ba18e19d21a8a3d9b239
:(省略)
なお、デプロイ中は途中で以下のようなエラーが見受けられるが、イメージ作成前にイメージのチェックが走ったりしているだけなので、Supply Chainの状況だけ確認しておけば基本問題ない。
💬 Messages
   Workload [MissingValueAtPath]:   waiting to read value [.status.latestImage] from resource [images.kpack.io/angular-frontend] in namespace [tap-demo]
   Deliverable [HealthyConditionRule]:   Unable to resolve image with tag "oss-harbor.10.220.157.229.sslip.io/tap/workloads/angular-frontend-tap-demo-bundle:fe73ab71-aa3f-4da6-a6ee-9f77e1ecdd47" to a digest: HEAD https://oss-harbor.10.220.157.229.sslip.io/v2/tap/workloads/angular-frontend-tap-demo-bundle/manifests/fe73ab71-aa3f-4da6-a6ee-9f77e1ecdd47: unexpected status code 404 Not Found (HEAD responses have no body, use GET for details)
また、Kubernetesリソースとして確認する場合はkubectl treeやkubectl lineageを使った方が分かりやすい。
$ kubectl lineage workload angular-frontend -n tap-demo
NAME                                          READY     STATUS                                                                                                                            AGE
Workload/angular-frontend                     Unknown   MissingValueAtPath                                                                                                                9s
├── Deliverable/angular-frontend              -                                                                                                                                           4s
├── Event/angular-frontend.1781f94b23f35945   -         StampedObjectApplied: Created object [gitrepositories.source.toolkit.fluxcd.io/angular-frontend]                                  5s
├── Event/angular-frontend.1781f94b2c049a49   -         StampedObjectApplied: Created object [deliverables.carto.run/angular-frontend]                                                    4s
├── Event/angular-frontend.1781f94b2c066e17   -         ResourceHealthyStatusChanged: [deliverable] found healthy status in [deliverables.carto.run/angular-frontend] changed to [True]   4s
└── GitRepository/angular-frontend            Unknown   Progressing
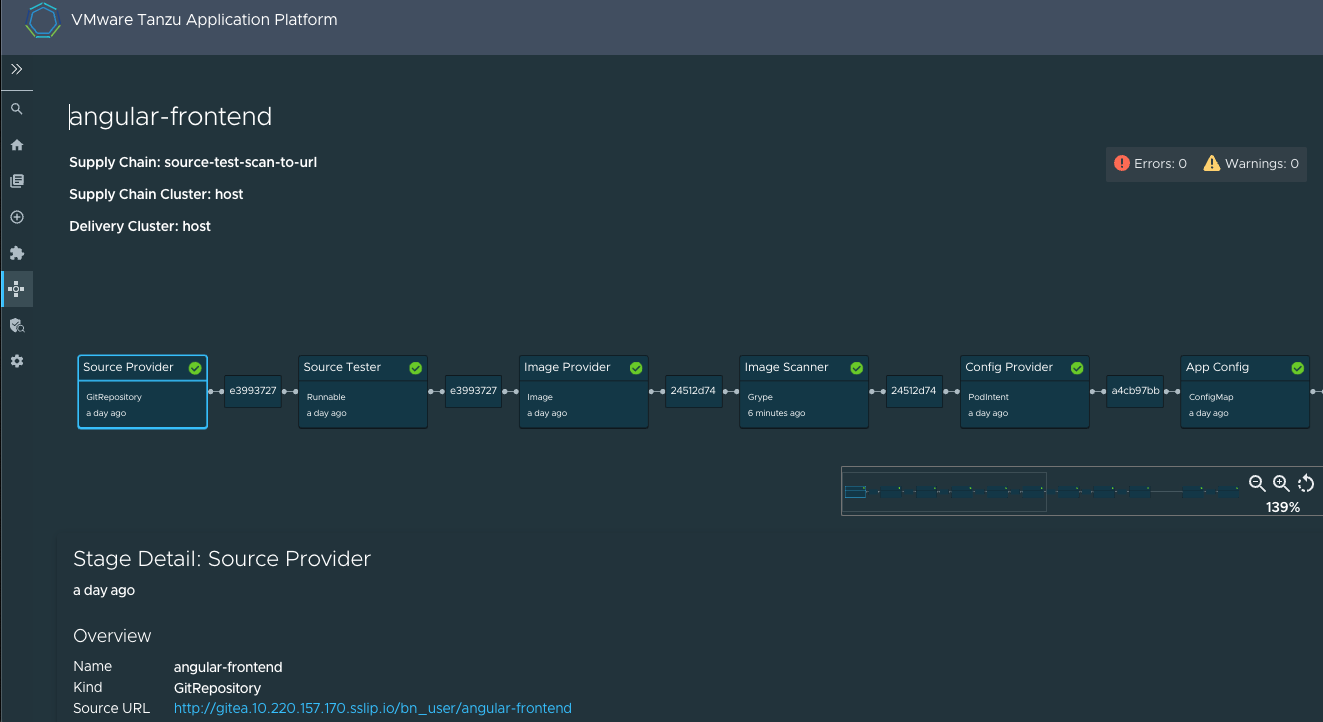
しばらくすると、tanzu apps workload get angular-frontend -n tap-demoのSupply Chainが全てTrueとなる。
TAPのGUIからもSuppliy Chainからangular-frontendを見ると全てが完了していることが分かる。
ただし、今回Angularのバックエンドを用意しなかったため、AngularのPod自体は起動しない。
KnativeのRevisionリソースを見ると、失敗した原因が確認できる。
$ kubectl get revision -o yaml angular-frontend-00001 -n tap-demo
:(省略)
  - lastTransitionTime: "2023-09-05T10:44:26Z"
    message: |
      Container failed with: 2023/09/05 10:40:25 [emerg] 1#0: host not found in upstream "customer-profile-backend.namespace" in /workspace/nginx.conf:162
Application Acceleratorで設定したバックエンドcustomer-profile-backend.namespaceが見つからないため失敗している。
ということで、次にちゃんと起動するサンプルを使って確認する。
Application Acceleratorを用いたTanzu Java Web Appのデプロイ
Acceleratorから選べるTanzu Java Web Appはバックエンドを必要としないサンプルなので、こちらでアプリにアクセス出来るところまで確認する。
Application AcceleratorからTanzu Java Web Appを選択する。

設定値は特に変えずにNEXTを押して先に進む。

この後の流れはangular-frontendと同じため、基本的なところは割愛する。
1点だけ変更点があり、ScanPolicyがangular-frontendと同じものを使うと、脆弱性が見つかってパイプラインが止まってしまう。
$ kubectl get imagescans.scanning.apps.tanzu.vmware.com/tanzu-java-web-app -n tap-demo
NAME                 PHASE    SCANNEDIMAGE                                                                                                                                           AGE     CRITICAL   HIGH   MEDIUM   LOW   UNKNOWN   CVETOTAL
tanzu-java-web-app   Failed   oss-harbor.10.220.157.229.sslip.io/tap/workloads/tanzu-java-web-app-tap-demo@sha256:2043a440e9e407898fff97a3fbeff54f4debde4e9ff3e0f0585d6204142f1d82   4m18s   1          1      5        13    0         20
そのため、ScanPolicyを以下のようにCritical, Highが見つかっても通すように変更する。
$ diff -u scan-policy.yaml scan-policy-java.yaml
--- scan-policy.yaml	2023-09-05 10:27:39.760463422 +0000
+++ scan-policy-java.yaml	2023-09-06 10:05:54.733360949 +0000
@@ -9,7 +9,7 @@
     package main

     # Accepted Values: "Critical", "High", "Medium", "Low", "Negligible", "UnknownSeverity"
-    notAllowedSeverities := ["Critical", "High", "UnknownSeverity"]
+    notAllowedSeverities := ["UnknownSeverity"]
     ignoreCves := []

     contains(array, elem) = true {
設定を変更して、Workloadを作成する。
tanzu apps workload create tanzu-java-web-app --git-repo http://gitea.10.220.157.170.sslip.io/bn_user/tanzu-java-web-app --git-branch main --type web --label app.kubernetes.io/part-of=tanzu-java-web-app --label apps.tanzu.vmware.com/has-tests="true" --yes --namespace tap-demo
なお、こちらもSupply Chainが全て流れても、Podは起動しない。これはKnativeというScale-to-Zeroを実現するOSSでデプロイされているせいであり、サービスのエンドポイントにアクセスして始めてPodが作成される。
サービスのエンドポイントはknativeのServiceリソース(通称ksvc)を見ることで確認できる。
$  kubectl get ksvc -n tap-demo
NAME                 URL                                                               LATESTCREATED              LATESTREADY                READY   REASON
angular-frontend     http://angular-frontend.tap-demo.tap.10.220.157.170.sslip.io      angular-frontend-00001                                False   RevisionMissing
tanzu-java-web-app   https://tanzu-java-web-app.tap-demo.tap.10.220.157.170.sslip.io   tanzu-java-web-app-00001   tanzu-java-web-app-00001   True
tanzu-java-web-appのURLにブラウザでアクセスしてみると、以下の画面が表示される。

サービスアクセス後、Podを見てみると、エンドポイントへのアクセス契機でPodが作成されたことが分かる。
$ kubectl get pod -n tap-demo
:(省略)
tanzu-java-web-app-00001-deployment-f957476dd-tscsg   2/2     Running     0          22s
しばらく待って、再度Podを見ると、Podは削除されていることも分かる。
GitOpsの確認
ソースコードの修正契機でSupply Chainが動くかも確認する。
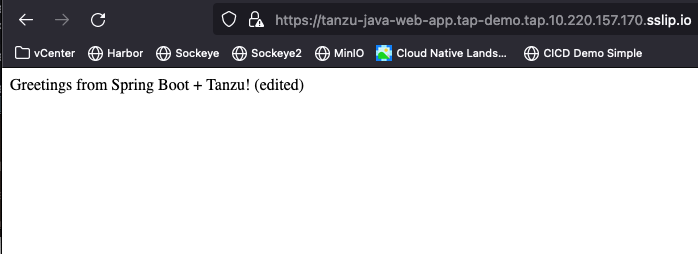
ブラウザで表示された文字列は、
src/main/java/com/example/springboot/HelloController.javaでコーディングされている。
こちらを以下のように修正してGitレポジトリにpushする。
        public String index() {
                return "Greetings from Spring Boot + Tanzu! (edited)";
        }
しばらく待ってtanzu apps workload get tanzu-java-web-app -n tap-demoを叩くと、Supply Chainの箇所でテストやビルドが再度実行されていることが分かる。
$ tanzu apps workload get tanzu-java-web-app -n tap-demo
:(省略)
📦 Supply Chain
   name:   source-test-scan-to-url

   NAME               READY     HEALTHY   UPDATED   RESOURCE
   source-provider    True      True      33m       gitrepositories.source.toolkit.fluxcd.io/tanzu-java-web-app
   source-tester      True      True      33s       runnables.carto.run/tanzu-java-web-app
   image-provider     Unknown   Unknown   23s       images.kpack.io/tanzu-java-web-app
   image-scanner      True      True      24m       imagescans.scanning.apps.tanzu.vmware.com/tanzu-java-web-app
   config-provider    True      True      24m       podintents.conventions.carto.run/tanzu-java-web-app
   app-config         True      True      24m       configmaps/tanzu-java-web-app
   service-bindings   True      True      24m       configmaps/tanzu-java-web-app-with-claims
   api-descriptors    True      True      24m       configmaps/tanzu-java-web-app-with-api-descriptors
   config-writer      True      True      24m       runnables.carto.run/tanzu-java-web-app-config-writer
:(省略)
SupplyChainが流れきると、knativeのServiceが参照しているRevisionが上がっていることが分かる。
$ kubectl get ksvc tanzu-java-web-app -n tap-demo
NAME                 URL                                                               LATESTCREATED              LATESTREADY                READY   REASON
tanzu-java-web-app   https://tanzu-java-web-app.tap-demo.tap.10.220.157.170.sslip.io   tanzu-java-web-app-00002   tanzu-java-web-app-00002   True
再度ブラウザでアクセスすると、更新したコードの内容が反映されていることが分かる。
注意点
crossplaneというコンポーネントがいるが、kapp-controllerのようにPod内からイメージレジストリを参照する模様。
そのため、crossplaneを使う場合でかつプライベートなイメージレジストリを使う場合、shared.ca_cert_dataにイメージレジストリの証明書を設定しておく必要がある。
付録:Giteaの構築
bitnamiでGiteaが公開されているので、これを使ってインストールする。
設定ファイルを取得する。
helm show values oci://registry-1.docker.io/bitnamicharts/gitea > gitea-values.yaml
ingressを使いたかったので、以下の変更を行った。
gitea-values.yaml.orig gitea-values.yaml
--- gitea-values.yaml.orig	2023-09-04 07:29:40.453002106 +0000
+++ gitea-values.yaml	2023-09-04 07:32:22.721681648 +0000
@@ -458,7 +458,7 @@
 ingress:
   ## @param ingress.enabled Enable ingress controller resource
   ##
-  enabled: false
+  enabled: true

   ## @param ingress.pathType Ingress Path type
   ##
@@ -473,7 +473,7 @@
   ingressClassName: ""
   ## @param ingress.hostname Default host for the ingress resource
   ##
-  hostname: "gitea.local"
+  hostname: "gitea.10.220.157.170.sslip.io"
   ## @param ingress.path The Path to Gitea. You may need to set this to '/*' in order to use this
   ## with ALB ingress controllers.
   ##
@@ -494,10 +494,10 @@
   ## TLS certificates will be retrieved from a TLS secret with name: {{- printf "%s-tls" .Values.ingress.hostname }}
   ## You can use the ingress.secrets parameter to create this TLS secret or relay on cert-manager to create it
   ##
-  tls: false
+  tls: true
   ## @param ingress.selfSigned Create a TLS secret for this ingress record using self-signed certificates generated by Helm
   ##
-  selfSigned: false
+  selfSigned: true
   ## @param ingress.extraHosts The list of additional hostnames to be covered with this ingress record.
   ## Most likely the hostname above will be enough, but in the event more hosts are needed, this is an array
   ## extraHosts:
インストールする。
helm install gitea oci://registry-1.docker.io/bitnamicharts/gitea -f gitea-values.yaml --create-namespace -n gitea
初期ユーザ(bn_user)のパスワードを取得する。
kubectl get secret --namespace gitea gitea -o jsonpath="{.data.admin-password}" | base64 -d
ログインすると以下のような画面が表示される。

パスワードを変更しておく。ログインして右上のユーザアイコンをクリックし、設定->アカウントから変更できる。
