SymfonyとVue Routerを使ってTODOリストを作ってみました。せっかくなのでBrefを使って完全サーバレスにしてみました。
Brefとは
BrefとはAWS Lambda上でPHPを動作させるためのもろもろの設定を楽にしてくれるCLIです。Brefを利用するためには、AWSアカウント、aws-cli、serverless frameworkが必要となります。
構成
| サービス | 内容 |
|---|---|
| Lambda | PHPを実行します。Symfonyで実装しました |
| API Gateway | 指定のURLでLambdaを実行します |
| S3 | JSやCSSを配置します。Vueで実装しました |
| Cloudfront | CDN、API GatewayとS3を同一ドメインとして扱います |
| Aurora Serverless | DB、今回はRDSのAurora Serverlessを使います |
| Cloudformation | プロビジョニング、デプロイ、serverlessが実行します |
| serverless | デプロイツール、Brefが実行します |
| Bref | 上記のサーバレスアプリケーションをビルド&デプロイします |
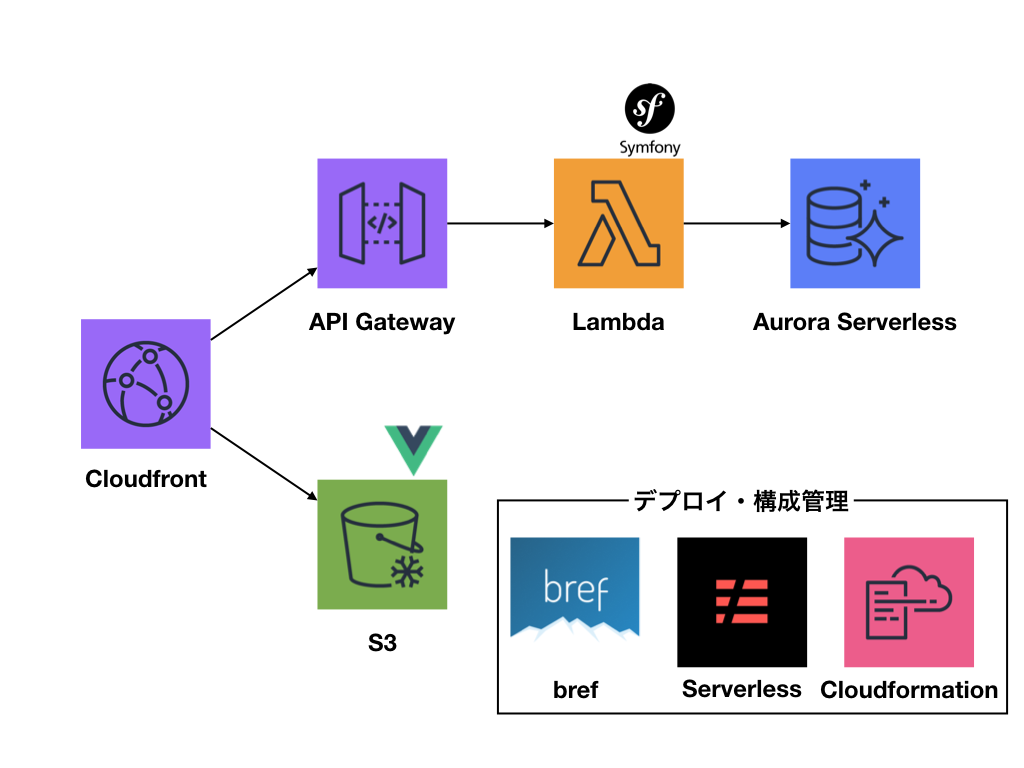
BrefはLambda用のPHP Runtimeを提供しているので、これを利用してSymfonyで実装したアプリケーションを実行する関数を作成します。PHPからDBにアクセスするので、RDSのAurora Serverlessを用意します。Lambda関数にはAPI Gatewayを利用してURLを割り当てます。LambdaにはJSやCS、画像などを用意しても動作しないので、S3に配置します。このままではドメインが分かれてしまうので、Cloudfrontを利用してそれぞれ同一ドメインでアクセスできるようにします。
追加インストール
AWS CLIインストール
AWS CLIはOSによってインストール方法が異なります。詳しくはAWSのドキュメントをご確認ください。
AWS CLIをインストールしたら、利用できるように設定を行います。
aws configure
AWS Access Key ID [None]:アクセスキー
AWS Secret Access Key [None]: シークレットアクセスキー
Default region name [None]: 利用するリージョン # 例:ap-northeast-1
Default output format [None]: json
アクセスキー、シークレットアクセスキーはIAMでユーザ追加し、追加後に表示されたキーを設定します。これでAWS CLIは完了です。
serverlessインストール
つづいてserverlessをインストールします。
curl -o- -L https://slss.io/install | bash
serverless upgrade

# もしくは
npm install -g serverless
インストール後に、aws cliと同様に設定します。
serverless config credentials --provider aws --key アクセスキー --secret シークレットアクセスキー
AWS CLIと同じアカウントのアクセスキー、シークレットアクセスキーを設定します。
Brefインストール
Brefはcomposerでインストールします。
cd path/to/project
composer require bref/bref
Serverless AWS Pseudo Parameters インストール
Serverless AWS Pseudo ParametersはAWSの擬似パラメータをserverlessで容易に設定できるためのライブラリです。Cloudfrontの設定をserverlessで行うために利用します。
yarn add serverless-pseudo-parameters
設定
インストールが完了したら、インストールを行うための設定を行います。
vendor/bin/bref init
実行するとserverless.ymlがルートディレクトリに作成されます。
それをさくっと以下のようにします。
service: todo

provider:
    name: aws
    region: ap-northeast-1
    runtime: provided
    environment:
        APP_ENV: prod

plugins:
    - ./vendor/bref/bref
    - serverless-pseudo-parameters

functions:
    console:
        handler: bin/console
        timeout: 120 # in seconds
        layers:
            - ${bref:layer.php-73} # PHP
            - ${bref:layer.console} # The "console" layer
        vpc:
            securityGroupIds:
                - sg-*****
            subnetIds:
                - subnet-*****1
                - subnet-*****2
                - subnet-*****3
    api:
        handler: public/index.php
        description: ''
        timeout: 28 # in seconds (API Gateway has a timeout of 29 seconds)
        layers:
            - ${bref:layer.php-73-fpm}
        events:
            -   http: 'ANY /'
            -   http: 'ANY /{proxy+}'
        vpc:
            securityGroupIds:
                - sg-*****
            subnetIds:
                - subnet-******1
                - subnet-******2
                - subnet-******3

# Exclude files from deployment
package:
    exclude:
        - 'node_modules/**'
        - 'tests/**'
        - '.env.local'

resources:
    Resources:
        # The S3 bucket that stores the assets
        Assets:
            Type: AWS::S3::Bucket
            Properties:
                BucketName: vue-router
                CorsConfiguration:
                    CorsRules:
                        -   AllowedHeaders: ["*"]
                            AllowedMethods: [GET]
                            AllowedOrigins: ["*"]
        # The policy that makes the bucket publicly readable
        AssetsBucketPolicy:
            Type: AWS::S3::BucketPolicy
            Properties:
                Bucket: !Ref Assets # References the bucket we defined above
                PolicyDocument:
                    Statement:
                        -   Effect: Allow
                            Principal: '*' # everyone
                            Action: 's3:GetObject' # to read
                            Resource: 'arn:aws:s3:::vue-router/*' # things in the bucket

        WebsiteCDN:
            Type: AWS::CloudFront::Distribution
            Properties:
                DistributionConfig:
                    Enabled: true
                    # Cheapest option by default (https://docs.aws.amazon.com/cloudfront/latest/APIReference/API_DistributionConfig.html)
                    PriceClass: PriceClass_200
                    # Enable http2 transfer for better performances
                    HttpVersion: http2
                    # Origins are where CloudFront fetches content
                    Origins:
                        # The website (AWS Lambda)
                        -   Id: Website
                            DomainName: '#{ApiGatewayRestApi}.execute-api.#{AWS::Region}.amazonaws.com'
                            # This is the stage, if you are using another one (e.g. prod), you will need to change it here too
                            OriginPath: '/dev'
                            CustomOriginConfig:
                                OriginProtocolPolicy: 'https-only' # API Gateway only supports HTTPS
                        # The assets (S3)
                        -   Id: Assets
                            # Use s3-website URLs instead if you host a static website (https://stackoverflow.com/questions/15309113/amazon-cloudfront-doesnt-respect-my-s3-website-buckets-index-html-rules#15528757)
                            DomainName: '#{Assets}.s3.amazonaws.com'
                            CustomOriginConfig:
                                OriginProtocolPolicy: 'http-only' # S3 websites only support HTTP
                    # The default behavior is to send everything to AWS Lambda
                    DefaultCacheBehavior:
                        AllowedMethods: [GET, HEAD, OPTIONS, PUT, POST, PATCH, DELETE]
                        TargetOriginId: Website # the PHP application
                        # Disable caching for the PHP application https://aws.amazon.com/premiumsupport/knowledge-center/prevent-cloudfront-from-caching-files/
                        DefaultTTL: 0
                        MinTTL: 0
                        MaxTTL: 0
                        # https://docs.aws.amazon.com/AWSCloudFormation/latest/UserGuide/aws-properties-cloudfront-distribution-forwardedvalues.html
                        ForwardedValues:
                            QueryString: true
                            Cookies:
                                Forward: all # Forward cookies to use them in PHP
                            # We must *not* forward the `Host` header else it messes up API Gateway
                            Headers:
                                - 'Accept'
                                - 'Accept-Language'
                                - 'Origin'
                                - 'Referer'
                        ViewerProtocolPolicy: redirect-to-https
                    CacheBehaviors:
                        # Assets will be served under the `/assets/` prefix
                        -   PathPattern: 'build/*'
                            TargetOriginId: Assets # the static files on S3
                            AllowedMethods: [GET, HEAD]
                            ForwardedValues:
                                # No need for all that with assets
                                QueryString: 'false'
                                Cookies:
                                    Forward: none
                            ViewerProtocolPolicy: redirect-to-https
                            Compress: true # Serve files with gzip for browsers that support it (https://docs.aws.amazon.com/AmazonCloudFront/latest/DeveloperGuide/ServingCompressedFiles.html)
                    CustomErrorResponses:
                        # Do not cache HTTP errors
                        -   ErrorCode: 500
                            ErrorCachingMinTTL: 0
                        -   ErrorCode: 504
                            ErrorCachingMinTTL: 0
いくつかポイントに分けて解説します。
Console
Lambda上のSymfony Consoleを実行できるように設定します。
functions:
    console:
        handler: bin/console
        timeout: 120 # in seconds
        layers:
            - ${bref:layer.php-73} # PHP
            - ${bref:layer.console} # The "console" layer
        vpc:
            securityGroupIds:
                - sg-*****
            subnetIds:
                - subnet-*****1
                - subnet-*****2
                - subnet-*****3
handlerはbin/consoleとし、Symfony Consoleを実行するようにします。layerにconsoleレイヤーも設定します。また、AuroraにアクセスするためにVPCの設定を行っています。(後述)
API
API Gatewayを通じてLambda上のSymfonyを実行できるように設定します。
    api:
        handler: public/index.php
        description: ''
        timeout: 28 # in seconds (API Gateway has a timeout of 29 seconds)
        layers:
            - ${bref:layer.php-73-fpm}
        events:
            -   http: 'ANY /'
            -   http: 'ANY /{proxy+}'
        vpc:
            securityGroupIds:
                - sg-*****
            subnetIds:
                - subnet-******1
                - subnet-******2
                - subnet-******3
handlerにはpublic/index.phpを設定し、Webアプリケーションとして 実行させます。eventsは全てのURIで起動させるようにします。VPCはconsoleと同様の設定です。
Resource
S3とCloudfrontの設定です。
resources:
    Resources:
        # The S3 bucket that stores the assets
        Assets:
            Type: AWS::S3::Bucket
            Properties:
                BucketName: vue-router # S3のバケット名
                CorsConfiguration:
                    CorsRules:
                        -   AllowedHeaders: ["*"]
                            AllowedMethods: [GET]
                            AllowedOrigins: ["*"]
        # The policy that makes the bucket publicly readable
        AssetsBucketPolicy:
            Type: AWS::S3::BucketPolicy
            Properties:
                Bucket: !Ref Assets # References the bucket we defined above
                PolicyDocument:
                    Statement:
                        -   Effect: Allow
                            Principal: '*' # everyone
                            Action: 's3:GetObject' # to read
                            Resource: 'arn:aws:s3:::vue-router/*' # S3のバケット名

        WebsiteCDN:

# 中略

                    CacheBehaviors:
                        # Assets will be served under the `/assets/` prefix
                        -   PathPattern: 'build/*' #
                            TargetOriginId: Assets # the static files on S3
                            AllowedMethods: [GET, HEAD]
                            ForwardedValues:
                                # No need for all that with assets
                                QueryString: 'false'
                                Cookies:
                                    Forward: none
                            ViewerProtocolPolicy: redirect-to-https
                            Compress: true # Serve files with gzip for browsers that support it (https://docs.aws.amazon.com/AmazonCloudFront/latest/DeveloperGuide/ServingCompressedFiles.html)
                    CustomErrorResponses:
                        # Do not cache HTTP errors
                        -   ErrorCode: 500
                            ErrorCachingMinTTL: 0
                        -   ErrorCode: 504
                            ErrorCachingMinTTL: 0
S3の指定のバケットをassetsとして利用するための設定です。S3のアクセス権や利用するパスのパターンを設定します。今回はbuildに全てのassetsがあるので、build/*をPath Patternに設定しました。
Aurora Serverless作成
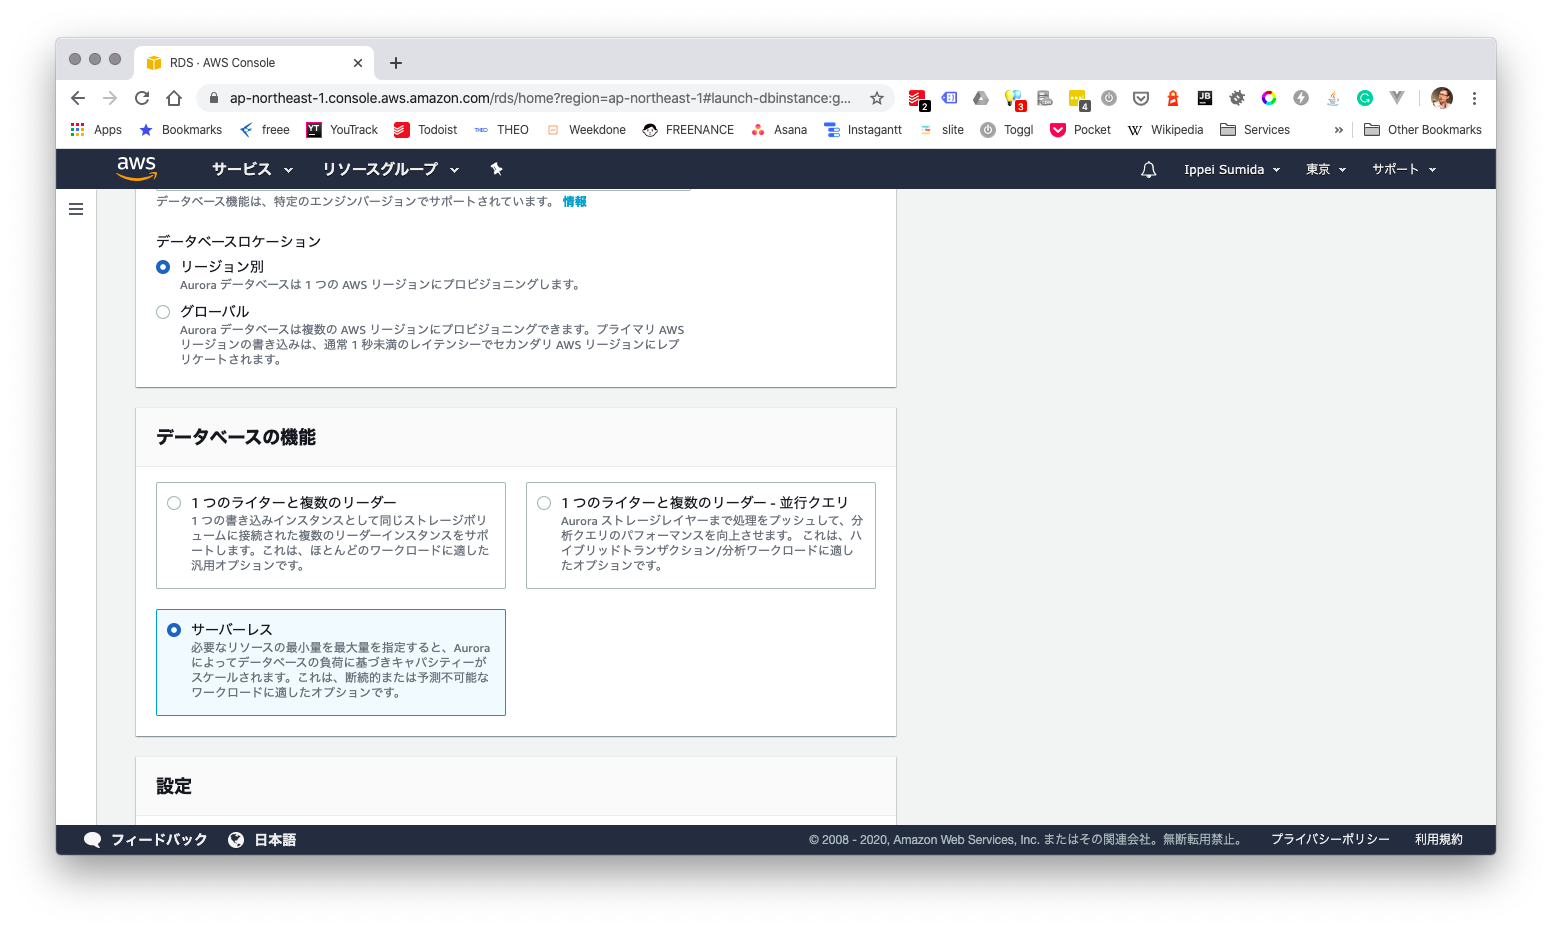
設定が終わったらDBを作成します。AWS ConsoleからRDSにアクセスし、『新しくDBを作成する』をクリックし、DBを作ります。Aurora Serverlessにするには、画像の『サーバーレス』部分をクリックします。
DBを作成してしばらくすると、DB情報が表示されるようになります。DB情報内の、セキュリティグループ(sg-ではじまる文字列)とサブネット(subnet-ではじまる文字列)をserverless.ymlのvpc部分に設定します。
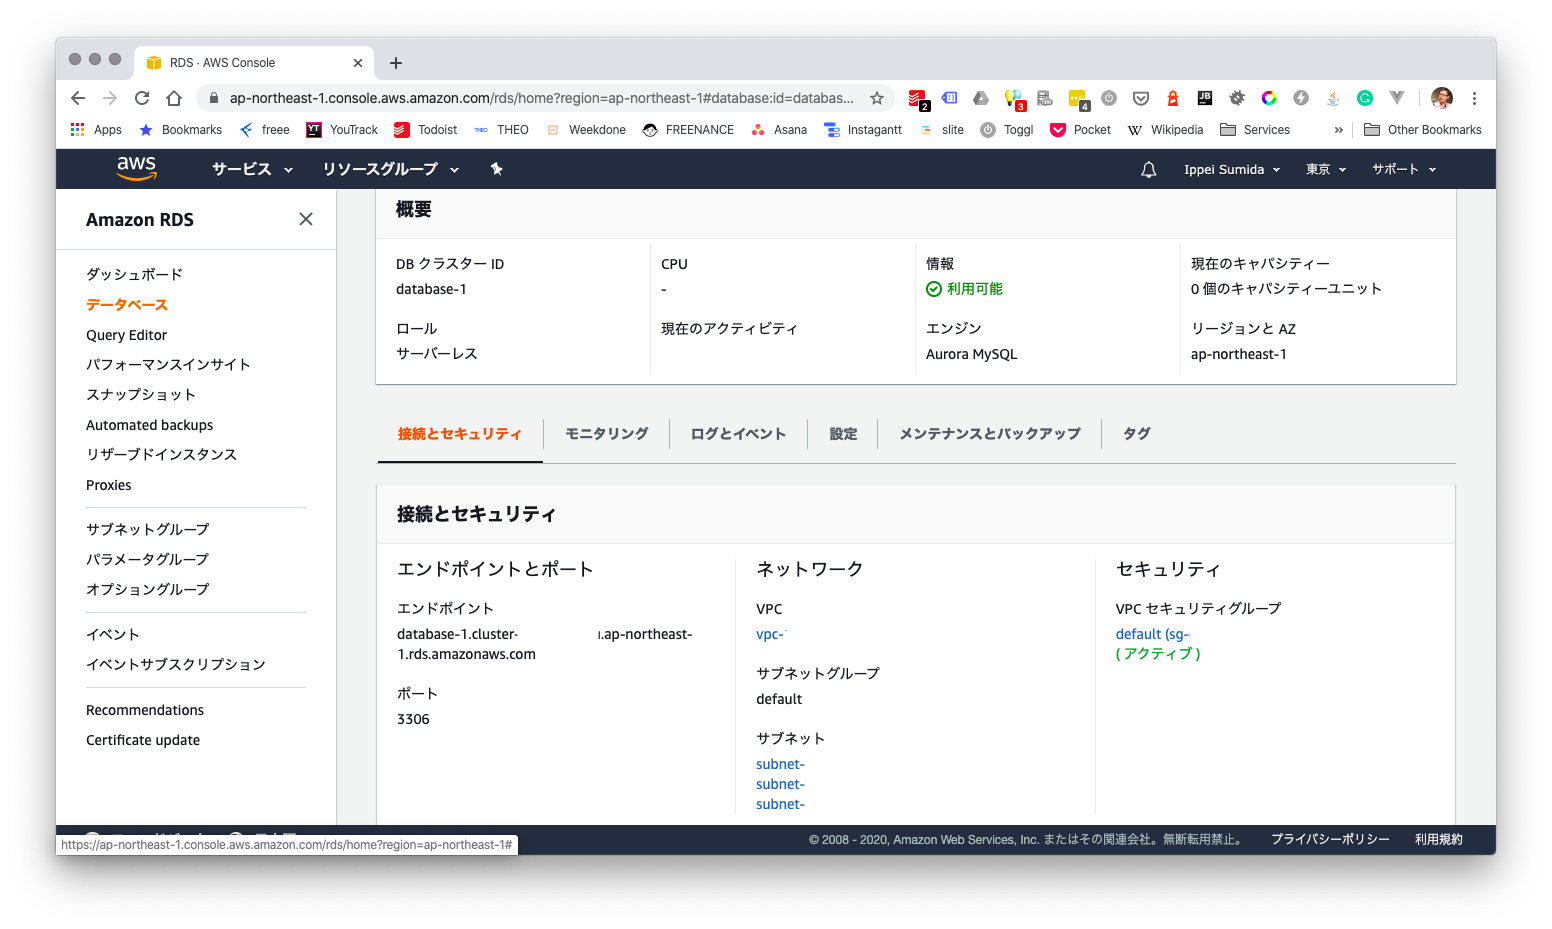
ひきつづき、DB情報内のエンドポイントとDB作成時に設定したユーザID,パスワードで.envにDBアクセス情報を作成します。
DATABASE_URL=mysql://[ユーザID]:[パスワード]@[エンドポイント]/[DB名]
なお、デフォルトだとAurora Serverlessは起動しっぱなしです。設定で『数分間アイドル状態のままの場合コンピューティング性能を一時停止する』を有効にすると、指定した時間アクセスがない場合は一時停止します。(ただし、指定した時間をすぎてアクセスすると起動に30秒くらいかかります。)
Symfony微調整
サーバーレスで利用するPHPレイヤーイメージには、ファイルの書き込みが/tmpのみ許されています。デフォルトだと、Symfonyはプロジェクト内のvarディレクトリにキャッシュやログを出力するので、この出力ディレクトリを変更するために、以下のメソッドを追記します。
    public function getLogDir()
    {
        // When on the lambda only /tmp is writeable
        if (getenv('LAMBDA_TASK_ROOT') !== false) {
            return '/tmp/log/';
        }

        return parent::getLogDir();
    }

    public function getCacheDir()
    {
        // When on the lambda only /tmp is writeable
        if (getenv('LAMBDA_TASK_ROOT') !== false) {
            return '/tmp/cache/' . $this->environment;
        }

        return parent::getCacheDir();
    }
デプロイ
デプロイできる準備が整ったので、デプロイしていきます。
最適化&ビルド
PHPのパッケージを最適化した後、Vueのビルドを行います。
composer install --prefer-dist --optimize-autoloader --no-dev
yarn encore production
S3にアップロード
現在は、S3のみ手動でアップロードする必要があります。
aws s3 sync public/build s3://[バケット名]/build --delete
Symfonyではpublicがドキュメントルートになるので、S3にはpublic内のコンテンツをアップロードします。
デプロイ
serverless deploy
...中略...
Service Information
service: todo
stage: dev
region: ap-northeast-1
stack: todo-dev
resources: **
api keys:
  None
endpoints:
  ANY - https://******.execute-api.ap-northeast-1.amazonaws.com/dev
  ANY - https://******.execute-api.ap-northeast-1.amazonaws.com/dev/{proxy+}
functions:
  console: todo-dev-console # bref cliで利用するfunction名
  api: todo-dev-api
layers:
  None
Serverless: Removing old service artifacts from S3...
Serverless: Run the "serverless" command to setup monitoring, troubleshooting and testing.
で、やっとデプロイです。成功すると、上記のようなメッセージが出力されます。普段はここに記載されているエンドポイントでアクセスしますが、今回はCloudformationを利用しているのでこのエンドポイントは使いません。
DB作成
Aurora ServerlessにDBとテーブルを設定します。
vendor/bin/bref cli --region=ap-northeast-1 -- todo-dev-console doctrine:database:create
vendor/bin/bref cli --region=ap-northeast-1 -- todo-dev-console doctrine:schema:update --force
デプロイ時のconsoleに記載されたファンクション名を使ってbref cliを実行します。ファンクション名はSymfony Console用のサブコマンド・オプションになります。
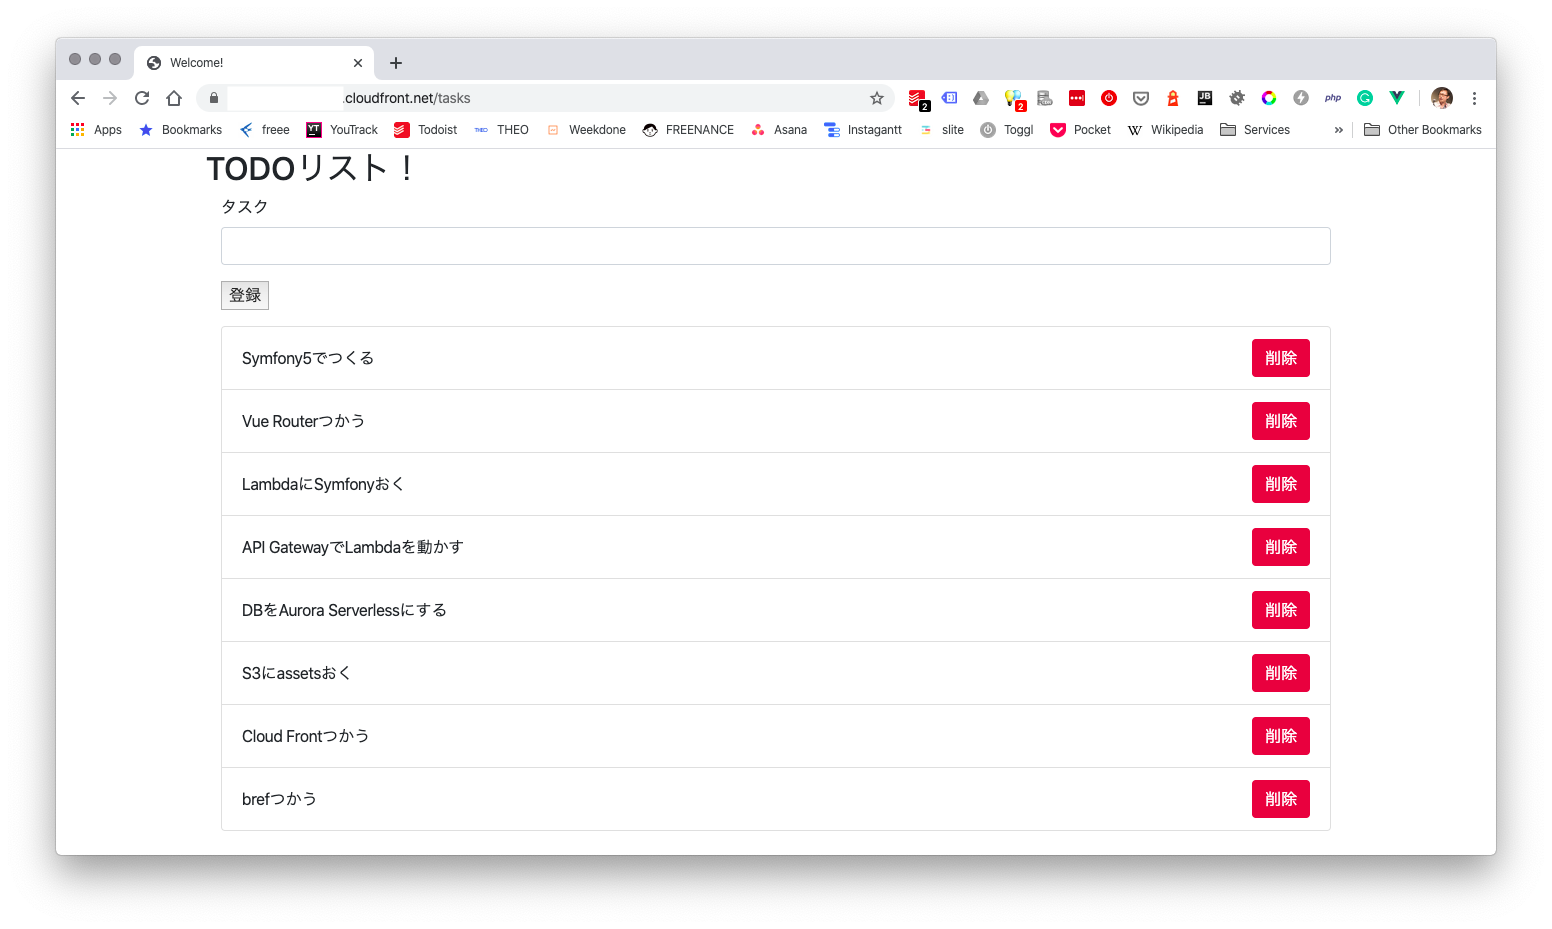
アクセス
AWS ConsoleのCloudfrontに新しい設定が追加されているのでこのドメインでアクセスします。
https://********.cloudfront.net/tasks
まとめ
Brefを使うことで比較的簡単にサーバーレスなアプリケーションをデプロイでき、AuroraやCloudfront周りとも連携できます。S3にアップロードの部分だけちょっとめんどくさいですが、VPCまわりのコールドスタート問題が解消されたおかげで、結構実用に耐えうるくらいのスピードが出るようになっんじゃないかなと思います。