はじめに
Excelで方眼紙設計書を作成するとき、オブジェクトの配置を考慮した表組みの罫線を手作業で引くのは面倒ですよね。
本記事では、選択範囲に対して適切に罫線を適用するVBAマクロを紹介します。
APIのレスポンス(JSON)を気持ちよく出すマクロです。
マクロの概要
このVBAコードは、以下の処理を行います。
- 選択範囲の罫線をリセット
- 外枠のボーダーを設定
- 1行目の値があるセルの左側にボーダーを設定し、最下行まで適用
- 各セルの内容を考慮し、適切な位置に罫線を適用
コード
Sub ApplyTableBorders()
    Dim rng As Range, cell As Range
    Dim ws As Worksheet
    Dim lastRow As Long, lastCol As Long
    Dim firstRow As Long, firstCol As Long
    Dim current As Range, nextCell As Range

    ' アクティブシートを設定
    Set ws = ActiveSheet

    ' 選択範囲を取得
    If TypeName(Selection) <> "Range" Then Exit Sub
    Set rng = Selection

    ' 罫線を消す
    rng.Borders.LineStyle = xlLineStyleNone

    ' 選択範囲の行・列の開始・終了位置
    firstRow = rng.Row
    firstCol = rng.Column
    lastRow = rng.Rows.Count + firstRow - 1
    lastCol = rng.Columns.Count + firstCol - 1

    ' 外枠のボーダーを設定
    rng.BorderAround Weight:=xlThin
    rng.Rows(1).Cells.BorderAround Weight:=xlThin
    With rng.Rows(1).Interior
        .Pattern = xlSolid
        .PatternColorIndex = xlAutomatic
        .ThemeColor = xlThemeColorAccent6
        .TintAndShade = 0.799981688894314
        .PatternTintAndShade = 0
    End With

    ' 1行目の値があるセルの左側にボーダーを設定し、最下行まで適用
    For Each cell In rng.Rows(1).Cells
        If cell.Value <> "" Then
            ' 左側のボーダーを設定
            cell.Borders(xlEdgeLeft).LineStyle = xlContinuous
            cell.Borders(xlEdgeLeft).Weight = xlThin

            ' 下方向にボーダーを延ばす
            Dim r As Long
            For r = cell.Row To lastRow
                ws.Cells(r, cell.Column).Borders(xlEdgeLeft).LineStyle = xlContinuous
                ws.Cells(r, cell.Column).Borders(xlEdgeLeft).Weight = xlThin
            Next r
        End If
    Next cell

    ' 最終セルから最初のセルへ順番に操作
    For r = lastRow To firstRow Step -1
        For c = lastCol To firstCol Step -1
            Set current = ws.Cells(r, c)

            ' セルに値がある場合のみ処理
            If current.Value <> "" Then
                ' 右方向にボーダー適用
                Set nextCell = current
                nextCell.Borders(xlEdgeTop).LineStyle = xlContinuous
                nextCell.Borders(xlEdgeTop).Weight = xlThin
                Do While nextCell.Borders(xlEdgeRight).LineStyle = xlNone And Not Intersect(nextCell, rng) Is Nothing
                    Set nextCell = nextCell.Offset(0, 1)
                    nextCell.Borders(xlEdgeTop).LineStyle = xlContinuous
                    nextCell.Borders(xlEdgeTop).Weight = xlThin
                Loop

                ' 下方向にボーダー適用
                Set nextCell = current
                nextCell.Borders(xlEdgeLeft).LineStyle = xlContinuous
                nextCell.Borders(xlEdgeLeft).Weight = xlThin
                Do While nextCell.Borders(xlEdgeBottom).LineStyle = xlNone And Not Intersect(nextCell, rng) Is Nothing
                    Set nextCell = nextCell.Offset(1, 0)
                    nextCell.Borders(xlEdgeLeft).LineStyle = xlContinuous
                    nextCell.Borders(xlEdgeLeft).Weight = xlThin
                Loop
            End If
        Next c
    Next r

    MsgBox "テーブルのボーダー設定が完了しました!", vbInformation
End Sub
使い方
- Excelの VBAエディタ(Alt + F11) を開き、標準モジュールに上記コードを貼り付けます
- 罫線を適用したい範囲を選択します
- ApplyTableBorders マクロを実行します
実行結果
実行後、以下のように表組みの罫線が適用されます。
実行前
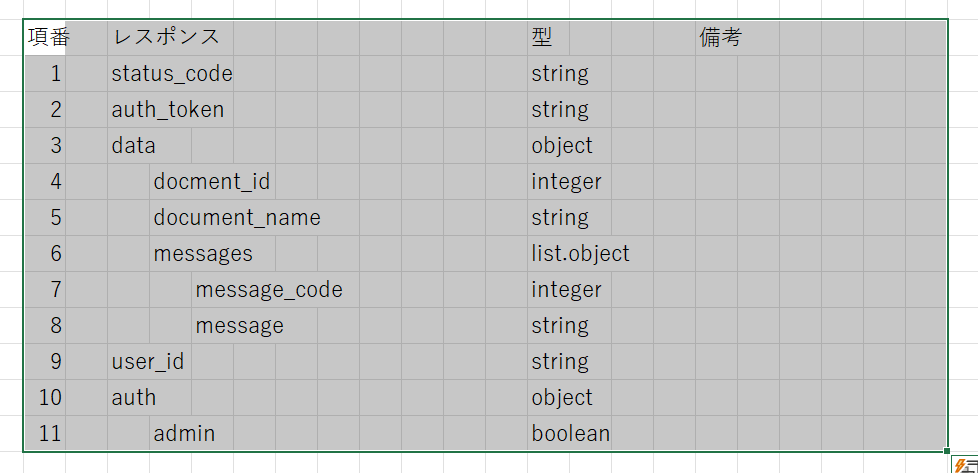
実行後

まとめ
本マクロを使用することで、方眼紙設計書の表組みを素早く作成できるようになります。
「手作業で罫線を引くのが面倒!」という方は、ぜひ試してみてください!
方眼紙。。。
方眼紙?好きじゃないけどさ、SESとかで入ると、それを使ってるんだもん。できる限りルールの上でラクしなきゃ。