DlibとopenCVを使って顔検知,顔向き推定を簡易的に行ったのでまとめておきます.結論から言うと,今のままではとても安定しないので,もっといい方法があればそちらへ移行したいです.
参考にしたサイトは
・https://www.pyimagesearch.com/2017/04/17/real-time-facial-landmark-detection-opencv-python-dlib/
・https://www.learnopencv.com/head-pose-estimation-using-opencv-and-dlib/
・https://qiita.com/TaroYamada/items/e3f3d0ea4ecc0a832fac
・https://kamino.hatenablog.com/entry/rotation_expressions
です.
前準備
事前にインストールしておくライブラリは以下です.
・Dlib
・openCV
・imutils
imutilに関してはpip install --upgrade imutilsしておいたほうが良い説あり.
顔向き推定について
先に顔の向き推定(face pose estimation)の話をします.正直ここの説明があまりにエレガントだったので,そちらを見たほうが早いのですが,一応ざっくりと.

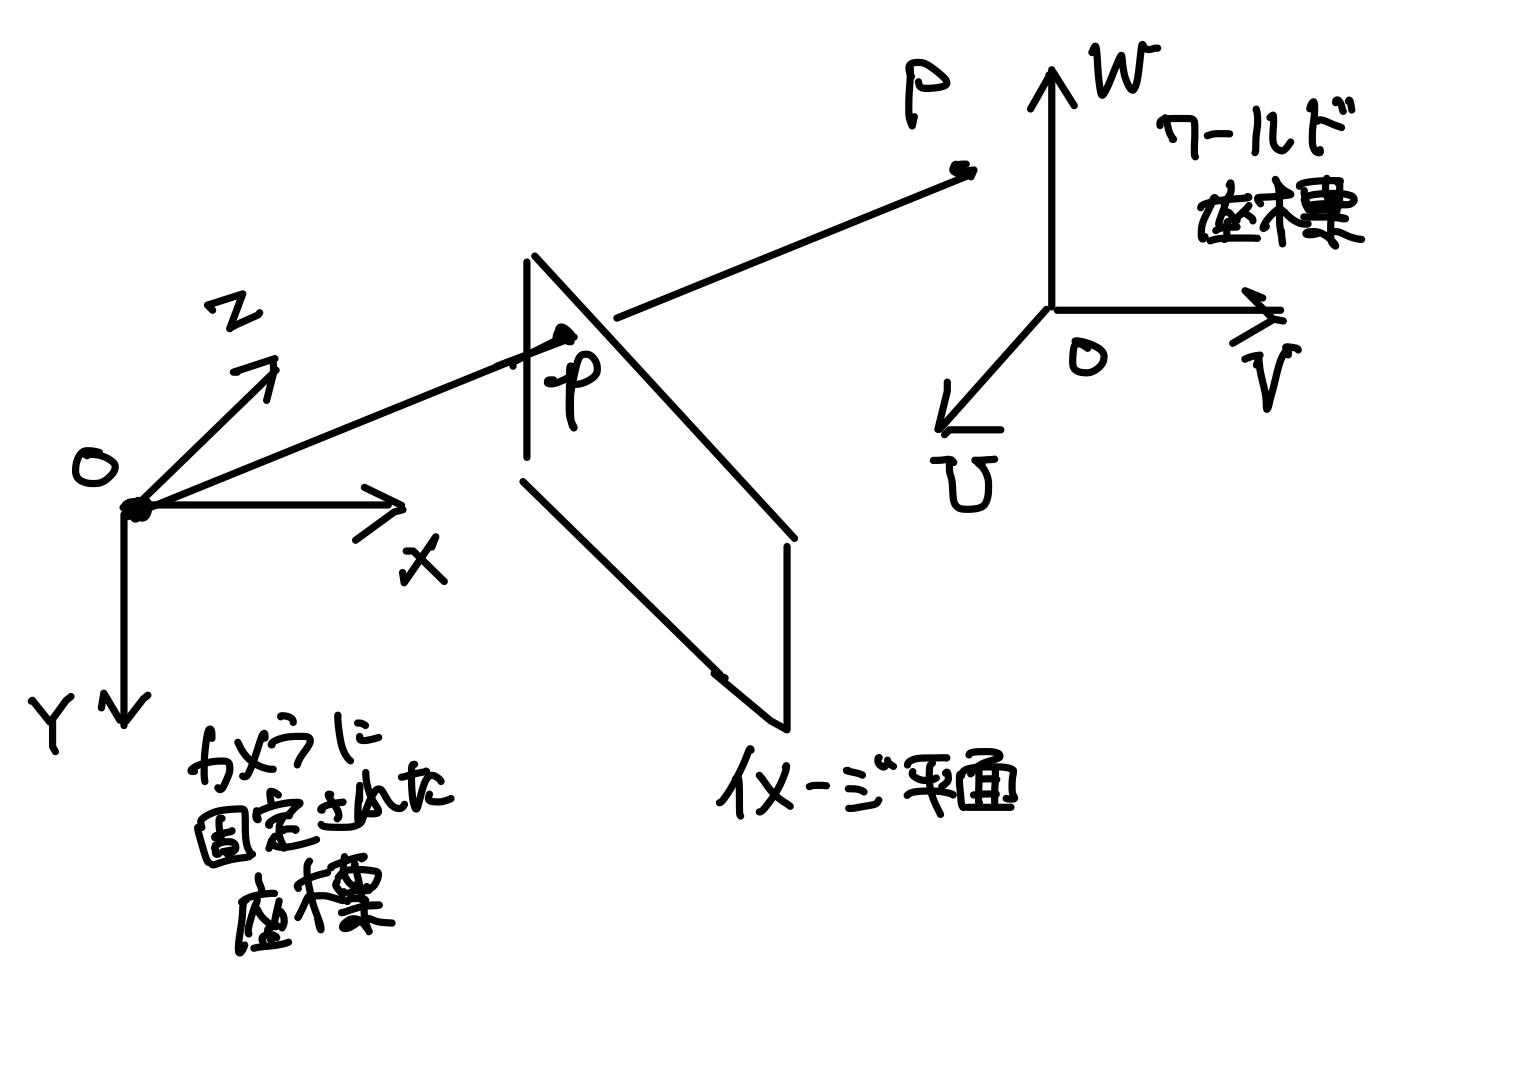
上の図にある通り,カメラに固定された座標系を$\Sigma_1:(X,Y,Z)$,人の頭部に固定された座標系を$\Sigma_2:(U,V,W)$と置くとします.
このとき,$\Sigma_1$から見た点$P$は以下のように表されます.
\begin{pmatrix}
X\\
Y\\
Z
\end{pmatrix}

= \boldsymbol{R}
\begin{pmatrix}
U\\
V\\
W
\end{pmatrix}

+ \boldsymbol{t}
$\boldsymbol{R}$は回転行列,$\boldsymbol{t}$はtranslationベクトルです.同次変換行列で書き直すと,
\begin{pmatrix}
X\\
Y\\
Z
\end{pmatrix}

= [\boldsymbol{R}|\boldsymbol{t}]
\begin{pmatrix}
U\\
V\\
W\\
1
\end{pmatrix}
$\Sigma_2$は頭部に固定されているわけですが,多くの場合顔のパーツの配置はわかっているので,頭部の座標$\Sigma_2$からみた顔のパーツの位置$P:(U,V,W)$は分かります.しかし,カメラから見た顔の各パーツの位置$(X, Y, Z)$はわかりません.知ることができるのは,カメラが得る画像上での顔のパーツの配置$p=(x, y)$のみです.
しかしもし,カメラのレンズに関するパラメーター(焦点位置,レンズの歪み)などがわかっているなら,$(x,y)$と$(X,Y,Z)$の関係なら分かります.すなわち,
\begin{pmatrix}
x\\
y\\
1
\end{pmatrix}

= s
\begin{pmatrix}
f_x & 0 & c_x \\
0 & f_y & c_y \\
0 & 0 & 1
\end{pmatrix}

\begin{pmatrix}
X\\
Y\\
Z
\end{pmatrix}
これらの関係を使って回転行列$R$とtranslationベクトル$t$を推定できれば,顔の向きが推定できるはずです.
で,実際はどうやって推定しているかというと,(ここは専門外なので詳しくはわかりませんが),ある$R,t$を仮定したときに射影として2次元の画面に映るであろう点$p_{expected}$と,画面上に射影として実際に写っている点$p$の距離誤差が最小になるように$R,t$を推定しているみたいです...(ですよね?)
顔の器官検出に関して
顔の向き推定のためには,顔の器官の何点かの座標がわかっている必要があります.この顔の器官の位置誤差を最小にするように計算しているからだと思います.今回参考にしたサイトでは一般的な顔の3Dモデルを想定し,6点の座標を設定しています.
Dlibを使えば顔のパーツ68点の推定が可能になります.今回はそのうち6点を抽出して使っています.
顔角度の算出
今回紹介した記事のサンプルコードを使えば,推定された回転の結果として回転「ベクトル」が算出できます.回転ベクトルも回転行列も回転を一意的に表すので,ロドリゲスの公式というのを使うと互いに変換できます.
回転ベクトルを$\boldsymbol{v}$とすると,大きさ1の向きを表すベクトル$\boldsymbol{b}$,回転角度を表す$\theta$はそれぞれ,
\boldsymbol{b} = \boldsymbol{v}/|\boldsymbol{b}| \\
\theta = |\boldsymbol{v}|
となります.これを用いて回転行列に変換すると,
\boldsymbol{R} =
\begin{pmatrix}
\cos{\theta}+b_x^2(1-\cos{\theta}) & b_{x}b_y(1-\cos{\theta})-b_z\sin{\theta} & b_xb_z(1-\cos{\theta})+b_y\sin{\theta} \\

b_yb_x(1-\cos{\theta}) + b_z\sin{\theta} &
\cos{\theta}+b_y^2(1-\cos{\theta}) & b_yb_z(1-\cos{\theta}) - b_y\sin{\theta}\\
b_zb_x(1-\cos{\theta}) - b_y\sin{\theta} & b_zb_y(1-\cos{\theta})+b_x\sin{\theta} & \cos{\theta}+b_z^2(1-\cos{\theta})
\end{pmatrix}
この計算で得た回転行列と,translationベクトルから,同次変換行列$\boldsymbol{D}=[\boldsymbol{R}|\boldsymbol{t}]$を導出したのち,
この$\boldsymbol{D}$をopenCVのdecomposeProjectionMatrixメソッドにぶちこむとオイラー角を得ることができます.
実際にやってみます.
from imutils.video import VideoStream
import numpy as np
from imutils import face_utils
import imutils
import dlib
import cv2

print("[INFO] loading facial landmark predictor...")
detector = dlib.get_frontal_face_detector()
predictor = dlib.shape_predictor(args["shape_predictor"])

# initialize the video stream and allow the cammera sensor to warmup
print("[INFO] camera sensor warming up...")
vs = VideoStream(usePiCamera=args["picamera"] > 0).start()

while True:
    frame = vs.read()
    frame = imutils.resize(frame, width=500)
    gray = cv2.cvtColor(frame, cv2.COLOR_BGR2GRAY)

    rects = detector(gray, 0)

   image_points = None
    for rect in rects:
        shape = predictor(gray, rect)
        shape = face_utils.shape_to_np(shape)

        image_points = np.array([tuple(shape[30]), tuple(shape[8]), tuple(shape[36]), tuple(shape[45]),
                                 tuple(shape[48]), tuple(shape[54])])


        for (x, y) in image_points:
            cv2.circle(frame, (x, y), 1, (0, 0, 255), -1)

        image_points = np.array([tuple(shape[30]), tuple(shape[8]), tuple(shape[36]), tuple(shape[45]),
                                 tuple(shape[48]), tuple(shape[54])], dtype='double')

    if len(rects) > 0:
        # cv2.putText(frame, "detected", (10, 30), cv2.FONT_HERSHEY_PLAIN, 0.7, (0, 0, 255), 2)

        model_points = np.array([
            (0.0, 0.0, 0.0),
            (0.0, -330.0, -65.0),
            (-225.0, 170.0, -135.0),
            (225.0, 170.0, -135.0),
            (-150.0, -150.0, -125.0),
            (150.0, -150.0, -125.0)
        ])

        size = frame.shape

        focal_length = size[1]
        center = (size[1] // 2, size[0] // 2)

        camera_matrix = np.array([
            [focal_length, 0, center[0]],
            [0, focal_length, center[1]],
            [0, 0, 1]
        ], dtype='double')

        dist_coeffs = np.zeros((4, 1))

        (success, rotation_vector, translation_vector) = cv2.solvePnP(model_points, image_points, camera_matrix,
                                                                      dist_coeffs, flags=cv2.SOLVEPNP_ITERATIVE)
        (rotation_matrix, jacobian) = cv2.Rodrigues(rotation_vector)
        mat = np.hstack((rotation_matrix, translation_vector))
        # homogeneous transformation matrix (projection matrix)

        (_, _, _, _, _, _, eulerAngles) = cv2.decomposeProjectionMatrix(mat)
        yaw = eulerAngles[1]
        pitch = eulerAngles[0]
        roll = eulerAngles[2]

        cv2.putText(frame, 'yaw' + str(int(yaw)), (20, 10), cv2.FONT_HERSHEY_PLAIN, 1, (0, 0, 255), 2)
        cv2.putText(frame, 'pitch' + str(int(pitch)), (20, 25), cv2.FONT_HERSHEY_PLAIN, 1, (0, 0, 255), 2)
        cv2.putText(frame, 'roll' + str(int(roll)), (20, 40), cv2.FONT_HERSHEY_PLAIN, 1, (0, 0, 255), 2)

        (nose_end_point2D, _) = cv2.projectPoints(np.array([(0.0, 0.0, 1000.0)]), rotation_vector,
                                                         translation_vector, camera_matrix, dist_coeffs)

        for p in image_points:
            cv2.circle(frame, (int(p[0]), int(p[1])), 3, (0, 0, 255), -1)

        p1 = (int(image_points[0][0]), int(image_points[0][1]))
        p2 = (int(nose_end_point2D[0][0][0]), int(nose_end_point2D[0][0][1]))

        cv2.line(frame, p1, p2, (255, 0, 0), 2)

    # show the frame
    cv2.imshow("Frame", frame)
    key = cv2.waitKey(1) & 0xFF

    # if the `q` key was pressed, break from the loop
    if key == ord("q"):
        break

cv2.destroyAllWindows()
vs.stop()
ここまで書いて力尽きたので気が向けばコードにコメントつけます.
ウェブカメラ搭載のPCであればこのまま実行するだけで顔検知・顔向き推定がなされると思います.