前回までに、GCP上でgitリポジトリ作成し、CloudShell上でスクレイピングPGMを手動実行するところまで行いました。
今回はいよいよ、GCE上でスクレイピングの自動実行を行います。
Pythonでのウェブスクレイピング学習のロードマップ
(1)ローカルでとりあえず目的のブツのスクレイピングに成功する。
(2)ローカルでスクレイピングした結果をGoogleスプレッドシートに連携する。
(3)ローカルでcron自動実行を行う。
(4)クラウドサーバー上での無料自動実行に挑戦する。(Google Compute Engine)
(4)-1 クラウドにテスト用PGMを載せて、CloudShell上で正常稼働させる
(4)-2 スクレイピングPGMをリポジトリに追加し、CloudShell上で正常稼働させる。
(4)-3 ComputeEngineのVMインスタンスを作成して、スクレイピングを自動実行させる。 ←いまココ
(5)クラウド上で、サーバーレスでの無料自動実行に挑戦する。(たぶんCloud Functions + Cloud Scheduler)
今回の手順
(1)GCEインスタンス作成
(2)GCEインスタンスSSH接続のセキュリティ強化
(3)GCEインスタンスに、git,anyenv,pyenv,python 3.8.5 をインストール
(3)GCEインスタンスへのリポジトリのクローン
(4)crontabの設定(テストPGM)
(5)crontabの設定(スクレイピングPGM)
(1)GCEインスタンス作成
Compute Engineのインスタンスを作ります。
Compute Engineの無料枠は以下なので、その性能範囲内で作ります。
Compute Engine
1 f1-micro インスタンス(1 か月あたり、北バージニア [us-east4] を除く米国リージョンのみ)
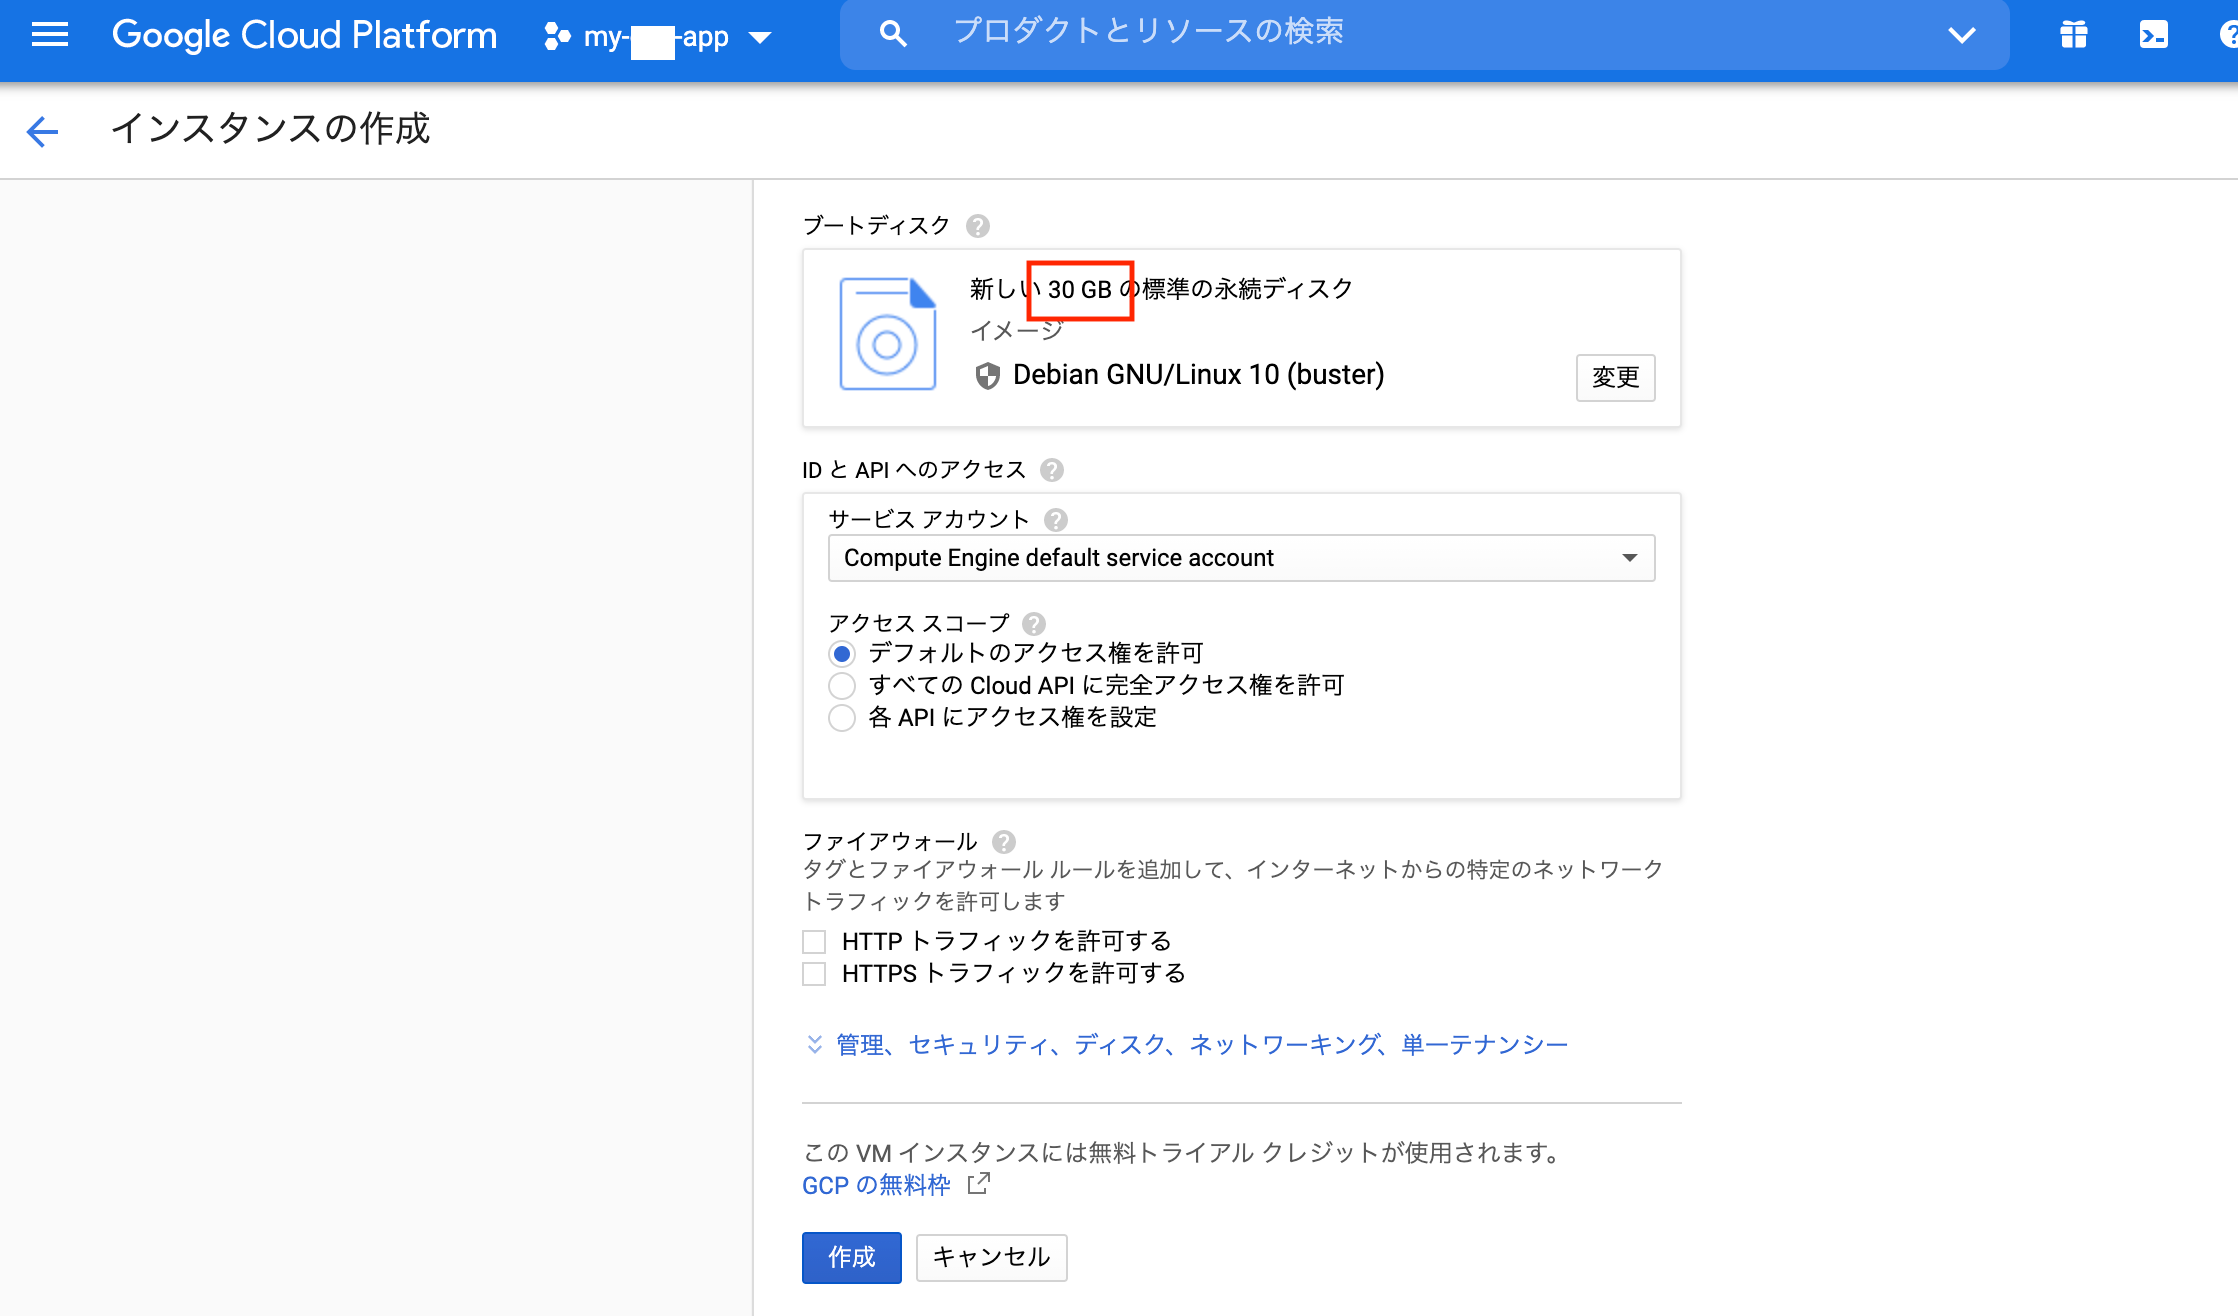
30 GB-月の HDD
5 GB-月のスナップショット(一部のリージョン)
1 GB の北米から全リージョン宛ての下り(外向き)ネットワーク(1 か月あたり、中国とオーストラリアを除く)
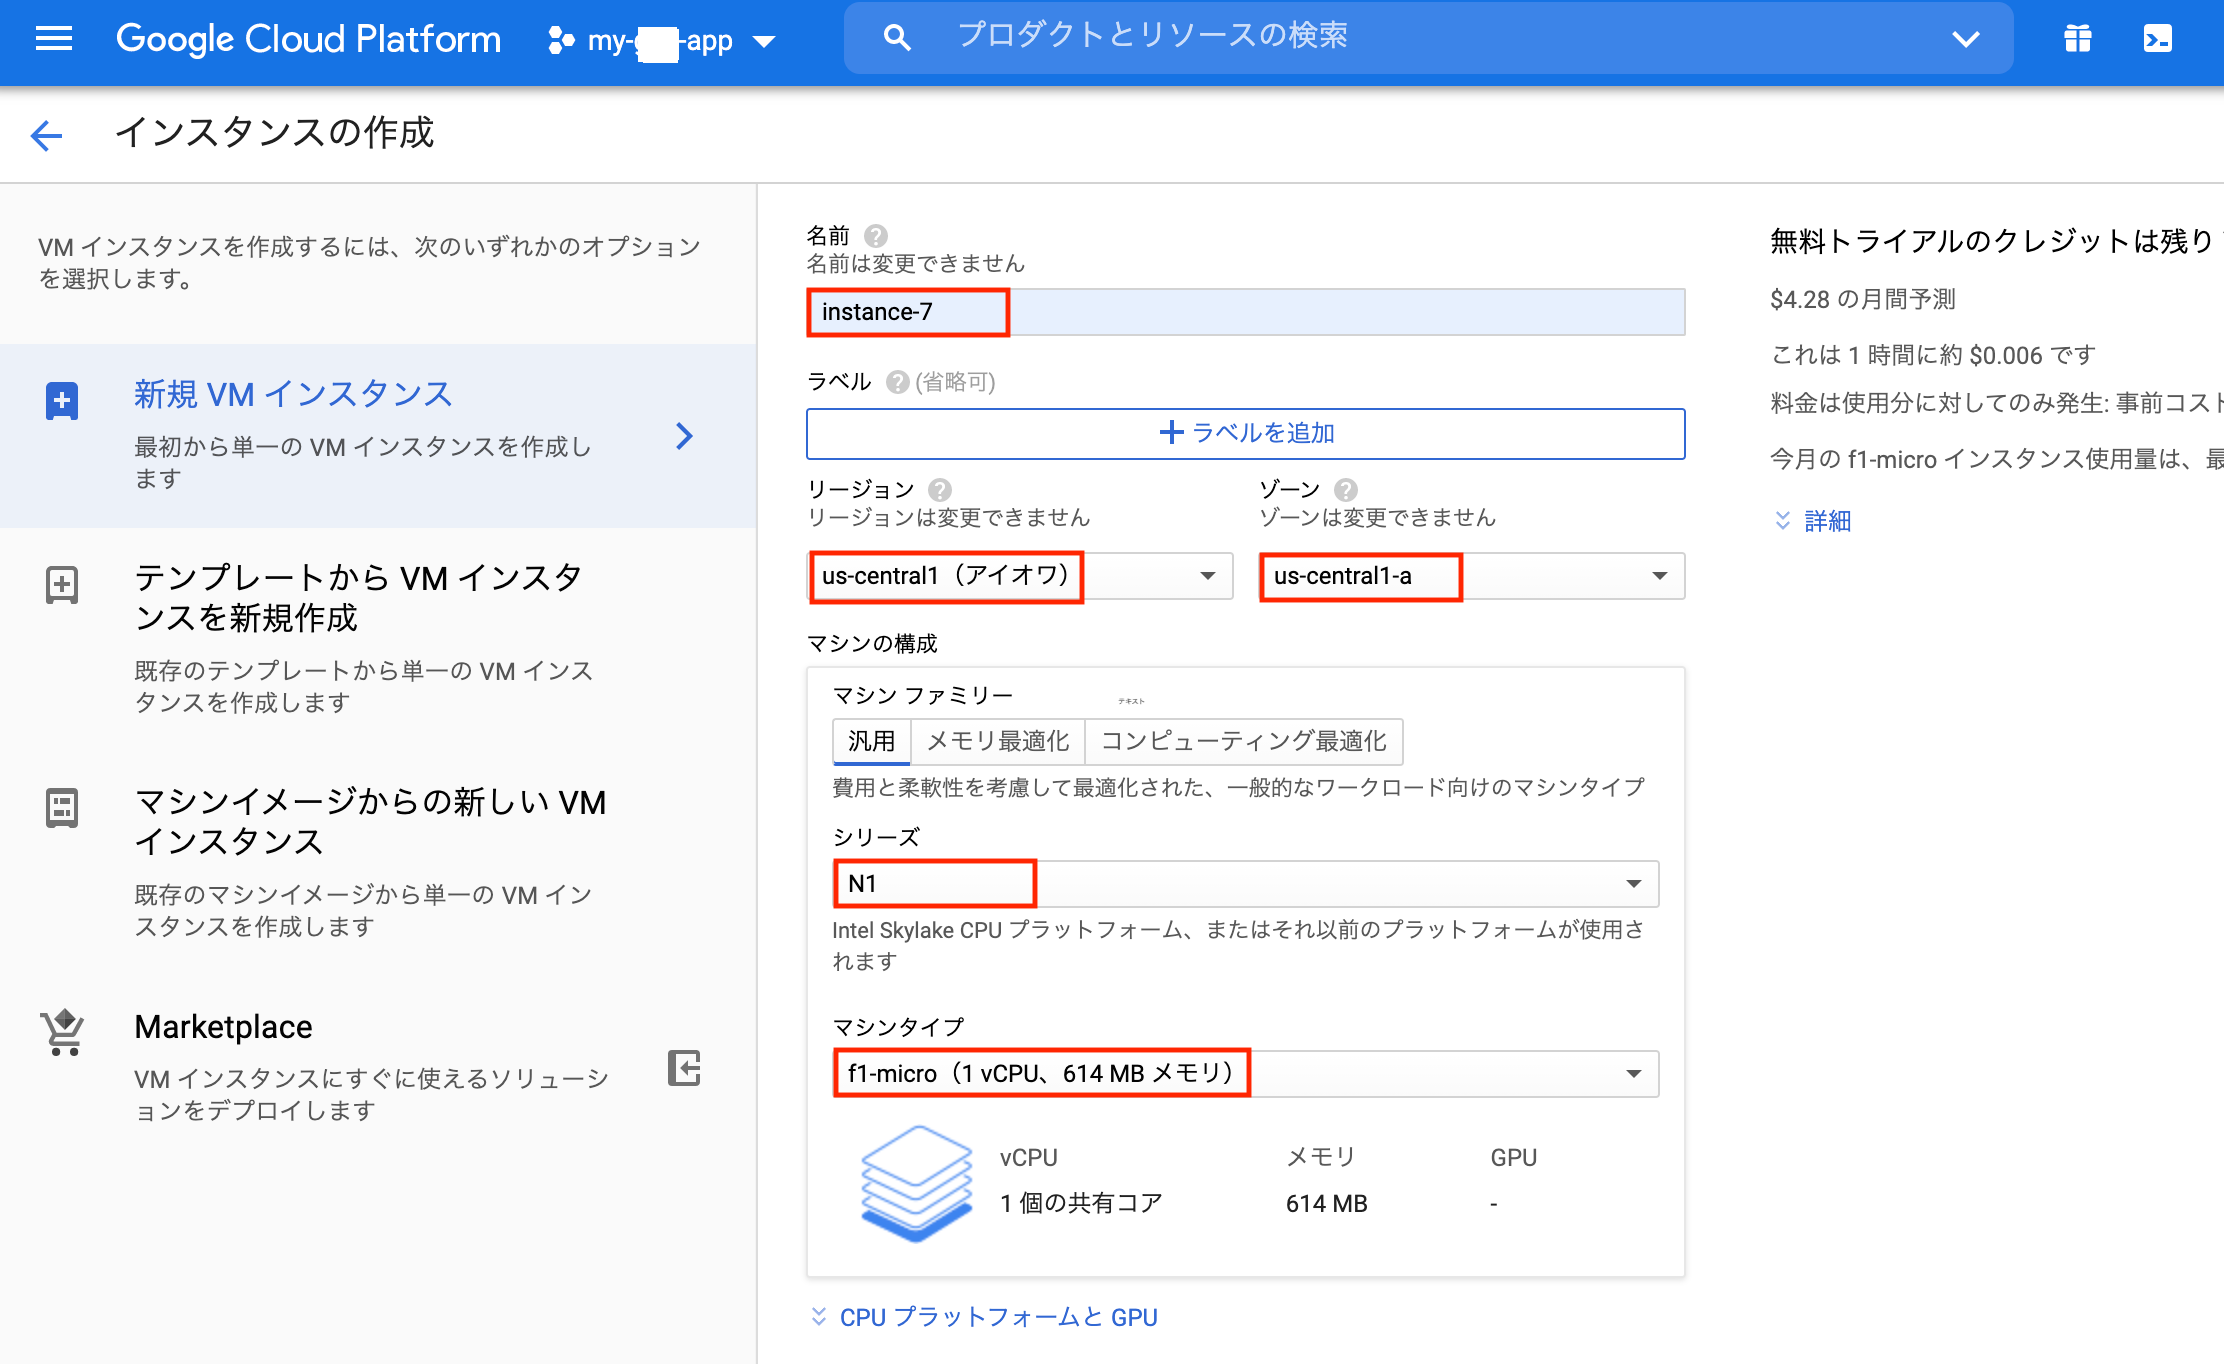
f1-microのインスタンス無料枠の上限は、インスタンス数ではなく時間に基づきます。
毎月720時間が無料なので、常時起動だと30日分ということだと思います。31日の月は微課金に注意・・?

無料枠の f1-micro インスタンスの上限は、インスタンス数ではなく時間に基づきます。当月内の合計時間数と同等の時間数を使い切るまで、毎月のすべての f1-micro インスタンスの使用は無料になります。使用量は、サポートされているリージョンすべての合計が集計されます。
Google Cloud の無料枠は、VM インスタンスで使用されている外部 IP アドレスについても提供されています。使用中の外部 IP アドレスは、当月内の合計時間数と同等の時間数を使い切るまで追加料金なしでご利用いただけます。使用量は、すべてのリージョンでの使用中の外部 IP アドレスすべての合計が集計されます。使用中の外部 IP アドレスに対する Google Cloud の無料枠は、f1-micro インスタンスだけでなく、すべてのインスタンス タイプに適用されます。
(2)GCEインスタンスSSH接続のセキュリティ強化
インスタンスへのSSH接続の制限とデフォルトSSHポートの変更を行います。
インスタンスのSSH接続制限には、SSHキーをメタデータに登録することによる制限と、OSログインと呼ばれる機能による制限とがあります。今回はOSログインによるSSH制限を採用します。
違い等の説明はこちらがわかりやすいと思います。
便利機能「OS Login」を使ってIAMでインスタンスへのSSH接続制限をする
さらにOSログインには2段階認証の設定が可能なので、そちらも設定してセキュリティを強化します。
2 段階認証プロセスを使用した OS Login の設定
またデフォルトのSSHポート22も使えないようにします。
ログインの際、追加パラメータの指定が必要となりますが、22のままだと無差別にアタックを受けるので、仕方がありません。
VMインスタンスの詳細から、ネットワークの詳細を表示して、
2段階認証プロセスを使用した OS Login の設定
設定後のインスタンスログインは以下のような感じになります。
そもそもIAMで設定されているアカウント(自分の場合、デフォルトでプロジェクトオーナーであるGoogleアカウント)以外は拒否されるはずです。
そして、(初めてなら)自動で作られる"google_compute_engine"sshキーのpassphraseでsshログインしますが、2段階認証の選択肢が示され、自分の場合、スマホのAuthenticatorアプリのワンタイムパスワードでログインします。
hoge@cloudshell:~ (my-hoge-app)$ gcloud compute --project "my-hoge-app" ssh --zone "us-central1-a" "instance-7" --ssh-flag="-p 50050"
Enter passphrase for key '/home/hoge/.ssh/google_compute_engine':
Please choose from the available authentication methods:
1: Google phone prompt
2: Security code from Google Authenticator application
3: Voice or text message verification code

Enter the number for the authentication method to use: 2
Enter your one-time password: xxxxxx
Linux instance-7 4.19.0-10-cloud-amd64 #1 SMP Debian 4.19.132-1 (2020-07-24) x86_64

The programs included with the Debian GNU/Linux system are free software;
the exact distribution terms for each program are described in the
individual files in /usr/share/doc/*/copyright.

Debian GNU/Linux comes with ABSOLUTELY NO WARRANTY, to the extent
permitted by applicable law.
Last login: Tue Sep 29 11:38:31 2020 from 35.189.187.53
hoge_gmail_com@instance-7:~$
GCEへのPython3インストール
で、ここからPythonのインストールに入りますが、一筋縄では行きません。
単純にPython入れようとしても、swap領域不足とかでエラーになる可能性大。
そこで以下サイトの手法を有り難く使わせていただきます。
GCEのf1-micro環境でPythonが動く環境を構築する
コマンドの意味その他、理解不足の面はありますが、まっさらで壊れても全然構わない環境なので、とにかく同じようにコマンド入力していきます。
大まかな流れは、git入れる、anyenv入れる、pyenv入れる、最後にPython3.8.5です。
hoge_gmail_com@instance-7:~$
hoge_gmail_com@instance-7:~$ sudo dd if=/dev/zero of=/var/swapfile bs=1M count=1200
1200+0 records in
1200+0 records out
1258291200 bytes (1.3 GB, 1.2 GiB) copied, 11.2339 s, 112 MB/s
hoge_gmail_com@instance-7:~$
hoge_gmail_com@instance-7:~$ sudo chmod 600 /var/swapfile
hoge_gmail_com@instance-7:~$
hoge_gmail_com@instance-7:~$ sudo mkswap -L swap /var/swapfile
Setting up swapspace version 1, size = 1.2 GiB (1258287104 bytes)
LABEL=swap, UUID=80b8b0ee-3779-4f2d-b9cb-00cccd3f401f
hoge_gmail_com@instance-7:~$
hoge_gmail_com@instance-7:~$ sudo swapon /var/swapfile
hoge_gmail_com@instance-7:~$
hoge_gmail_com@instance-7:~$ cat /proc/swaps
Filename                                Type            Size    Used    Priority
/var/swapfile                           file            1228796 0       -2
hoge_gmail_com@instance-7:~$
hoge_gmail_com@instance-7:~$ echo '/var/swapfile swap swap defaults 0 0' | sudo tee -a /etc/fstab
/var/swapfile swap swap defaults 0 0
hoge_gmail_com@instance-7:~$
hoge_gmail_com@instance-7:~$
gitインストール
anyenvのインストールにgitを使いますが、gitは初期状態だと使えないのでインストールします。
hoge_gmail_com@instance-7:~$ sudo apt-get install git-all
ログが鬼のように流れます。体感5分。
最後、以下のような感じで終わります。
Install emacsen-common for emacs
emacsen-common: Handling install of emacsen flavor emacs
Install git for emacs
Setting up git-el (1:2.20.1-2+deb10u3) ...
Install git for emacs
Install git for emacs
Setting up emacs (1:26.1+1-3.2+deb10u1) ...
Setting up git-all (1:2.20.1-2+deb10u3) ...
Processing triggers for libgdk-pixbuf2.0-0:amd64 (2.38.1+dfsg-1) ...
Processing triggers for libc-bin (2.28-10) ...
hoge_gmail_com@instance-7:~$
anyenvインストール
また例のサイトの手順に戻り、anyenvをインストールします。
hoge_gmail_com@instance-7:~$ git clone https://github.com/anyenv/anyenv ~/.anyenv
Cloning into '/home/hoge_gmail_com/.anyenv'...
remote: Enumerating objects: 14, done.
remote: Counting objects: 100% (14/14), done.
remote: Compressing objects: 100% (11/11), done.
remote: Total 406 (delta 3), reused 4 (delta 2), pack-reused 392
Receiving objects: 100% (406/406), 70.99 KiB | 3.09 MiB/s, done.
Resolving deltas: 100% (179/179), done.
hoge_gmail_com@instance-7:~$
これ以外のコマンドも手順通り忠実に行います。
さらに、pyenvのインストールも手順通りに。
pyenvのバージョンは。。。
hoge_gmail_com@instance-7:~$ pyenv --version
pyenv 1.2.20-7-gdd62b0d1
Python 3.8.5 インストール
やっと、pyenvにPython 3.8.5 をインストールします。(ほとんどログ流れず、しかし約15分)
globalして、無事3.8.5に。
hoge_gmail_com@instance-7:~$ pyenv install 3.8.5
Downloading Python-3.8.5.tar.xz...
-> https://www.python.org/ftp/python/3.8.5/Python-3.8.5.tar.xz
Installing Python-3.8.5...

Installed Python-3.8.5 to /home/hoge_gmail_com/.anyenv/envs/pyenv/versions/3.8.5

hoge_gmail_com@instance-7:~$
hoge_gmail_com@instance-7:~$ pyenv global 3.8.5
hoge_gmail_com@instance-7:~$ python --version
Python 3.8.5
hoge_gmail_com@instance-7:~$
(3)GCEインスタンスへのリポジトリのクローン
早速、Cloud Source Repositoriesのレポジトリをクローンしてみます。
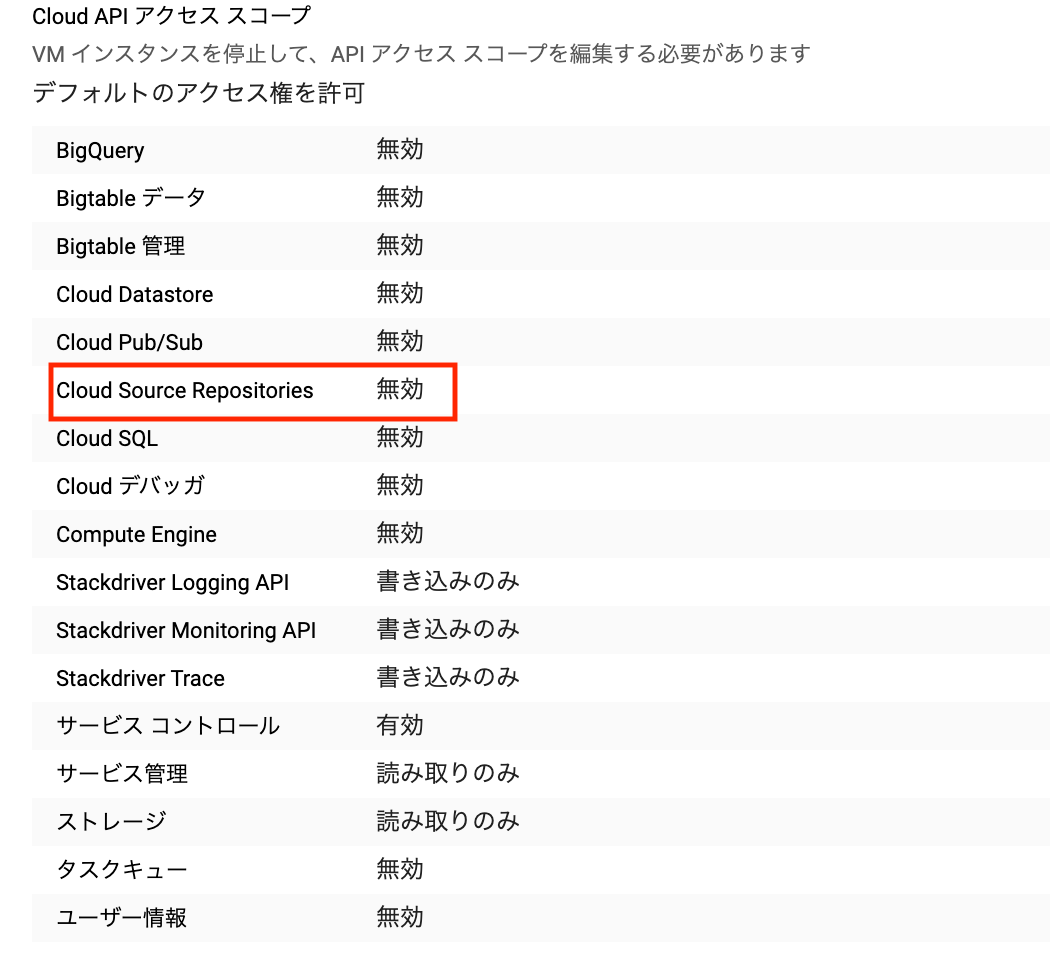
instance-7:10/01/20 12:24:54 ~ $ gcloud source repos clone gce-cron-test
ERROR: (gcloud.source.repos.clone) PERMISSION_DENIED: Request had insufficient authentication scopes.

If you are in a compute engine VM, it is likely that the specified scopes during VM creation are not enough to run this command.
See https://cloud.google.com/compute/docs/access/service-accounts#accesscopesiam for more information of access scopes.
See https://cloud.google.com/compute/docs/access/create-enable-service-accounts-for-instances#changeserviceaccountandscopes for how to update access scopes of the VM.
Cloud Shellではすんなにいった
gcloud source repos cloneに失敗しました。。。
Cloud API アクセススコープ修正
Cloud API アクセススコープが問題のようなので、修正します。
一旦VMインスタンスを停止して、[VMインスタンスの詳細] > [編集] から、一番下の「Cloud API アクセス スコープ」で、"Cloud Source Repositories"の権限を、無効から読み取りのみに変更します。
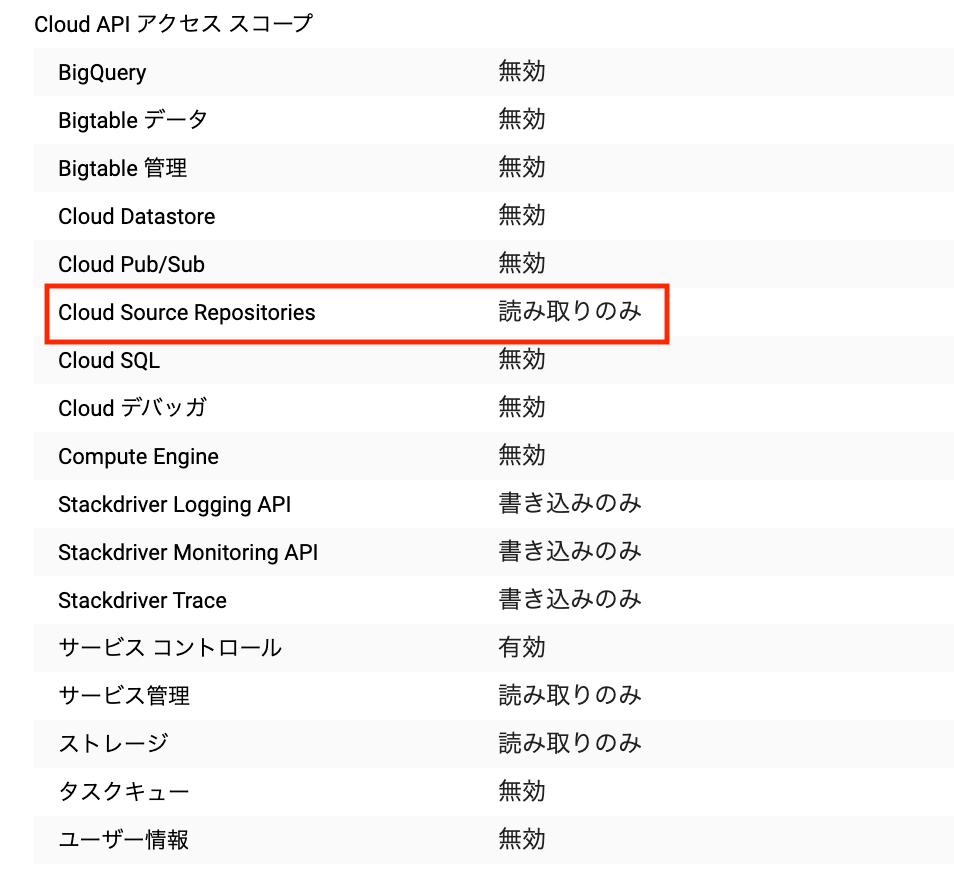
クローン実施
これで、VMからCloud Source Repositoriesの操作ができるようになるはずです。
instance-7:10/01/20 12:51:36 ~ $
instance-7:10/01/20 12:51:36 ~ $ gcloud source repos clone gce-cron-test
Cloning into '/home/hogehoge_gmail_com/gce-cron-test'...
remote: Total 11 (delta 1), reused 11 (delta 1)
Unpacking objects: 100% (11/11), done.
Project [my-gce-app] repository [gce-cron-test] was cloned to [/home/hogehoge_gmail_com/gce-cron-test].
成功しました。
gce-cron-testディレクトリの中身を確認します。
nstance-7:10/01/20 12:53:02 ~ $
instance-7:10/01/20 12:53:20 ~ $
instance-7:10/01/20 12:53:20 ~ $ cd gce-cron-test
instance-7:10/01/20 12:53:42 ~/gce-cron-test $ ls -la
total 36
drwxr-xr-x 3 hogehoge_gmail_com hogehoge_gmail_com 4096 Oct  1 12:52 .
drwxr-xr-x 6 hogehoge_gmail_com hogehoge_gmail_com 4096 Oct  1 12:52 ..
-rw-r--r-- 1 hogehoge_gmail_com hogehoge_gmail_com 6148 Oct  1 12:52 .DS_Store
drwxr-xr-x 8 hogehoge_gmail_com hogehoge_gmail_com 4096 Oct  1 12:52 .git
-rw-r--r-- 1 hogehoge_gmail_com hogehoge_gmail_com  146 Oct  1 12:52 cron-test.py
-rw-r--r-- 1 hogehoge_gmail_com hogehoge_gmail_com 2352 Oct  1 12:52 my-web-scraping-app-6293fbee8c53.json
-rw-r--r-- 1 hogehoge_gmail_com hogehoge_gmail_com 2763 Oct  1 12:52 requests-test2.py
-rw-r--r-- 1 hogehoge_gmail_com hogehoge_gmail_com  334 Oct  1 12:52 requirements.txt
instance-7:10/01/20 12:53:47 ~/gce-cron-test $hogehoge
おなじみの顔ぶれが並び、見事に成功です。
pythonのパスを確認します。
instance-7:10/01/20 12:53:56 ~/gce-cron-test $
instance-7:10/01/20 12:53:56 ~/gce-cron-test $
instance-7:10/01/20 12:58:06 ~ $
instance-7:10/01/20 12:58:06 ~ $ which python
/home/hogehoge_gmail_com/.anyenv/envs/pyenv/shims/python
instance-7:10/01/20 12:59:10 ~ $
(4)crontabの設定(テストPGM)
いよいよcrontabの編集をしましょう。
最初にeditorのチョイスを求められるので、無難にvimを選択します。
instance-7:10/01/20 13:05:10 ~/gce-cron-test $
instance-7:10/01/20 13:05:36 ~/gce-cron-test $
instance-7:10/01/20 13:05:36 ~/gce-cron-test $ crontab -e
no crontab for hogehoge_gmail_com - using an empty one

Select an editor.  To change later, run 'select-editor'.
  1. /bin/nano        <---- easiest
  2. /usr/bin/vim.basic
  3. /usr/bin/vim.tiny
  4. /usr/bin/emacs

Choose 1-4 [1]: 2
crontab: installing new crontab
instance-7:10/01/20 13:06:47 ~/gce-cron-test $
crontab: installing new crontabで新しいcrontabが生成されました。
crontab -l で中身を確認します。
やり方は今までと一緒で、pythonのパスとPGMとlogのディレクトリを微調整するのみです。
instance-7:10/01/20 13:06:52 ~/gce-cron-test $ crontab -l
# Edit this file to introduce tasks to be run by cron.
#
# Each task to run has to be defined through a single line
# indicating with different fields when the task will be run
# and what command to run for the task
#
# To define the time you can provide concrete values for
# minute (m), hour (h), day of month (dom), month (mon),
# and day of week (dow) or use '*' in these fields (for 'any').
#
# Notice that tasks will be started based on the cron's system
# daemon's notion of time and timezones.
#
# Output of the crontab jobs (including errors) is sent through
# email to the user the crontab file belongs to (unless redirected).
#
# For example, you can run a backup of all your user accounts
# at 5 a.m every week with:
# 0 5 * * 1 tar -zcf /var/backups/home.tgz /home/
#
# For more information see the manual pages of crontab(5) and cron(8)
#
# m h  dom mon dow   command
* * * * * cd /home/hogehoge_gmail_com/gce-cron-test; /home/hogehoge_gmail_com/.anyenv/envs/pyenv/shims/python /home/hogehoge_gmail_com/gce-cron-test/cron-test.py >> /home/hogehoge_gmail_com/gce-cron-test/cron.log 2>&1
instance-7:10/01/20 13:06:58 ~/gce-cron-test $
スクレイピングの前にテストPGMを動かした結果。
instance-7:10/01/20 13:09:49 ~/gce-cron-test $ cat cron.log
2020/10/01 13:07:02 cronが動いた!
2020/10/01 13:08:01 cronが動いた!
2020/10/01 13:09:01 cronが動いた!
2020/10/01 13:10:01 cronが動いた!
crontabはGCEでもちゃんと動くことが確認できました。
(5)crontabの設定(スクレイピングPGM)
スクレイピングのライブラリインストール
requirements.txtを使って、ライブラリをインストールします。
instance-7:10/02/20 11:54:02 ~/gce-cron-test $ /home/hogehoge_gmail_com/.anyenv/envs/pyenv/versions/3.8.5/bin/python3.8 -m pip install -r requirements.txt
がっつりインストールされました。
instance-7:10/02/20 11:57:34 ~/gce-cron-test $ pip list
Package              Version
-------------------- ---------
beautifulsoup4       4.9.1
cachetools           4.1.1
certifi              2020.6.20
chardet              3.0.4
google-auth          1.21.0
google-auth-oauthlib 0.4.1
gspread              3.6.0
httplib2             0.18.1
idna                 2.10
oauth2client         4.1.3
oauthlib             3.1.0
pip                  20.2.3
pyasn1               0.4.8
pyasn1-modules       0.2.8
requests             2.24.0
requests-oauthlib    1.3.0
rsa                  4.6
setuptools           47.1.0
six                  1.15.0
soupsieve            2.0.1
    #scope = ['https://spreadsheets.google.com/feeds',
urllib3              1.25.10
crontabに載せるコマンドを直接叩いてみます。
iinstance-7:10/02/20 11:57:40 ~/gce-cron-test $
instance-7:10/02/20 12:06:15 ~/gce-cron-test $ cd /home/hogehoge_gmail_com/gce-cron-test; /home/hogehoge_gmail_com/.anyenv/envs/pyenv/shims/python /home/hogehoge_gmail
_com/gce-cron-test/requests-test2.py
2020/10/02 12:06:44 スクレイピングを終了しました。
instance-7:10/02/20 12:06:46 ~/gce-cron-test $
成功です。

### crontabの設定(スクレイピングPGM)
続いて、crontabを編集します。

```bash:bash
instance-7:10/02/20 12:06:57 ~/gce-cron-test $
instance-7:10/02/20 12:06:59 ~/gce-cron-test $ crontab -e
crontab: installing new crontab
instance-7:10/02/20 12:08:52 ~/gce-cron-test $
instance-7:10/02/20 12:08:54 ~/gce-cron-test $
instance-7:10/02/20 12:08:54 ~/gce-cron-test $ crontab -l
# Edit this file to introduce tasks to be run by cron.
#
# Each task to run has to be defined through a single line
# indicating with different fields when the task will be run
# and what command to run for the task
#
# To define the time you can provide concrete values for
# minute (m), hour (h), day of month (dom), month (mon),
# and day of week (dow) or use '*' in these fields (for 'any').
#
# Notice that tasks will be started based on the cron's system
# daemon's notion of time and timezones.
#
# Output of the crontab jobs (including errors) is sent through
# email to the user the crontab file belongs to (unless redirected).
#
# For example, you can run a backup of all your user accounts
# at 5 a.m every week with:
# 0 5 * * 1 tar -zcf /var/backups/home.tgz /home/
#
# For more information see the manual pages of crontab(5) and cron(8)
#
# m h  dom mon dow   command
# * * * * * cd /home/hogehoge_gmail_com/gce-cron-test; /home/hogehoge_gmail_com/.anyenv/envs/pyenv/shims/python /home/hogehoge_gmail_com/gce-cron-test/cron-test.py >> /home/hogehoge_gmail_com/gce-cron-test/cron.log 2>&1
*/3 * * * * cd /home/hogehoge_gmail_com/gce-cron-test; /home/hogehoge_gmail_com/.anyenv/envs/pyenv/shims/python /home/hogehoge_gmail_com/gce-cron-test/requests-test2.py >> /home/hogehoge_gmail_com/gce-cron-test/cron.log 2>&1
instance-7:10/02/20 12:11:42 ~/gce-cron-test $
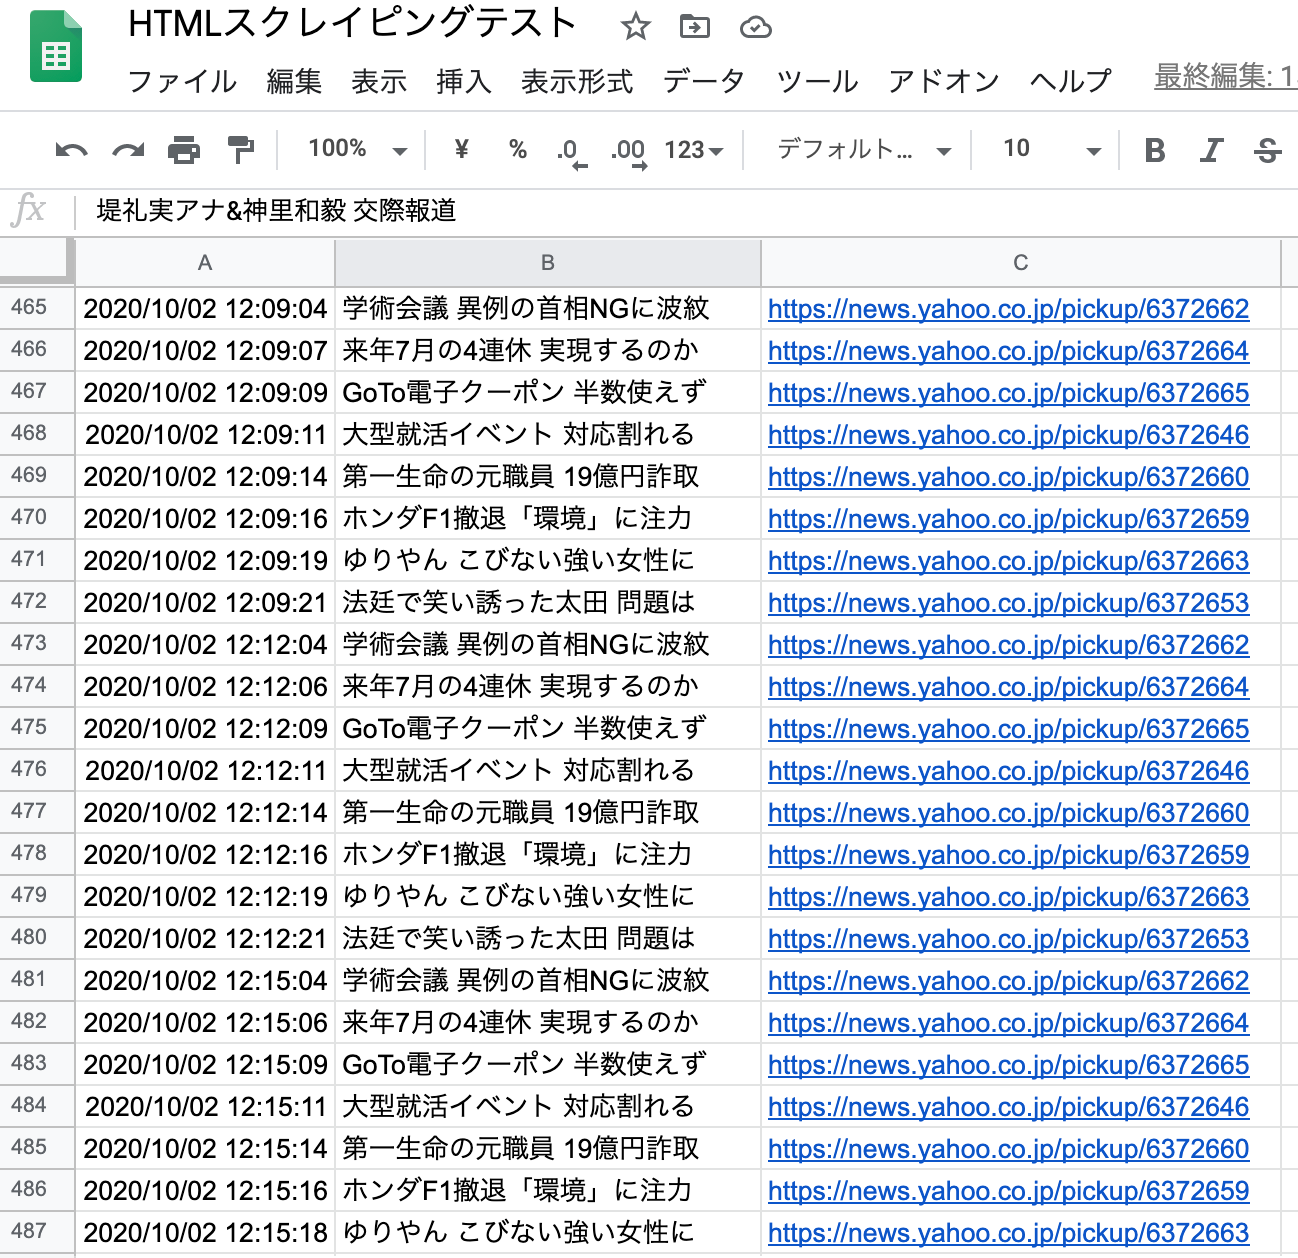
3分おきの設定でうまく動きました!!
GCEでのpythonスクレイピング自動実行成功です!
instance-7:10/02/20 12:16:38 ~/gce-cron-test $ cat cron.log
2020/10/01 13:04:53 cronが動いた!
2020/10/01 13:07:02 cronが動いた!
2020/10/01 13:08:01 cronが動いた!
2020/10/01 13:09:01 cronが動いた!
2020/10/01 13:10:01 cronが動いた!
2020/10/02 12:09:21 スクレイピングを終了しました。
2020/10/02 12:12:21 スクレイピングを終了しました。
2020/10/02 12:15:21 スクレイピングを終了しました。
instance-7:10/02/20 12:16:48 ~/gce-cron-test $
まとめ
・GCEでもcrontabは動く
・GCEのインスタンスは無料枠の性能でもスクレイピングは動く
・GCEのVMインスタンスは、初期状態でgitはインストールしないと使えない。
・GCEのVMインスタンスは、権限設定しないとリポジトリ操作ができない。
・GCE無料枠でのPython3のインストールはちゃんとswap領域を設定してからインストールしないと失敗するかも