RaspberryPiプログラムをMacでコンパイルおよびデバッグ
RaspberryPiプログラムをLinux上でクロスコンパイル&デバッグする記事は見かけるが、Mac上でこれらを行っているものはあまり見かけないので、備忘録も兼ねて記録する。
環境
Mac
macOS Catalina 10.15.7
RaspberryPi
大昔に買ったもの。バージョンなどは下記のとおり。(これらの確認方法については参照サイト参照)
pi@raspberrypi:~ $ uname -a
Linux raspberrypi 4.19.97+ #1294 Thu Jan 30 13:10:54 GMT 2020 armv6l GNU/Linux
pi@raspberrypi:~ $ lsb_release -a
No LSB modules are available.
Distributor ID:	Raspbian
Description:	Raspbian GNU/Linux 10 (buster)
Release:	10
Codename:	buster
pi@raspberrypi:~ $ cat /proc/device-tree/model
Raspberry Pi Model B Plus Rev 1.2
クロスコンパイラ&クロスコンパイル
ほぼ、こちらの記事に従う。
1 Command line toolおよびHomebrewをインストール
こちらのとおり。
2 wgetインストール(オプション)
$ brew install wget
3 クロスコンパイラ用ディレクトリの作成
$ mkdir -p raspbian-sdk/{prebuilt,sysroot}
4 clang+llvmのダウンロードおよび解凍
$ wget https://github.com/llvm/llvm-
project/releases/download/llvmorg-11.0.0/clang+llvm-11.0.0-x86_64-apple-darwin.tar.xz
$ tar -xzf clang+llvm-11.0.0-x86_64-apple-darwin.tar.xz -C "raspbian-sdk/prebuilt" --strip-components=1
5 binutilsのインストール
私の環境では、v2.31以上のbinutilsはうまくBuildできず、v2.30を利用。
$ wget http://ftp.gnu.org/gnu/binutils/binutils-2.30.tar.xz
$ tar -xzf binutils-2.30.tar.xz
$ cd binutils-2.30
$ brew install coreutils
$ ./configure --prefix="`/usr/local/bin/realpath ../raspbian-sdk/prebuilt`" \
	--target=arm-linux-gnueabihf \
	--enable-gold=yes \
	--enable-ld=yes \
	--enable-targets=arm-linux-gnueabihf \
	--enable-multilib \
	--enable-interwork \
	--disable-werror \
	--quiet
$ make && make install
6 最初のディレクトリに戻る
$ cd ..
7 rsync導入
Macにインストール済のrsyncでは、この後に実施する何かのオプションが足りないらしい(どこかの記事にあり)。
$ brew install rsync
8 RaspberryPiからライブラリやヘッダをMacにコピー
本題からそれるが、RaspberryPiにはavahi-daemonが動作する設定をしているので、IPアドレスではなく、"raspberrypi.local"でRaspberryPiを指定することが可能。
$ /usr/local/bin/rsync -rzLR --safe-links \
	pi@raspberrypi.local:/usr/lib/arm-linux-gnueabihf \
	pi@raspberrypi.local:/usr/lib/gcc/arm-linux-gnueabihf \
	pi@raspberrypi.local:/usr/include \
	pi@raspberrypi.local:/lib/arm-linux-gnueabihf \
	raspbian-sdk/sysroot
9 クロスコンパイル用のスクリプト作成
$ vi raspbian-sdk/prebuilt/bin/arm-linux-gnueabihf-clang
# !/bin/bash
BASE=$(dirname $0)
SYSROOT="${BASE}/../../sysroot"
TARGET=arm-linux-gnueabihf
COMPILER_PATH="${SYSROOT}/usr/lib/gcc/${TARGET}/8"
exec env COMPILER_PATH="${COMPILER_PATH}" \
	"${BASE}/clang" --target=${TARGET} \
		--sysroot="${SYSROOT}" \
		-isysroot "${SYSROOT}" \
		-L"${COMPILER_PATH}" \
		--gcc-toolchain="${BASE}" \
		"$@"
$ chmod +x raspbian-sdk/prebuilt/bin/arm-linux-gnueabihf-clang
10 ビルド&RaspberryPiへのコピー
ここでは次のソースコードをビルド&デバッグの対象とする。
# include <stdio.h>

int main() {
  int i, sum=0;
  printf("Bonjour!\n");
  for (i=1; i<=10; i++) {
    sum += i;
    printf("i=%d sum=%d\n", i, sum);
  }
  printf("Au revoir!\n");
  return(0);
}
$ ls
abc.c
$ ../raspbian-sdk/prebuilt/bin/arm-linux-gnueabihf-clang -g3 -o abc abc.c
$ scp abc pi@raspberrypi.local:
デバッグ環境(gdb)
RaspberryPi
gdbserverをインストール。
pi@raspberrypi:~ $ sudo apt install gdbserver
Mac
$ brew install arm-none-eabi-gdb
など。LinaroなどにもBuildされたgdbが見つかる。
デバッグ
RaspberryPi
pi@raspberrypi:~ $ gdbserver --multi :5555
Listening on port 5555
Mac(CLI)
gdb用スクリプト(gdb_local)を用意して、arm-none-eabi-gdbを起動する。
$ cat gdb_load
target extended-remote raspberrypi.local:5555
file /Users/xyz/proj/pi/abc
remote put /Users/xyz/proj/pi/abc /home/pi/abc
set remote exec-file /home/pi/abc
start
$
$ arm-none-eabi-gdb -x gdb_load

 多数メッセージ省略

Temporary breakpoint 1 at 0x10424: file abc.c, line 4.
warning: A handler for the OS ABI "GNU/Linux" is not built into this configuration
of GDB.  Attempting to continue with the default armv6 settings.


Temporary breakpoint 1, main () at abc.c:4
4	  int i, sum=0;
(gdb)
この時のRaspberryPi側表示。
Remote debugging from host 192.168.10.107
Process /home/pi/abc created; pid = 850
あとは、煮るなり焼くなりする。
Mac(VSCode)
VSCodeは使ったことがないので、こちらの記事を参考にして、素人レベルの視点で記載。
ソースコードがあるディレクトリを開いた後、VSCodeにてデバッグ開始。

すると、

となり、「C++(GDB/LLDB)」を選択する。その後、launch.jsonが開くので、次のように編集。
{
    "version": "0.2.0",
    "configurations": [
        {
            "name": "arm-none-eabi-gcc - アクティブ ファイルのビルドとデバッグ",
            "type": "cppdbg",
            "request": "launch",
            "program": "${workspaceFolder}/abc",
            "args": [],
            "stopAtEntry": true,
            "cwd": "${workspaceFolder}",
            "environment": [],
            "externalConsole": false,
            "MIMode": "gdb",
            "miDebuggerPath": "arm-none-eabi-gdb",
            "setupCommands": [
                {"text": "target extended-remote raspberrypi.local:5555"},
                {"text": "file ${workspaceFolder}/abc"},
                {"text": "remote put ${workspaceFolder}/abc /home/pi/abc"},
                {"text": "set remote exec-file /home/pi/abc"}
            ]
        }
    ]
}
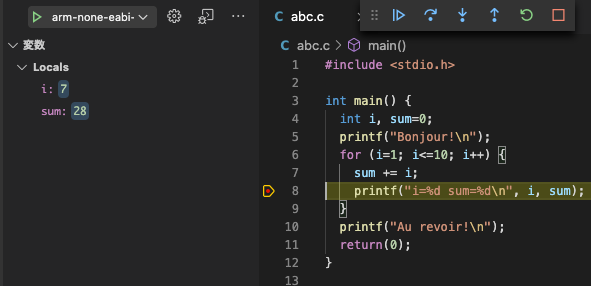
適宜、メニューから「デバッグの開始」を選択し、設定したい行にブレークポイントを設定する。

ブレークポイント選択後の様子(8行目)。

変数の状況を見るには、

ビューを開くから、

「変数」を検索すると、変数を表示するWindowが表示される。

変数をクリックすれば、値を変更することも可能。
終わりに
参考サイトの方、トレビアンです。