LinuxにてL2TPを実現
LinuxでL2TPを実現してみた。こちらのサイト(「Linuxのl2tp_ethモジュールを使ってL2ネットワークを作る」)の内容を自分なりに解釈して簡略化したものである。
ネットワーク
下記ネットワーク構成であり、すべてのLinuxは、VirtualBox上のVM上で動作している。
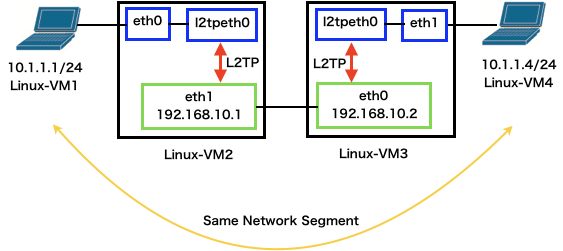
両端が同一ネットワークセグメントとなる。ネットワークI/F(l2tpeth0, eth0, eth1)については後述。
設定
VM
小生の環境では、VMにて、プロミスキャスモードを「すべて許可」にする必要があった。

Linux
LT2Pに関する説明を下記する。なお、Linux-VM2のeth1(192.168.10.1)およびLinux-VM3のeth0(192.168.10.2)の設定はほぼ自明なので、説明省略。
l2tp_ethモジュール
l2tp_ethモジュールをロードする。
# modprobe l2tp_eth
# lsmod | grep l2tp
l2tp_eth               16384  1
l2tp_netlink           24576  1 l2tp_eth
l2tp_core              32768  2 l2tp_eth,l2tp_netlink
ip6_udp_tunnel         16384  1 l2tp_core
udp_tunnel             16384  1 l2tp_core
Linux-VM2
L2TPトンネルの作成。
# ip l2tp add tunnel tunnel_id 1001 peer_tunnel_id 1002 encap udp local 192.168.10.1 remote 192.168.10.2 udp_sport 1701
 udp_dport 1701
お互いを指すようなトンネルID、自機および対向機のIPアドレス、ポート番号を指定する。次にセッションの作成。
# ip l2tp add session tunnel_id 1001 session_id 2001 peer_session_id 2002
トンネルID内に、自機および対向機のセッションIDを指定する。これにより、L2TP用のl2tpeth0 I/Fが作成される。このI/Fは、作成したトンネルIPアドレスを持つI/F"eth1"の上に位置付けされるイメージと考えている。
# ip link show dev l2tpeth0
4: l2tpeth0: <BROADCAST,MULTICAST,UP,LOWER_UP> mtu 1446 qdisc pfifo_fast state UNKNOWN mode DEFAULT group default qlen 1000
    link/ether de:60:f9:6d:91:a0 brd ff:ff:ff:ff:ff:ff
回線に依存して、MTUサイズを変更する必要があるが、ここでは省略。トンネルおよびセッションの状況は下記となる。
# ip l2tp show tunnel
Tunnel 1001, encap UDP
  From 192.168.10.1 to 192.168.10.2
  Peer tunnel 1002
  UDP source / dest ports: 1701/1701
  UDP checksum: disabled
# ip l2tp show session
Session 2001 in tunnel 1001
  Peer session 2002, tunnel 1002
  interface name: l2tpeth0
  offset 0, peer offset 0
次に、新たなブリッジI/F"br0"を作成し、L2TPの対象となる(同一ネットワークセグメントとする)I/F"eth0"とL2TP I/F"l2tpeth0"とを所属させる。
# ip link add br0 type bridge
# ip link set dev l2tpeth0 master br0
# ip link set dev eth0 master br0

# ip link show master br0
2: eth0: <BROADCAST,MULTICAST,UP,LOWER_UP> mtu 1500 qdisc pfifo_fast master br0 state UP mode DEFAULT group default qlen 1000
    link/ether 08:00:27:c2:b3:07 brd ff:ff:ff:ff:ff:ff
4: l2tpeth0: <BROADCAST,MULTICAST,UP,LOWER_UP> mtu 1446 qdisc pfifo_fast master br0 state UNKNOWN mode DEFAULT group default qlen 1000
    link/ether ee:59:cd:4b:ee:b2 brd ff:ff:ff:ff:ff:ff
Linux-VM3
Linux-VM2の設定値と、IPアドレスやIDが入れ替わるのみ。
# ip l2tp add tunnel tunnel_id 1002 peer_tunnel_id 1001 encap udp local 192.168.10.2 remote 192.168.10.1 udp_sport 1701 udp_dport 1701
# ip l2tp add session tunnel_id 1002 session_id 2002 peer_session_id 2001
# ip link add br0 type bridge
# ip link set dev l2tpeth0 master br0
# ip link set dev eth1 master br0
検証
Linux-VM1(10.1.1.1)からLinux-VM4(10.1.1.4)にping実行したときのLinux-VM2でのI/F"eth1"のWiresharkデータが下記である。

I/F"eth1"のUDP(青枠)上に、L2TPヘッダ(赤枠)が存在し、その上に、Ethernet+IPレイヤ(緑枠)が存在している。また、L2TPヘッダ内に、設定時に指定した対向のSession ID(2002)が見える。(Tunnel IDはどこにも見つからず。)
参考までに、Linux-VM2でのI/F"l2tpeth0"のWiresharkデータは下記となる。

こちらは、当然のことながら、L2TPヘッダなどは見当たらない。
最後に
L2レベルの話なので、net.ipv4.ip_forwardの設定値は影響しない。