【2019/06/09更新】M5 UI.Flow v1.3 で変更になった MicroPython に合わせて対応
- buttonA, buttonB, buttonC → btnA, btnB, btnC
- wifisetup → wifiCfg
- rtc.ntp_sync → ntptime.py
- time.strftime → .format で対応
概要
CO2濃度センサー MH-Z19B を購入したので、以前作成した「M5GO(M5Stack)で気温・湿度・気圧メーター&時計表示」 を元にCO2濃度メーター表示を追加しました。また、Ambientへの送信、ボタンAを押す事で各メーターを画面全体表示で切り替える、ボタンCを押す事でMH-Z19Bのゼロキャリブレーションを行う等の仕組みも実装しています。
環境
- M5GO
- M5 UI.Flow (Firmware v1.3.2-en)
- 環境センサー(DHT12、BMP280)
- CO2濃度センサー(MH-Z19B)
- MicroPythonで記述
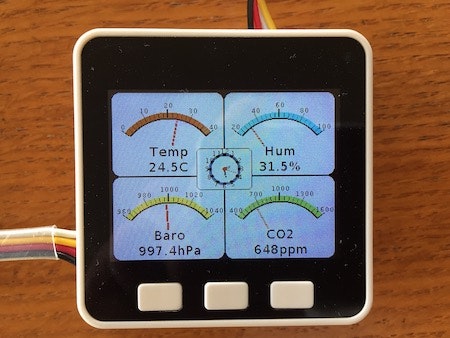
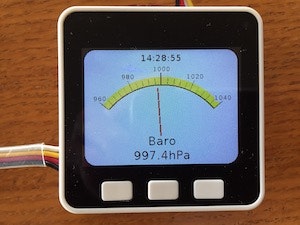
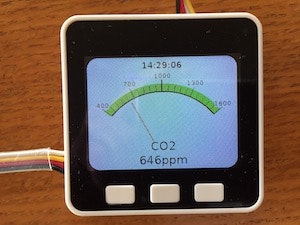
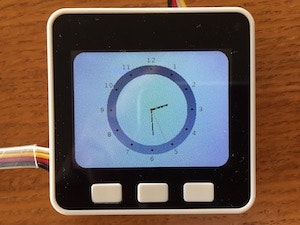
実行結果
全メーターと(無理やり)時計を表示
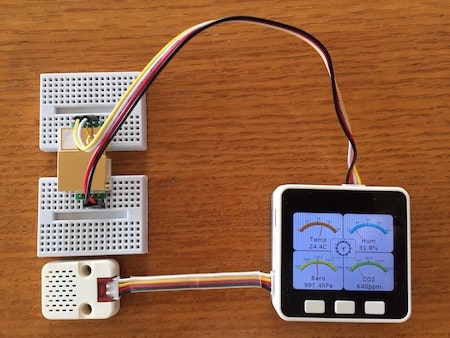
(M5GO/M5Stack FIRE 付属のケーブル/説明書と市販のGrove用のケーブル(MH-Z19Bとの接続で使用)では黄と白のケーブルが逆になっているので要注意)
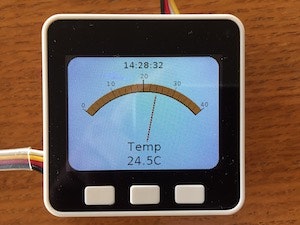
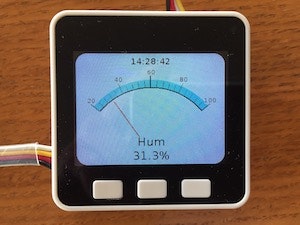
ボタンAを押す事で表示を切り替え
Ambientでのグラフ表示
(MH-Z19Bで取得できる気温は整数値なのでDHT12(小数点以下1桁) BMP280(小数点以下2桁)と比べると大雑把)
(DHT12で取得している湿度の値、以前は妥当な値でしたが、今回の値は別途 Raspberry Pi で取得している BME-280 での取得値と比べると20%程度低い値となってしまっています。センサーの問題なのか、原因不明です)

MH-Z19B の接続
MH-Z19B は M5Stack の Port C (UART) に接続です。
| PORT C | MH-Z19B |
|---|---|
| GND | GND |
| 5V | Vin |
| TXD (G17) | RX |
| RXD (G16) | TX |
【注意】
「M5BALAに超音波距離センサーを載せて障害物回避」 にも書きましたが、M5GO/M5Stack FIRE 付属のケーブル/説明書ではケーブルの色が「黒、赤、黄、白」となっていますが、市販のGrove用のケーブルでは「黒、赤、白、黄」と黄と白が逆になっていますのでお気をつけて。今回も最初の接続時に間違えてしまい値が取得できませんでした。(学習してない…)
プログラム
取得データの Ambient へ送信してグラフ化を行うため以下を参考にしています。
M5StackでセンサーデーターをAmbientに送る (MicroPython編)
以下より ambient のMicroPython用モジュール ambient.py を取得
https://github.com/AmbientDataInc/ambient-python-lib
ampy を使って ambient.py を M5Stack に転送
$ ampy put ambient.py
使えなくなった rtc.ntp_sync の代わりに ntptime.py の修正版(タイムゾーンのオフセット指定を追加)を使用
#
# 以下にタイムゾーンのオフセット指定を追加
# https://github.com/micropython/micropython/blob/master/ports/esp8266/modules/ntptime.py
#
try:
    import usocket as socket
except:
    import socket
try:
    import ustruct as struct
except:
    import struct

# (date(2000, 1, 1) - date(1900, 1, 1)).days * 24*60*60
NTP_DELTA = 3155673600

host = "pool.ntp.org"

def time():
    NTP_QUERY = bytearray(48)
    NTP_QUERY[0] = 0x1b
    addr = socket.getaddrinfo(host, 123)[0][-1]
    s = socket.socket(socket.AF_INET, socket.SOCK_DGRAM)
    s.settimeout(1)
    res = s.sendto(NTP_QUERY, addr)
    msg = s.recv(48)
    s.close()
    val = struct.unpack("!I", msg[40:44])[0]
    return val - NTP_DELTA

# There's currently no timezone support in MicroPython, so
# utime.localtime() will return UTC time (as if it was .gmtime())
#
# offset: timezone offset (sec)
#         settime(9*60*60) for JST
def settime(offset=0):
    t = time() + offset
    import machine
    import utime
    tm = utime.localtime(t)
    tm = tm[0:3] + (0,) + tm[3:6] + (0,)
    machine.RTC().datetime(tm)
ampy を使って ntptime.py を M5Stack に転送
$ ampy put ntptime.py
# UI.Flow 1.2 以前は buttonA, buttonB, buttonC
# UI.Flow 1.3 以降は btnA, btnB, btnC
from m5stack import lcd, btnA, btnB, btnC
from dht12   import DHT12
from bmp280  import BMP280
import i2c_bus
import machine
import time
import math
import gc
import ambient

# Ambientで取得したチャネルのチャネルId, ライトキーを指定
AMBIENT_CHANNEL_ID = チャネルId
AMBIENT_WRITE_KEY  = 'ライトキー'

# MH-Z19B のCO2濃度取得コマンド
READ_CO2_CONCENTRATION = bytearray(b'\xff\x01\x86\x00\x00\x00\x00\x00\x79')
# MH-Z19B のゼロキャリブレーションコマンド
ZERO_POINT_CALIBRATION = bytearray(b'\xff\x01\x87\x00\x00\x00\x00\x00\x78')


class Meter:
    def __init__(self, x, y, w, h, tick_s, tick_e, color, title, value_format):
        self.x = x # メーターの表示位置
        self.y = y # メーターの表示位置
        self.w = w # メーターの表示幅
        self.h = h # メーターの表示高
        self.tick_s = tick_s              # 目盛の最小値
        self.tick_e = tick_e              # 目盛の最大値
        self.title  = title
        self.value_format = value_format  # 値をテキスト表示する際のフォーマット

        self.center_x = x + w // 2        # 針の原点
        self.center_y = y + int(h * 0.9)  # 針の原点
        self.prev_value = tick_s
        self.prev_angle = None

        lcd.roundrect(x, y, w, h, h // 10, lcd.BLACK, lcd.WHITE)
        lcd.arc(self.center_x, self.center_y, int(h * 0.67), int(h * 0.07), -50, 50, color, color)
        lcd.arc(self.center_x, self.center_y, int(h * 0.6), 2, -50, 50, lcd.BLACK)

        # 目盛の値表示用フォント設定
        if self.w == win_w:
            lcd.font(lcd.FONT_Default, transparent=False)
        else:
            lcd.font(lcd.FONT_DefaultSmall, transparent=True)

        fw, fh = lcd.fontSize()

        tick = tick_s
        tick_i = (tick_e - tick_s) // 4
        for r in range(-50, 51, 5):
            if r % 25 == 0:
                # 目盛の最小値から最大値を4分割して目盛値を表示
                lcd.lineByAngle(self.center_x - 1, self.center_y, int(h * 0.6), int(h * 0.1), r, lcd.BLACK)
                lcd.lineByAngle(self.center_x,     self.center_y, int(h * 0.6), int(h * 0.1), r, lcd.BLACK)
                tick_text = str(tick)
                text_width = lcd.textWidth(tick_text)
                lcd.print(tick_text, self.center_x + int(math.sin(math.radians(r)) * h * 0.7) - text_width // 2,
                                     self.center_y - int(math.cos(math.radians(r)) * h * 0.7) - fh,
                                     lcd.BLACK)
                tick += tick_i
            else:
                # 細かい目盛線を表示
                lcd.lineByAngle(self.center_x, self.center_y, int(h * 0.6), int(h * 0.05), r, lcd.BLACK)

    def update(self, value):
        # 取得値をテキストでも表示
        if self.w == win_w:
            lcd.font(lcd.FONT_DejaVu24, transparent=False)
        else:
            lcd.font(lcd.FONT_DejaVu18, transparent=False)

        fw, fh = lcd.fontSize()

        if value is not None:
            angle = int((value - self.tick_s) / (self.tick_e - self.tick_s) * 100 - 50)
            if angle != self.prev_angle:
                # 前回取得値の針を消去
                if self.prev_angle is not None:
                    for i in range(-1, 2):
                        lcd.lineByAngle(self.center_x + i, self.center_y, int(self.h * 0.15), int(self.h * 0.42),
                                        self.prev_angle, lcd.WHITE)
                # 今回取得値の針を表示
                for i in range(-1, 2):
                    lcd.lineByAngle(self.center_x + i, self.center_y, int(self.h * 0.15), int(self.h * 0.42),
                                    angle, lcd.RED)

                if self.title != '':
                    lcd.print(self.title, self.center_x - lcd.textWidth(self.title) // 2, self.y + self.h - int(fh * 2.4), lcd.BLACK)
                self.prev_angle = angle

            if value != self.prev_value:
                text = self.value_format.format(value)
                lcd.print(text, self.center_x - lcd.textWidth(text) // 2, self.y + self.h - int(fh * 1.2), lcd.BLACK)
                self.prev_value = value
        else:
            text = self.value_format.format(self.prev_value)
            lcd.print(text, self.center_x - lcd.textWidth(text) // 2, self.y + self.h - int(fh * 1.2), lcd.RED)


class Clock_digital:
    def __init__(self, x, y):
        self.x = x # 時計の表示位置
        self.y = y # 時計の表示位置

    def update(self):
        lcd.font(lcd.FONT_DejaVu18, transparent=False)
        lcd.print('{:02d}:{:02d}:{:02d}'.format(*time.localtime()[3:6]), self.x, self.y, lcd.BLACK)


class Clock:
    def __init__(self, x, y, w, h, color):
        self.x = x # 時計の表示位置
        self.y = y # 時計の表示位置
        self.w = w # 時計の表示幅
        self.h = h # 時計の表示高
        self.center_x = x + w // 2 # 針の中心
        self.center_y = y + h // 2 # 針の中心
        self.hour_deg = 0
        self.minute_deg = 0
        self.second_deg = 0

        lcd.roundrect(x, y, w, h, h // 10, lcd.BLACK, lcd.WHITE)
        # 0 から 360 とは書けないので、半分の円弧を合わせる
        lcd.arc(self.center_x, self.center_y, int(h * 0.39), int(h * 0.08),   0, 180, color, color)
        lcd.arc(self.center_x, self.center_y, int(h * 0.39), int(h * 0.08), 180, 360, color, color)

        if self.w == win_w:
            lcd.font(lcd.FONT_Default, transparent=False)
        else:
            lcd.font(lcd.FONT_DefaultSmall, transparent=True)

        fw, fh = lcd.fontSize()
        hour = 12
        for r in range(0, 360, 360 // 60):
            if r % (360 // 12) == 0:
                # 1〜12の位置に黒点および数字を表示
                lcd.circle(self.center_x + int(math.sin(math.radians(r)) * h / 2 * 0.7),
                           self.center_y - int(math.cos(math.radians(r)) * h / 2 * 0.7), 2, lcd.BLACK, lcd.BLACK)
                hour_text = str(hour)
                text_width = lcd.textWidth(hour_text)
                lcd.print(hour_text, self.center_x + int(math.sin(math.radians(r)) * h / 2 * 0.85) - text_width // 2,
                                     self.center_y - int(math.cos(math.radians(r)) * h / 2 * 0.85) - fh // 2,
                                     lcd.BLACK)
                hour = (hour + 1) % 12
            else:
                lcd.pixel(self.center_x + int(math.sin(math.radians(r)) * h / 2 * 0.7),
                          self.center_y - int(math.cos(math.radians(r)) * h / 2 * 0.7), lcd.BLACK)

    def update(self):
        def needle(n, m, deg, l, color):
            for i in range(n, n + m):
                if deg >= 315 or deg < 45 or deg >= 135 and deg < 225:
                    x, y = i, 0
                else:
                    x, y = 0, i
                lcd.lineByAngle(self.center_x + x, self.center_y + y,
                                0, l, deg, color)

        # 時分秒の各針の角度を計算
        (year, month, mday, hour, minute, second, weekday, yearday) = time.localtime()
        second_deg = second * 6
        minute_deg = minute * 6 + second_deg // 60
        hour_deg   = hour % 12 * 30 + minute_deg // 12

        # 時針の消去(角度が変わっていないときは消さない)
        if hour_deg != self.hour_deg:
            needle(-2, 4, self.hour_deg, int(self.h / 2 * 0.3), lcd.WHITE)
        # 分針の消去(角度が変わっていないときは消さない)
        if minute_deg != self.minute_deg:
            needle(-1, 2, self.minute_deg, int(self.h / 2 * 0.45), lcd.WHITE)
        # 秒針の消去
        needle(0, 1, self.second_deg, int(self.h / 2 * 0.6), lcd.WHITE)

        self.second_deg = second_deg
        self.minute_deg = minute_deg
        self.hour_deg = hour_deg

        # 時針の描画(4本線)
        needle(-2, 4, hour_deg, int(self.h / 2 * 0.3), lcd.BLACK)
        # 分針の描画(2本線)
        needle(-1, 2, minute_deg, int(self.h / 2 * 0.45), lcd.BLACK)
        # 秒針の描画(1本線)
        needle(0, 1, self.second_deg, int(self.h / 2 * 0.6), lcd.RED)
        # 中心に赤丸
        lcd.circle(self.center_x, self.center_y, 3, lcd.RED, lcd.RED)


def mhz19_checksum(value):
    s = 0
    for v in value[1:8]:
        s = (s + v) & 0xff
    return (0xff - s + 1) & 0xff


def mhz19_response(mhz19_value, checksum):
    print('{}-{:02d}-{:02d} {:02d}:{:02d}:{:02d}'.format(*time.localtime()[:6]), ' Script Name: ', __name__)
    print('{} [x{:02x}]'.format(' '.join('x{:02x}'.format(v) for v in mhz19_value), checksum))


def env_meter_update(meter_mode):
    while True:
        # 次の秒までの差分(ミリ秒)を求めてスリープ
        time.sleep_ms(1000 - int(time.time() % 1 * 1000))

        # 各メーターおよび時計の更新
        localtime = time.localtime()
        localtime_str = '{}-{:02d}-{:02d} {:02d}:{:02d}:{:02d}'.format(*localtime[:6])

        # 時計の表示を更新
        clock.update()

        try:
            # DHT12 から湿度を取得
            dht12.measure()
            h = dht12.humidity()

            # BMP280 から気温、気圧を取得
            t, p = bmp280.values
        except Exception as e:
            print('{}-{:02d}-{:02d} {:02d}:{:02d}:{:02d}'.format(*time.localtime()[:6]), ' Script Name: ', __name__)
            print('Exception: ', e)
            t, h, p = None, None, None

        # MH-Z19B からCO2濃度・気温を取得
        mhz19_value = bytearray(9)
        mhz19.write(READ_CO2_CONCENTRATION)
        mhz19.readinto(mhz19_value, len(mhz19_value))
        checksum = mhz19_checksum(mhz19_value)
        c = None
        if mhz19_value[0] == 0xff and mhz19_value[1] == 0x86 and mhz19_value[8] == checksum:
            # CO2濃度を取得
            c = mhz19_value[2] * 256 + mhz19_value[3]
            # 気温を取得
            mhz19_t = mhz19_value[4] - 40
        else:
            mhz19_response(mhz19_value, checksum)

        # それぞれのメーターに取得値を表示
        if meter_mode == 0 or meter_mode == 1:
            t_meter.update(t)
        if meter_mode == 0 or meter_mode == 2:
            h_meter.update(h)
        if meter_mode == 0 or meter_mode == 3:
            p_meter.update(p)
        if meter_mode == 0 or meter_mode == 4:
            c_meter.update(c)

        # Ambientへの送信は1分間隔で行う。
        # localtime[5](秒) == 0 の時に送信
        if localtime[5] == 0 and t is not None:
            try:
                if c is None:
                    am.send({'created': localtime_str,
                            'd1': dht12.temperature(), 'd2': h, 'd3': t, 'd4': p})
                else:
                    am.send({'created': localtime_str,
                            'd1': dht12.temperature(), 'd2': h, 'd3': t, 'd4': p, 'd6': c, 'd7': mhz19_t})
            except Exception as e:
                print('{}-{:02d}-{:02d} {:02d}:{:02d}:{:02d}'.format(*time.localtime()[:6]), ' Script Name: ', __name__)
                print('Ambient send error: ', e)

        gc.collect()

        # button A が押された時は表示を切り替える
        if btnA.wasPressed():
            return

        # button C が押された時は MH-Z19B のゼロキャリブレーションを行う
        if btnC.wasPressed():
            mhz19.write(ZERO_POINT_CALIBRATION)
            mhz19.readinto(mhz19_value, len(mhz19_value))
            checksum = mhz19_checksum(mhz19_value)
            mhz19_response(mhz19_value, checksum)


# M5 UI.Flow からの実行ではなく、APP.LIST に登録して実行する場合は、
# プログラム内でネットワーク接続を行う必要がある。
# Connect network
#
# UI.Flow 1.2 以前は以下
# import wifisetup
# wifisetup.auto_connect()
#
# UI.Flow 1.3 以降は以下
import wifiCfg
wifiCfg.autoConnect(lcdShow=True)

# 日本時間に同期
# UI.Flow 1.2 以前は以下
'''
rtc = machine.RTC()
rtc.ntp_sync('ntp.nict.jp', tz='JST-9')
# M5GOのfirmwareがv0.11ではntp_syncでtzを指定するとエラーになるので以下で対応
# rtc.ntp_sync('ntp.nict.jp')
# sys.tz('JST-9')

# 同期が完了するまで100ms程度かかる
for i in range(100):
    if rtc.synced():
        print('synced.')
        break
    print(i, end=' ')
    time.sleep_ms(10)
'''
# UI.Flow 1.3 以降は以下
# ntptime は以下のモジュールの改訂版(オフセット指定を追加)
# https://github.com/micropython/micropython/blob/master/ports/esp8266/modules/ntptime.py
import ntptime
ntptime.settime(9*60*60) # +09:00:00 for JST

# UI.Flow 1.2 以前はタイムスタンプの出力に以下のように time.strftime を使用していたが
# print(time.strftime('%Y-%m-%d %H:%M:%S', time.localtime()), ' Script Name: ', __name__)
# UI.Flow 1.3 以降は time.strftime が使えないため以下で対応
print('{}-{:02d}-{:02d} {:02d}:{:02d}:{:02d}'.format(*time.localtime()[:6]), ' Script Name: ', __name__)

am = ambient.Ambient(AMBIENT_CHANNEL_ID, AMBIENT_WRITE_KEY)

i2c = i2c_bus.get(i2c_bus.M_BUS)
dht12 = DHT12(i2c)
bmp280 = BMP280(i2c)

mhz19 = machine.UART(2, tx=17, rx=16)
mhz19.init(9600, bits=8, parity=None, stop=1)

lcd.setColor(lcd.BLACK, lcd.WHITE)
lcd.setTextColor(lcd.BLACK, lcd.WHITE)
lcd.clear(lcd.BLACK)

win_w, win_h = lcd.winsize() # (320, 240)

meter_mode = 0
while True:
    lcd.clear(lcd.BLACK)

    if meter_mode == 0:
        # 画面を4分割して、気温計、湿度計、気圧計、CO2濃度計を表示
        # 表示フォーマットは、表示桁数が減った時に(気圧が1000から999になった時等)
        # 前の表示を消すために前後に空白を入れている
        t_meter = Meter(0,          0,          win_w // 2, win_h // 2,   0,   40, lcd.ORANGE,      'Temp', ' {:.1f}C ')
        h_meter = Meter(win_w // 2, 0,          win_w // 2, win_h // 2,  20,  100, lcd.CYAN,        'Hum',  ' {:.1f}% ')
        p_meter = Meter(0,          win_h // 2, win_w // 2, win_h // 2, 960, 1040, lcd.YELLOW,      'Baro', ' {:.1f}hPa ')
        c_meter = Meter(win_w // 2, win_h // 2, win_w // 2, win_h // 2, 400, 1600, lcd.GREENYELLOW, 'CO2',  ' {:.0f}ppm ')
        # 中央に小さい時計を表示
        clock   = Clock(win_w // 2 - win_w // 8, win_h // 2 - win_h // 8 - 10, win_w // 4, win_h // 4, lcd.LIGHTGREY)
        # clock   = Clock_digital(win_w // 2 - 43, win_h // 2 - 8)
    elif meter_mode == 1:
        # 全画面で気温計を表示
        t_meter = Meter(0, 0, win_w, win_h,   0,   40, lcd.ORANGE,      'Temp', ' {:.1f}C ')
        clock   = Clock_digital(win_w // 2 - 43, 10)
    elif meter_mode == 2:
        # 全画面で湿度計を表示
        h_meter = Meter(0, 0, win_w, win_h,  20,  100, lcd.CYAN,        'Hum',  ' {:.1f}% ')
        clock   = Clock_digital(win_w // 2 - 43, 10)
    elif meter_mode == 3:
        # 全画面で気圧計を表示
        p_meter = Meter(0, 0, win_w, win_h, 960, 1040, lcd.YELLOW,      'Baro', ' {:.1f}hPa ')
        clock   = Clock_digital(win_w // 2 - 43, 10)
    elif meter_mode == 4:
        # 全画面でCO2濃度計を表示
        c_meter = Meter(0, 0, win_w, win_h, 400, 1600, lcd.GREENYELLOW, 'CO2',  ' {:.0f}ppm ')
        clock   = Clock_digital(win_w // 2 - 43, 10)
    elif meter_mode == 5:
        # 全画面で時計を表示
        clock   = Clock(0, 0, win_w, win_h, lcd.LIGHTGREY)

    env_meter_update(meter_mode)

    meter_mode = (meter_mode + 1) % 6
補足
MH-Z19B User’s Manual にはCO2濃度読み出し時の応答データについて Byte4〜Byte7 の値の説明がありませんが、以下の Raspberry Pi用Pythonモジュールのサイトに参考になりそうな情報があります。こちらを参考に Byte4 - 40 を温度として取得し Ambient へ送信しています。
https://github.com/UedaTakeyuki/mh-z19
Byte6とByte7について実際に動かした時の変化を出力してみたところ、以下のような動きになっていました。
起動直後の読み出し時は All 0
2019-04-13 20:03:41  Script Name:  __main__
x00 x00 x00 x00 x00 x00 x00 x00 x00 [x00]
約10分5秒ごとにByte6がインクリメント
2019-04-13 20:21:51  Script Name:  __main__
xff x86 x02 x24 x40 x00 x01 x00 x13 [x13]
2019-04-13 20:31:55  Script Name:  __main__
xff x86 x02 x33 x40 x00 x02 x00 x03 [x03]
2019-04-13 20:42:00  Script Name:  __main__
xff x86 x02 x30 x40 x00 x03 x00 x05 [x05]
2019-04-13 20:52:05  Script Name:  __main__
xff x86 x02 x25 x40 x00 x04 x00 x0f [x0f]
起動から24時間ごとに Automatic Baseline Correction が行われて Byte7がインクリメント、その後 Byte6がリセット
2019-04-14 20:03:25  Script Name:  __main__
xff x86 x02 x43 x40 x00 x8e x00 x67 [x67]
2019-04-14 20:13:30  Script Name:  __main__
xff x86 x02 x38 x40 x00 x8f x01 x70 [x70]
2019-04-14 20:23:35  Script Name:  __main__
xff x86 x02 x30 x40 x00 x00 x01 x07 [x07]
2019-04-14 20:33:40  Script Name:  __main__
xff x86 x02 x3c x40 x00 x01 x01 xfa [xfa]
2019-04-14 20:43:45  Script Name:  __main__
xff x86 x02 x2b x40 x00 x02 x01 x0a [x0a]