概要
M5BALAでライントレース、今回は M5Camera で線の画像を撮影し、iPad 上の Pythonista で画像処理して M5BALA の進行方向を制御する方式です。
- M5Camera の Firmware は購入時点のものをそのまま使用
- M5Camera の Wifi アクセスポイントに iPad を接続し Pythonista を実行
- M5Camera から取得した JPEG画像をグレースケールに変換
- 線の認識、線の位置による M5BALA の制御方式は「M5BALAでライントレース(iPhone Camera-Pythonista-BLE編)」 と同様
- M5Stack側は 「iPhoneを使ってM5BALAを操作する(Pythonista-BLE編)」 のものをそのまま使用
環境
- Pythonista3 v3.2
- iPad mini 4 iOS 12.1.1
- M5BALA+M5Stack FIRE
- Arduino 1.8.7 以下のライブラリを使用(Arduino IDEの「ライブラリを管理」からインストール可)
- M5Stack 0.2.4 - https://github.com/m5stack/M5Stack
- MPU6050_tockn 1.4.0 - https://github.com/tockn/MPU6050_tockn
- NeoPixelBus 2.3.4 - https://github.com/Makuna/NeoPixelBus
実行例
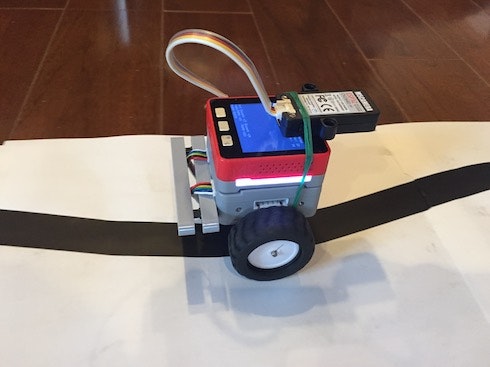
- M5Camera を M5BALA+M5Stack FIRE の上に載せ前方の線を撮影
- M5Camera のGROVEポートを M5Stack FIRE のポートA に接続して電源供給
- 待ち時間なしで画像取得、線の認識、M5BALAの制御を繰り返して、実際の処理レートは4fps程度
#M5BALA と遊ぼう、#M5Camera の画像をiPadの #Pythonista で処理してM5BALAを制御する方式の実装です。
— 稲澤祐一 (@inasawa) 2018年12月22日
「M5BALAでライントレース(M5Camera-Pythonista-BLE編)」https://t.co/Ya2JZA9Qve
制御しているiPadも一緒に撮影してみました。iPadにはM5Cameraの撮影画像が表示されています。#M5Stack pic.twitter.com/ogo1HDglKO
Pythonista3プログラム
M5BALA_M5Camera_BLE.py
# coding: utf-8

import time
from PIL import Image
import cb
import struct
import ui
import numpy as np
import matplotlib.pyplot as plt
import io
import requests

M5BALA_SERVICE_UUID        = 'c44205a6-c87c-11e8-a8d5-f2801f1b9fd1'.upper()
M5BALA_CHARACTERISTIC_UUID = 'c442090c-c87c-11e8-a8d5-f2801f1b9fd1'.upper()
M5BALA_NAME = 'M5BALA'

DEBUG_MODE = False
CAPTURE_INTERVAL = 0
if DEBUG_MODE:
    CAPTURE_INTERVAL = 5

TURN_MAX = 150
MOVE_OFFSET = 20
LINE_DETECTION_THRESHOLD = -10

# M5Camera のJPG画像取得用URL
M5CAMERA_URL = 'http://192.168.4.1/jpg'


class MyCentralManagerDelegate (object):
    def __init__(self):
        self.peripheral = None
        self.data_characteristics = None

    def did_discover_peripheral(self, p):
        if p.name and M5BALA_NAME in p.name and not self.peripheral:
            # Keep a reference to the peripheral, so it doesn't get garbage-collected:
            print('+++ Discovered peripheral: %s (%s)' % (p.name, p.uuid))
            self.peripheral = p
            cb.connect_peripheral(self.peripheral)
            label_status.text = 'Detected'

    def did_connect_peripheral(self, p):
        print('*** Connected: %s' % p.name)
        print('Discovering services...')
        label_status.text = 'Connected'
        p.discover_services()

    def did_fail_to_connect_peripheral(self, p, error):
        print('Failed to connect')
        label_status.text = 'Failed'

    def did_disconnect_peripheral(self, p, error):
        print('Disconnected, error: %s' % (error,))
        self.peripheral = None
        self.data_characteristics = None
        label_status.text = 'Scanning'
        cb.scan_for_peripherals()

    def did_discover_services(self, p, error):
        for s in p.services:
            print(s.uuid)
            if M5BALA_SERVICE_UUID in s.uuid:
                print('M5BALA found')
                p.discover_characteristics(s)

    def did_discover_characteristics(self, s, error):
        if M5BALA_SERVICE_UUID in s.uuid:
            for c in s.characteristics:
                if M5BALA_CHARACTERISTIC_UUID in c.uuid:
                    self.data_characteristics = c

    def send_action(self, move, turn):
        if self.peripheral and self.data_characteristics:
            data = struct.pack('hh', move, turn)
            self.peripheral.write_characteristic_value(self.data_characteristics, data, True)


# View が閉じられた時に処理を止めるため、カスタムビューを定義
class MyView (ui.View):
    def __init__(self, *args, **kwargs):
        super().__init__(*args, **kwargs)

    def will_close(self):
        global action_loop
        # This will be called when a presented view is about to be dismissed.
        # You might want to save data here.
        action_loop = False


# M5Cameraの画像サイズ(横800x縦600)に合わせた画像サイズ
frame_w = 800
frame_h = 600
main_view = MyView(frame=(0, 0, frame_w, frame_h))
main_view.name = 'M5BALA Line Trace'

image_view = ui.ImageView(frame=(0, 0, frame_w, frame_h))

# M5BALA制御用の M5Stack との BLE 接続状況の表示
label_status = ui.Label(frame=(0, 0, frame_w, 30), flex='W', name='status')
label_status.background_color = (0, 0, 0, 0.5)
label_status.text_color = 'white'
label_status.text = 'Scanning'
label_status.alignment = ui.ALIGN_CENTER

# M5Stack に送信する move/turn の値表示
label_action = ui.Label(frame=(0, 30, frame_w, 30), flex='W', name='action')
label_action.background_color = (0, 0, 0, 0.5)
label_action.text_color = 'white'
label_action.text = ''
label_action.alignment = ui.ALIGN_CENTER

# フレームの処理レート表示
label_fps = ui.Label(frame=(0, 60, frame_w, 30), flex='W', name='fps')
label_fps.background_color = (0, 0, 0, 0.5)
label_fps.text_color = 'white'
label_fps.text = ''
label_fps.alignment = ui.ALIGN_CENTER

main_view.add_subview(image_view)
main_view.add_subview(label_status)
main_view.add_subview(label_action)
main_view.add_subview(label_fps)

main_view.present('sheet')

cb_delegate = MyCentralManagerDelegate()
print('Scanning for peripherals...')
cb.set_central_delegate(cb_delegate)
cb.scan_for_peripherals()

# フレームの処理レート表示用
last_fps_time = time.time()
fps_counter = 0

action_loop = True
while action_loop:
    if True:
        # フレームの処理レート表示
        fps_counter += 1
        now = time.time()
        if int(now) > int(last_fps_time):
            label_fps.text = '{:5.2f} fps'.format((fps_counter) / (now - last_fps_time))
            last_fps_time = now
            fps_counter = 0

        # M5Cameraからの画像データを PIL Image として取得
        im = Image.open(requests.get(M5CAMERA_URL, stream=True).raw)

        # 取得した画像を Pythonista の View に表示
        with io.BytesIO() as bIO:
            im.save(bIO, im.format)
            image_view.image = ui.Image.from_data(bIO.getvalue())
            del bIO

        # 画像をグレースケールに変換
        im = im.convert('L')
        # 画像の縦中央部分の横1行のデータを取得
        imx = np.asarray(im)[im.size[1]//2, :].astype(np.float32)
        # 差分取得
        imd = np.diff(imx)

        if DEBUG_MODE:
            print(im.size)
            plt.figure()
            im.show()
            plt.figure()
            plt.plot(imx)
            plt.show()
            plt.figure()
            plt.plot(imd)
            plt.show()
            plt.close()

        # 差分データの最小値、最大値のインデックスを取得
        # 最小値:白から黒になる部分(線の左端)
        # 最大値:黒から白になる部分(線の右端)
        min_i = np.argmin(imd)
        max_i = np.argmax(imd)

        # move 前方向の移動量は固定値を設定
        move = MOVE_OFFSET
        # turn 線の左端部分と中央の差によって回転の移動量を計算する
        turn = TURN_MAX
        imd_xh = imd.shape[0] / 2
        # 輝度の差分の最小値が閾値より小さい時に線を認識したとして回転の計算をする
        # 閾値以上の場合は線を見失ったものとして最大の回転を行う
        if imd[min_i] < LINE_DETECTION_THRESHOLD:
            turn = int((min_i - imd_xh) / imd_xh * TURN_MAX)
        else:
            turn = TURN_MAX

        label_action.text = 'min:{} max:{} move:{} turn:{}'.format(imd[min_i], imd[max_i], move, turn)
        if DEBUG_MODE:
            print(min_i, max_i, imd[min_i], imd[max_i], min_i - imd_xh, move, turn)

        cb_delegate.send_action(move, turn)

    time.sleep(CAPTURE_INTERVAL)

# Disconnect everything:
cb.reset()