はじめに
textToPoints()
これの仕様は、点の列をベクトルで返すもので、テキストのパスごとになっていない。点の集合だけ欲しい場合は便利だが、パスごとに分かれていないと困る場合もある。例えばそれを使ってfillで描画したい場合に不便である。
実はこれを解消する議論がすでになされているようで、p5.js2.0の議題のひとつになっていて、それを実現する関数が導入予定である。つまり2.0になれば手に入るらしいです。
待てない人のためにこれを書くことにしました。
目的
ロードしたフォントに対して、それの輪郭を作る点列をパスごとに取得する。文字列の場合は、必要なら文字ごとに取得する。たとえば"ABC"なら"A","B","C"それぞれの点列を取得する(もちろんパスごと)。
コード全文(パスごと)
let huiFont;

function preload(){
  huiFont = loadFont("https://inaridarkfox4231.github.io/assets/HuiFont29.ttf");
}

function setup(){
  createCanvas(400,400);
  background(50);

  // まずcmdまでいく
  const cmd = huiFont.font.getPath("hui",0,0,200).commands;
  // これを文字列に変換する
  const cmdText = parseCmdToText(cmd);
  // 文字列をcontoursに変換する
  const contours = parseData({
    data:cmdText, parseScale:1
  });
  // bdを取る
  const bd = getBoundingBoxOfContours(contours);
  console.log(bd); // x,yはmin値、w,hがそこからの横幅と縦幅
  // 中央揃えしたいので全体から(x+w/2,y+h/2)を引く
  for(const ctr of contours){
    for(const p of ctr){
      p.sub(bd.x+bd.w/2, bd.y+bd.h/2);
    }
  }
  // 最後に内容をちょっとあれする。
  // mergeのthresholdはおおよそスケール*(1e-9)でよいかと
  // evenのminLengthはおおよそスケール*0.02でよいかと
  mergePointsAll(contours, {threshold:200*(1e-9), closed:true});
  evenlySpacingAll(contours, {closed:true, minLength:200*0.02});

  // じゃあ
  noFill();
  stroke(255);
  strokeWeight(2);
  translate(200,100);
  for(const ctr of contours){
    beginShape();
    for(const p of ctr){ vertex(p.x,p.y); }
    endShape(CLOSE);
  }
  // 長いですね

  textFont(huiFont);
  translate(0,160);
  textAlign(CENTER,CENTER);
  textSize(200);
  text("hui",0,0);
}

function parseCmdToText(cmd){
  let result = "";
  for(let i=0; i<cmd.length-1; i++){
    const command = cmd[i];
    const {x, y, x1, y1, x2, y2} = command;
    switch(command.type){
      case "M":
        result += "M " + x.toFixed(3) + " " + y.toFixed(3) + " ";
        break;
      case "Q":
        result += "Q " + x1.toFixed(3) + " " + y1.toFixed(3) + " " + x.toFixed(3) + " " + y.toFixed(3) + " ";
        break;
      case "L":
        result += "L " + x.toFixed(3) + " " + y.toFixed(3) + " ";
        break;
      case "C":
        result += "C " + x1.toFixed(3) + " " + y1.toFixed(3) + " " + x2.toFixed(3) + " " + y2.toFixed(3) + " " + x.toFixed(3) + " " + y.toFixed(3) + " ";
        break;
      case "Z":
        result += "Z ";
        break;
    }
  }
  result += "Z";
  return result;
}

function parseData(options = {}){
  const {data="M 0 0", bezierDetail2 = 8, bezierDetail3 = 5, parseScale = 1, lineSegmentLength = 1} = options;
  const cmdData = data.split(" ");
  const result = [];
  let subData = [];
  for(let i=0; i<cmdData.length; i++){
    switch(cmdData[i]){
      case "M":
        if (subData.length>0) result.push(subData.slice());
        subData.length = 0;
        subData.push(createVector(Number(cmdData[i+1]), Number(cmdData[i+2])).mult(parseScale));
        i+=2; break;
      case "L":
        const p = subData[subData.length-1];
        const q = createVector(Number(cmdData[i+1]), Number(cmdData[i+2])).mult(parseScale);
        const lineLength = q.dist(p);
        for(let lengthSum=0; lengthSum<lineLength; lengthSum += lineSegmentLength){
          subData.push(p5.Vector.lerp(p, q, lengthSum/lineLength));
        }
        subData.push(q);
        i+=2; break;
      case "Q":
        const p0 = subData[subData.length-1];
        const a0 = Number(cmdData[i+1])*parseScale;
        const b0 = Number(cmdData[i+2])*parseScale;
        const c0 = Number(cmdData[i+3])*parseScale;
        const d0 = Number(cmdData[i+4])*parseScale;
        for(let k=1; k<=bezierDetail2; k++){
          const t = k/bezierDetail2;
          subData.push(createVector(
            (1-t)*(1-t)*p0.x + 2*t*(1-t)*a0 + t*t*c0,
            (1-t)*(1-t)*p0.y + 2*t*(1-t)*b0 + t*t*d0
          ));
        }
        i+=4; break;
      case "C":
        const p1 = subData[subData.length-1];
        const a1 = Number(cmdData[i+1])*parseScale;
        const b1 = Number(cmdData[i+2])*parseScale;
        const c1 = Number(cmdData[i+3])*parseScale;
        const d1 = Number(cmdData[i+4])*parseScale;
        const e1 = Number(cmdData[i+5])*parseScale;
        const f1 = Number(cmdData[i+6])*parseScale;
        for(let k=1; k<=bezierDetail3; k++){
          const t = k/bezierDetail3;
          subData.push(createVector(
            (1-t)*(1-t)*(1-t)*p1.x + 3*t*(1-t)*(1-t)*a1 + 3*t*t*(1-t)*c1 + t*t*t*e1,
            (1-t)*(1-t)*(1-t)*p1.y + 3*t*(1-t)*(1-t)*b1 + 3*t*t*(1-t)*d1 + t*t*t*f1
          ));
        }
        i+=6; break;
      case "Z":
        // 最初の点を追加するんだけど、subData[0]を直接ぶち込むと
        // 頭とおしりが同じベクトルになってしまうので、
        // copy()を取らないといけないんですね
        // Lでつなぎます。
        const p2 = subData[subData.length-1];
        const q2 = subData[0].copy();
        const lineLength2 = q2.dist(p2);
        for(let lengthSum=0; lengthSum<lineLength2; lengthSum += lineSegmentLength){
          subData.push(p5.Vector.lerp(p2, q2, lengthSum/lineLength2));
        }
        subData.push(q2);
        //result.push(subData.slice());
        break;
    }
  }
  // Mが出てこない場合はパス終了
  result.push(subData.slice());
  return result;
}

function getBoundingBoxOfContours(contours){

  let _minX = Infinity;
  let _minY = Infinity;
  let _maxX = -Infinity;
  let _maxY = -Infinity;

  for(let contour of contours){
    for(let p of contour){
      _minX = Math.min(p.x, _minX);
      _minY = Math.min(p.y, _minY);
      _maxX = Math.max(p.x, _maxX);
      _maxY = Math.max(p.y, _maxY);
    }
  }
  return {x:_minX, y:_minY, w:_maxX-_minX, h:_maxY-_minY};
}

function mergePoints(points, options = {}){
  const {threshold = 0.000001, closed = false, showDetail = false} = options;

  let middlePointCount = 0;
  let tailPointCount = 0;

  for(let i = points.length-1; i >= 1; i--){
    const p = points[i];
    const q = points[i-1];
    const d = p.dist(q);
    if (d < threshold){
      middlePointCount++;
      if(showDetail){ console.log(`middle merged: ${d}`); }
      points.splice(i,1);
    }
  }
  if (closed) {
    // 頭に戻る場合はそれも排除する
    const d = points[0].dist(points[points.length-1]);
    if (d < threshold) {
      tailPointCount++;
      if(showDetail){ console.log(`tail merged: ${d}`); }
      points.pop();
    }
  }
  if(showDetail){
    console.log(`middle: ${middlePointCount} merged | tail: ${tailPointCount} merged`);
  }
}

function mergePointsAll(contours, options = {}){
  for(let contour of contours) {
    mergePoints(contour, options);
  }
}

function evenlySpacing(points, options = {}){
  const {partition, minLength = 1, closed = false, showDetail = false} = options;

  // closedの場合はおしりに頭を付ける
  // そして最後におしりを外す
  const q = points.slice();
  if(closed){ q.push(q[0].copy()); }

  // まず全長を計算する
  let totalLength = 0;
  let N = 0;
  let l = 0;
  for(let i=0; i<q.length-1; i++){ totalLength += q[i].dist(q[i+1]); }

  if(partition !== undefined){
    // partitionが定義されている場合はそれでNを決めてlはそれとtotalLengthで決める
    N = Math.max(1, partition);
    l = totalLength/N;
  }else{
    // 未定義の場合、minLengthを使う。これでNを決めてそこからlを決める。
    N = Math.floor(totalLength/minLength) + 1;
    l = totalLength/N;
  }

  // lを基準の長さとして分けていく。まず頭を採用する。次の点と差を取る。これの累積を
  // 取っていってlを超えるようならそこで比率を計算しlerpして加えて差分を新しい
  // elapsedとする。
  let elapsed = 0;
  const prev = q[0].copy();
  const next = createVector();
  const result = [q[0]];
  for(let i=1; i<q.length; i++){
    next.set(q[i]);
    const d = prev.dist(next);
    if(elapsed + d < l){
      elapsed += d;
      prev.set(next);
      continue;
    }
    // prevとnextをratio:(l-elapsed)/dで分割。

    // この時点でelapsedはlより小さいことが想定されている。が...
    // 以下略
    let m=1;
    while(elapsed + d >= m*l){
      const newPoint = p5.Vector.lerp(prev, next, (m*l - elapsed)/d);
      result.push(newPoint);
      m++;
      if(m > N+2) break;
    }
    elapsed += d-(m-1)*l;
    if(m > N+2) elapsed = 0;
    prev.set(next);
  }
  // 最後の点が入ったり入んなかったりするのがめんどくさい。
  // そこで
  // 最後の点についてはもう入れてしまって
  // 末尾とその一つ前がl/2より小さいときにカットする。
  result.push(q[q.length-1].copy());
  if(result[result.length-1].dist(result[result.length-2]) < l/2){
    result.pop();
  }
  // closedの場合は末尾をカットする
  if(closed){ result.pop(); }

  points.length = 0;
  points.push(...result);

  if(showDetail){
    let minL = Infinity;
    let maxL = -Infinity;
    for(let i=0; i<points.length; i++){
      if(!closed && i===points.length-1) break;
      const d = points[i].dist(points[(i+1)%points.length]);
      minL = Math.min(d, minL);
      maxL = Math.max(d, maxL);
    }
    console.log(`minL:${minL}, maxL:${maxL}`);
    // showDetailの場合はきちんと計算して返す
    return {minL, maxL};
  }
  // そうでない場合は単純にlを返す。まあそこまで外れてはいない。
  return {minL:l, maxL:l};
}

function evenlySpacingAll(contours, options = {}){
  for(const contour of contours){
    evenlySpacing(contour, options);
  }
}
実行結果:

今回使用するフォントはふい字。ありがたく使わせていただきます。
フォントをロードする
まず、loadFontでfontをロードする。これのfontにopentypeのfontオブジェクトが入っており、p5の枠組みではできないことをいろいろできるようになっている。実はsayoさんがこれを駆使してだいぶ前にテキストのメッシュとか作ったりしているから、p5のスケッチを色々見てる人はここでやることについてはもう熟知しているかもしれないですね。いわゆる裏技というものです。
fontのgetPathを使って得られるオブジェクトのcommandsを取るとここに文字描画のためのデータが入っているので、それを取得する。文字列は"hui"とする。そのあとの$x$と$y$はどうせあとでアラインメントするので両方0でいい。その次がサイズで、まあ200とでもしておく。
  // まずcmdまでいく
  const cmd = huiFont.font.getPath("hui",0,0,200).commands;
この内容を、いわゆるパスデータにする。パスデータというのはMとかQとかLとかが入っており、ここからPath2Dを作ることで描画にもっていったりできる。Path2D知っているならわかるかと。
ここからベクトル列の列を作る。Mコマンドで区切られているので、それにより分ける。LやQは直線や2次ベジエという意味である。ほぼすべてQでまれにLで、Cはまず出てこないがどうでもいい。
  // これを文字列に変換する
  const cmdText = parseCmdToText(cmd);
  // 文字列をcontoursに変換する
  const contours = parseData({
    data:cmdText, parseScale:1
  });
これのバウンディングボックスを取る。単純にminとmaxを取りまくるだけ。ここで出力される$x,y$はmin値で、$w,h$は横幅と縦幅である。なので、もし仮に中央揃えするなら、すべてのベクトルに対し、$x$からx+w/2を引いて、$y$からy+h/2を引けばいい。
  // bdを取る
  const bd = getBoundingBoxOfContours(contours);
  console.log(bd); // x,yはmin値、w,hがそこからの横幅と縦幅
  // 中央揃えしたいので全体から(x+w/2,y+h/2)を引く
  for(const ctr of contours){
    for(const p of ctr){
      p.sub(bd.x+bd.w/2, bd.y+bd.h/2);
    }
  }
基本的にはここまででいいが、これだけだと点列が汚いので、適当にマージして余計な点を省き、さらになるべく均等になるように間隔を調整する。それがここの処理。
  // mergeのthresholdはおおよそスケール*(1e-9)でよいかと
  // evenのminLengthはおおよそスケール*0.02でよいかと
  mergePointsAll(contours, {threshold:200*(1e-9), closed:true});
  evenlySpacingAll(contours, {closed:true, minLength:200*0.02});
マージはなるべく小さければいいです。均等割りについては、サイズの1/50くらいとしてもいいし、2とか3とか具体的に決めてもいい。
加工が終わったので、begin~endShapeで描画してみましょう。
  noFill();
  stroke(255);
  strokeWeight(2);
  translate(200,100);
  for(const ctr of contours){
    beginShape();
    for(const p of ctr){ vertex(p.x,p.y); }
    endShape(CLOSE);
  }
そうして描画されたのが上の方の"hui"です。その下は、普通にtextFontで描画したものです。
  textFont(huiFont);
  translate(0,160);
  textAlign(CENTER,CENTER);
  textSize(200);
  text("hui",0,0);
そっくりですね。ただ上の方は個別に点を動かせるので、そこが違いですね。
中身を描画したい場合はこう:(ただしABCの場合)
  noStroke();
  fill(255);
  translate(200,200);
  const ctx = drawingContext;
  ctx.beginPath();
  for(const ctr of contours){
    ctx.moveTo(ctr[0].x, ctr[0].y);
    for(let k=0; k<ctr.length; k++){
      ctx.lineTo(ctr[k].x, ctr[k].y);
    }
  }
  ctx.fill();

p5にはcontour描画もあるんですが、敢えてコンテキストで書いてみました。
次に、文字ごとの場合...
コード全文(文字ごと)
// separateケース

let huiFont;

function preload(){
  huiFont = loadFont("https://inaridarkfox4231.github.io/assets/HuiFont29.ttf");
}

function setup(){
  createCanvas(400,400);
  background(50);

  // cmdの配列を作り...
  const contoursArray = [];
  const paths = huiFont.font.getPaths("hui",0,0,200);
  for(let i=0;i<paths.length;i++){
    const cmd = paths[i].commands;
    // これを文字列に変換する
    const cmdText = parseCmdToText(cmd);
    // 文字列をcontoursに変換する
    const contours = parseData({
      data:cmdText, parseScale:1
    });
    contoursArray.push(contours);
  }

  // それとは別にcontoursを用意する。あとは同じ。
  const contours = contoursArray.flat();
  // 変更の結果が反映されたら別の処理をする。

  // bdを取る
  const bd = getBoundingBoxOfContours(contours);
  console.log(bd); // x,yはmin値、w,hがそこからの横幅と縦幅
  // 中央揃えしたいので全体から(x+w/2,y+h/2)を引く
  for(const ctr of contours){
    for(const p of ctr){
      p.sub(bd.x+bd.w/2, bd.y+bd.h/2);
    }
  }
  // 最後に内容をちょっとあれする。
  // mergeのthresholdはおおよそスケール*(1e-9)でよいかと
  // evenのminLengthはおおよそスケール*0.02でよいかと
  mergePointsAll(contours, {threshold:200*(1e-9), closed:true});
  evenlySpacingAll(contours, {closed:true, minLength:200*0.02});

  // じゃあ
  noFill();
  strokeWeight(2);
  translate(200,100);

  // 個別に色を変えてみよう。
  // "h"
  stroke("red");
  for(const ctr of contoursArray[0]){
    beginShape();
    for(const p of ctr){ vertex(p.x,p.y); }
    endShape(CLOSE);
  }
  // "u"
  stroke("orange");
  for(const ctr of contoursArray[1]){
    beginShape();
    for(const p of ctr){ vertex(p.x,p.y); }
    endShape(CLOSE);
  }
  // "i"
  stroke("yellow");
  for(const ctr of contoursArray[2]){
    beginShape();
    for(const p of ctr){ vertex(p.x,p.y); }
    endShape(CLOSE);
  }
  // できました。

  // 比較用
  textFont(huiFont);
  translate(0,160);
  noFill();
  stroke(255);
  textAlign(CENTER,CENTER);
  textSize(200);
  text("hui",0,0);
}

/* 以下省略 */
実行結果:

getPaths
opentypeのマニュアルにあるように、getPathの代わりにgetPathsを使うとパスのデータを文字ごとに取得できる(配列で出力される)。そこでこのコードでは最初にその配列を取得し、それぞれに対してコマンドを取り、contoursにしている。
  // cmdの配列を作り...
  const contoursArray = [];
  const paths = huiFont.font.getPaths("hui",0,0,200);
  for(let i=0;i<paths.length;i++){
    const cmd = paths[i].commands;
    // これを文字列に変換する
    const cmdText = parseCmdToText(cmd);
    // 文字列をcontoursに変換する
    const contours = parseData({
      data:cmdText, parseScale:1
    });
    contoursArray.push(contours);
  }
この時点ですべてのベクトルは出そろっている。ベクトルの内容的にはさっきのコードと完全に同一、全く同じものである。文字ごとに分かれているだけ。だからこれをflattenすると全く同じcontoursができる。
  // それとは別にcontoursを用意する。あとは同じ。
  const contours = contoursArray.flat();
  // 変更の結果が反映されたら別の処理をする。
だからこの後は完全に一緒。
処理が終わったので、contoursごとに個別に色を変えて描画してみる。
  noFill();
  strokeWeight(2);
  translate(200,100);

  // 個別に色を変えてみよう。
  // "h"
  stroke("red");
  for(const ctr of contoursArray[0]){
    beginShape();
    for(const p of ctr){ vertex(p.x,p.y); }
    endShape(CLOSE);
  }
  // "u"
  stroke("orange");
  for(const ctr of contoursArray[1]){
    beginShape();
    for(const p of ctr){ vertex(p.x,p.y); }
    endShape(CLOSE);
  }
  // "i"
  stroke("yellow");
  for(const ctr of contoursArray[2]){
    beginShape();
    for(const p of ctr){ vertex(p.x,p.y); }
    endShape(CLOSE);
  }
全く同じ場所に、それぞれ違う色で描画されました。
fillで個別に描画する場合
// 個別に色を変えてみよう。
// "A"
fill("red");
ctx.beginPath();
for(const ctr of contoursArray[0]){
  ctx.moveTo(ctr[0].x,ctr[0].y);
  for(let k=0;k<ctr.length;k++){
    ctx.lineTo(ctr[k].x,ctr[k].y);
  }
}
ctx.fill();
// "B"
fill("orange");
ctx.beginPath();
for(const ctr of contoursArray[1]){
  ctx.moveTo(ctr[0].x,ctr[0].y);
  for(let k=0;k<ctr.length;k++){
    ctx.lineTo(ctr[k].x,ctr[k].y);
  }
}
ctx.fill();
// "C"
fill("yellow");
ctx.beginPath();
for(const ctr of contoursArray[2]){
  ctx.moveTo(ctr[0].x,ctr[0].y);
  for(let k=0;k<ctr.length;k++){
    ctx.lineTo(ctr[k].x,ctr[k].y);
  }
}
ctx.fill();

以上です。
おわりに
いずれp5でもできるようになると思います。2.0が待ち遠しいですね。
ここまでお読みいただいていただいてありがとうございました。
改行について
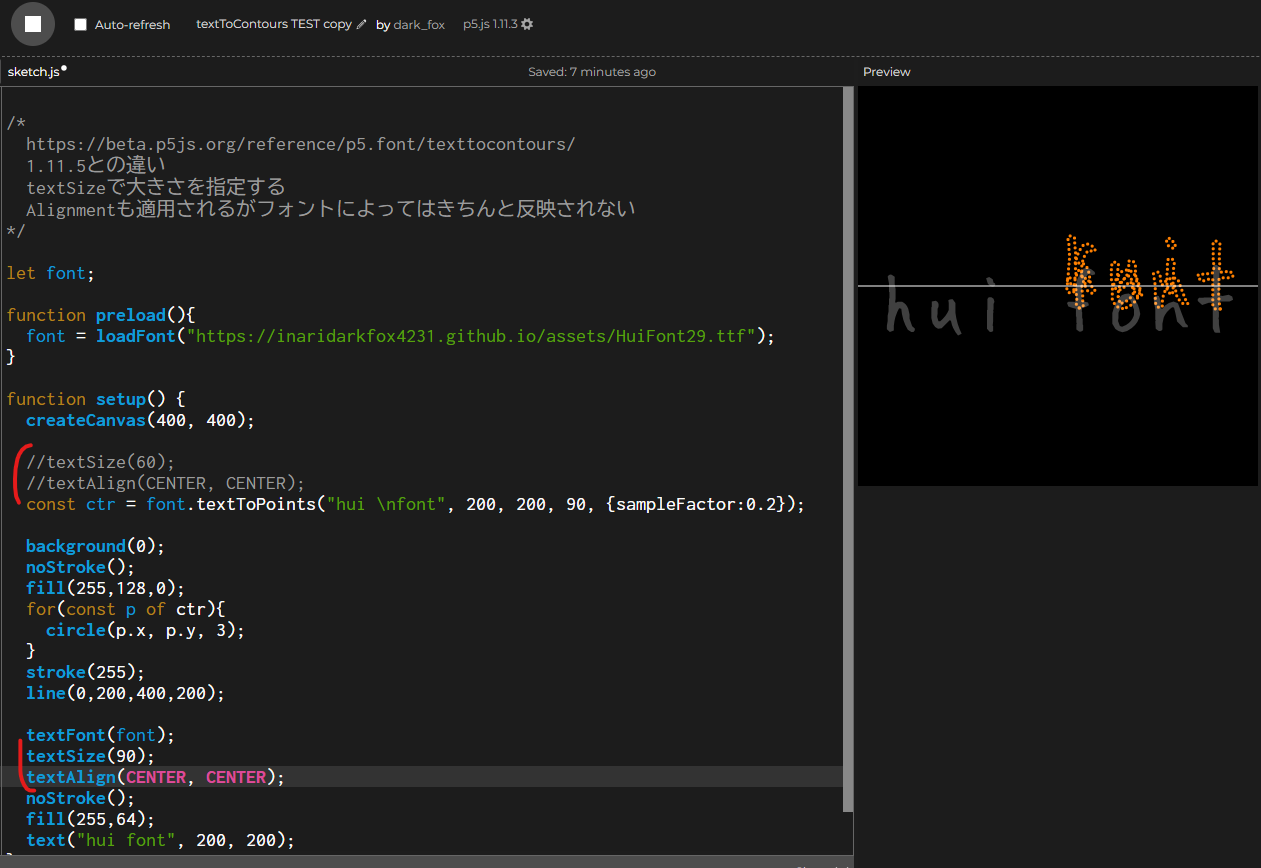
textToPointsは改行にも対応しています。このように。

任意幅にするにはtextLeadingを使えば良いそうです。
まじめに考えると、\nでsplitすればいいですね。それで個別にcontoursを計算し、間隔を適当に空ければ問題ないかと思います。具体的には、textLeadingがデフォルトでそのテキストの縦幅の0.25倍くらいあるので、そのくらい空ければよいかと思います。
もしくは、p5にはtextBoundsがあったはずです。それを使って個別に取得すればいいかと思います。どのみちいずれ2.0になればすべて解決するでしょう。
補足終わり。
改行について追記
1.11.5ですが、事前にtextSizeとtextAlignを実行することで改行の仕様に影響が出るようです。なお全体のアラインメントも若干影響される模様ですが詳細は不明です。

ただ、もしそうだとしても、複数の機能を同じ関数に持たせるのはあまりいい仕様では無いので、裏技的な位置づけで良いかと思いますね。サイズについては関数で決めているようです。
自分としては、テキストから点を取得する処理は文字描画とは別だと思ってるので、取得時に全部決められるのが一番いいんじゃないかと思います。描画は描画で、取得は取得で、役割分担した方がすっきりするんじゃないですかね。
なお、2.0.0では改行が使えなくなる模様です。先日バグ取り目的のためのベータ版が仮リリースされたんですが、使えませんでした。

これも需要次第では実装されるんでしょうが、どうなるかわかんないですね。またこの記事にあるような文字ごとの取得もできない模様です。それも誰かが欲しいと言えば、実装してくれるでしょう。言わなければ、実装されないでしょう。